2018 SUBARU CROSSTREK fuel pressure
[x] Cancel search: fuel pressurePage 27 of 474

(26,1)
北米Model "A1320BE-C" EDITED: 2017/ 10/ 10
Mark Name Page
X-mode indicator (if
equipped)3-32Hill descent control in-
dicator (if equipped)3-32Low fuel warning light 3-22Low tire pressure
warning light
(U.S.-spec. models)3-18Windshield washer
fluid warning light3-18Steering responsive
fog lights warning indi-
cator/Steering respon-
sive fog lights OFF
indicator (if equipped)3-31BSD/RCTA warning
indicator (if equipped)3-32BSD/RCTA OFF indi-
cator (if equipped)3-32RAB warning indicator
(if equipped)3-32RAB OFF indicator (if
equipped)3-32Mark Name Page
Icy road surface warn-
ing indicator (if
equipped)3-32
24
Page 134 of 474

(139,1)
北米Model "A1320BE-C" EDITED: 2017/ 10/ 10
Ignition switch (models without“keyless
access with push-button start system”) ............ 3-4
Key positions......................................................... 3-4
Key reminder chime............................................... 3-5
Ignition switch light (if equipped)........................... 3-5
Push-button ignition switch (models with
“keyless access with push-button start
system”) ............................................................... 3-6
Safety precautions................................................. 3-6
Operating range for push-button start system........ 3-6
Switching power status.......................................... 3-7
When access key fob does not operate properly.... 3-8
Hazard warning flasher..........................................3-8
Meters and gauges.................................................3-8
Speedometer......................................................... 3-8
Tachometer............................................................ 3-8
Odometer............................................................... 3-9
Double trip meter................................................... 3-9
Fuel gauge............................................................3-10
ECO gauge (if equipped).......................................3-10
Combination meter settings.................................. 3-11
Illumination brightness control............................3-12
Auto dimmer cancel function (if equipped)............3-12
Warning andindicator..........................................3-12
Initial illumination for system check......................3-12
Seatbelt warning light and chime..........................3-13
SRS airbag system warning light...........................3-15
Front passenger’s frontal airbag ON and OFF
indicators...........................................................3-15
CHECK ENGINE warning light/Malfunction
indicator light.....................................................3-15Coolant temperature low indicator light/Coolant
temperature high warning light..........................3-16
Charge warning light............................................3-17
Oil pressure warning light.....................................3-17
Engine low oil level warning light..........................3-18
Windshield washer fluid warning light...................3-18
AT OIL TEMP warning light (CVT models)..............3-18
Low tire pressure warning light
(U.S.-spec. models)............................................3-18
ABS warning light.................................................3-20
Brake system warning light (red)..........................3-21
Low fuel warning light..........................................3-22
Hill start assist warning light/Hill start assist
OFF indicator light.............................................3-22
Door open warning light.......................................3-22
All-Wheel Drive warning light (CVT models)..........3-22
Power steering warning light ................................3-23
Vehicle Dynamics Control warning light/Vehicle
Dynamics Control operation indicator light........3-23
Vehicle Dynamics Control OFF indicator light.......3-24
Warning chimes and warning indicator of the
keyless access with push-button start system
(if equipped)......................................................3-25
Security indicator light..........................................3-29
Select lever/gear position indicator
(CVT models).....................................................3-30
Turn signal indicator lights...................................3-30
High beam indicator light......................................3-30
High beam assist indicator light (green)
(if equipped)......................................................3-30
High beam assist warning indicator (yellow)
(if equipped)......................................................3-30
Instruments and controls
3
Page 146 of 474

(151,1)
北米Model "A1320BE-C" EDITED: 2017/ 10/ 10
: CHECK ENGINE warning light/Mal-
function indicator light: Coolant temperature low indicator
light/Coolant temperature high warn-
ing light: Charge warning light: Oil pressure warning light: Engine low oil level warning light: Windshield washer fluid warning light: AT OIL TEMP warning light
(CVT models): Low tire pressure warning light
(U.S.- spec. models)/
: ABS warning light
/
: Brake system warning light
: Low fuel warning light: Hill start assist warning light/Hill start
assist OFF indicator light: Door open warning light: AWD warning light (CVT models): Power steering warning light: Vehicle Dynamics Control warning light/
Vehicle Dynamics Control operation
indicator light
: Vehicle Dynamics Control OFF indicator
light: Automatic headlight beam leveler
warning light (models with LED head-
lights): Hill descent control indicator light (if
equipped)
If any lights fail to illuminate, it indicates a
burned-out bulb or a malfunction of the
corresponding system.
Consult your authorized SUBARU dealer
for repair.
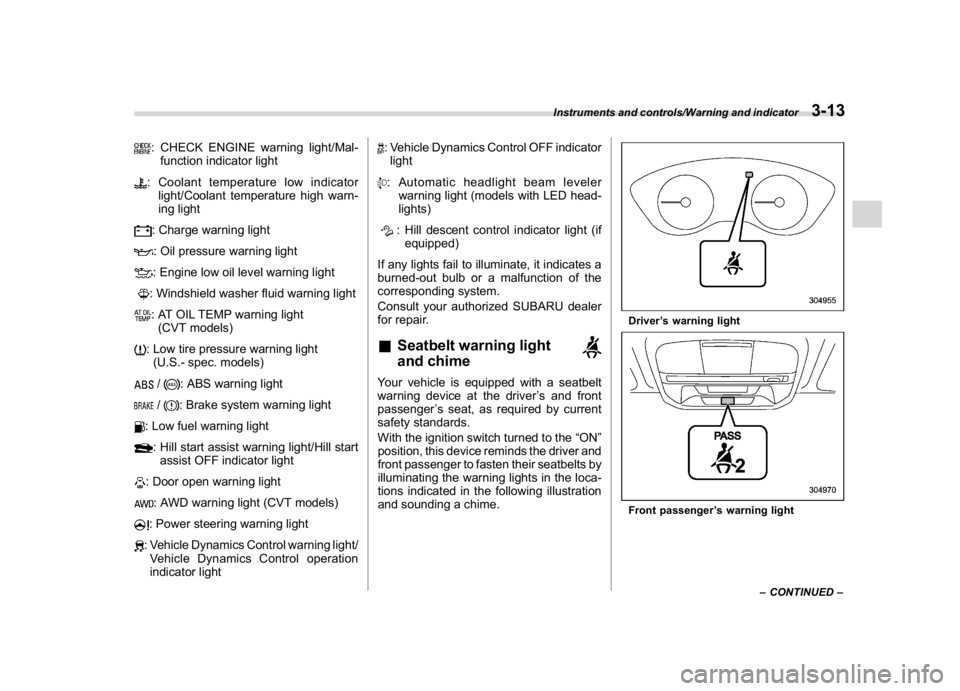
&Seatbelt warning light
and chimeYour vehicle is equipped with a seatbelt
warning device at the driver’s and front
passenger’s seat, as required by current
safety standards.
With the ignition switch turned to the“ON”
position, this device reminds the driver and
front passenger to fasten their seatbelts by
illuminating the warning lights in the loca-
tions indicated in the following illustration
and sounding a chime.
Driver’s warning lightFront passenger’s warning light
–CONTINUED–
Instruments and controls/Warning and indicator
3-13
3
Page 152 of 474

(157,1)
北米Model "A1320BE-C" EDITED: 2017/ 10/ 10
inflated to the inflation pressure recom-
mended by the vehicle manufacturer on
the vehicle placard or tire inflation pres-
sure label. (If your vehicle has tires of a
different size than the size indicated on the
vehicle placard or tire inflation pressure
label, you should determine the proper tire
inflation pressure for those tires.)
As an added safety feature, your vehicle
has been equipped with a tire pressure
monitoring system (TPMS) that illuminates
a low tire pressure telltale when one or
more of your tires is significantly under-
inflated. Accordingly, when the low tire
pressure telltale illuminates, you should
stop and check your tires as soon as
possible, and inflate them to the proper
pressure. Driving on a significantly under-
inflated tire causes the tire to overheat and
can lead to tire failure. Under-inflation also
reduces fuel efficiency and tire tread life,
and may affect the vehicle’s handling and
stopping ability.
Please note that the TPMS is not a
substitute for proper tire maintenance,
and it is the driver’s responsibility to
maintain correct tire pressure, even if
under-inflation has not reached the level
to trigger illumination of the TPMS low tire
pressure telltale.
Your vehicle has also been equipped with
a TPMS malfunction indicator to indicatewhen the system is not operating properly.
The TPMS malfunction indicator is com-
bined with the low tire pressure telltale.
When the system detects a malfunction,
the telltale will flash for approximately one
minute and then remain continuously
illuminated. This sequence will continue
upon subsequent vehicle start-ups as long
as the malfunction exists. When the mal-
function indicator is illuminated, the sys-
tem may not be able to detect or signal low
tire pressure as intended. TPMS malfunc-
tions may occur for a variety of reasons,
including the installation of replacement or
alternate tires or wheels on the vehicle that
prevent the TPMS from functioning prop-
erly. Always check the TPMS malfunction
telltale after replacing one or more tires or
wheels on your vehicle to ensure that the
replacement or alternate tires and wheels
allow the TPMS to continue to function
properly.
Should the warning light illuminate steadily
after blinking for approximately one min-
ute, have the system inspected by your
nearest SUBARU dealer as soon as
possible.
WARNING
If this light does not illuminate
briefly after the ignition switch is
turned ON or the light illuminates
steadily after blinking for approxi-
mately one minute, you should have
your Tire Pressure Monitoring Sys-
tem checked at a SUBARU dealer as
soon as possible.
If this light illuminates while driving,
never brake suddenly and keep
driving straight ahead while gradu-
ally reducing speed. Then slowly
pull off the road to a safe place.
Otherwise an accident involving
serious vehicle damage and serious
personal injury could occur.
If this light still illuminates while
driving after adjusting the tire pres-
sure, a tire may have significant
damage and a fast leak that causes
the tire to lose air rapidly. If you have
a flat tire, replace it with a spare tire
as soon as possible.
When a spare tire is mounted or a
wheel rim is replaced without the
original pressure sensor/transmitter
being transferred, the Low tire pres-
sure warning light will illuminate
steadily after blinking for approxi-
mately one minute. This indicates
–CONTINUED–
Instruments and controls/Warning and indicator
3-19
3
Page 155 of 474

(160,1)
北米Model "A1320BE-C" EDITED: 2017/ 10/ 10
the engine, there may be a malfunction in
the vacuum system. In this case, drive the
vehicle carefully and have the system
inspected by a SUBARU dealer.&Low fuel warning lightThe low fuel warning light illuminates when
the tank is nearly empty, at approximately
2.5 US gal (9.5 liters, 2.1 Imp gal). It only
operates when the ignition switch is in the
“ON”position.
CAUTION
Promptly put fuel in the tank when-
ever the low fuel warning light
illuminates. Engine misfires as a
result of an empty tank could cause
damage to the engine.&Hill start assist warning
light/Hill start assist
OFF indicator light!Hill start assist warning light
While the engine is running, if there are
any malfunctions in the Hill start assist
system, the warning light will illuminate.
WARNING
When the Hill start assist warning
light illuminates, have the vehicle
inspected at an authorized SUBARU
dealer.
!Hill start assist OFF indicator light
While the Hill start assist system is
deactivated, the Hill start assist OFF
indicator light illuminates continuously to
inform the driver that the Hill start assist
system is not operational.&Door open warning lightThe warning light illuminates if any door or
the rear gate is not fully closed. This
function is effective even if the ignition
switch is in the“LOCK”/“OFF”or“ACC”
position, or the key is removed from the
ignition switch.
For some models, only the open doors are
indicated by the warning lights.
Always make sure this light is not illumi-
nated before you start to drive.
&All-Wheel Drive warn-
ing light (CVT models)This light blinks if the vehicle is driven with
tires of differing diameters fitted on the
wheels or with an excessively low air
pressure in any of the tires.
WARNING
If the AWD warning light flashes,
promptly park in a safe location then
check whether all four tires are the
same diameter and whether any of
the tires has a puncture or has lost
air pressure for some other reason.
Continuing to drive with the AWD
warning light flashing can lead to
powertrain damage.NOTEIf the temporary spare tire is used, the
AWD warning light may flash. Use of the
temporary spare tire should therefore
be restricted to the minimum time
necessary. Replace the temporary
spare tire with a conventional tire as
soon as possible.
Instruments and controls/Warning and indicator
3-22
Page 262 of 474

(271,1)
北米Model "A1320BE-C" EDITED: 2017/ 10/ 10
!Refueling
Only one person should be involved in
refueling. Do not allow others to approach
the area of the vehicle near the fuel filler
pipe while refueling is in progress.
Be sure to observe any other precautions
that are posted at the service station.
1. Stop the vehicle and turn the ignition
switch to the“LOCK”/“OFF”position and
turn off all the other electrical components.
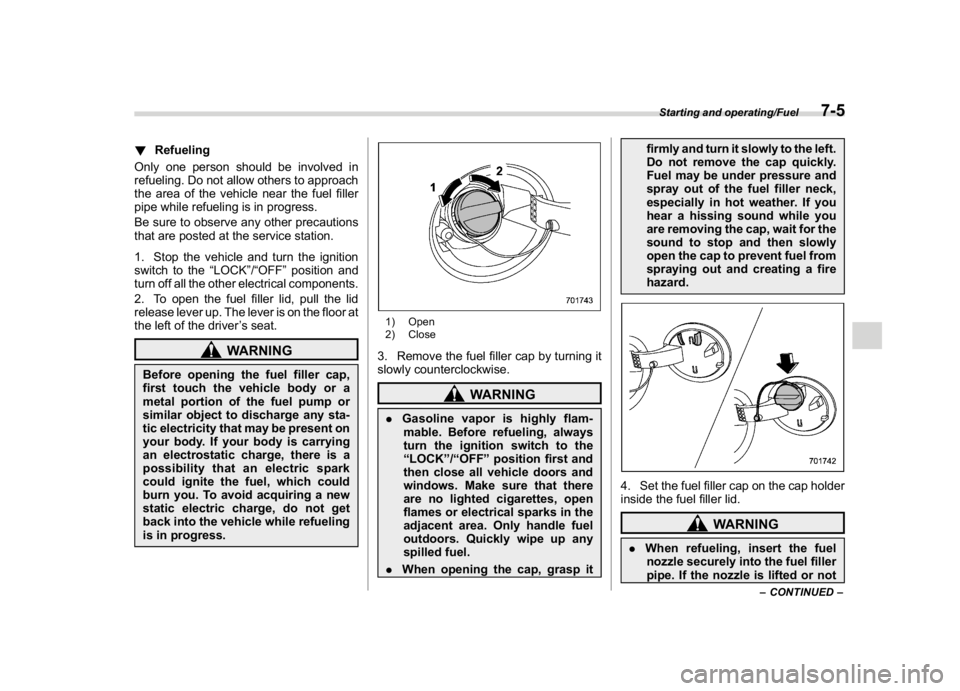
2. To open the fuel filler lid, pull the lid
release lever up. The lever is on the floor at
the left of the driver’s seat.
WARNING
Before opening the fuel filler cap,
first touch the vehicle body or a
metal portion of the fuel pump or
similar object to discharge any sta-
tic electricity that may be present on
your body. If your body is carrying
an electrostatic charge, there is a
possibility that an electric spark
could ignite the fuel, which could
burn you. To avoid acquiring a new
static electric charge, do not get
back into the vehicle while refueling
is in progress.
1) Open
2) Close3. Remove the fuel filler cap by turning it
slowly counterclockwise.
WARNING
.Gasoline vapor is highly flam-
mable. Before refueling, always
turn the ignition switch to the
“LOCK”/“OFF”position first and
then close all vehicle doors and
windows. Make sure that there
are no lighted cigarettes, open
flames or electrical sparks in the
adjacent area. Only handle fuel
outdoors. Quickly wipe up any
spilled fuel.
.When opening the cap, grasp itfirmly and turn it slowly to the left.
Do not remove the cap quickly.
Fuel may be under pressure and
spray out of the fuel filler neck,
especially in hot weather. If you
hear a hissing sound while you
are removing the cap, wait for the
sound to stop and then slowly
open the cap to prevent fuel from
spraying out and creating a fire
hazard.
4. Set the fuel filler cap on the cap holder
inside the fuel filler lid.
WARNING
.When refueling, insert the fuel
nozzle securely into the fuel filler
pipe. If the nozzle is lifted or not
–CONTINUED–
Starting and operating/Fuel
7-5
7
Page 329 of 474

(340,1)
北米Model "A1320BE-C" EDITED: 2017/ 10/ 10
New vehicle break-in driving–
the first 1,000 miles (1,600 km)The performance and long life of your
vehicle are dependent on how you handle
and care for your vehicle while it is new.
Follow these instructions during the first
1,000 miles (1,600 km):
.Do not race the engine. And do not
allow engine speed to exceed 4,000 rpm
except in an emergency.
.Do not drive at one constant engine or
vehicle speed, either fast or slow.
.Avoid starting suddenly and rapid ac-
celeration, except in an emergency.
.Avoid hard braking, except in an emer-
gency.
The same break-in procedures should be
applied to an overhauled engine, newly
mounted engine or when brake pads or
brake linings are replaced with new ones.
Fuel economy hintsThe following suggestions will help to save
fuel.
.Select the proper gear position for the
speed and road conditions.
.Avoid sudden acceleration or decelera-
tion. Always accelerate gently until you
reach the desired speed. Then try to
maintain that speed for as long as possi-
ble.
.Do not pump the accelerator and avoid
racing the engine.
.Avoid unnecessary engine idling.
.Keep the engine properly tuned.
.Keep the tires inflated to the correct
pressure shown on the tire placard, which
is located under the door latch on the
driver’s side. Low pressure will increase
tire wear and fuel consumption.
.Use the air conditioner only when
necessary.
.Keep the front and rear wheels in
proper alignment.
.Avoid carrying unnecessary luggage or
cargo.
Engine exhaust gas (carbon
monoxide)
WARNING
.Never inhale engine exhaust gas.
Engine exhaust gas contains
carbon monoxide, a colorless
and odorless gas which is dan-
gerous, or even lethal, if inhaled.
.Always properly maintain the en-
gine exhaust system to prevent
engine exhaust gas from entering
the vehicle.
.Never run the engine in a closed
space, such as a garage, except
for the brief time needed to drive
the vehicle in or out of it.
.Avoid remaining in a parked ve-
hicle for a lengthy time while the
engine is running. If that is un-
avoidable, then use the ventila-
tion fan to force fresh air into the
vehicle.
.Always keep the front ventilator
inlet grille free from snow, leaves
or other obstructions to ensure
that the ventilation system al-
ways works properly.
.If at any time you suspect that
Driving tips/New vehicle break-in driving–the first 1,000 miles (1,600 km)
8-2
Page 376 of 474

(389,1)
北米Model "A1320BE-C" EDITED: 2017/ 10/ 10
!Washing the underbody
Chemicals, salts and gravel used for
deicing road surfaces are extremely cor-
rosive, accelerating the corrosion of un-
derbody components, such as the exhaust
system, fuel and brake lines, brake cables,
floor pan and fenders, and suspension.
Thoroughly flush the underbody and inside
of the fenders with lukewarm or cold water
at frequent intervals to reduce the harmful
effects of such agents.
Mud and sand adhering to the underbody
components may accelerate their corro-
sion.
After driving off-road or on muddy or sandy
roads, wash the mud and sand off the
underbody. Carefully flush the suspension
and axle parts, as they are particularly
prone to mud and sand buildup. Do not use
a sharp-edged tool to remove caked mud.
CAUTION
.Be careful not to damage brake
hoses, sensor harnesses, and
other parts when washing sus-
pension components.
.Be careful not to flush the engine
bottom for a long time. It may
cause damage of some electrical
parts.
!Using a warm water washer
.Keep a good distance of 12 in (30 cm)
or more between the washer nozzle and
the vehicle.
.Do not wash the same area continu-
ously.
.If a stain will not come out easily, wash
by hand. Some warm water washers are of
the high temperature, high pressure type,
and they can damage or deform the resin
parts such as moldings, or cause water to
leak into the vehicle.
&Waxing and polishingAlways wash and dry the vehicle before
waxing and polishing.
Use a good quality polish and wax and
apply them according to the manufac-
turer’s instructions. Wax or polish when
the painted surface is cool.
Be sure to polish and wax the chrome trim,
as well as the painted surfaces. Loss of
wax on a painted surface leads to loss of
the original luster and also quickens the
deterioration of the surface. It is recom-
mended that a coat of wax be applied at
least once a month, or whenever the
surface no longer repels water.
If the appearance of the paint has dimin-
ished to the point where the luster or tone
cannot be restored, lightly polish the sur-
face with a fine-grained compound. Never
polish just the affected area, but include
the surrounding area as well. Always
polish in only one direction. A No. 2000
grain compound is recommended. Never
use a coarse-grained compound. Coarse-
grained compounds have a smaller grain-
size number and could damage the paint.
After polishing with a compound, coat with
wax to restore the original luster. Frequent
polishing with a compound or an incorrect
polishing technique will result in removing
the paint layer and exposing the under-
–CONTINUED–
Appearance care/Exterior care
10-3
10