2018 RENAULT ZOE buttons
[x] Cancel search: buttonsPage 23 of 226

1.17
Charge start
Charging starts at the set time:
– if the ignition is switched off;
– The gear lever should be in posi-tion P;
– if the vehicle is connected to a power supply.
ELECTRIC VEHICLE: charging programming (2/2)
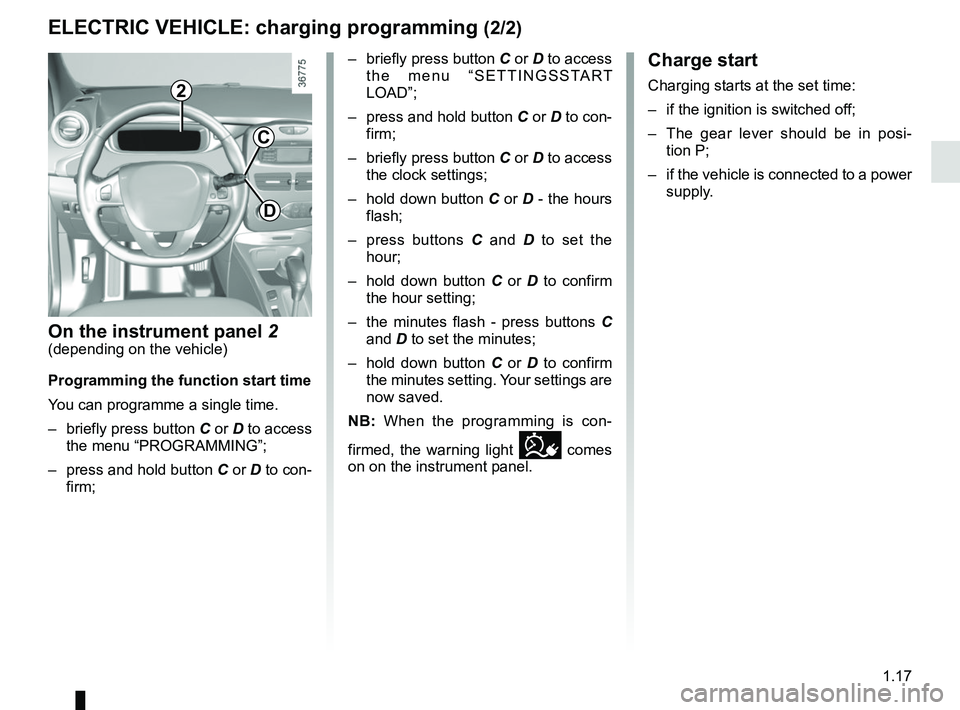
On the instrument panel 2(depending on the vehicle)
Programming the function start time
You can programme a single time.
– briefly press button C or D to access
the menu “PROGRAMMING”;
– press and hold button C or D to con-
firm; – briefly press button C or D to access
the menu “SETTINGSSTART
LOAD”;
– press and hold button C or D to con-
firm;
– briefly press button C or D to access the clock settings;
– hold down button C or D - the hours
flash;
– press buttons C and D to set the
hour;
– hold down button C or D to confirm
the hour setting;
– the minutes flash - press buttons C and D to set the minutes;
– hold down button C or D to confirm
the minutes setting. Your settings are
now saved.
NB: When the programming is con-
firmed, the warning light
comes
on on the instrument panel.
2
C
D
Page 24 of 226

1.18
RENAULT CARDS: general information (1/2)
1 Unlocking the doors and boot.
2 Locking the doors and boot.
3 Unlocking the charging cord/opening the charging flap.
4 Activation of the air-conditioning
5 Integrated key.
The RENAULT card is used
for:
– locking/unlocking the doors and
boot. Refer to the following pages;
– opening the charging flap, please see the information on “Electric ve-
hicle: charging” in Section 1;
– unlocking the charging cord. Please refer to the information on “Electric
vehicle: charging” in Section 1;
– activation of the air-conditioning. Please refer to the information on
“Air-conditioning” in Section 3.
– starting the engine; refer to the in- formation on “Starting the engine” in
Section 2.
RENAULT card operating
range
This varies according to the surround-
ings: when handling the RENAULT
card, it is important to make sure that
you do not lock or unlock the doors by
inadvertently pressing the buttons.
45123
When the battery is flat, you can
still lock/unlock and start your ve-
hicle. Refer to the information on
“Locking/unlocking the doors” in
Section 1 and “Starting the engine”
in Section 2.
Driver’s responsibility
when parking or stopping
the vehicle
Never leave an animal,
child or adult who is not self-suffi-
cient alone in your vehicle, even for
a short time.
They may pose a risk to themselves
or to others by starting the engine,
activating equipment such as the
electric windows or locking the
doors, for example.
Also, in hot and/or sunny weather,
please remember that the tempera-
ture inside the passenger compart-
ment increases very quickly.
RISK OF DEATH OR SERIOUS
INJURY.
Page 26 of 226

1.20
REMOTE CONTROL RENAULT CARD: use (1/2)
Unlocking the doors and
tailgate
Press button 1.
The hazard warning lights flash once
to indicate that the doors have been un-
locked.
1
2
Locking the doors and
luggage compartment
Press the locking button 2. The hazard
warning lights flash twice to indicate
that the doors have locked. If a door
or the luggage compartment is open
or not properly shut, or if a RENAULT
card is still in the reader, the doors and
luggage compartment lock then quickly
unlock and the hazard warning lights
do not flash .
The card buttons are deactivated
when the engine is running.
The flashing status of the hazard
warning lights informs you of the ve-
hicle status:
– one flash indicates that the vehi-
cle is completely unlocked;
– two flashes indicate that the ve-
hicle is completely locked.
If the vehicle has been unlocked
but neither the doors or tailgate are
open, it locks again automatically
after approximately two minutes.
Driver’s responsibility
when parking or stopping
the vehicle
Never leave an animal,
child or adult who is not self-suffi-
cient alone in your vehicle, even for
a short time.
They may pose a risk to themselves
or to others by starting the engine,
activating equipment such as the
electric windows or locking the
doors, for example.
Also, in hot and/or sunny weather,
please remember that the tempera-
ture inside the passenger compart-
ment increases very quickly.
RISK OF DEATH OR SERIOUS
INJURY.
Page 29 of 226

1.23
HANDS-FREE RENAULT CARD: use (2/4)
2
3
Unlocking the vehicleWith the RENAULT card in zone 1 and
the vehicle locked, press button 3 on
handle 2 on one of the two front doors:
the vehicle will unlock.
Pressing button 4 also unlocks all the
doors and the tailgate.
The hazard warning lights flash once
to indicate that the doors have been un-
locked.
Note: The vehicle cannot be locked
again for approximately three seconds
after unlocking by pressing button 3.
4
After unlocking the vehicle or the
boot only using the buttons of the
RENAULT card, remote locking and
unlocking in hands-free mode are
deactivated.
To reactivate the hands-free mode:
restart the vehicle.
Page 74 of 226

1.68
TRIP COMPUTER: general information (2/2)
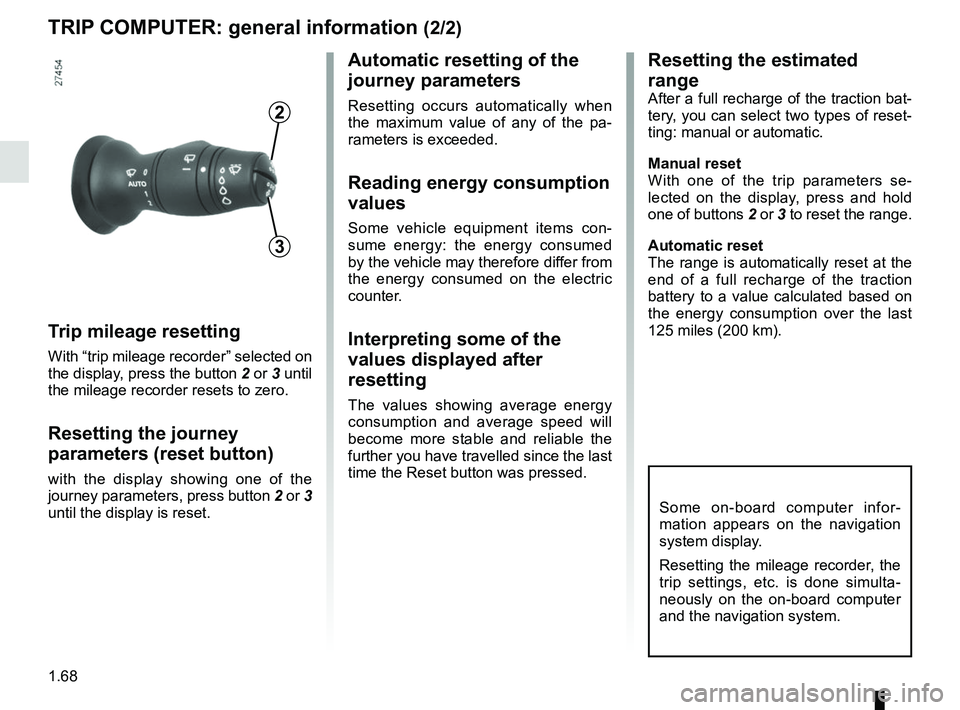
Trip mileage resetting
With “trip mileage recorder” selected on
the display, press the button 2 or 3 until
the mileage recorder resets to zero.
Resetting the journey
parameters (reset button)
with the display showing one of the
journey parameters, press button 2 or 3
until the display is reset.
Automatic resetting of the
journey parameters
Resetting occurs automatically when
the maximum value of any of the pa-
rameters is exceeded.
Reading energy consumption
values
Some vehicle equipment items con-
sume energy: the energy consumed
by the vehicle may therefore differ from
the energy consumed on the electric
counter.
Interpreting some of the
values displayed after
resetting
The values showing average energy
consumption and average speed will
become more stable and reliable the
further you have travelled since the last
time the Reset button was pressed.
3
2
Some on-board computer infor-
mation appears on the navigation
system display.
Resetting the mileage recorder, the
trip settings, etc. is done simulta-
neously on the on-board computer
and the navigation system.
Resetting the estimated
range
After a full recharge of the traction bat-
tery, you can select two types of reset-
ting: manual or automatic.
Manual reset
With one of the trip parameters se-
lected on the display, press and hold
one of buttons 2 or 3 to reset the range.
Automatic reset
The range is automatically reset at the
end of a full recharge of the traction
battery to a value calculated based on
the energy consumption over the last
125 miles (200 km).
Page 81 of 226

1.75
CLOCK AND EXTERIOR TEMPERATURE (1/2)
– the minutes flash - press buttons 1 and 2 to set the minutes;
– hold down button 1 or 2 to confirm
the minutes setting. Your settings are
now saved.Resetting the clock A
To access the display 3 for setting the
time:
– press button 1 or 2 a few times to
obtain the menu “Time settings”.
Wait for a few seconds.
– hold down button 1 or 2 - the hours
flash;
– press buttons 1 and 2 to set the hour;
– hold down button 1 or 2 to confirm
the hour setting;
If the power supply is cut (battery
disconnected, supply wire cut, etc.),
the clock must be reset.
We recommend that you do not
adjust these settings while driving.
9°C 12:00
3
A
1
2
Page 130 of 226

3.4
MANUAL AIR CONDITIONING (1/3)
The controls
1 Adjusting the air temperature.
2 “Clear View” function.
3 Passenger compartment air distribu- tion adjustment.
4 Air-conditioning deactivation control.
5 Adjusting the fan speed until the
system switches off.
6 Air recirculation.
7 De-icing/demisting of the rear screen
and, depending on the vehicle, the
door mirrors.
Heating or air-conditioning can only be
used while the engine is running.
2345
67
1
Some buttons have an operating
tell-tale which indicates the operat-
ing status.
Switching air conditioning on
or off
(depending on vehicle)
The air conditioning is switched on (in-
dicator light on) or off (indicator light off)
using button 4.
Activation is not possible if control 5 is
set to OFF. The air conditioning system is used
for:
–
lowering the temperature inside the
passenger compartment;
– eliminating condensation more quickly.
Advice: to optimize vehicle range, de-
activate the air conditioning when the
outside temperature is comfortable.
Adjusting the ventilation
speed
Turn the control 5 to one of the eight
positions to start the ventilation system
and adjust the power.
Position OFF
In this position:
– the air conditioning switches off au- tomatically;
– the ventilation speed of air in the passenger compartment is zero;
– there is, however, a slight flow of air when the vehicle is moving.
This position should not normally be
used.
Page 131 of 226

3.5
½All the air flow is directed to the
dashboard vents.
¿The air flow is directed mainly
towards the footwells.
Rear screen de-icing/
demisting
Press the 7 button: the integrated in-
dicator light comes on. This function
enables rapid demisting or de-icing of
the rear screen and de-icing of the door
mirrors (on equipped vehicles).
To exit this function, press button 7
again. Demisting automatically stops.
MANUAL AIR CONDITIONING (2/3)
Adjusting the air temperature
Turn control 1 to obtain the desired
temperature. The further towards the
red the slide is, the higher the tempera-
ture will be.
When the air conditioning system is
used for long periods, it may begin to
feel cold. To increase the temperature,
turn control 1 to the right.
Recommendations
In the event of freezing, manu-
ally de-ice the windscreen using a
scraper rather than the de-icing/de-
misting function in order to reduce
your energy consumption.
Adjusting the distribution
of air in the passenger
compartment
Press one of the buttons 3 to select the
air distribution. The integrated warning
light in the button comes on.
It is possible to combine two positions
simultaneously – press both buttons 3.
ØThe air flow is distributed be-
tween demisting air vents of
the front side-window and the wind-
screen demisting vents.
3
7
1