Page 257 of 364

3.41
REAR SEATS (2/6)
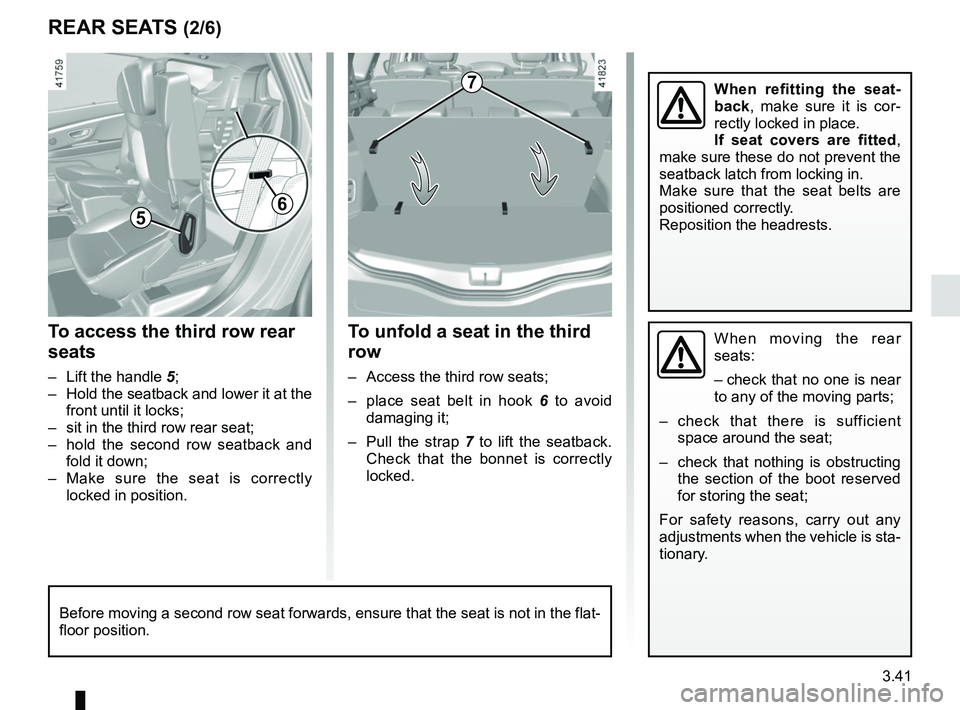
To unfold a seat in the third
row
– Access the third row seats;
– place seat belt in hook 6 to avoid
damaging it;
– Pull the strap 7 to lift the seatback.
Check that the bonnet is correctly
locked.
To access the third row rear
seats
– Lift the handle 5;
– Hold the seatback and lower it at the front until it locks;
– sit in the third row rear seat;
– hold the second row seatback and fold it down;
– Make sure the seat is correctly locked in position.
56
When moving the rear
seats:
– check that no one is near
to any of the moving parts;
– check that there is sufficient space around the seat;
– check that nothing is obstructing the section of the boot reserved
for storing the seat;
For safety reasons, carry out any
adjustments when the vehicle is sta-
tionary.
Before moving a second row seat forwards, ensure that the seat is not in\
the flat-
floor position.
7When refitting the seat-
back, make sure it is cor-
rectly locked in place.
If seat covers are fitted ,
make sure these do not prevent the
seatback latch from locking in.
Make sure that the seat belts are
positioned correctly.
Reposition the headrests.
Page 258 of 364
3.42
REAR SEATS (3/6)To fold down a third row seat
manually
– From the luggage compartment, lower the headrest;
– pull strap 10. Depending on the vehi-
cle, it is located above or below the
false floor 11 .
10
To get out of the third row
rear seats
– Lift the lever 8;
– guide the seat forwards until it locks.
11
Note: If the lever 8 does not work, pull
the emergency exit strap 9.
Using the emergency exit
strap 9 causes the second
row rear seats to move
backwards. During the op-
eration, ensure that nothing is ob-
structing the movement of the seat
(body parts, pets, toys etc.).
For safety reasons, carry out any
adjustments when the vehicle is sta-
tionary.
Risk of injury.
98
Page 259 of 364

3.43
REAR SEATS (4/6)
To automatically fold down
the seats (flat position)
The rear seats are electrically unlocked
to fold down in order to create a flat
floor.
There are two ways to manoeuvre the
seats:
– from the boot using control 12;
– on the multifunction screen 13. Disabling the function
– With the engine running, a buckled
seat belt prevents the movement of
the relevant seat.
– Once the vehicle is moving the two controls are deactivated.
To raise the seats manually
Raise each seat as described on the
previous pages.
13
Conditions of use
With the vehicle at a standstill and the
rear seat belts unlocked:
– from control 12, with the boot lid
open;
– from the multifunction screen 13, with the engine running.
Note: Before performing any unlock-
ing operations to fold down the seats,
the trays on the back of the front seats
must be folded away.
12
When moving the rear
seats:
– check that no one is near
to any of the moving parts;
– check that there is sufficient space around the seat;
– check that nothing is obstructing the section of the boot reserved
for storing the seat;
For safety reasons, carry out any
adjustments when the vehicle is sta-
tionary.
Page 262 of 364
3.46
TAILGATE
2
Manual controls
To open
Press button 1 and lift the tailgate.
To close
Lower the boot lid using the handle
inside the boot 2 to assist you.
Opening the doors manually
from the inside
If it is impossible to unlock the tailgate,
it can be done manually from inside:
– access the luggage compartment by
folding forward the seatback(s) of
the rear bench seat;
– insert a pencil or similar object in recess 3 and slide the unit as shown
in the illustration;
– push the tailgate to open it.
The attaching of any carry-
ing device (bike rack, lug-
gage box, etc.) resting on
the luggage compartment
lid is prohibited. To install a carrying
device on your vehicle, contact an
Approved Dealer.
1
3
Page 265 of 364
3.49
LUGGAGE COMPARTMENT FITTINGS AND STORAGE (1/2)
Mobile floor 1
Depending on the vehicle, the mobile
floor is reversible.
Flat position
It allows you to have a flat floor by fold-
ing down the backs of the rear bench
seats and to compartmentalise the boot
into two distinct spaces.
The mobile floor is positioned on the
runners (2 and 3).
Maximum load allowed on the
mobile floor: 120 kg, evenly distrib-
uted.
Storage position
This allows for more space to store
things in the boot.
– Remove the mobile floor 1;
– place it in the boot under the runners (2 and 3).
3
Intermediate position
(depending on vehicle)
In the blocked position, it allows you to
access the tools stored under the boot
carpet.
– Remove the mobile floor 1 by moving
it back (movement A) and pivoting it
upwards (movement B);
– place it in the boot, letting it be guided by the runners ( 2 and 3).
1
2
A
B
1
1
Page 274 of 364
4.2
BONNET (1/2)Unlocking the bonnet catch
To unlock, push tab 3 at the same time
as opening the bonnet.
Opening the bonnet
Lift the bonnet, guiding it up, and it
will rest in position with the help of two
struts 2.
To open, pull handle
1, located on the
left-hand side of the dashboard.Please note when work-
ing close to the engine that
it may be hot. In addition,
the engine cooling fan may
start at any moment. The
warning light in the engine compart-
ment reminds you of this.
Risk of injury.
1
Do not press down on the
bonnet: there is a risk that
the bonnet may accidentally
close.
Before performing any
action in the engine com-
partment, the ignition must
be switched off (please see
the information on “Starting, stop-
ping the engine” in Section 2).
When working in the engine
compartment, ensure that
the windscreen wiper stalk
is in the park position.
Risk of injury.
2
3
Page 275 of 364
4.3
BONNET (2/2)
Closing the bonnet
Check that nothing has been left in the
engine compartment.
To close the bonnet again, hold the
bonnet in the middle and lower it to
30 cm above the closed position, then
release it. It will latch automatically
under its own weight.
Ensure that the bonnet is
properly locked.
Check that nothing is pre-
venting the catch from lock-
ing (gravel, cloth, etc.).
After carrying out any work
in the engine compart-
ment, check that nothing
has been left behind (cloth,
tools, etc.).
These may damage the engine or
cause a fire.
In the event of even a slight
impact involving the radia-
tor grille or bonnet, have the
bonnet lock checked by an
authorised dealer as soon as pos-
sible.
Page 290 of 364

4.18
Glass instrument panel(e.g. instrument panel, clock, exterior
temperature display, radio display, etc.)
Use a soft cloth (or cotton wool).
If this does not clean them properly,
use a soft cloth (or cotton wool) slightly
moistened with soapy water and then
wipe clean with another soft damp cloth
or cotton wool.
Finally, carefully dry off with a soft dry
cloth.
Do not use products containing alco-
hol and/or spray fluids on the area.
Seat belts
These must be kept clean.
Use products selected by our Technical
Department (Approved outlets) or
warm, soapy water and a sponge and
wipe with a dry cloth.
Detergents or dyes must not be used
under any circumstances.
INTERIOR TRIM MAINTENANCE (1/2)
Textiles (seats, door trim, etc)
Vacuum-clean the textiles regularly.
Liquid stain
Use soapy water.
Dab lightly (never rub) with a soft cloth,
rinse and remove the excess.
Solid or pasty stain
Carefully remove the excess solid or
pasty material immediately with a
spatula (working from the edges to the
centre to avoid spreading the stain).
Clean as for a liquid stain.
Special instructions for sweets or
chewing gum
Put an ice cube on the stain to solidify
it, then proceed as for a solid stain.
A well-maintained vehicle will last
longer. It is therefore recommended to
maintain the interior of the vehicle regu-
larly.
A stain should always be dealt with
swiftly.
Whatever type of stain is on the trim,
use
cold (or warm) soapy water with
natural soap.
Detergents (washing-up liquid, pow-
dered products, alcohol-based prod-
ucts) should not be used.
Use a soft cloth.
Rinse and soak up the excess.
For further recommendations for
maintaining the interior, and/or for
any unsatisfactory results, please
see an authorised dealer.