Page 215 of 364

2.95
AUTOMATIC GEARBOX (3/3)
Maintenance period
The automatic gearbox does not re-
quire any maintenance. There is no
need to add oil.
Frequency of coolant level check:
please refer to the maintenance docu-
ment for your vehicle, or contact an
Authorised Dealer.
Operating faults
– when driving , if the message
“Check auto gearbox” appears on
the instrument panel, it indicates a
failure.
Contact your approved Dealer as
soon as possible;
– when driving, if the message
“Gearbox overheating” appears on
the instrument panel, stop as soon
as possible to let the gearbox cool
down and wait for the message to
disappear;
– If a vehicle with an automatic
gearbox breaks down, refer to the
information on “Towing” in Section 5.
Parking the vehicle
When the vehicle is stopped, move
the lever to position P while keeping
your foot on the brake pedal: the drive
wheels are mechanically locked by the
driveshaft.
Ensure that the electronic parking
brake is engaged.
An impact to the under-
side of the vehicle while
manoeuvring (e.g. strik-
ing a post, raised kerb or
other street furniture) may result in
damage to the vehicle (e.g. defor-
mation of an axle).
To avoid any risk of accident, have
your vehicle checked by an ap-
proved Dealer.
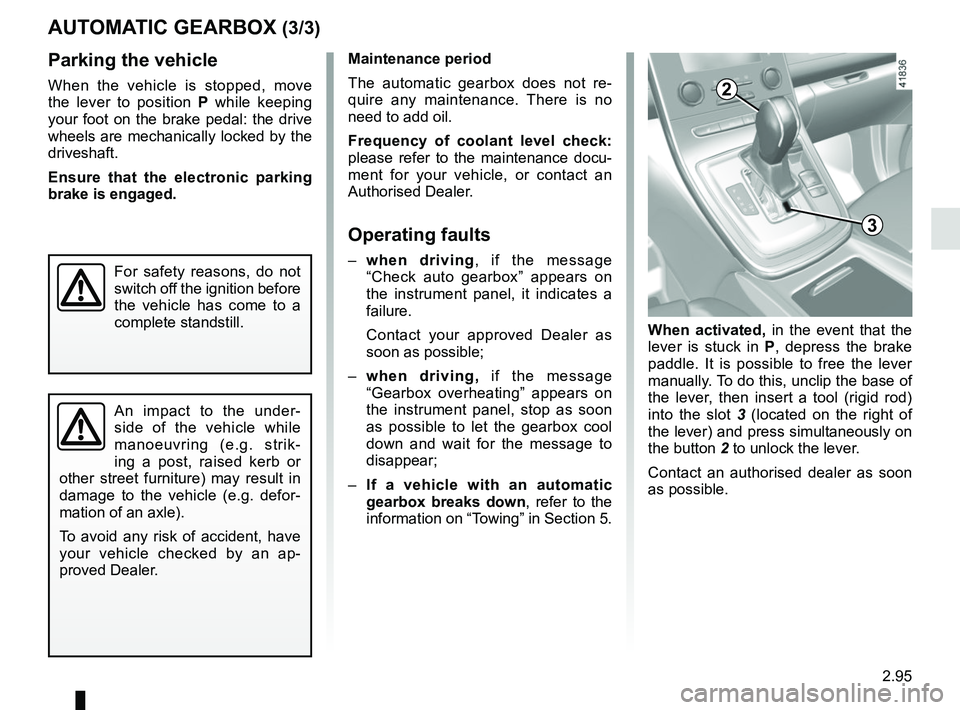
When activated, in the event that the
lever is stuck in P , depress the brake
paddle. It is possible to free the lever
manually. To do this, unclip the base of
the lever, then insert a tool (rigid rod)
into the slot 3 (located on the right of
the lever) and press simultaneously on
the button 2 to unlock the lever.
Contact an authorised dealer as soon
as possible.
3
2
For safety reasons, do not
switch off the ignition before
the vehicle has come to a
complete standstill.
Page 241 of 364

3.25
Operating faults
In case of a fault when closing a
window, the system reverts to normal
mode: pull the switch concerned up
as often as necessary to fully close
the window, then hold the switch (still
on the closure side) for approximately
one second, then lower and raise the
window fully to reinitialise the system.
If necessary, contact an approved
Dealer.
ELECTRIC WINDOWS (2/2)Remote control window
closing
(vehicles with 4 one-touch electric win-
dows).
When you lock the doors from the out-
side, press the locking button on the
RENAULTcard twice in quick suc-
cession, or on the driver's door in
hands-free mode, and all the windows
will close automatically (and, depend-
ing on the vehicle, the sunroof).
It is recommended that the user only
operates the system when the vehi-
cle can be seen clearly and no one is
inside.
One-touch mode
This mode works in addition to the ope-
ration of the electric windows described
previously.
Briefly press or pull the window switch
fully: the window is fully lowered or
raised. Pressing the switch again stops
the window moving.
Note: if the window detects resistance
when closing (e.g. tree branch, etc.), it
stops and then lowers again by a few
centimetres.
When closing the windows,
ensure that no part of the
body (arm, hand, etc.) is
protruding from the vehicle.
Risk of serious injury.
Page 242 of 364

3.26
FIXED GLASS ROOF
To slide the curtain 1
With the ignition on:
– full opening: move the mark 3 on
the button 2 towards position B. The
marks in between correspond to the
intermediate positions of the sun-
blind.
– to close: move mark 3 on button 2
to position 0.
1
Driver’s responsibility
Never leave your vehicle
with the RENAULT card or
key inside, and never leave
a child, adult who is not self-suffi-
cient or a pet, even for a short while.
They may pose a risk to themselves
or to others by starting the engine,
activating equipment such as the
electric windows or by locking the
doors.
If something gets trapped, reverse
the direction of travel as soon as
possible by turning button 2 fully to
the right (position B).
Risk of serious injury.
3
0
A
B2
Special features
If the fixed sunroof blind detects resist-
ance when closing (arm etc.), it stops
and then moves back several centime-
tres.
Operating fault
If the blind will not close, turn switch 2
to position A or B to open the blind,
then turn switch 2 to position 0 until the
blind is fully closed.
If the blockage persists, contact an ap-
proved dealer.
2
Page 243 of 364
3.27
When the doors or boot are un-
locked and opened, the reading and
footwell lights come on temporarily.
1
INTERIOR LIGHTING (1/2)
1
Map reading lights
Press switch 1 to get:
– permanent lighting;
– immediate switching off.
Note: for vehicles fitted with a multi-
function screen, you can use the mul-
tifunction screen to deactivate/acti-
vate the courtesy lights which come on
when the doors or luggage compart-
ment are opened. To do this, please
refer to “Vehicle settings customisation
menu” in Section 1.
1
2
Footwell lights
The lights 2 come on when the doors
are opened.
Page 245 of 364
3.29
SUN VISOR, BLINDS
Front sun visor
Lower the sun visor 1 on the wind-
screen or unclip it and lower it over the
side window.
Vanity mirror
Slide cover 2 , depending on the vehi-
cle, and the mirror is lit.
Lateral sun visor
Pull the sun visor upwards using the
tab 3 until the hooks 4 engage in their
housings (make sure the hooks are
properly locked in position).
3
4
2
1
Page 249 of 364
3.33
PASSENGER COMPARTMENT STORAGE SPACE AND FITTINGS (4/8)
Centre console 13
To move the centre console forward
or backward (movement B), press the
button 14 and slide the console. Once
in position, release the button and
check that it is correctly locked.
B
13
In cases of intensive use, a protective
system will prevent it from operating for
a few minutes.
In any case, the load must not
exceed 6 kg.
14
B
13
Page 255 of 364
3.39
To adjust the angle of the
headrest
Depending on the vehicle, move sec-
tion A towards or away from you to the
required position.
To adjust side supportsDepending on the vehicle, sections B
can be adjusted independently to the
desired position.
Storage position 2 for the
headrest
Press tab 1 and lower the headrest
completely.
REAR HEADRESTS
Position for useLift the headrest fully until it locks.
To remove the headrestLower the seatback slightly, press the
tab 1 and remove the headrest.
To refit the headrestInsert the headrest rods into the
sleeves, and lower the headrest until it
locks.
2
The headrest is a safety
component; check that it is
fitted and in the correct po-
sition. The top of the head-
rest should be as close as possible
to the top of the head.
1
B
A
B
When the headrest is set at the
lowest position, this is for storage
only. It should not be in this position
when a seat is occupied.
Page 256 of 364

3.40
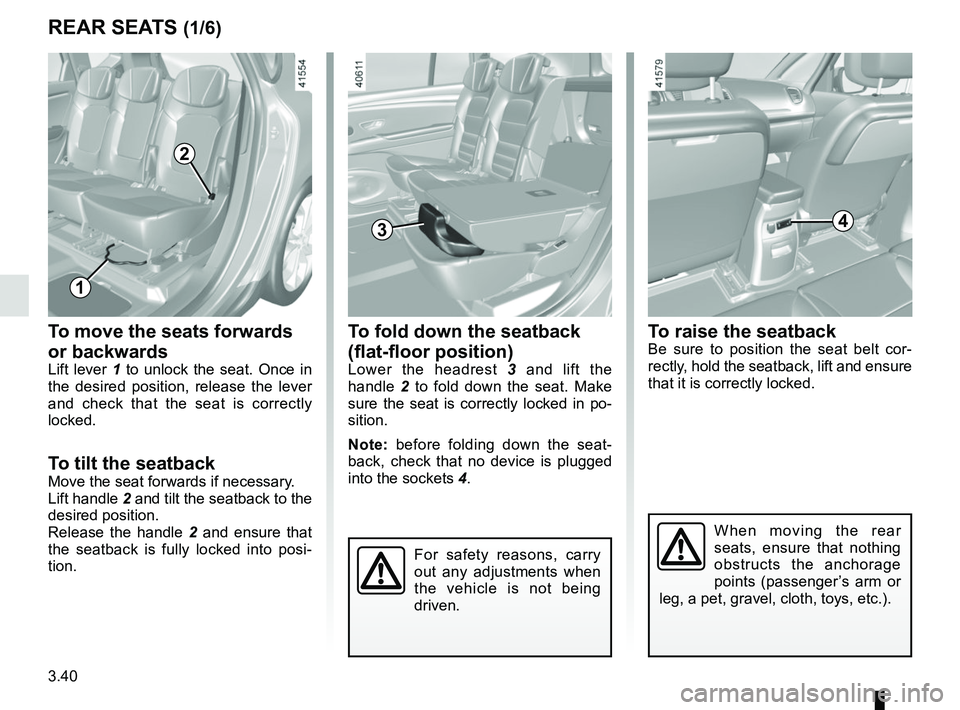
To move the seats forwards
or backwards
Lift lever 1 to unlock the seat. Once in
the desired position, release the lever
and check that the seat is correctly
locked.
To tilt the seatbackMove the seat forwards if necessary.
Lift handle 2 and tilt the seatback to the
desired position.
Release the handle 2 and ensure that
the seatback is fully locked into posi-
tion.
REAR SEATS (1/6)
2
When moving the rear
seats, ensure that nothing
obstructs the anchorage
points (passenger’s arm or
leg, a pet, gravel, cloth, toys, etc.).
3
To fold down the seatback
(flat-floor position)
Lower the headrest 3 and lift the
handle 2 to fold down the seat. Make
sure the seat is correctly locked in po-
sition.
Note: before folding down the seat-
back, check that no device is plugged
into the sockets 4.
1
For safety reasons, carry
out any adjustments when
the vehicle is not being
driven.
To raise the seatbackBe sure to position the seat belt cor-
rectly, hold the seatback, lift and ensure
that it is correctly locked.
4