Page 274 of 364
4.2
BONNET (1/2)Unlocking the bonnet catch
To unlock, push tab 3 at the same time
as opening the bonnet.
Opening the bonnet
Lift the bonnet, guiding it up, and it
will rest in position with the help of two
struts 2.
To open, pull handle
1, located on the
left-hand side of the dashboard.Please note when work-
ing close to the engine that
it may be hot. In addition,
the engine cooling fan may
start at any moment. The
warning light in the engine compart-
ment reminds you of this.
Risk of injury.
1
Do not press down on the
bonnet: there is a risk that
the bonnet may accidentally
close.
Before performing any
action in the engine com-
partment, the ignition must
be switched off (please see
the information on “Starting, stop-
ping the engine” in Section 2).
When working in the engine
compartment, ensure that
the windscreen wiper stalk
is in the park position.
Risk of injury.
2
3
Page 279 of 364

4.7
Engine oil grade
Refer to the Maintenance Service
Booklet for your vehicle.
Never run the engine in an
enclosed space as exhaust
gases are poisonous.
Filling: take care when
topping up the oil that
no oil drips onto engine
components - risk of fire.
Remember to refit the cap securely
as there is a risk of fire if oil splashes
onto hot engine components.Consult your approved Dealer at
once if you notice an abnormal or
repeated drop in any of the fluid
levels.
ENGINE OIL LEVEL: topping up, filling (3/3)/ OIL CHANGE
Exceeding the maximum
engine oil level
Under no circumstances
must the maximum fill level
be exceeded: risk of damage to the
engine and catalytic converter.
If the oil level exceeds the maximum
level, do not start your vehicle and
contact an approved Dealer.
Oil change
Service interval: refer to the
Maintenance Service Booklet for your
vehicle.
Oil change capacity
Please refer to the maintenance docu-
ment for your vehicle, or contact an au-
thorised dealer.
Always check the engine oil level using
the dipstick, as explained previously (it
should never fall below the minimum
level, or be over the maximum level on
the dipstick).
When working in the engine
compartment, ensure that
the windscreen wiper stalk
is in the park position.
Risk of injury.
Engine oil change: if you
are changing the oil when
the engine is hot, be careful
not to scald yourself if the
oil overflows.
Please note when work-
ing close to the engine that
it may be hot. In addition,
the engine cooling fan may
start at any moment. The
warning light in the engine compart-
ment reminds you of this.
Risk of injury.
Page 280 of 364

4.8
Replacement intervals
Refer to the Maintenance Document for
your vehicle.
Checking intervals
Check the coolant level regularly
(very severe damage is likely to be
caused to the engine if it runs out of
coolant).
If the level needs to be topped up, only
use products approved by our Technical
Department which ensure:
– protection against freezing;
– anticorrosion protection of the cool- ing system.
LEVELS (1/3)
Coolant
With the engine switched off and on
level ground, the level when cold must
be between the “MINI" and "MAXI"
marks on coolant reservoir 1.
Top this level up when cold before it
reaches the MIN mark.
No operations should be
carried out on the cooling
circuit when the engine is
hot.
Risk of burns.
Consult your approved dealer at
once if you notice an abnormal or
repeated drop in any of the fluid
levels.
Please note when work-
ing close to the engine that
it may be hot. In addition,
the engine cooling fan may
start at any moment. The
warning light in the engine compart-
ment reminds you of this.
Risk of injury.
1
Before performing any
action in the engine com-
partment, the ignition must
be switched off (please see
the information on “Starting, stop-
ping the engine” in Section 2).
Page 281 of 364

4.9
LEVELS (2/3)
Brake fluid
This should be checked frequently, and
any time you notice even the slightest
loss in braking efficiency.
The level should be read with the engine
switched off and on level ground.Level 2
It is normal for the level to drop as
the linings become worn, but it should
never drop below the “MINI” warning
line.
If you wish to check the disc and drum
wear yourself, you should obtain the
document explaining the checking pro-
cedure from our network or from the
manufacturer’s website. Topping up
After any operation on the hydraulic cir-
cuit, a specialist must replace the fluid.
Only use fluids approved by our
Technical Department (and taken from
a sealed container).
Replacement intervals
Refer to the Maintenance Document for
your vehicle.
Please note when work-
ing close to the engine that
it may be hot. In addition,
the engine cooling fan may
start at any moment. The
warning light in the engine compart-
ment reminds you of this.
Risk of injury.
2
Before performing any
action in the engine com-
partment, the ignition must
be switched off (please see
the information on “Starting, stop-
ping the engine” in Section 2).
Page 283 of 364

4.11
12 VOLT BATTERY (1/2)
1
Battery 1 does not require any mainte-
nance. You should not open it or add
any fluid.
Handle the battery with care
as it contains sulphuric acid
which must not come into
contact with the eyes or
skin. If it does, wash the affected
area with plenty of cold water. If
necessary, consult a doctor.
Ensure that naked flames, red hot
objects and sparks do not come into
contact with the battery as there is a
risk of explosion.
Depending on the vehicle, a system
continuously checks the battery charge
status. If this decreases, the message
“Battery low start engine” is displayed
on the instrument panel. In this case,
start the engine and the message on
the instrument panel will disappear.
The charge status of your battery can
decrease especially if you use your ve-
hicle:
– for short journeys;
– for driving in town;
– when the temperature drops;
– after extended use of energy-con- suming devices (radio, etc.) with the
engine switched off.
Please note when work-
ing close to the engine that
it may be hot. In addition,
the engine cooling fan may
start at any moment. The
warning light in the engine compart-
ment reminds you of this.
Risk of injury.
Before performing any
action in the engine com-
partment, the ignition must
be switched off (please see
the information on “Starting, stop-
ping the engine” in Section 2).
Page 285 of 364

4.13
TYRE PRESSURE (1/2)
A
Label A
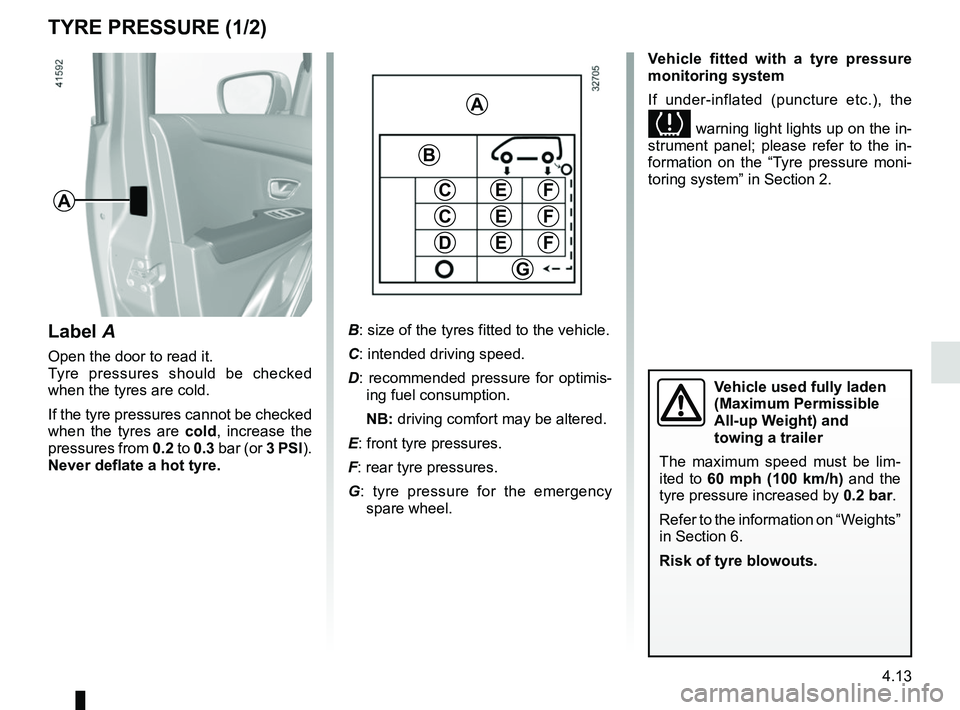
Open the door to read it.
Tyre pressures should be checked
when the tyres are cold.
If the tyre pressures cannot be checked
when the tyres are cold, increase the
pressures from 0.2 to 0.3 bar (or 3 PSI).
Never deflate a hot tyre. Vehicle fitted with a tyre pressure
monitoring system
If under-inflated (puncture etc.), the
warning light lights up on the in-
strument panel; please refer to the in-
formation on the “Tyre pressure moni-
toring system” in Section 2.
B: size of the tyres fitted to the vehicle.
C: intended driving speed.
D: recommended pressure for optimis- ing fuel consumption.
NB: driving comfort may be altered.
E: front tyre pressures.
F: rear tyre pressures.
G : tyre pressure for the emergency
spare wheel.
A
C
D
FE
G
B
C
E
E
F
F
Vehicle used fully laden
(Maximum Permissible
All-up Weight) and
towing a trailer
The maximum speed must be lim-
ited to 60 mph (100 km/h) and the
tyre pressure increased by 0.2 bar.
Refer to the information on “Weights”
in Section 6.
Risk of tyre blowouts.
Page 298 of 364

5.6
TYRE INFLATION KIT (2/4)
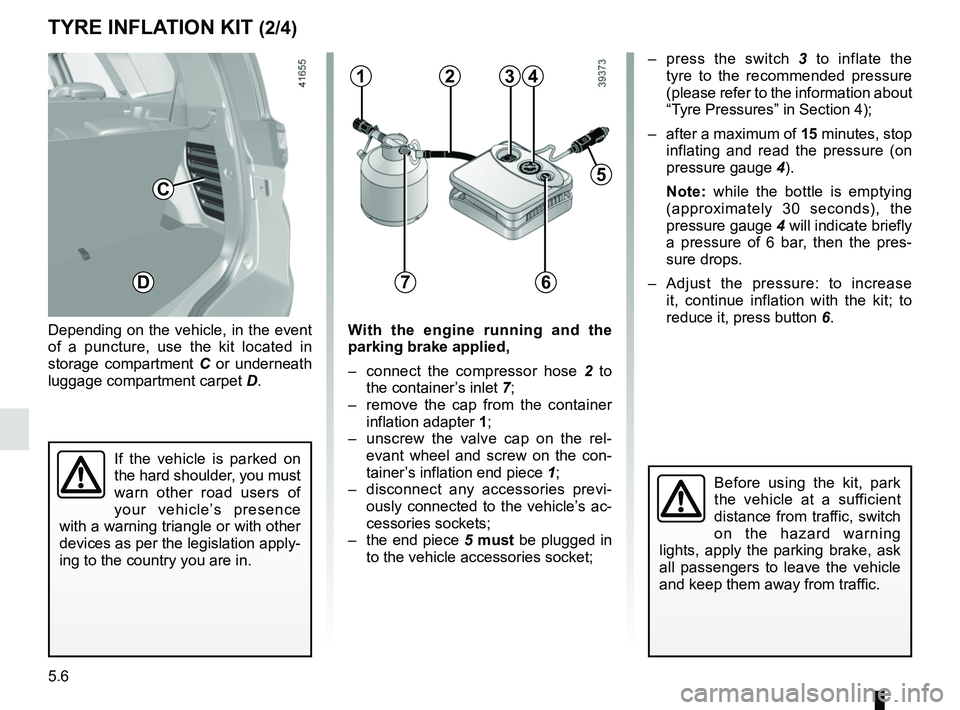
Depending on the vehicle, in the event
of a puncture, use the kit located in
storage compartment C or underneath
luggage compartment carpet D.
Before using the kit, park
the vehicle at a sufficient
distance from traffic, switch
on the hazard warning
lights, apply the parking brake, ask
all passengers to leave the vehicle
and keep them away from traffic.
If the vehicle is parked on
the hard shoulder, you must
warn other road users of
your vehicle’s presence
with a warning triangle or with other
devices as per the legislation apply-
ing to the country you are in.
C
D
With the engine running and the
parking brake applied,
– connect the compressor hose 2 to
the container’s inlet 7;
– remove the cap from the container inflation adapter 1;
– unscrew the valve cap on the rel- evant wheel and screw on the con-
tainer’s inflation end piece 1;
– disconnect any accessories previ- ously connected to the vehicle’s ac-
cessories sockets;
– the end piece 5 must be plugged in
to the vehicle accessories socket;
341
7
– press the switch 3 to inflate the
tyre to the recommended pressure
(please refer to the information about
“Tyre Pressures” in Section 4);
– after a maximum of 15 minutes, stop inflating and read the pressure (on
pressure gauge 4).
Note: while the bottle is emptying
(approximately 30 seconds), the
pressure gauge 4 will indicate briefly
a pressure of 6 bar, then the pres-
sure drops.
– Adjust the pressure: to increase it, continue inflation with the kit; to
reduce it, press button 6.
5
2
6
Page 304 of 364

5.12
CHANGING A WHEEL (1/2)
3
1
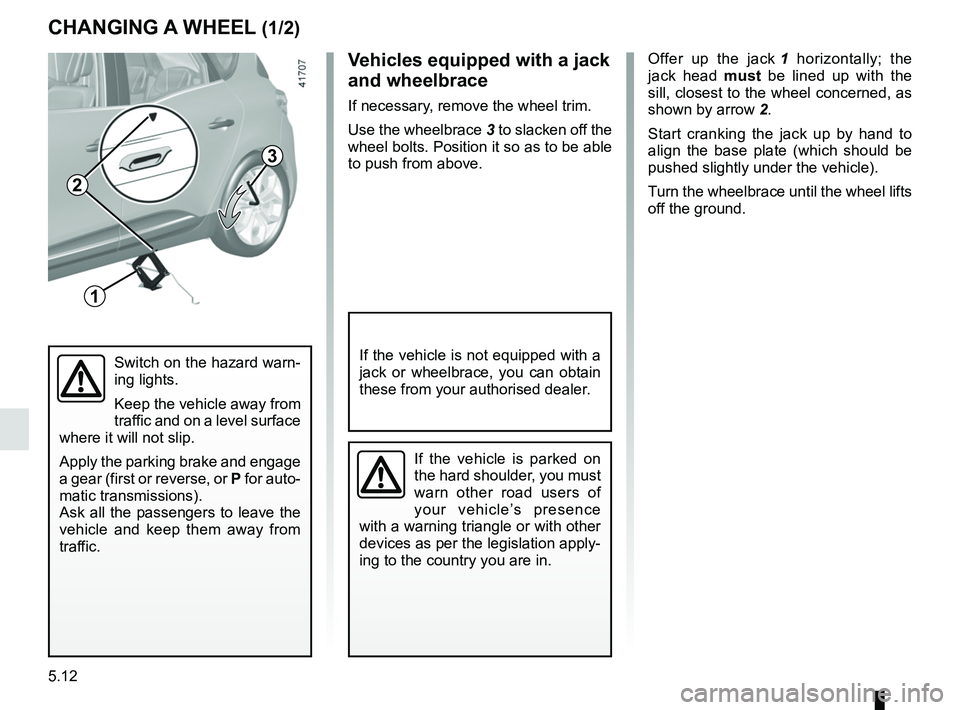
Offer up the jack 1 horizontally; the
jack head must be lined up with the
sill, closest to the wheel concerned, as
shown by arrow 2.
Start cranking the jack up by hand to
align the base plate (which should be
pushed slightly under the vehicle).
Turn the wheelbrace until the wheel lifts
off the ground.Vehicles equipped with a jack
and wheelbrace
If necessary, remove the wheel trim.
Use the wheelbrace 3 to slacken off the
wheel bolts. Position it so as to be able
to push from above.
Switch on the hazard warn-
ing lights.
Keep the vehicle away from
traffic and on a level surface
where it will not slip.
Apply the parking brake and engage
a gear (first or reverse, or P for auto-
matic transmissions).
Ask all the passengers to leave the
vehicle and keep them away from
traffic.
If the vehicle is parked on
the hard shoulder, you must
warn other road users of
your vehicle’s presence
with a warning triangle or with other
devices as per the legislation apply-
ing to the country you are in.
If the vehicle is not equipped with a
jack or wheelbrace, you can obtain
these from your authorised dealer.
2