2018 RENAULT KOLEOS warning lights
[x] Cancel search: warning lightsPage 145 of 332

2.41
8
7
System A (continued)
For vehicle not fitted with a
navigation system
– With the vehicle at a standstill, press and hold the switch 7 OK to access
the settings menu,
– repeatedly press the control 8 up or
down until you reach the “Driving as-
sistance” menu. Press the switch 7
OK;
– repeatedly press control 8up or down
until you reach the “Active braking”
menu, then press the switch 7 OK.
ACTIVE EMERGENCY BRAKING (3/11)
Operating faults
When the system detects an operating
fault, the
warning light lights up
on the instrument panel, with the mes-
sage “Active braking disconnected”.
There are two possibilities:
– the system is temporarily disrupted (for example: radar obscured by
dirt, mud, snow etc.). In this case,
park the vehicle and switch off the
engine. Clean the detection zone of
the radar. When you next start the
engine, the warning light and the
message go out
– if this is not the case, this may arise from another cause; contact an
Approved Dealer.
Consult an approved dealer.
Press the switch 7
OK again to activate
or deactivate the function:= function activated
< function deactivated
The warning light
is displayed on
the instrument panel when the system
is deactivated. This system is reacti-
vated each time the ignition is switched
on.
Conditions for non-activation
of the system
The system cannot be activated:
– when the gear lever is in neutral;
– when the parking brake is activated;
– while cornering.
– For 4-wheel drive vehicles, when Electronic Stability Programme
(ESC) with understeer and trac-
tion control are deactivated (please
see “Electronic Stability Programme
(ESC) with understeer and trac-
tion control” above). Warning light
comes on.The system A only detects vehicles
driving in the same direction of traf-
fic. The system cannot detect mo-
torcycles because of the difficulty in
forecasting their trajectory.
Page 151 of 332
2.47
ACTIVE EMERGENCY BRAKING (9/11)
System B (continued)
Conditions for non-activation
of the system
The system cannot be activated:
– when the gear lever is in neutral;
– when the parking brake is activated;
– while cornering.
As a general rule, if the driver shows
signs of attention (action on the steering
wheel, pedals etc.), the system delays
its operation or does not activate.
Operating faults
When the system detects an operating
fault, the
warning light lights up
on the instrument panel, with the mes-
sage “Active braking disconnected”.
Consult an approved dealer.
Temporarily not available
When the system detects a tempo-
rary unavailability, the
warning
light lights up on the instrument panel
accompanied by the message “Active
braking: sensor blind” or, depending on
the vehicle, “Radar-camera: no visibil-
ity”.
The possible causes are:
– the system is temporarily blinded (glare from the sun, dipped beam
headlights, bad weather conditions
etc.). The system will be operational
again when visibility conditions are
better.
– The system is temporarily disrupted (for example: windscreen obscured
by dirt, ice, snow etc.). In this case,
park the vehicle and switch off the
engine. Clean the windscreen. When
you next start the engine, the warn-
ing light and the message go out.
– If this is not the case, this may arise from another cause; contact an
Approved Dealer.
Page 156 of 332

2.52
2
65
Adjustment
Vehicles fitted with a navigation
system
From the multifunction screen 2, select
“Vehicle”, “Driving assistance”, “Lane
departure warning settings”.
– Volume: adjust the alert volume to one of five levels;
– sensitivity: adjust the sensitivity level for line detection. To do this select:
– “Low” line detected upon cross-
ing;
– “Average” line detected on ap-
proach;
– “high” line detected nearby.
Vehicles not fitted with a navigation
system
– With the vehicle at a standstill, press and hold the switch 5 OK to access
the settings menu;
– repeatedly press the control 6 up or
down until you reach the “Driving as-
sistance” menu. Press the switch 5
OK;
– repeatedly press control 6 up or
down until you reach the “Lane de-
parture warning settings” menu, then
press the switch 5 OK.
– Volume: adjust the alert volume to one of three levels;
– sensitivity: adjust the sensitivity level for line detection. To do this select:
– “Low” line detected upon cross-
ing;
– “Average” line detected on ap-
proach;
– “high” line detected nearby.
Operating faults
In the event of a malfunction, a mes-
sage “Lane departure warning check” is
displayed on the instrument panel, and
the visibility indicators for the left and
right lines disappear from the instru-
ment panel.
Consult an approved dealer.
LANE DEPARTURE WARNING (3/3)
Conditions for non-activation
of alerts
– Direction indicators activated for less than around 2 seconds prior to de-
parting from the lane;
– very fast lane departure;
– driving continuously on a line;
– on bends, the function allows for slightly cutting the bend;
– hazard warning lights activated;
– ...
Page 161 of 332
2.57
1
BLIND SPOT WARNING (3/4)
Operation
This function will indicate:
– when the vehicle speed is between approximately 30 km/h (19 mph) and
140 km/h (87 mph);
– when another vehicle is in the blind spot area and travelling in the same
direction as your vehicle.
If another vehicle is being overtaken,
the indicator 6 will be activated only if
that vehicle remains in the blind spot for
more than one second.
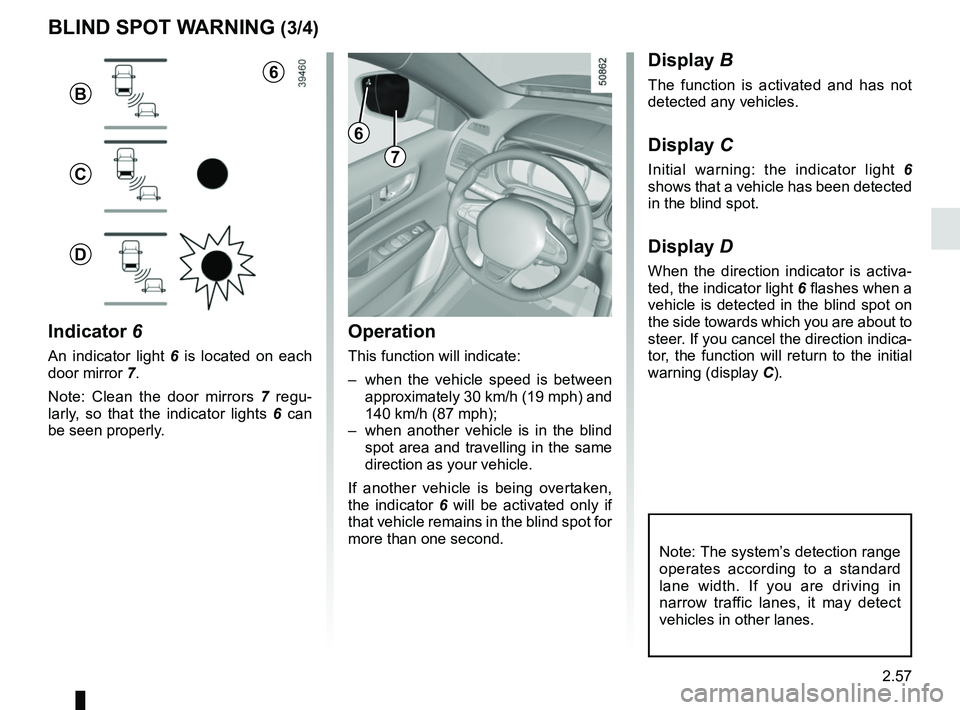
Indicator 6
An indicator light 6 is located on each
door mirror 7.
Note: Clean the door mirrors 7 regu-
larly, so that the indicator lights 6 can
be seen properly.
Display B
The function is activated and has not
detected any vehicles.
Display C
Initial warning: the indicator light 6
shows that a vehicle has been detected
in the blind spot.
Display D
When the direction indicator is activa-
ted, the indicator light 6 flashes when a
vehicle is detected in the blind spot on
the side towards which you are about to
steer. If you cancel the direction indica-
tor, the function will return to the initial
warning (display C).
7
6
B
C
D
Note: The system’s detection range
operates according to a standard
lane width. If you are driving in
narrow traffic lanes, it may detect
vehicles in other lanes.
6
Page 189 of 332

2.85
Choice of manoeuvre
The system can perform four types of
manoeuvres:
– 4 parallel parking;– 5 perpendicular parking;– 6 angle parking;
– 7 moving out of a parallel parking space.
From the multifunction screen, select
the manoeuvre to be performed.
And activate the direction indicator (turn
signal) on the side you wish to park.
Note: When starting the vehicle, or
after successfully completed parallel
parking using the system, the default
manoeuvre proposed by the system is
assistance in exiting a parallel parking
space. In other cases, the default ma-
noeuvre can be set with 8 from the mul-
tifunction screen.
ASSISTED PARKING (2/6)
Operation
Parking
As long as the vehicle speed is less
than 18.6 mph (30 km/h), the system
looks for available parking spaces on
both sides of the vehicle.
Once a space has been found, it is dis-
played on the multifunction screen, indi-
cated by a small letter “P”. Drive slowly,
with the indicators activated on the side
of the space, until the message “Stop”
is displayed, alongside a beep.
The space is then indicated on the mul-
tifunction screen by a capital “P”. – Stop the vehicle;
– select reverse gear.
Warning light
lights up on the in-
strument panel, along with a beep.
– release the steering wheel;
– follow the system instructions pro- vided on the multifunction screen.
Your speed should not exceed around
4 mph (7 km/h). Bar 9 tells you the
progress.
Once the warning light
on the
instrument panel goes off and a beep
sounds, the manoeuvre has been com-
pleted.
4567
Look in all directions
Select indicator Look in all directions
Reverse
9
8
Page 190 of 332
2.86
Special note
– Drive slowly and always be ready to use the brake;
– The system can not detect parking spaces between objects except for
vehicles such as a post, motorbike or
obstacle;
– The system can not detect park- ing spaces made after detecting or
before detecting;
– Maintain the distance about 50~150 cm from the parked vehicles
when looking for parking spaces.
The system may not detect spaces
when the distance is less than 50 cm
or over 150 cm;
– You can move the gear lever position R to D or D to R while parking. The system is still available.
– The driver should look out for the de- tected space if it is possible to park
(obstacles in the space);
– If you fit a different tire or wheel, the system performance may be
changed. For the best performance,
fit the same size with original one;
– The system may not work if the wheels are misaligned. Contact an
approved dealer.
ASSISTED PARKING (3/6)
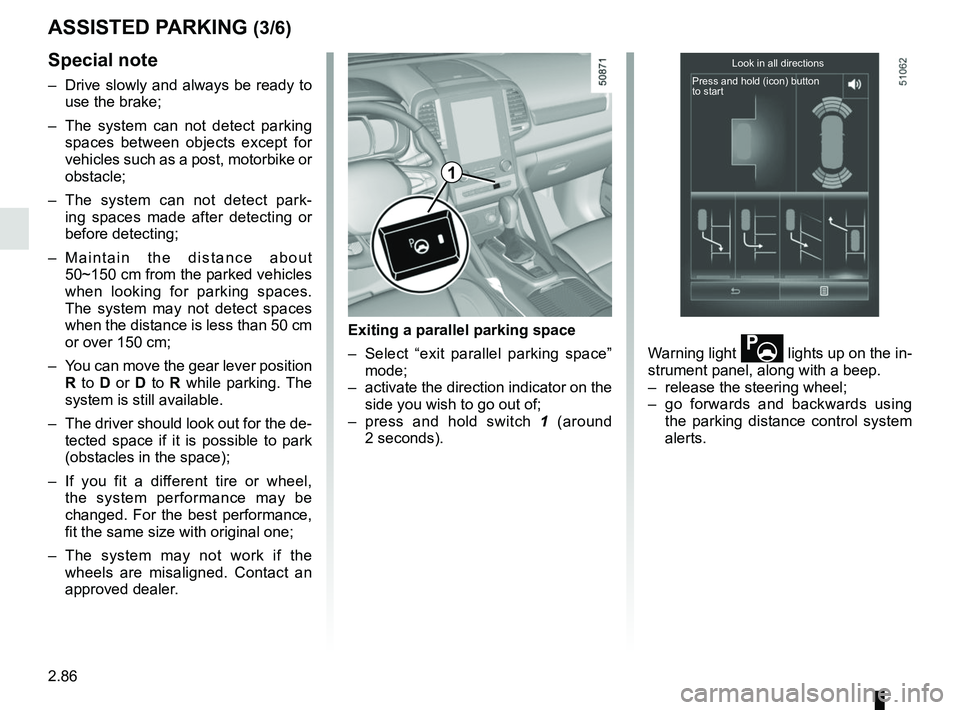
Exiting a parallel parking space
– Select “exit parallel parking space” mode;
– activate the direction indicator on the side you wish to go out of;
– press and hold switch 1 (around
2 seconds). Warning light
lights up on the in-
strument panel, along with a beep.
– release the steering wheel;
– go forwards and backwards using the parking distance control system
alerts.
Look in all directions
Press and hold (icon) button
to start
1
Page 257 of 332
4.11
TYRE PRESSURE (1/2)
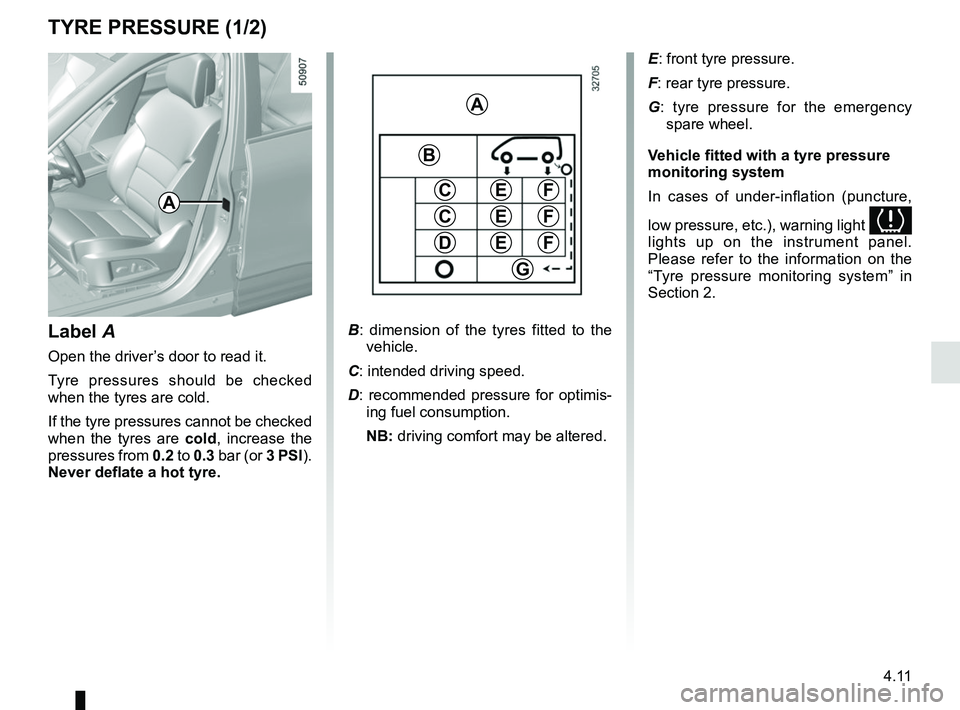
B: dimension of the tyres fitted to the
vehicle.
C: intended driving speed.
D: recommended pressure for optimis- ing fuel consumption.
NB: driving comfort may be altered.
A
C
D
FE
G
B
C
E
E
F
F
E: front tyre pressure.
F: rear tyre pressure.
G : tyre pressure for the emergency
spare wheel.
Vehicle fitted with a tyre pressure
monitoring system
In cases of under-inflation (puncture,
low pressure, etc.), warning light
lights up on the instrument panel.
Please refer to the information on the
“Tyre pressure monitoring system” in
Section 2.
Label A
Open the driver’s door to read it.
Tyre pressures should be checked
when the tyres are cold.
If the tyre pressures cannot be checked
when the tyres are cold, increase the
pressures from 0.2 to 0.3 bar (or 3 PSI).
Never deflate a hot tyre.
A
Page 269 of 332
5.5
TYRE PRESSURE KIT (2/3)
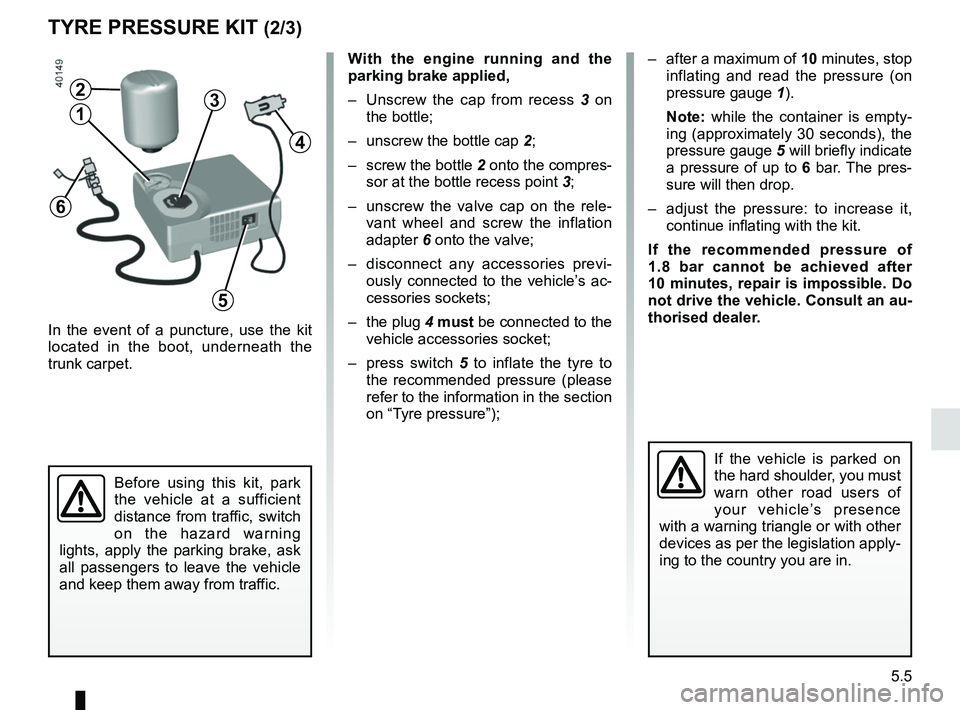
In the event of a puncture, use the kit
located in the boot, underneath the
trunk carpet.
With the engine running and the
parking brake applied,
– Unscrew the cap from recess 3 on
the bottle;
– unscrew the bottle cap 2;
– screw the bottle 2 onto the compres- sor at the bottle recess point 3;
– unscrew the valve cap on the rele- vant wheel and screw the inflation
adapter 6 onto the valve;
– disconnect any accessories previ- ously connected to the vehicle’s ac-
cessories sockets;
– the plug 4 must be connected to the
vehicle accessories socket;
– press switch 5 to inflate the tyre to
the recommended pressure (please
refer to the information in the section
on “Tyre pressure”);
Before using this kit, park
the vehicle at a sufficient
distance from traffic, switch
on the hazard warning
lights, apply the parking brake, ask
all passengers to leave the vehicle
and keep them away from traffic.
If the vehicle is parked on
the hard shoulder, you must
warn other road users of
your vehicle’s presence
with a warning triangle or with other
devices as per the legislation apply-
ing to the country you are in.
– after a maximum of 10 minutes, stop inflating and read the pressure (on
pressure gauge 1).
Note: while the container is empty-
ing (approximately 30 seconds), the
pressure gauge 5 will briefly indicate
a pressure of up to 6 bar. The pres-
sure will then drop.
– adjust the pressure: to increase it, continue inflating with the kit.
If the recommended pressure of
1.8 bar cannot be achieved after
10 minutes, repair is impossible. Do
not drive the vehicle. Consult an au-
thorised dealer.
4
2
13
5
6