2018 RENAULT KOLEOS heating
[x] Cancel search: heatingPage 108 of 332

2.4
STARTING, STOPPING THE ENGINE: vehicle with key
Starting the engine
Petrol versions– Activate the starter without ac-
celerating;
– release the key as soon as the
engine starts.
ÉDiesel versions
– Turn the ignition key to the
“Ignition on” position 2, and hold
this position until the engine pre-
heating light goes off;
– turn the key to starter position 3
without depressing the accel-
erator pedal;
– release the key as soon as the
engine starts.
Special note: if starting the engine
when the outdoor temperature is very
low (below -10°C): hold down the clutch
pedal until the engine starts.
Never start your vehicle
while freewheeling on a
gradient. Risk of non-ac-
tivation of power-assisted
steering.
There is a risk of accidents.
Never switch off the igni-
tion before the vehicle has
stopped completely. Once
the engine has stopped, the
brake servo, power-assisted steer-
ing, etc. and the passive safety de-
vices such as air bags and preten-
sioners will no longer operate.
Driver’s responsibility
when parking or stopping
the vehicle
Never leave an animal,
child or adult who is not self-suffi-
cient alone in your vehicle, even for
a short time.
They may pose a risk to themselves
or to others by starting the engine,
activating equipment such as the
electric windows or locking the
doors, for example.
Also, in hot and/or sunny weather,
please remember that the tempera-
ture inside the passenger compart-
ment increases very quickly.
RISK OF DEATH OR SERIOUS
INJURY.
Stopping the engine
With the engine idling, turn the key to
the “Stop” position 0.
Page 121 of 332

2.17
PARKING BRAKE
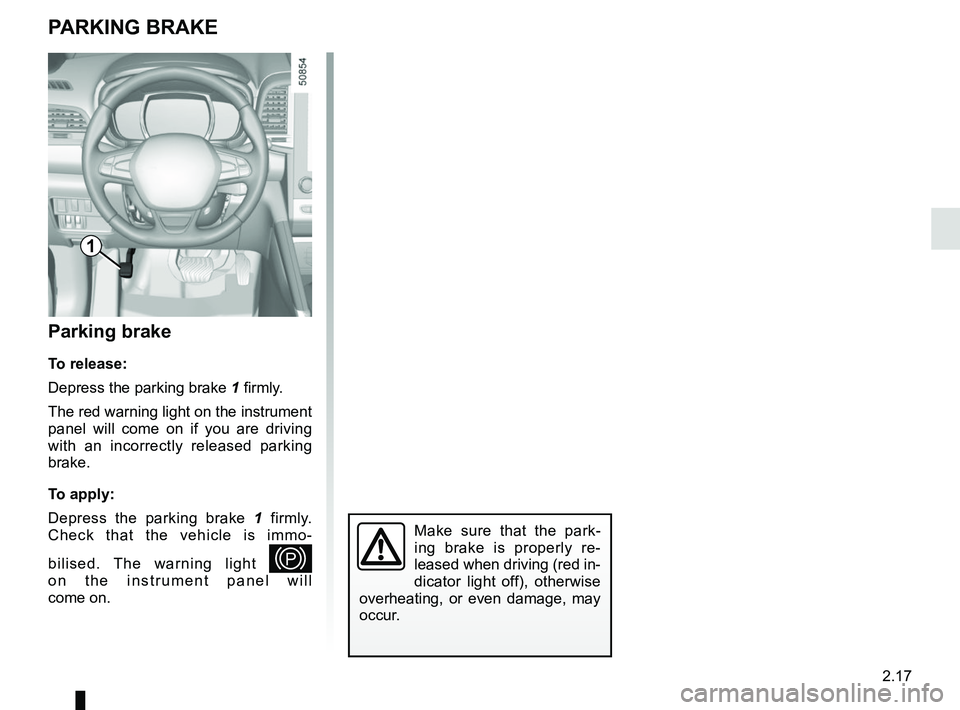
Parking brake
To release:
Depress the parking brake 1 firmly.
The red warning light on the instrument
panel will come on if you are driving
with an incorrectly released parking
brake.
To apply:
Depress the parking brake 1 firmly.
Check that the vehicle is immo-
bilised. The warning light
—
on the instrument panel will
come on.
Make sure that the park-
ing brake is properly re-
leased when driving (red in-
dicator light off), otherwise
overheating, or even damage, may
occur.
1
Page 127 of 332

2.23
DRIVING ADVICE, ECO-DRIVING (3/5)
ECO mode
ECO mode is a function which opti-
mises fuel consumption. This acts on
all power consuming elements (engine
power, switching gears for vehicles
fitted with an automatic gearbox, heat-
ing and/or air conditioning, etc.).
Limiting acceleration enables low fuel
consumption in urban and surrounding
areas. When ECO modeis in use, it is
normal to notice a change in heating
level.
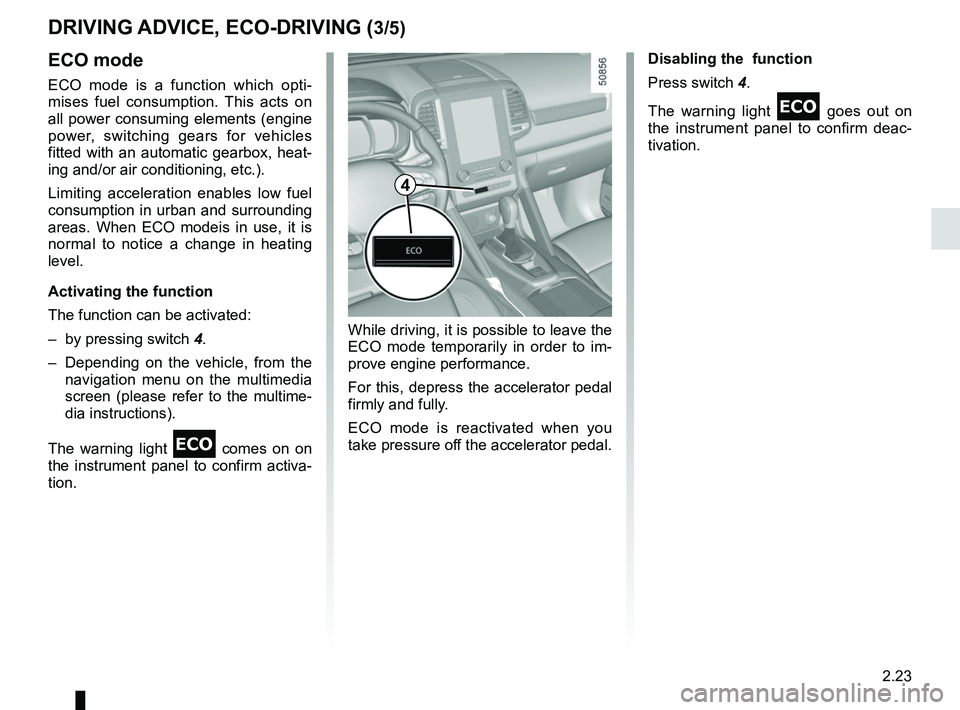
Activating the function
The function can be activated:
– by pressing switch 4.
– Depending on the vehicle, from the navigation menu on the multimedia
screen (please refer to the multime-
dia instructions).
The warning light
comes on on
the instrument panel to confirm activa-
tion. Disabling the function
Press switch 4.
The warning light
goes out on
the instrument panel to confirm deac-
tivation.
While driving, it is possible to leave the
ECO mode temporarily in order to im-
prove engine performance.
For this, depress the accelerator pedal
firmly and fully.
ECO mode is reactivated when you
take pressure off the accelerator pedal.
4
Page 140 of 332

2.36
TRANSMISSION: 4-wheel drive (4WD) (2/4)
This problem may be resolved by
changing the tyres. Always use four
identical tyres (same brand, profile,
etc.) and with similar wear.
In the event of excessive wheelspin, the
mechanical components may overheat.
If this happens:
– at first, the
’ warning light
comes on. “4WD Lock” mode is still
active – however, we recommend
that you stop as soon as possible to
allow the system to cool down (until
the warning light goes out);
– if the wheels still spin, the system au- tomatically switches to “2WD” mode
to protect the mechanical compo-
nents.
The message “4WD overheating” is
displayed on the instrument panel.
The mode cannot be changed while
the message is displayed.
Note: If the vehicle speed exceeds
approximately 24.8 mph (40 km/h) in
“4WD Lock” mode, the system auto-
matically switches back to “AUTO”
mode.
The
’ warning light goes out and
the
warning light comes on.
Special features of the
4-wheel drive transmission
The vehicle may make more noise when
the “AUTO” or “4WD Lock” modes are
activated. This is normal. If the system
detects a difference in the dimensions
of the front and rear wheels (eg. un-
derinflation, severe wear on an axle),
the system automatically switches to
“2WD” mode.
The message “4WD unavailable unsuit-
able tyres” is displayed on the instru-
ment panel. Drive as soon as possible
at a moderate speed to an approved
dealer.
“4WD Lock” mode
To activate this mode, turn selector 1 to
the “4WD Lock” position. The selector
the returns to the “AUTO” position. The
’ indicator light will light up on the
instrument panel.
Operating principle
“4WD Lock” mode distributes the
engine torque between the front and
rear axles in order to optimise the per-
formance capacity of the vehicle in off-
road situations. This mode should only
be used in extreme driving conditions
(mud, steep slopes, sand).
To deactivate this mode, turn selector 1
to the “4WD Lock” position again. The
warning light goes out on the instru-
ment panel.
Page 195 of 332

2.91
AUTOMATIC TRANSMISSION (2/3)
Special cases
In certain driving conditions (for exam-
ple, engine protection, operation of the
Electronic Stability Programme: the au-
tomatic system may change gear auto-
matically.
Likewise, to prevent incorrect manoeu-
vres, a gear change may be refused by
the automatic system: in this case the
gear display flashes for a few seconds
as a warning.
Special circumstances
– If the bends and road surface do
not allow you to stay in automatic
mode (e.g. in the mountains), we
recommend that you change to
manual mode. This will prevent the
automatic gearbox from changing
gear repeatedly when climbing, and
permit engine braking on long de-
scents.
– In cold weather , start the engine
and wait a few seconds before
moving the selector lever from posi-
tion P or N and engaging it in D or R
to prevent the engine stalling.
Driving in manual mode
With the selection lever 1 in position D,
move the lever to the left.
Shifting the lever repeatedly allows you
to change gears manually:
– to move down through the gears, push the lever forwards;
– to move up through the gears, push the lever backwards.
The gear selected is displayed on the
instrument panel.
1
When facing uphill, to remain
stopped, do not keep your foot on
the accelerator.
Risk of overheating the automatic
gearbox.
Page 196 of 332

2.92
AUTOMATIC TRANSMISSION (3/3)
Parking the vehicle
When the vehicle is stopped, move the
lever to position P while keeping your
foot on the brake pedal: the gearbox is
in neutral and the drive wheels are me-
chanically locked by the driveshaft.
Apply the parking brake or, depen-
ding on the vehicle, ensure that the
electronic parking brake is applied.
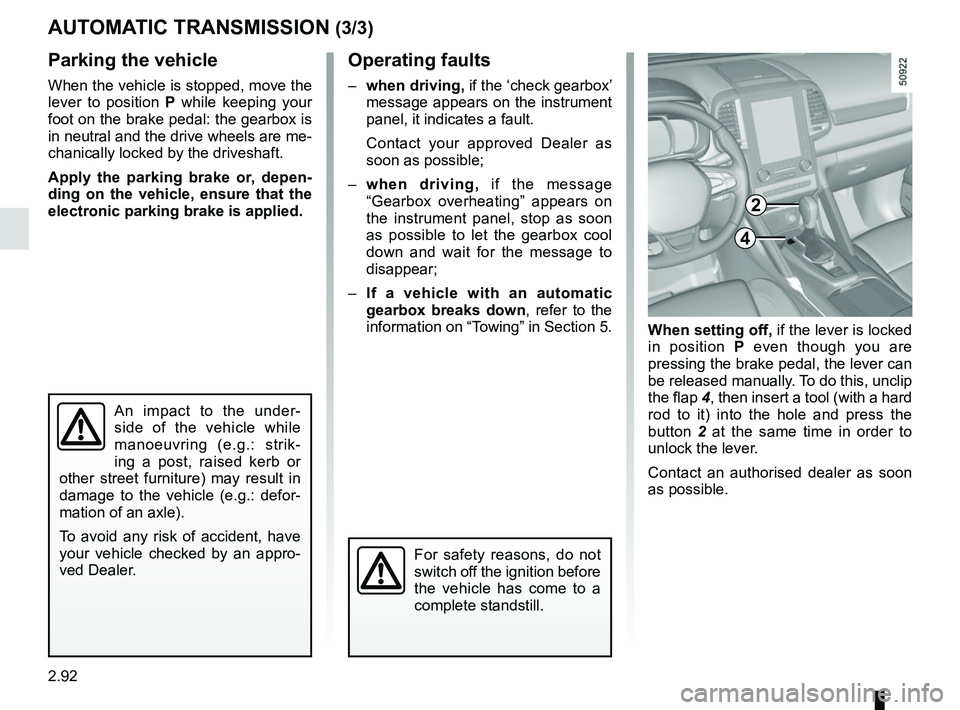
When setting off, if the lever is locked
in position P even though you are
pressing the brake pedal, the lever can
be released manually. To do this, unclip
the flap 4, then insert a tool (with a hard
rod to it) into the hole and press the
button 2 at the same time in order to
unlock the lever.
Contact an authorised dealer as soon
as possible.
Operating faults
– when driving, if the ‘check gearbox’
message appears on the instrument
panel, it indicates a fault.
Contact your approved Dealer as
soon as possible;
– when driving, if the message
“Gearbox overheating” appears on
the instrument panel, stop as soon
as possible to let the gearbox cool
down and wait for the message to
disappear;
– If a vehicle with an automatic
gearbox breaks down, refer to the
information on “Towing” in Section 5.
4
For safety reasons, do not
switch off the ignition before
the vehicle has come to a
complete standstill.
An impact to the under-
side of the vehicle while
manoeuvring (e.g.: strik-
ing a post, raised kerb or
other street furniture) may result in
damage to the vehicle (e.g.: defor-
mation of an axle).
To avoid any risk of accident, have
your vehicle checked by an appro-
ved Dealer.
2
Page 197 of 332

3.1
Section 3: Your comfort
Air vents. . . . . . . . . . . . . . . . . . . . . . . . . . . . . . . .\
. . . . . . . . . . . . . . . . . . . . . . . . . . . . . . . . . . . . . . . 3.2
Manual air conditioning/heating system . . . . . . . . . . . . . . . . . . . . . . . . . . . . . . . . . . . .\
. . . . . . . . . . 3.4
Automatic climate control . . . . . . . . . . . . . . . . . . . . . . . . . . . . . . . . . . . .\
. . . . . . . . . . . . . . . . . . . . . 3.7
Air conditioning: information and advice on use . . . . . . . . . . . . . . . . . . . . . . . . . . . . . . . . . . . .\
. . . . 3.17
Outside air quality and deodorisation functions . . . . . . . . . . . . . . . . . . . . . . . . . . . . . . . . . . . . \
. . . . . 3.18
Electric windows . . . . . . . . . . . . . . . . . . . . . . . . . . . . . . . . . . . .\
. . . . . . . . . . . . . . . . . . . . . . . . . . . . 3.19
Electric sunroof . . . . . . . . . . . . . . . . . . . . . . . . . . . . . . . . . . . .\
. . . . . . . . . . . . . . . . . . . . . . . . . . . . . 3.21
Interior lighting . . . . . . . . . . . . . . . . . . . . . . . . . . . . . . . . . . . . \
. . . . . . . . . . . . . . . . . . . . . . . . . . . . . . 3.23
Passenger compartment storage space and fittings . . . . . . . . . . . . . . . . . . . . . . . . . . . . . . . . . . . . \
. 3.26
Ashtray, cigarette lighter, accessories socket . . . . . . . . . . . . . . . . . . . . . . . . . . . . . . . . . . . .\
. . . . . . 3.31
Rear headrest . . . . . . . . . . . . . . . . . . . . . . . . . . . . . . . . . . . .\
. . . . . . . . . . . . . . . . . . . . . . . . . . . . . . 3.32
Sliding rear bench seat . . . . . . . . . . . . . . . . . . . . . . . . . . . . . . . . . . . .\
. . . . . . . . . . . . . . . . . . . . . . . 3.33
Boot . . . . . . . . . . . . . . . . . . . . . . . . . . . . . . . . . . . . \
. . . . . . . . . . . . . . . . . . . . . . . . . . . . . . . . . . . . . . 3.36
Automatic tailgate . . . . . . . . . . . . . . . . . . . . . . . . . . . . . . . . . . . .\
. . . . . . . . . . . . . . . . . . . . . . . . . . . 3.37
Luggage cover . . . . . . . . . . . . . . . . . . . . . . . . . . . . . . . . . . . . \
. . . . . . . . . . . . . . . . . . . . . . . . . . . . . . 3.42
Luggage net. . . . . . . . . . . . . . . . . . . . . . . . . . . . . . . . . . . . \
. . . . . . . . . . . . . . . . . . . . . . . . . . . . . . . . 3.43
Luggage compartment storage . . . . . . . . . . . . . . . . . . . . . . . . . . . . . . . . . . . .\
. . . . . . . . . . . . . . . . . 3.45
Transporting objects in the boot . . . . . . . . . . . . . . . . . . . . . . . . . . . . . . . . . . . .\
. . . . . . . . . . . . . . . . 3.46
Transporting objects: . . . . . . . . . . . . . . . . . . . . . . . . . . . . . . . . . . . . \
. . . . . . . . . . . . . . . . . . . . . . . . . 3.47 equipment . . . . . . . . . . . . . . . . . . . . . . . . . . . . . . . . . . . .\
. . . . . . . . . . . . . . . . . . . . . . . . . . . 3.47
Roof bars, Spoiler . . . . . . . . . . . . . . . . . . . . . . . . . . . . . . . . . . . .\
. . . . . . . . . . . . . . . . . . . . . . . . . . . 3.48
Multimedia equipment . . . . . . . . . . . . . . . . . . . . . . . . . . . . . . . . . . . . \
. . . . . . . . . . . . . . . . . . . . . . . . 3.49
Page 231 of 332

3.35
Depending on the vehicle, if you lower
the rear seats armrest, there is a rear
seats heating controller on the rear
armrest.
Rear heated seats(depending on the vehicle)
With the engine running, press switch 4
(for left side of the rear seat) or switch 5
(for right side of the rear seat). The in-
dicator light on the switch lights on to
confirm that the heating has been ac-
tivated. Press the left side of the switch to select
the warmest setting or the right side of
the switch to select the average setting.
The middle position of the switch is off.
The indicator light in the switch lights
off.
The system, which has a thermostat,
decides whether heating is needed de-
pending on the position selected and
stops heating once a certain tempera-
ture has been reached.
REAR BENCH SEAT (3/3)
For safety reasons, carry
out any adjustments when
the vehicle is not being
driven.
45