2018 PEUGEOT EXPERT clock
[x] Cancel search: clockPage 99 of 416
97
Anti-slip net
Installing the net
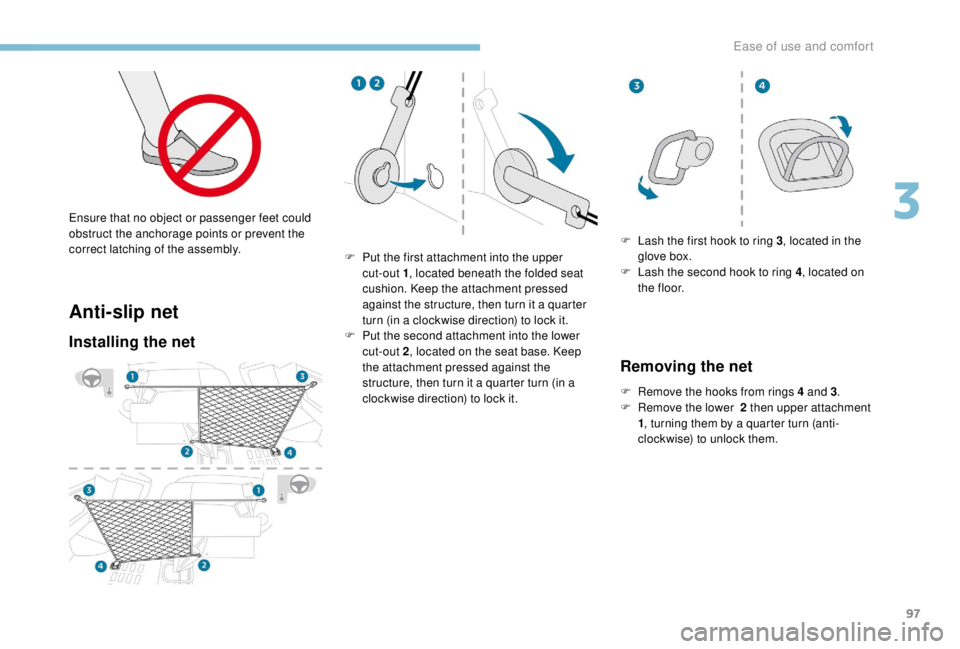
F Put the first attachment into the upper cut-out 1 , located beneath the folded seat
cushion. Keep the attachment pressed
against the structure, then turn it a quarter
turn (in a clockwise direction) to lock it.
F
P
ut the second attachment into the lower
cut-out 2 , located on the seat base. Keep
the attachment pressed against the
structure, then turn it a quarter turn (in a
clockwise direction) to lock it.
Ensure that no object or passenger feet could
obstruct the anchorage points or prevent the
correct latching of the assembly.
F
L
ash the first hook to ring 3
, located in the
glove box.
F L ash the second hook to ring 4, located on
t h e f l o o r.
Removing the net
F Remove the hooks from rings 4 and 3.
F R emove the lower 2 then upper attachment
1 , turning them by a quarter turn (anti-
clockwise) to unlock them.
3
Ease of use and comfort
Page 128 of 416
126
Using these two clocks and according to
season you can, for example, select one
or the other start time.
A message in the screen confirms your
choice.
Long range remote control
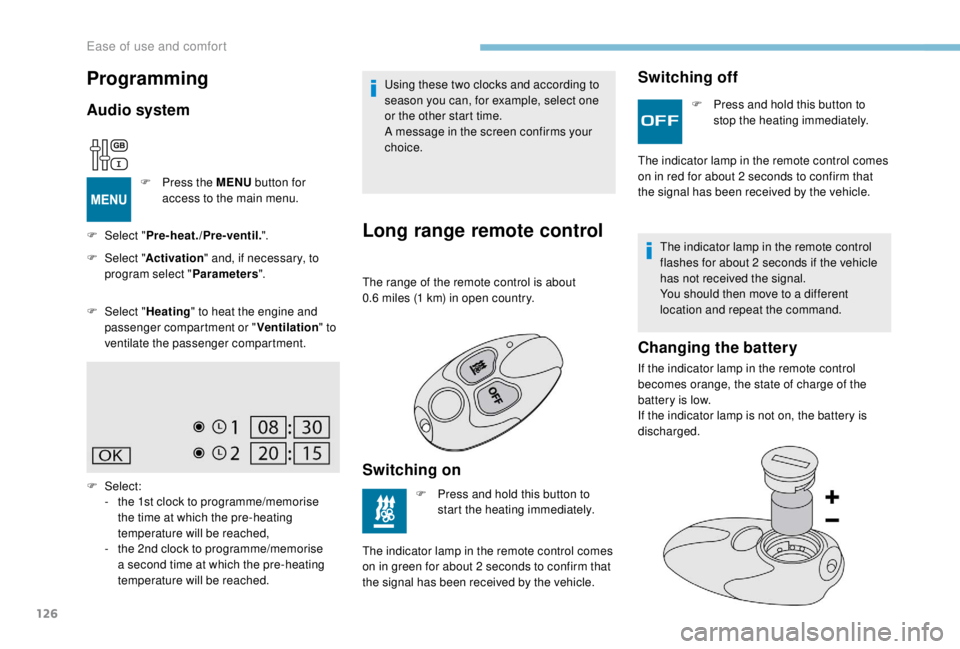
The range of the remote control is about
0.6 miles (1 km) in open country.
Switching on
F Press and hold this button to start the heating immediately.
The indicator lamp in the remote control comes
on in green for about 2
seconds to confirm that
the signal has been received by the vehicle.
Switching off
F Press and hold this button to stop the heating immediately.
The indicator lamp in the remote control comes
on in red for about 2
seconds to confirm that
the signal has been received by the vehicle.
The indicator lamp in the remote control
flashes for about 2
seconds if the vehicle
has not received the signal.
You should then move to a different
location and repeat the command.
Changing the battery
If the indicator lamp in the remote control
becomes orange, the state of charge of the
battery is low.
If the indicator lamp is not on, the battery is
discharged.
Programming
Audio system
F Press the MENU button for
access to the main menu.
F
Sel
ect " Pre-heat./Pre-ventil. ".
F
Sel
ect " Activation " and, if necessary, to
program select " Parameters".
F
Sel
ect " Heating " to heat the engine and
passenger compartment or " Ventilation" to
ventilate the passenger compartment.
F
Select:
-
t
he 1st clock to programme/memorise
the time at which the pre-heating
temperature will be reached,
-
t
he 2nd clock to programme/memorise
a second time at which the pre-heating
temperature will be reached.
Ease of use and comfort
Page 239 of 416
237
Fuel
Tank capacity: approximately 69 litres.
Opening the fuel filler flap
If your vehicle is fitted with Stop & Start,
never refuel with the engine in STOP
mode; you must switch off the ignition
using the key, or the START/STOP button
if your vehicle has
K
eyless Entry and
Starting. At least 8
litres of fuel must be added, in order
to be registered by the fuel gauge.
Opening the cap can cause an air intake noise.
This vacuum is quite normal, caused by the air
tightness of the fuel system.
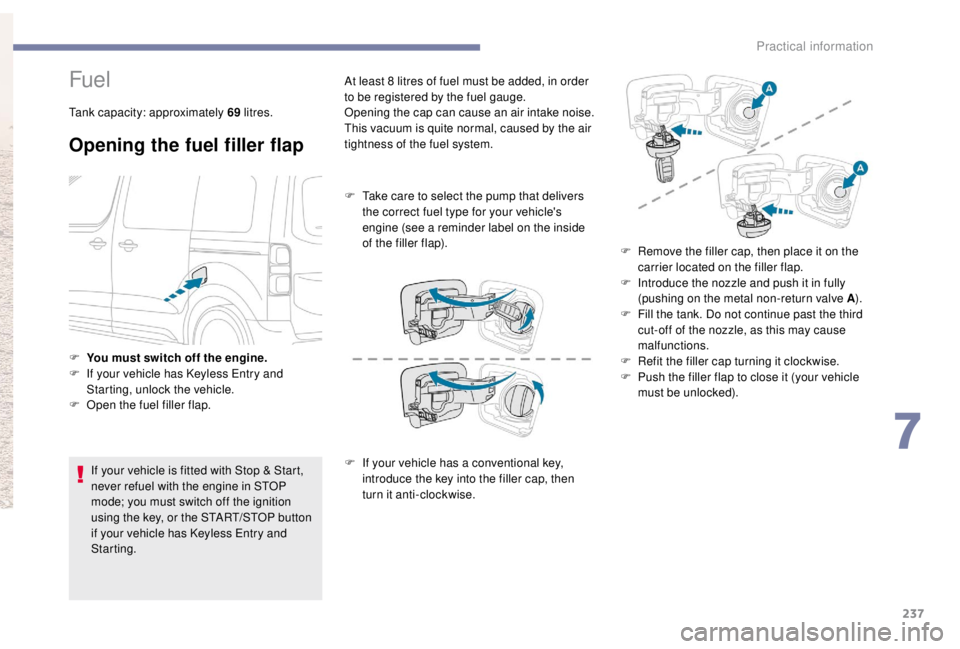
F
T
ake care to select the pump that delivers
the correct fuel type for your vehicle's
engine (see a reminder label on the inside
of the filler flap).
F I f your vehicle has a conventional key,
introduce the key into the filler cap, then
turn it anti-clockwise.
F
Y
ou must switch off the engine.
F
I
f your vehicle has
K
eyless Entry and
Starting, unlock the vehicle.
F
O
pen the fuel filler flap. F
R
emove the filler cap, then place it on the
carrier located on the filler flap.
F
I
ntroduce the nozzle and push it in fully
(pushing on the metal non-return valve A ).
F
F
ill the tank. Do not continue past the third
cut-off of the nozzle, as this may cause
malfunctions.
F
R
efit the filler cap turning it clockwise.
F
P
ush the filler flap to close it (your vehicle
must be unlocked).
7
Practical information
Page 257 of 416
255
Important: if your vehicle's AdBlue®
tank is completely empty – which is
confirmed by the alert messages and the
impossibility of starting the engine – you
must add at least 4
litres and no more than
10
litres.
F
A
fter emptying the container or bottle, wipe
away any spillage around the tank filler
using a damp cloth.
If any fluid is spilt or splashed, wash
immediately with cold water or wipe with a
damp cloth.
If the fluid has crystallised, clean it off
using a sponge and hot water.
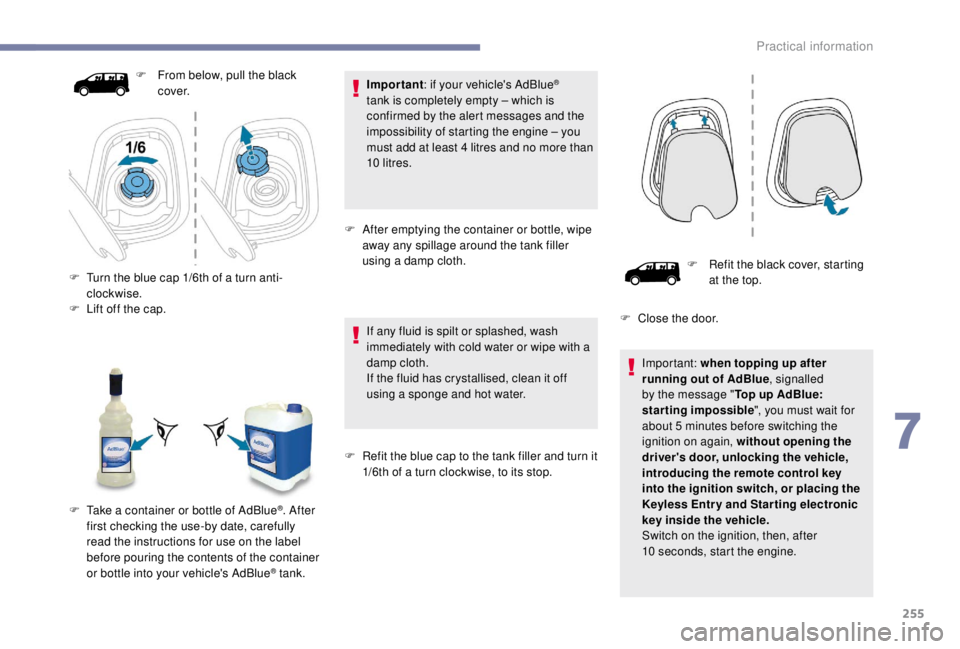
F
R
efit the blue cap to the tank filler and turn it
1/6th of a turn clockwise, to its stop.
F
F
rom below, pull the black
c ove r.
F
T
urn the blue cap 1/6th of a turn anti-
clockwise.
F
L
ift off the cap.
F
T
ake a container or bottle of AdBlue
®. After
first checking the use-by date, carefully
read the instructions for use on the label
before pouring the contents of the container
or bottle into your vehicle's AdBlue
® tank. F
R
efit the black cover, starting
at the top.
F
C
lose the door.
Important: when topping up after
running out of AdBlue , signalled
by the message " Top up AdBlue:
starting impossible ", you must wait for
about 5 minutes before switching the
ignition on again, without opening the
driver's door, unlocking the vehicle,
introducing the remote control key
into the ignition switch, or placing the
K
eyless Entr y and Star ting electronic
key inside the vehicle.
Switch on the ignition, then, after
10
seconds, start the engine.
7
Practical information
Page 266 of 416
264
Removing the pipe and
cartridge
Take care of fluid discharge.
The expiry date of the fluid is indicated on
the cartridge.
The sealant cartridge is designed for
single use; it must be replaced even if only
partly used.
After use, do not discard the cartridge into
the environment, take it to an authorised
waste disposal site or a PEUGEOT dealer.
Do not forget to obtain a new sealant
cartridge, available from PEUGEOT
dealers or from a qualified workshop.
F
T
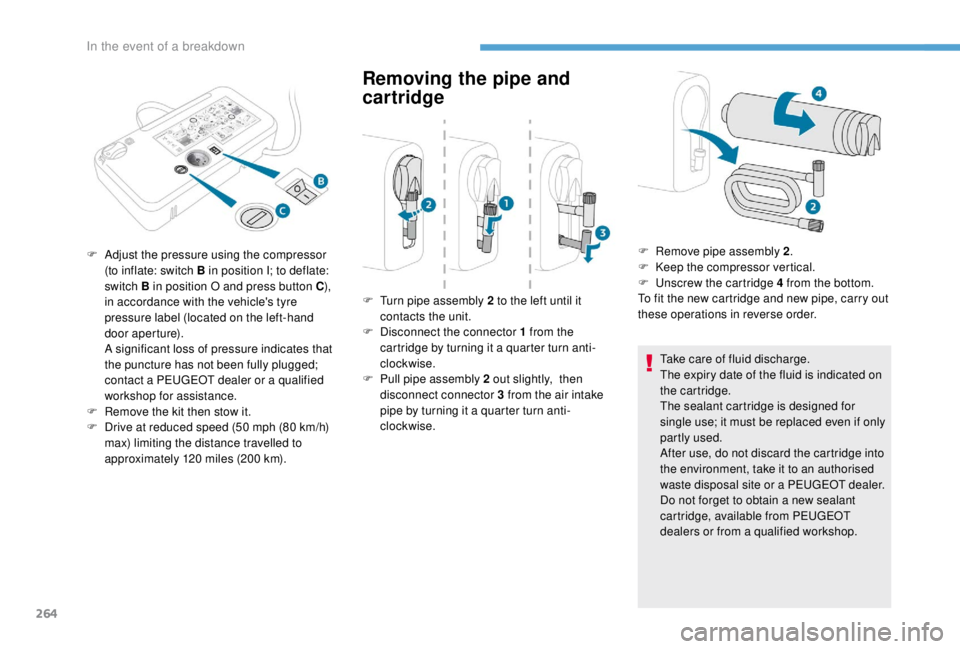
urn pipe assembly 2
to the left until it
contacts the unit.
F
D
isconnect the connector 1
from the
cartridge by turning it a quarter turn anti-
clockwise.
F
P
ull pipe assembly 2 out slightly, then
disconnect connector 3
from the air intake
pipe by turning it a quarter turn anti-
clockwise.
F
A
djust the pressure using the compressor
(to inflate: switch B in position I; to deflate:
switch B in position O and press button C ),
in accordance with the vehicle's tyre
pressure label (located on the left-hand
door aperture). A s
ignificant loss of pressure indicates that
the puncture has not been fully plugged;
contact a PEUGEOT dealer or a qualified
workshop for assistance.
F
R
emove the kit then stow it.
F
D
rive at reduced speed (50
mph (80 km/h)
max) limiting the distance travelled to
approximately 120
miles (200
km). F
R
emove pipe assembly 2
.
F
K
eep the compressor vertical.
F
U
nscrew the cartridge 4 from the bottom.
To fit the new cartridge and new pipe, carry out
these operations in reverse order.
In the event of a breakdown
Page 269 of 416

267
Access to the spare wheel
F Access to the spare wheel is from the rear.
F O pen the side-hinged rear doors or the
tailgate, according to the configuration of
your vehicle.
To avoid any unwanted opening of the
electric side door(s), deactivate the
" Hands-Free Tailgate Access " function
in the vehicle configuration menu.
For more information on the Hands-
free sliding side door , refer to the
corresponding section. F
I
f your vehicle is fitted with a towbar, raise
the rear of the vehicle using the jack (must
be at jacking point B ) to allow sufficient
space to remove the spare wheel.
Removing
F Access the carrier bolt, located on the rear door sill. F
T
urn the bolt anti-clockwise using the
wheelbrace (about 14 turns) until the carrier
is low enough to allow the carrier hook to be
disengaged.
F
R
elease the carrier from the hook, take the
spare wheel and place it next to the wheel
to be changed.
8
In the event of a breakdown
Page 274 of 416
272
Changing a bulb
The headlamps have polycarbonate
lenses with a protective coating:
F
d
o not clean them using a dr y or
abrasive cloth, nor with a detergent
or solvent product,
F
u
se a sponge and soapy water or a pH
neutral product,
F
w
hen using a high pressure washer
on persistent marks, do not keep the
lance directed towards the lamps or
their edges for too long, so as not to
damage their protective coating and
seals.
Changing a bulb should only be done after
the headlamp has been switched off for
several minutes (risk of serious burns).
F
D
o not touch the bulb directly with your
fingers, use a lint-free cloth.
It is essential only to use anti-ultraviolet
(UV) type bulbs, so as not to damage the
headlamp.
Always replace a failed bulb with a new
bulb with the same type and specification. In some weather conditions (e.g. low
temperature or humidity), the presence
of misting on the internal sur face of the
glass of the headlamps and rear lamps is
normal; it disappears after the lamps have
been on for a few minutes.
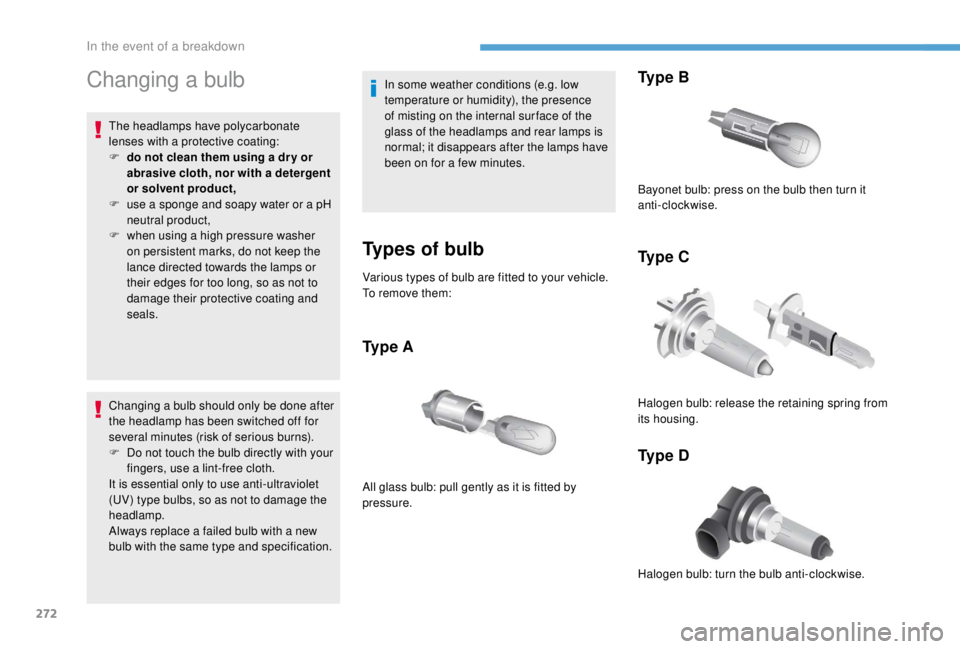
Types of bulb
Various types of bulb are fitted to your vehicle.
To remove them:
Ty p e A
Ty p e B
Ty p e C
Ty p e D
All glass bulb: pull gently as it is fitted by
pressure. Bayonet bulb: press on the bulb then turn it
anti-clockwise.
Halogen bulb: release the retaining spring from
its housing.
Halogen bulb: turn the bulb anti-clockwise.
In the event of a breakdown
Page 278 of 416
276
Direction indicators (halogen
headlamps)
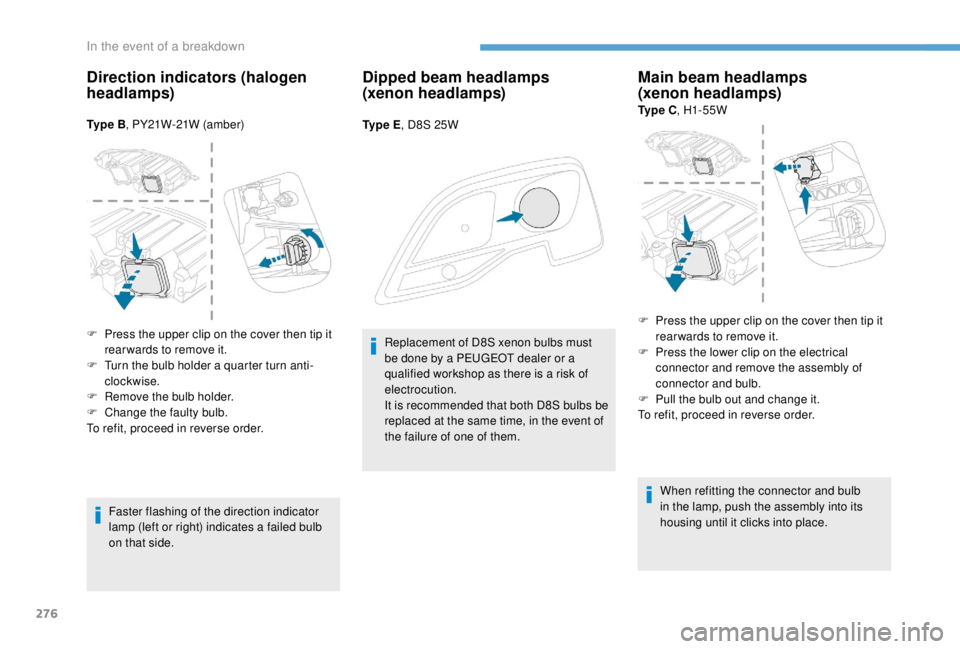
Ty p e B, PY21W-21W (amber)
Faster flashing of the direction indicator
lamp (left or right) indicates a failed bulb
on that side.
Dipped beam headlamps
(xenon headlamps)
Ty p e E , D8S 25W
Replacement of D8S xenon bulbs must
be done by a PEUGEOT dealer or a
qualified workshop as there is a risk of
electrocution.
It is recommended that both D8S bulbs be
replaced at the same time, in the event of
the failure of one of them.
Main beam headlamps
(xenon headlamps)
Ty p e C , H1- 55W
When refitting the connector and bulb
in the lamp, push the assembly into its
housing until it clicks into place.
F
P
ress the upper clip on the cover then tip it
rear wards to remove it.
F
T
urn the bulb holder a quarter turn anti-
clockwise.
F
R
emove the bulb holder.
F
C
hange the faulty bulb.
To refit, proceed in reverse order. F
P
ress the upper clip on the cover then tip it
rear wards to remove it.
F
P
ress the lower clip on the electrical
connector and remove the assembly of
connector and bulb.
F
P
ull the bulb out and change it.
To refit, proceed in reverse order.
In the event of a breakdown