Page 85 of 416

83
Remote control failure
To deactivate the monitoring functions:
F U nlock the vehicle using the key (integrated
with the remote control if equipped with
Keyless Entry and Starting) in the driver's
door lock.
F
O
pen the door; the alarm is triggered.
F
S
witch on the ignition; the alarm stops; the
indicator lamp in the button goes off.
Locking the vehicle without
activating the alarm
F Lock or deadlock the vehicle using the key (integrated with the remote control if
equipped with
K
eyless Entry and Starting)
in the driver's door lock.
Malfunction
When the ignition is switched on,
fixed illumination of the button’s
indicator lamp indicates a fault in the
system.
Have it checked by a PEUGEOT
dealer or a qualified workshop.
Automatic activation
This function is either not available, an option
or is standard.
2
minutes after the last opening element (door
or tailgate) is closed, the system is activated
automatically.
F
T
o avoid triggering the alarm on entering
the vehicle, first press the unlocking button
on the remote control or unlock the vehicle
using the Keyless Entry and Starting
system.
Electric windows
1 Left electric window control.
2 R ight electric window control.
Manual mode
Press or pull the control gently, without
exceeding the resistance point. The window
stops as soon as the control is released.
Automatic mode
Press or pull the control fully, beyond the
resistance point. The window opens or closes
completely when the switch is released.
Pressing the switch again stops the movement
of the window.
The electrical functions of the electric windows
are deactivated:
-
a
pproximately 45 seconds after the ignition
is switched off,
-
a
fter one of the front doors is opened, if the
ignition is off.
2
Access
Page 131 of 416
129
Automatic operation
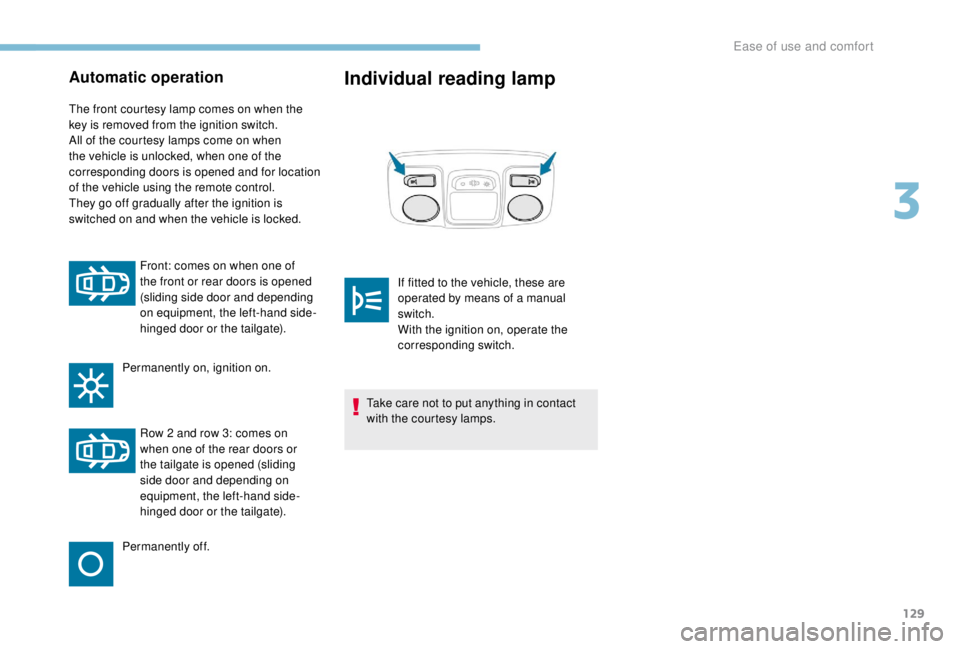
The front courtesy lamp comes on when the
key is removed from the ignition switch.
All of the courtesy lamps come on when
the vehicle is unlocked, when one of the
corresponding doors is opened and for location
of the vehicle using the remote control.
They go off gradually after the ignition is
switched on and when the vehicle is locked.Front: comes on when one of
the front or rear doors is opened
(sliding side door and depending
on equipment, the left-hand side-
hinged door or the tailgate).
Permanently on, ignition on.
Row 2
and row 3: comes on
when one of the rear doors or
the tailgate is opened (sliding
side door and depending on
equipment, the left-hand side-
hinged door or the tailgate).
Permanently off.
Individual reading lamp
Take care not to put anything in contact
with the courtesy lamps. If fitted to the vehicle, these are
operated by means of a manual
switch.
With the ignition on, operate the
corresponding switch.
3
Ease of use and comfort
Page 176 of 416
174
Manual child lock
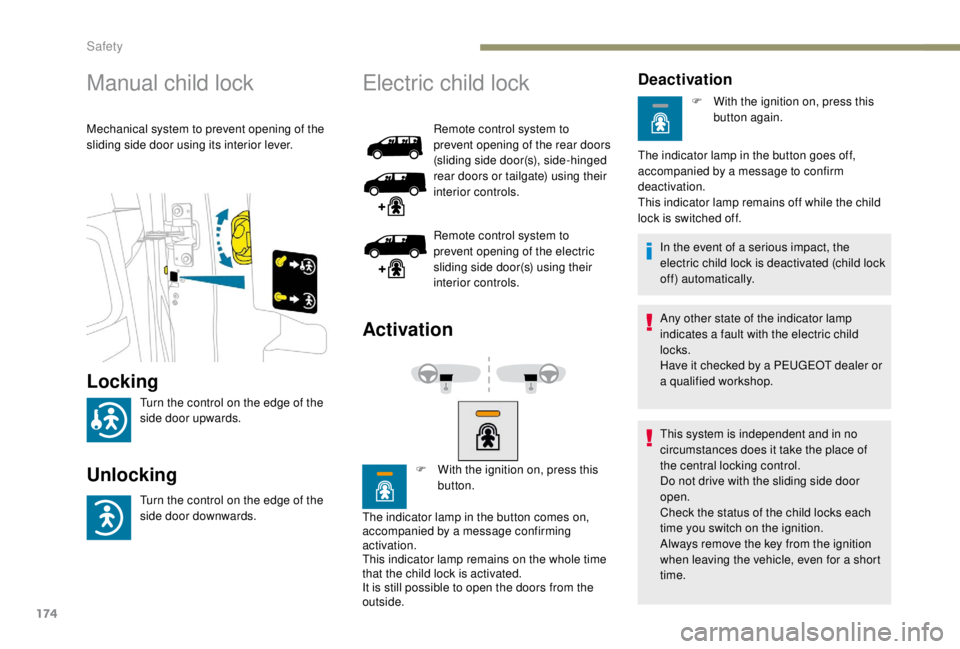
Mechanical system to prevent opening of the
sliding side door using its interior lever.
Electric child lock
Remote control system to
prevent opening of the rear doors
(sliding side door(s), side-hinged
rear doors or tailgate) using their
interior controls.
Remote control system to
prevent opening of the electric
sliding side door(s) using their
interior controls.
Activation
F With the ignition on, press this button.
Deactivation
F With the ignition on, press this button again.
The indicator lamp in the button comes on,
accompanied by a message confirming
activation.
This indicator lamp remains on the whole time
that the child lock is activated.
It is still possible to open the doors from the
outside. The indicator lamp in the button goes off,
accompanied by a message to confirm
deactivation.
This indicator lamp remains off while the child
lock is switched off.
In the event of a serious impact, the
electric child lock is deactivated (child lock
off) automatically.
Any other state of the indicator lamp
indicates a fault with the electric child
locks.
Have it checked by a PEUGEOT dealer or
a qualified workshop.
This system is independent and in no
circumstances does it take the place of
the central locking control.
Do not drive with the sliding side door
open.
Check the status of the child locks each
time you switch on the ignition.
Always remove the key from the ignition
when leaving the vehicle, even for a short
time.
Locking
Turn the control on the edge of the
side door upwards.
Unlocking
Turn the control on the edge of the
side door downwards.
Safety
Page 232 of 416
230
They are represented by lines marked "on
the ground" and do not allow the position
of the vehicle to be determined relative to
tall obstacles (for example: other vehicles,
e t c .) .
Some deformation of the image is normal.
It is normal to see part of the number plate
displayed at the bottom of the screen.
Opening the tailgate or rear door
(depending on equipment) can interfere
with the display.
If a side door is open, allow for the space
it occupies.Check the cleanliness of the camera lens
regularly.
Clean the reversing camera regularly
using a soft, dry cloth.
Visiopark 1
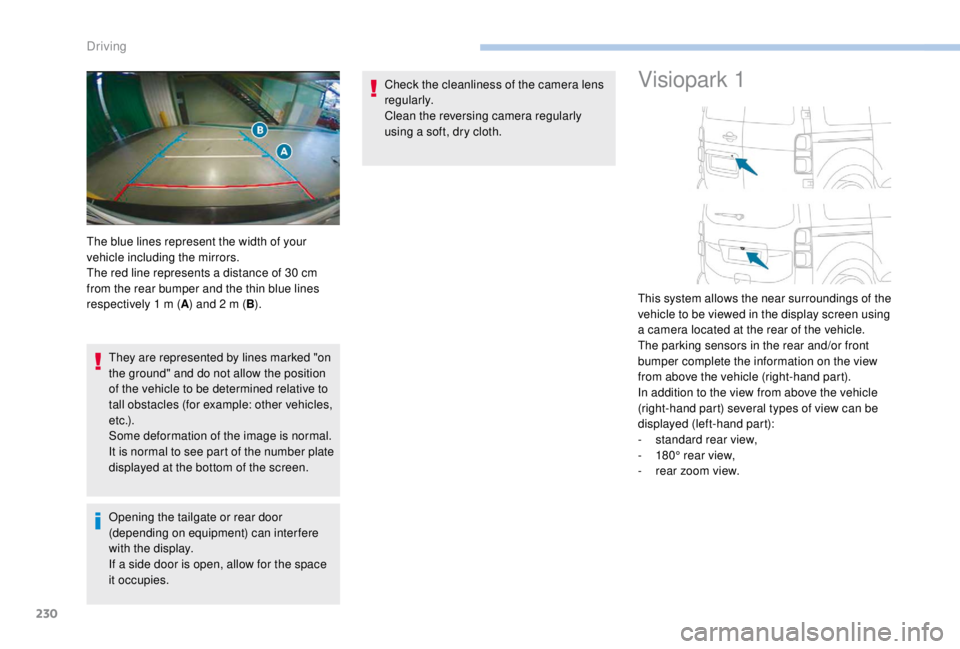
The blue lines represent the width of your
vehicle including the mirrors.
The red line represents a distance of 30
cm
from the rear bumper and the thin blue lines
respectively 1
m (A) and 2
m (B). This system allows the near surroundings of the
vehicle to be viewed in the display screen using
a camera located at the rear of the vehicle.
The parking sensors in the rear and/or front
bumper complete the information on the view
from above the vehicle (right-hand part).
In addition to the view from above the vehicle
(right-hand part) several types of view can be
displayed (left-hand part):
-
s
tandard rear view,
-
1
80° rear view,
-
r
ear zoom view.
Driving
Page 258 of 416
256
Advice on care
General recommendations on the care and maintenance of your vehicle are given in the Warranty
and Maintenance Record.Observe the following recommendations to
avoid damaging your vehicle:
-
D
o not clean your headlamps with a dry
or abrasive cloth, nor with detergent or
solvent products. Use a sponge and
soapy water or a pH neutral product.
-
W
hen using a high pressure washer on
stubborn dirt, avoid prolonged use on the
headlamps, the lamps and their edges to
avoid damaging their lacquer finish and
seals.
-
N
ever use an abrasive sponge to clean
persistent dirt, as this may scratch the
paint sur face. Use a soft cloth with soapy
water instead.
-
W
hen washing your vehicle, never clean
the interior with a water jet.
-
W
hen washing your vehicle in an
automatic roller-brush car wash, be sure
to lock your doors and, depending on the
version you have, remove the key and
deactivate the " Hands-Free Tailgate
Access " system. It is always preferable to have paint
repairs carried out by a PEUGEOT dealer
or a qualified workshop.
-
N
ever use high pressure washing to
clean the engine compartment, in order
to avoid damaging the electrical units.
-
L
iquids carried in an open vessel (a cup
or mug) could be spilt, presenting a risk
of damage on contact with the controls
in the dashboard and centre console. Be
careful.
Depending on the version you have, in order
to avoid damaging or unpeeling the stickers
on the bodywork, you are strongly advised
against using high-pressure cleaners to
wash your vehicle. It is recommended that
you wash it using a high-flow water jet and
rinse the vehicle down using demineralised
water.
Only a microfibre cloth is recommended for
wiping your vehicle, it must be clean and
used gently.
Practical information
Page 269 of 416
267
Access to the spare wheel
F Access to the spare wheel is from the rear.
F O pen the side-hinged rear doors or the
tailgate, according to the configuration of
your vehicle.
To avoid any unwanted opening of the
electric side door(s), deactivate the
" Hands-Free Tailgate Access " function
in the vehicle configuration menu.
For more information on the Hands-
free sliding side door , refer to the
corresponding section. F
I
f your vehicle is fitted with a towbar, raise
the rear of the vehicle using the jack (must
be at jacking point B ) to allow sufficient
space to remove the spare wheel.
Removing
F Access the carrier bolt, located on the rear door sill. F
T
urn the bolt anti-clockwise using the
wheelbrace (about 14 turns) until the carrier
is low enough to allow the carrier hook to be
disengaged.
F
R
elease the carrier from the hook, take the
spare wheel and place it next to the wheel
to be changed.
8
In the event of a breakdown
Page 282 of 416
280
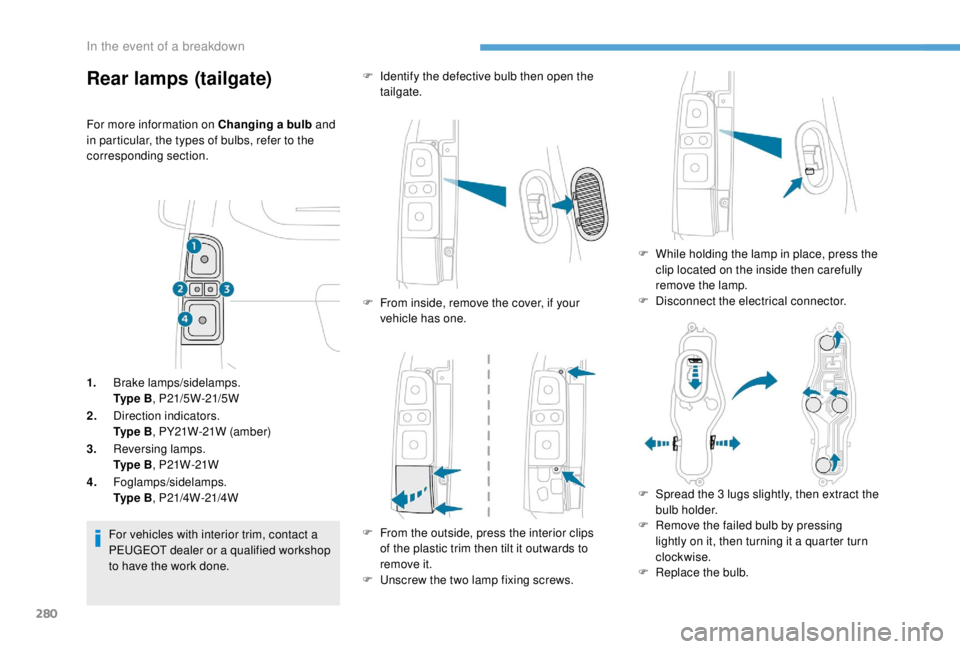
Rear lamps (tailgate)
For more information on Changing a bulb and
in particular, the types of bulbs, refer to the
corresponding section.
1. Brake lamps/sidelamps.
Ty p e B , P21/5W-21/5W
2. Direction indicators.
Ty p e B , PY21W-21W (amber)
3. Reversing lamps.
Ty p e B , P21W-21W
4. Foglamps/sidelamps.
Ty p e B , P21/4W-21/4W
For vehicles with interior trim, contact a
PEUGEOT dealer or a qualified workshop
to have the work done. F
I
dentify the defective bulb then open the
tailgate.
F
F
rom inside, remove the cover, if your
vehicle has one.
F
F
rom the outside, press the interior clips
of the plastic trim then tilt it outwards to
remove it.
F
U
nscrew the two lamp fixing screws.F
W
hile holding the lamp in place, press the
clip located on the inside then carefully
remove the lamp.
F
D
isconnect the electrical connector.
F
S
pread the 3 lugs slightly, then extract the
bulb holder.
F
R
emove the failed bulb by pressing
lightly on it, then turning it a quarter turn
clockwise.
F
R
eplace the bulb.
In the event of a breakdown
Page 283 of 416
281
To refit, proceed in reverse order.
Third brake lamp (tailgate)
Ty p e A, W5W-5W
F
O
pen the tailgate. F
U
nclip the trim at each end by turning it
upwards.
F
P
ull the trim to unclip the centre clips, then
remove it.
F
U
sing a screwdriver through the aperture,
push the lamp towards the outside.
F
D
isconnect the electrical connector.
F
R
emove the lamp.
F
T
urn the bulb holder a quarter turn anti-
clockwise.
F
C
hange the faulty bulb.
To refit, proceed in reverse order.
To refit the lamp and trim, press on them to clip
them in place.
Number plate lamps (tailgate)
Ty p e A , W5W-5W
F
I
nsert a thin screwdriver into one of the cut-
outs in the lens.
F
P
ush it outwards to unclip it.
F
R
emove the lens.
F
C
hange the faulty bulb.
To refit, press on the lens to clip it in place.
8
In the event of a breakdown