2018 PEUGEOT EXPERT spare wheel
[x] Cancel search: spare wheelPage 5 of 416

3
.
.
Driving recommendations 176
Starting/switching off the engine,
manual key, remote control
1
78
Starting/switching off the engine,
Keyless Entry and Starting
1
81
Anti-theft protection
1
85
Parking brake
1
85
Hill start assist
1
86
5-speed manual gearbox
1
87
6-speed manual gearbox
1
87
Gear shift indicator
1
88
Automatic gearbox
1
89
Electronic gearbox
1
94
Stop & Start
1
98
Head-up display
2
00
Memorising speeds
2
02
Recognition of speed limit signs and
recommendation
202
Spe
ed limiter
20
6
Cruise control
2
09
Adaptive cruise control
2
11
Collision Risk Alert and Active
Safety Brake
2
18
Lane departure warning system
2
22
Fatigue detection system
2
23
Blind spot monitoring system
2
25
Parking sensors
2
27
Reversing camera, interior mirror
2
29
Visiopark 1
2
30
Under-inflation detection
23
4Fuel
237
Diesel misfuel prevention 23 8
Compatibility of fuels
2
40
Snow chains
2
41
Towing a trailer
2
42
Energy economy mode
2
42
Load reduction mode
2
43
Roof bars/Roof rack
2
43
Changing a wiper blade
2
45
Bonnet
246
Engine
247
Checking levels
2
47
Checks
2
50
AdBlue
® (BlueHDi engines) 2 52
Advice on care 2 56
Warning triangle
2
57
Running out of fuel (Diesel)
2
57
Tool box
2
58
Temporary puncture repair kit
2
60
Spare wheel
26
6
Changing a bulb
2
72
Changing a fuse
2
83
12
V battery
2
88
To w i n g
2
9 2Characteristics of the engines and
towed loads
2
94
Dimensions
301
Identification markings
3
05
PEUGEOT Connect Nav
PEUGEOT Connect Radio
Bluetooth audio system
Driving Practical information
In the event of a breakdown Technical data
Alphabetical index
Audio equipment and telematics
.
Contents
Page 11 of 416
9
Limit the causes of excess
consumption
Spread loads throughout the vehicle; place
the heaviest items in the bottom of the boot,
as close as possible to the rear seats.
Limit the loads carried in the vehicle and
reduce wind resistance (roof bars, roof rack,
bicycle carrier, trailer, etc.). Preferably, use a
roof box.
Remove roof bars and roof racks after use.
At the end of winter, remove snow tyres and
refit your summer tyres.
Observe the recommendations
on maintenance
Check the tyre pressures regularly, when cold,
referring to the label in the door aperture,
driver's side.
Carry out this check in particular:
-
b
efore a long journey,
-
a
t each change of season,
-
a
fter a long period out of use.
Do not forget the spare wheel and the tyres on
any trailer or caravan. Have your vehicle ser viced regularly (engine
oil, oil filter, air filter, cabin filter, etc.) and
obser ve the schedule of operations in the
manufacturer's service schedule.
When filling the tank, do not continue after the
3rd
cut-off of the nozzle to avoid over flow.
At the wheel of your new vehicle, it is only
after the first 1,800
miles (3,000 kilometres)
that you will see the fuel consumption settle
down to a consistent average. With a BlueHDi Diesel engine, if the SCR
system is faulty, your vehicle becomes
polluting. Visit a PEUGEOT dealer or a
qualified workshop as soon as possible to
make your vehicle’s level of nitrogen oxide
emissions compliant to the standard.
.
Eco-driving
Page 221 of 416
219
After an impact, the function automatically
stops operating. Consult a PEUGEOT
dealer or a qualified workshop to have the
system checked.
Operating limits
In the following cases, deactivating the
system via the vehicle's configuration menu is
recommended:
-
w
hen towing a trailer or caravan,
-
w
hen a load on the roof rack extends
beyond the windscreen (for example: long
objects),
-
w
hen the vehicle is being towed, with the
engine running,
-
w
hen a "space-saver" type spare wheel is
fitted (if your vehicle has one),
-
w
hen on a rolling stand for a ser vice in a
workshop,
-
w
hen in an automatic car wash,
-
i
f the brake lamps are not working. Because of limits in the operation of the
system, it is possible that warnings are
not given, are given too late or seem
unjustified. Consequently, always stay
alert and be prepared to react at any time
to avoid an accident.
Collision Risk Alert
Depending on the degree of risk of collision
detected by the system and the alert threshold
chosen, different levels of alert can be
triggered and displayed in the instrument panel
or the head-up display.
This information also appears in the
head-up display. For more information
on the Head-up display, refer to the
corresponding section. Level 1
: visual alert only, warning
you that the vehicle ahead is very
close.
A message is displayed warning you
to be vigilant when approaching the
target vehicle.
This level of alert is based on the inter-vehicle
time between your vehicle and the vehicle in
front.
Level 2: visual and audible alert,
warning you that a collision is
imminent.
A message indicating that you
should brake is displayed.
This level of alert is based on the time before
collision. It takes account of the vehicle
dynamics, the speed of your vehicle and the
one in front, the environmental conditions, the
operation of the vehicle (cornering, pedals
pressed, etc.) to trigger the alert at the best
moment.
6
Driving
Page 236 of 416
234
Under-inflation detection
This system automatically monitors the tyre
pressure while driving.
The system monitors the pressure in all four
tyres, once the vehicle is moving.
It compares the information given by the
wheel speed sensors with reference values,
which must be reinitialised after ever y tyre
pressure adjustment or wheel change.
The system triggers an alert as soon as it
detects a drop in the pressure of one or more
tyres.
The tyre under-inflation detection system
does not replace the need for vigilance on
the part of the driver.
This system still requires you to check the
tyre inflation pressure (including the spare
wheel) every month as well as before a
long journey.
Driving with under-inflated tyres impairs
handling, extends braking distances and
causes early tyre wear, particularly in
adverse conditions (heavy loads, high
speeds, long journeys). Driving with under-inflated tyres
increases fuel consumption.
The tyre pressure specifications for your
vehicle can be found on the tyre pressure
label.
For more information on the
Identification markings , refer to the
corresponding section.
Tyre pressures should be checked when
the tyres are "cold" (vehicle stopped for
1
hour or after a journey of less than
6
miles (10 km) at moderate speeds).
Other wise (when hot), add 0.3
bar to the
pressures shown on the label.
Snow chains
The system does not have to be
reinitialised after fitting or removing snow
chains. Spare wheel
The steel spare wheel does not have an
under-inflation detection sensor.
Under-inflation alert
This warning is indicated by
continuous illumination of the lamp,
an audible signal and, depending on
the equipment installed, a message
displayed on the screen.
F
R
educe speed immediately, avoid excessive
steering movements and sudden braking.
F
S
top the vehicle as soon as it is safe to do
so.
The loss of pressure detected does not
always cause visible bulging of the tyre.
Do not satisfy yourself with just a visual
check.
F
I
n the event of a puncture, use the
temporary puncture repair kit or the spare
wheel (depending on equipment),
or
F
i
f you have a compressor, such as the one
in the temporary puncture repair kit, check
the pressures of the four tyres when cold,
Driving
Page 262 of 416
260
These tools are specific to your vehicle
and may vary according to its equipment.
Do not use them for any other purpose.
Temporary puncture
repair kit
This kit comprises a compressor and a sealant
cartridge.
It allows the temporary repair of a tyre.
You are then able to go to the nearest garage.
It is designed to repair most punctures which
could affect the tyre, located on the tyre tread
or shoulder.
Its compressor can be used to check and
adjust the pressure of the tyre.
Access to the kit
For more information on the Tool box ,
refer to the corresponding section.
List of tools
These tools are specific to your vehicle and
may vary according to the level of equipment.
Do not use them for any other purposes.
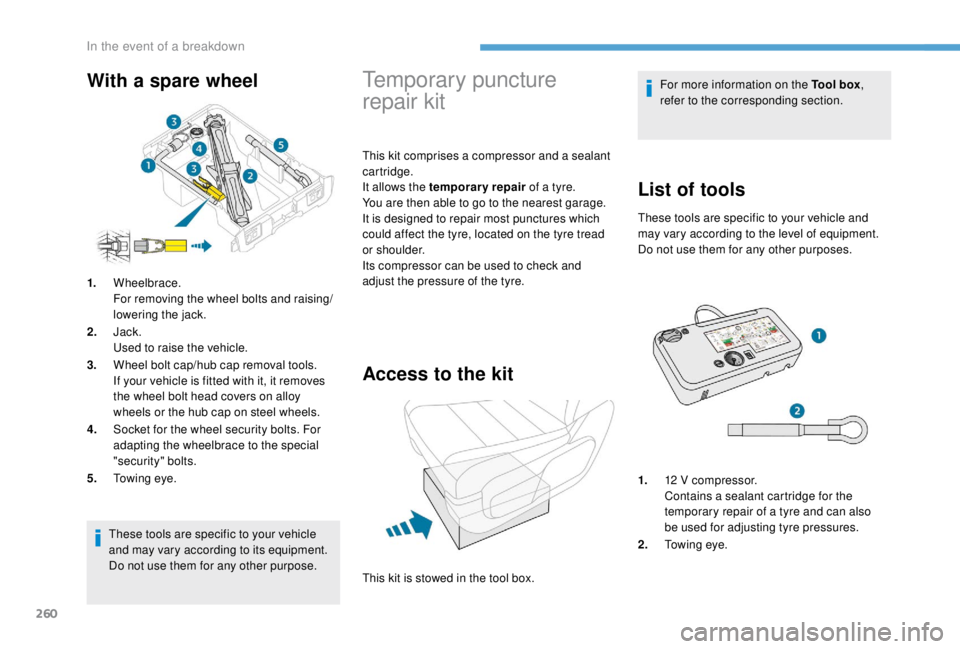
1. 12
V compressor.
Contains a sealant cartridge for the
temporary repair of a tyre and can also
be used for adjusting tyre pressures.
2. Towing eye.
With a spare wheel
1.Wheelbrace.
For removing the wheel bolts and raising/
lowering the jack.
2. Jack.
Used to raise the vehicle.
3. Wheel bolt cap/hub cap removal tools.
If your vehicle is fitted with it, it removes
the wheel bolt head covers on alloy
wheels or the hub cap on steel wheels.
4. Socket for the wheel security bolts. For
adapting the wheelbrace to the special
"security" bolts.
5. Towing eye.
This kit is stowed in the tool box.
In the event of a breakdown
Page 268 of 416
266
Spare wheel
Access to the tools
For more information on the Tool box,
refer to the corresponding section.
List of toolsFor more information on To w i n g , refer to
the corresponding section.
All of these tools are specific to your
vehicle and may vary depending on the
level of equipment.
Do not use them for any other purposes.
The jack must only be used to change
a wheel with a damaged or punctured tyre.
Do not use any jack other than the one
supplied with this vehicle.
If the vehicle does not have its original
jack, contact a PEUGEOT dealer or a
qualified workshop to obtain the correct
jack for it.
The jack meets European standards,
as defined in the Machinery Directive
2006/42/EC.
The jack does not require any
maintenance.
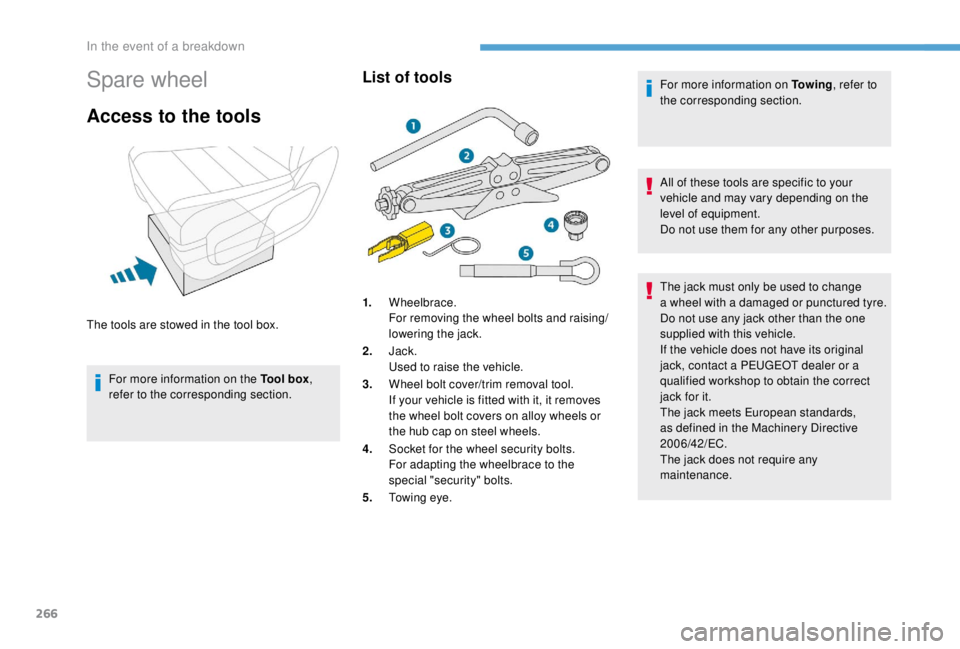
The tools are stowed in the tool box.
1.
Wheelbrace.
For removing the wheel bolts and raising/
lowering the jack.
2. Jack.
Used to raise the vehicle.
3. Wheel bolt cover/trim removal tool.
If your vehicle is fitted with it, it removes
the wheel bolt covers on alloy wheels or
the hub cap on steel wheels.
4. Socket for the wheel security bolts.
For adapting the wheelbrace to the
special "security" bolts.
5. Towing eye.
In the event of a breakdown
Page 269 of 416

267
Access to the spare wheel
F Access to the spare wheel is from the rear.
F O pen the side-hinged rear doors or the
tailgate, according to the configuration of
your vehicle.
To avoid any unwanted opening of the
electric side door(s), deactivate the
" Hands-Free Tailgate Access " function
in the vehicle configuration menu.
For more information on the Hands-
free sliding side door , refer to the
corresponding section. F
I
f your vehicle is fitted with a towbar, raise
the rear of the vehicle using the jack (must
be at jacking point B ) to allow sufficient
space to remove the spare wheel.
Removing
F Access the carrier bolt, located on the rear door sill. F
T
urn the bolt anti-clockwise using the
wheelbrace (about 14 turns) until the carrier
is low enough to allow the carrier hook to be
disengaged.
F
R
elease the carrier from the hook, take the
spare wheel and place it next to the wheel
to be changed.
8
In the event of a breakdown
Page 270 of 416
268
RefittingTyre in the carrier
If you want to change the size of the tyre on the spare wheel, follow the instructions below.A punctured tyre of size 215
or 225 can be
placed in the carrier.
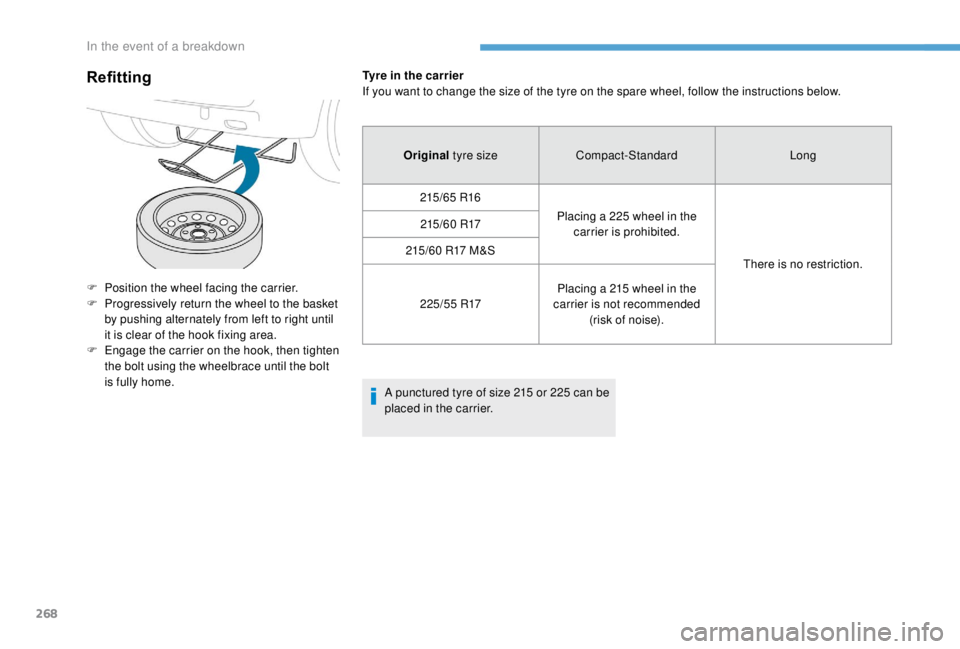
F
P
osition the wheel facing the carrier.
F
P
rogressively return the wheel to the basket
by pushing alternately from left to right until
it is clear of the hook fixing area.
F
E
ngage the carrier on the hook, then tighten
the bolt using the wheelbrace until the bolt
is fully home. Original
tyre size Compact-Standard Long
215/65
R16Placing a 225
wheel in the
carrier is prohibited.
There is no restriction.
215/60
R17
215/60
R17 M&S
2 2 5 / 5 5
R17Placing a 215
wheel in the
carrier is not recommended (risk of noise).
In the event of a breakdown