2018 PEUGEOT EXPERT rear view mirror
[x] Cancel search: rear view mirrorPage 4 of 416

2
.
.
Instrument panel 10
Warning and indicator lamps 1 3
Indicators
2
7
Lighting dimmer
3
4
Trip computer
3
5
Date and time adjustment
3
7
Key
39
Key, remote control
3
9
Keyless Entry and Starting
4
6
Locking/unlocking from inside
6
1
Front doors
6
3
Manual sliding side door(s)
6
4
Electric sliding side door(s)
6
6
Hands-free sliding side door(s)
7
4
Side-hinged rear doors
7
7
Tailgate
80
Alarm
81
Electric windows
8
3Steering wheel adjustment
8
5
Mirrors 85
Front seats
87
A
dditional adjustments
9
1
2-seat front bench seat
9
2
Moduwork
9
4
Fixed one-piece bench seat
9
9
Fixed rear seat and bench seat 1 02
Precautions for the seats and
bench seats 1 05
Fixed crew cab
1
06
Folding crew cab
1
07
Interior fittings
1
08
Loading area fittings
1
12
Seating area fittings
1
13
Heating
115
Manual air conditioning
1
15
Dual-zone automatic air conditioning
1
17
Recirculation of the interior air
1
20
Front demist – defrost
1
20
Door mirrors demist – defrost
1
21
Rear screen demist – defrost
1
22
Rear Heating – Air conditioning
1
24
Programmable Heating/Ventilation
1
25
Courtesy lamp(s)
1
28Lighting control stalk
1
30
Daytime running lamps
1
32
Automatic illumination of headlamps
1
32
Cornering lighting
1
34
Automatic headlamp dipping
1
35
Headlamp beam height
adjustment
137
Wiper control stalk
1
37
General safety recommendations
1
42
Hazard warning lamps
1
43
Emergency or assistance call
1
43
Hor n
14
5
Electronic stability control (ESC)
1
45
Grip control
1
48
Seat belts
1
50
Airbags
154
Child seats
1
57
Deactivating the passenger front airbag
1
59
ISOFIX mountings and child seats
1
66
Manual child lock
1
74
Electric child lock
1
74
Child lock on rear windows
1
75
Over view
Instruments
Access Ease of use and comfort
Safety
Lighting and visibility
Eco-driving
Instruments and controls 4
L abels 7
Eco-driving
8
Contents
Page 88 of 416

86
Heated mirrors
If your vehicle is so equipped:or
F
P
ress the heated mirror button.
As a safety measure, the mirrors should
be adjusted to reduce the blind spots.
The objects obser ved are, in reality, closer
than they appear.
Take this into account in order to
correctly judge the distance of vehicles
approaching from behind.
F
P
ress the heated rear window
button.
Electric unfolding
Door mirrors are unfolded electrically with
the remote control or key when the vehicle is
unlocked. Unless folding was selected with
control A , pull the control backwards in the
centre position.
Folding/unfolding during locking/unlocking
can be disabled. Contact a PEUGEOT
dealer or a qualified workshop.
If necessary, the mirrors can be folded in
manually. For more information on Rear
screen demist - defrost, refer to the
corresponding section.
Rear view mirror
Equipped with an anti-dazzle system, which
darkens the mirror glass and reduces the
nuisance to the driver caused by the sun,
headlamps from other vehicles, etc.
Manual model
Adjustment
F
A djust the mirror so that the glass is
directed correctly in the "day" position.
Day/night position
F
P
ull the lever to change to the "night"
anti-dazzle position.
F
P
ush the lever to change to the normal
"day" position.
Ease of use and comfort
Page 135 of 416
133
Switching on
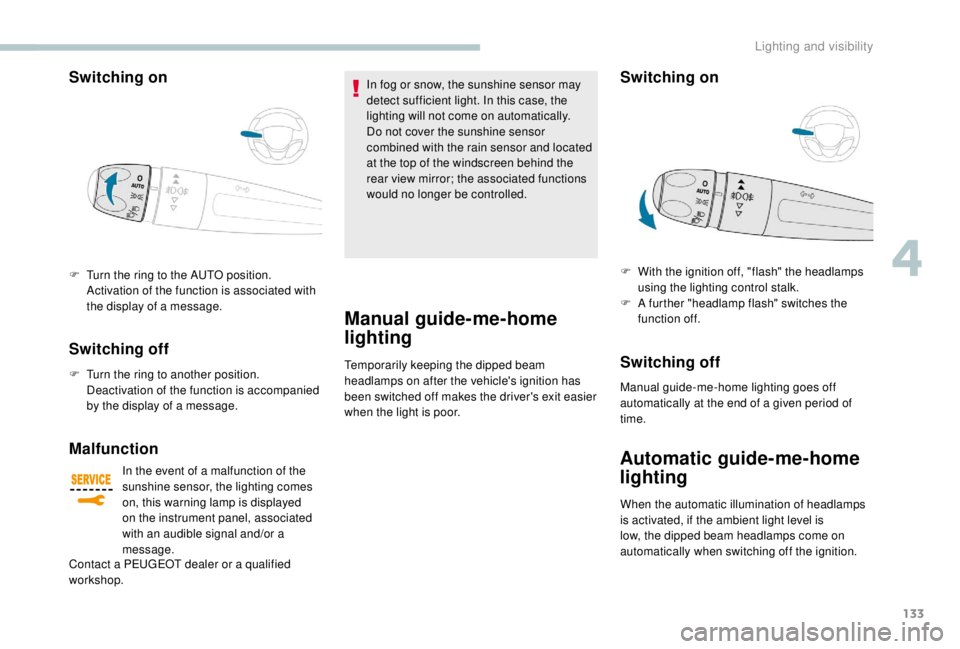
F Turn the ring to the AUTO position. Activation of the function is associated with
the display of a message.
Switching off
F Turn the ring to another position. Deactivation of the function is accompanied
by the display of a message.
Malfunction
In the event of a malfunction of the
sunshine sensor, the lighting comes
on, this warning lamp is displayed
on the instrument panel, associated
with an audible signal and/or a
message.
Contact a PEUGEOT dealer or a qualified
workshop. In fog or snow, the sunshine sensor may
detect sufficient light. In this case, the
lighting will not come on automatically.
Do not cover the sunshine sensor
combined with the rain sensor and located
at the top of the windscreen behind the
rear view mirror; the associated functions
would no longer be controlled.
Manual guide-me-home
lighting
Temporarily keeping the dipped beam
headlamps on after the vehicle's ignition has
been switched off makes the driver's exit easier
when the light is poor.
Switching on
Switching off
Manual guide-me-home lighting goes off
automatically at the end of a given period of
time.
Automatic guide-me-home
lighting
F With the ignition off, "flash" the headlamps
using the lighting control stalk.
F
A f
urther "headlamp flash" switches the
function off.
When the automatic illumination of headlamps
is activated, if the ambient light level is
low, the dipped beam headlamps come on
automatically when switching off the ignition.
4
Lighting and visibility
Page 140 of 416
138
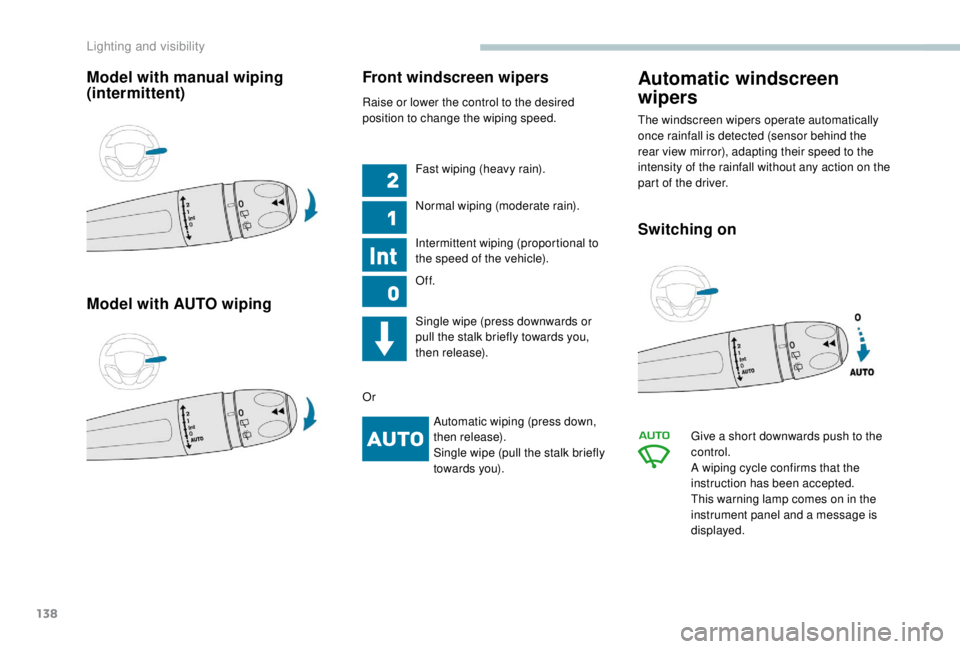
Model with manual wiping
(intermittent)
Model with AUTO wipingFront windscreen wipers
Raise or lower the control to the desired
position to change the wiping speed.
Fast wiping (heavy rain).
Normal wiping (moderate rain).
Intermittent wiping (proportional to
the speed of the vehicle).
Of f.
Single wipe (press downwards or
pull the stalk briefly towards you,
then release).
Or Automatic wiping (press down,
then release).
Single wipe (pull the stalk briefly
towards you).
Automatic windscreen
wipers
The windscreen wipers operate automatically
once rainfall is detected (sensor behind the
rear view mirror), adapting their speed to the
intensity of the rainfall without any action on the
part of the driver.
Switching on
Give a short downwards push to the
control.
A wiping cycle confirms that the
instruction has been accepted.
This warning lamp comes on in the
instrument panel and a message is
displayed.
Lighting and visibility
Page 227 of 416
225
Blind spot monitoring
system
A fixed warning lamp appears in the door mirror
on the side in question:
-
i
mmediately, when being overtaken,
-
a
fter about one second, when overtaking a
vehicle slowly. This system is designed to improve safety
when driving and is in no circumstances
a substitute for the use of the interior rear
view mirror and door mirrors. It is the
driver's responsibility to constantly check
the traffic, to assess the distances and
relative speeds of other vehicles and to
predict their movements before deciding
whether to change lane.
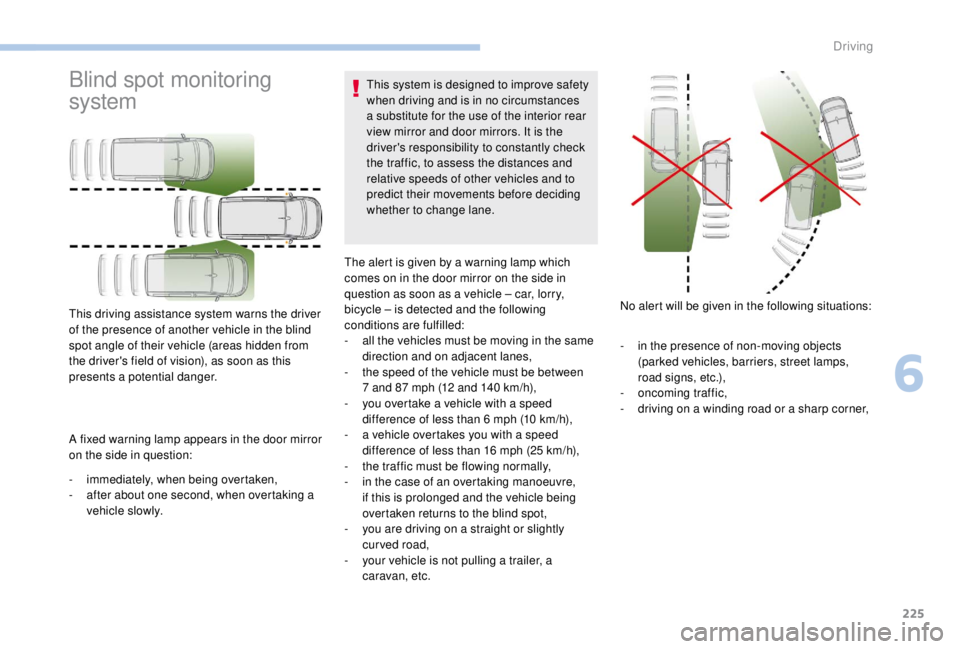
This driving assistance system warns the driver
of the presence of another vehicle in the blind
spot angle of their vehicle (areas hidden from
the driver's field of vision), as soon as this
presents a potential danger. The alert is given by a warning lamp which
comes on in the door mirror on the side in
question as soon as a vehicle – car, lorry,
bicycle – is detected and the following
conditions are fulfilled:
-
a
ll the vehicles must be moving in the same
direction and on adjacent lanes,
-
t
he speed of the vehicle must be between
7 and 87 mph (12 and 140 km/h),
-
y
ou overtake a vehicle with a speed
difference of less than 6 mph (10 km/h),
- a v ehicle overtakes you with a speed
difference of less than 16 mph (25 km/h),
-
t
he traffic must be flowing normally,
-
i
n the case of an overtaking manoeuvre,
if this is prolonged and the vehicle being
overtaken returns to the blind spot,
-
y
ou are driving on a straight or slightly
curved road,
-
y
our vehicle is not pulling a trailer, a
caravan, etc. No alert will be given in the following situations:
-
i
n the presence of non-moving objects
(parked vehicles, barriers, street lamps,
road signs, etc.),
-
on
coming traffic,
-
d
riving on a winding road or a sharp corner,
6
Driving
Page 232 of 416
230
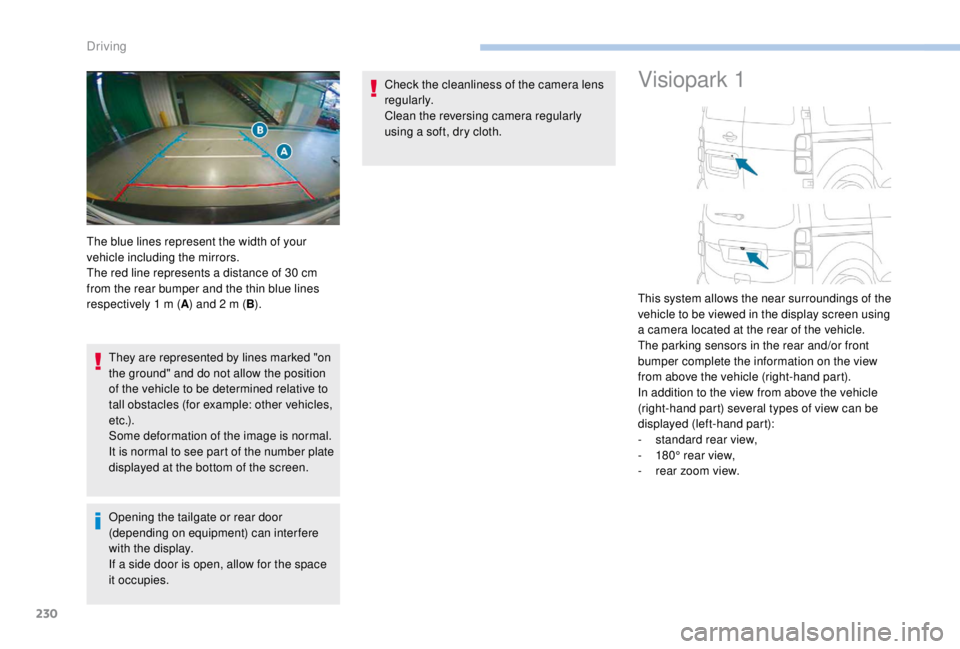
They are represented by lines marked "on
the ground" and do not allow the position
of the vehicle to be determined relative to
tall obstacles (for example: other vehicles,
e t c .) .
Some deformation of the image is normal.
It is normal to see part of the number plate
displayed at the bottom of the screen.
Opening the tailgate or rear door
(depending on equipment) can interfere
with the display.
If a side door is open, allow for the space
it occupies.Check the cleanliness of the camera lens
regularly.
Clean the reversing camera regularly
using a soft, dry cloth.
Visiopark 1
The blue lines represent the width of your
vehicle including the mirrors.
The red line represents a distance of 30
cm
from the rear bumper and the thin blue lines
respectively 1
m (A) and 2
m (B). This system allows the near surroundings of the
vehicle to be viewed in the display screen using
a camera located at the rear of the vehicle.
The parking sensors in the rear and/or front
bumper complete the information on the view
from above the vehicle (right-hand part).
In addition to the view from above the vehicle
(right-hand part) several types of view can be
displayed (left-hand part):
-
s
tandard rear view,
-
1
80° rear view,
-
r
ear zoom view.
Driving
Page 233 of 416
231
Principle of operation
The images provided by the cameras may
be distorted by the environment (external
conditions, driving mode, etc.).
The presence of areas in shadow, bright
sunlight, or poor lighting conditions may
make the image dark and reduce contrast.
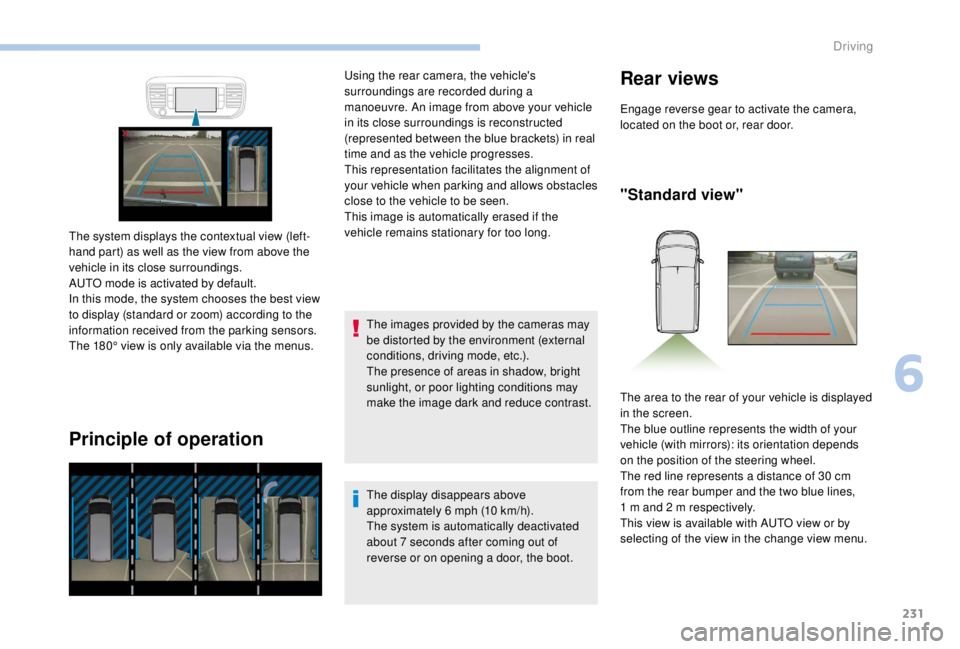
The system displays the contextual view (left-
hand part) as well as the view from above the
vehicle in its close surroundings.
AUTO mode is activated by default.
In this mode, the system chooses the best view
to display (standard or zoom) according to the
information received from the parking sensors.
The 180° view is only available via the menus. Using the rear camera, the vehicle's
surroundings are recorded during a
manoeuvre. An image from above your vehicle
in its close surroundings is reconstructed
(represented between the blue brackets) in real
time and as the vehicle progresses.
This representation facilitates the alignment of
your vehicle when parking and allows obstacles
close to the vehicle to be seen.
This image is automatically erased if the
vehicle remains stationary for too long.
The display disappears above
approximately 6 mph (10 km/h).
The system is automatically deactivated
about 7
seconds after coming out of
reverse or on opening a door, the boot.
Rear views
Engage reverse gear to activate the camera,
located on the boot or, rear door.
"Standard view"
The area to the rear of your vehicle is displayed
in the screen.
The blue outline represents the width of your
vehicle (with mirrors): its orientation depends
on the position of the steering wheel.
The red line represents a distance of 30
cm
from the rear bumper and the two blue lines,
1
m and 2 m respectively.
This view is available with AUTO view or by
selecting of the view in the change view menu.
6
Driving
Page 234 of 416
232
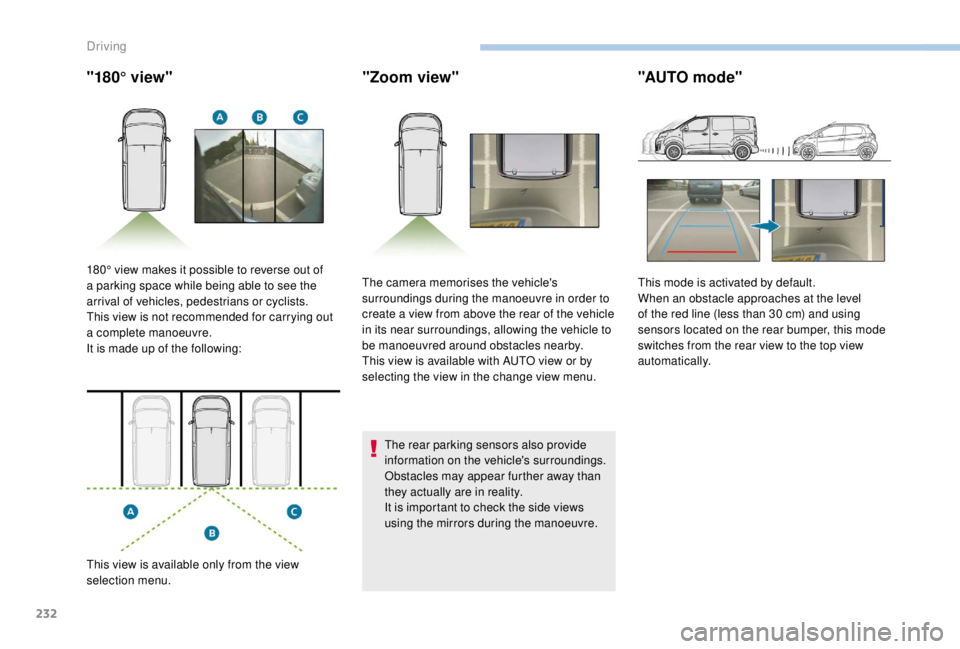
"180° view""Zoom view"
The rear parking sensors also provide
information on the vehicle's surroundings.
Obstacles may appear further away than
they actually are in reality.
It is important to check the side views
using the mirrors during the manoeuvre.
"AUTO mode"
180° view makes it possible to reverse out of
a parking space while being able to see the
arrival of vehicles, pedestrians or cyclists.
This view is not recommended for carrying out
a complete manoeuvre.
It is made up of the following:
This view is available only from the view
selection menu. The camera memorises the vehicle's
surroundings during the manoeuvre in order to
create a view from above the rear of the vehicle
in its near surroundings, allowing the vehicle to
be manoeuvred around obstacles nearby.
This view is available with AUTO view or by
selecting the view in the change view menu.
This mode is activated by default.
When an obstacle approaches at the level
of the red line (less than 30
cm) and using
sensors located on the rear bumper, this mode
switches from the rear view to the top view
automatically.
Driving