2018 PEUGEOT EXPERT air condition
[x] Cancel search: air conditionPage 4 of 416

2
.
.
Instrument panel 10
Warning and indicator lamps 1 3
Indicators
2
7
Lighting dimmer
3
4
Trip computer
3
5
Date and time adjustment
3
7
Key
39
Key, remote control
3
9
Keyless Entry and Starting
4
6
Locking/unlocking from inside
6
1
Front doors
6
3
Manual sliding side door(s)
6
4
Electric sliding side door(s)
6
6
Hands-free sliding side door(s)
7
4
Side-hinged rear doors
7
7
Tailgate
80
Alarm
81
Electric windows
8
3Steering wheel adjustment
8
5
Mirrors 85
Front seats
87
A
dditional adjustments
9
1
2-seat front bench seat
9
2
Moduwork
9
4
Fixed one-piece bench seat
9
9
Fixed rear seat and bench seat 1 02
Precautions for the seats and
bench seats 1 05
Fixed crew cab
1
06
Folding crew cab
1
07
Interior fittings
1
08
Loading area fittings
1
12
Seating area fittings
1
13
Heating
115
Manual air conditioning
1
15
Dual-zone automatic air conditioning
1
17
Recirculation of the interior air
1
20
Front demist – defrost
1
20
Door mirrors demist – defrost
1
21
Rear screen demist – defrost
1
22
Rear Heating – Air conditioning
1
24
Programmable Heating/Ventilation
1
25
Courtesy lamp(s)
1
28Lighting control stalk
1
30
Daytime running lamps
1
32
Automatic illumination of headlamps
1
32
Cornering lighting
1
34
Automatic headlamp dipping
1
35
Headlamp beam height
adjustment
137
Wiper control stalk
1
37
General safety recommendations
1
42
Hazard warning lamps
1
43
Emergency or assistance call
1
43
Hor n
14
5
Electronic stability control (ESC)
1
45
Grip control
1
48
Seat belts
1
50
Airbags
154
Child seats
1
57
Deactivating the passenger front airbag
1
59
ISOFIX mountings and child seats
1
66
Manual child lock
1
74
Electric child lock
1
74
Child lock on rear windows
1
75
Over view
Instruments
Access Ease of use and comfort
Safety
Lighting and visibility
Eco-driving
Instruments and controls 4
L abels 7
Eco-driving
8
Contents
Page 6 of 416

4
Instruments and controls
Without audio system
1.Storage compartments (if fitted).
2. 12
V accessory sockets (120 W).
Obser ve the maximum power rating to
avoid damaging your accessory.
3. Cup or can holder.
4. Horn.
Depending on your vehicle's equipment,
the storage compartments may be open
or closed. This configuration is shown for
illustrative purposes.
With audio system
Depending on your vehicle's equipment,
the storage compartments may be open
or closed. This configuration is shown for
illustrative purposes.
1.
Glove box.
2. 12 V accessory sockets (120 W).
Obser ve the maximum power rating to
avoid damaging your accessory.
3. USB port.
4. Auxiliary socket (JACK).
5. Cup or can holder.
6. Storage compartments.
7. Cooled glove box (if fitted).
Via a ventilation nozzle, if opened, engine
running and air conditioning on.
8. Upper glove box.
9. 230 V accessory socket (150 W, if fitted).
Obser ve the maximum power rating to
avoid damaging your accessory.
10. Horn.
Over view
Page 7 of 416

5
Steering mounted controls
1.External lighting/direction indicator
control stalk
2. Wiper/screenwash/trip computer control
stalk
3. Audio system adjustment controls
(depending on version).
4. Controls for Speed limiter/Cruise control/
Adaptive cruise control
5. Instrument panel display mode selection
wheel
6. Voice synthesis control (depending on
ve r s i o n).
Volume adjustment (depending on
ve r s i o n).
7. Audio system adjustment controls
(depending on version).
With touch screen
Depending on your vehicle's equipment,
the storage compartments may be open
or closed. This configuration is shown for
illustrative purposes.
1.
Open glove box.
2. 12 V accessory sockets (120 W).
Obser ve the maximum power rating to
avoid damaging your accessory.
3. USB port.
4. Auxiliary socket (JACK).
5. Cup or can holder.
6. Storage compartments.
7. Cooled glove box (if fitted).
Via a ventilation nozzle, if opened, engine
running and air conditioning on.
8. Upper glove box.
9. 230 V accessory socket (150 W, if fitted).
Obser ve the maximum power rating to
avoid damaging your accessory.
10. Horn.
.
Over view
Page 10 of 416

8
As a passenger, if you avoid connecting your
multimedia devices (film, music, video game
etc.), you will contribute towards limiting the
consumption of electrical energy, and so of
fuel.
Disconnect your portable devices before
leaving the vehicle.
Eco- driving
Eco-driving is a range of everyday practices that allow the motorist to optimise their fuel consumption and CO2 emissions.
Optimise the use of your
gearbox
With a manual gearbox, move off gently
and change up without waiting. During
acceleration, change up early.
With an automatic gearbox, favour automatic
mode and avoid pressing the accelerator
pedal heavily or suddenly.
The gear shift indicator invites you to engage
the most suitable gear: as soon as the
indication is displayed in the instrument panel,
follow it straight away.
For vehicles fitted with an automatic gearbox,
this indicator appears only in manual mode.
Drive smoothly
Maintain a safe distance between vehicles,
use engine braking rather than the
brake pedal, and press the accelerator
progressively. These practices contribute
towards a reduction in fuel consumption and
CO
2 emissions and also help reduce the
background traffic noise.
If your vehicle has cruise control, make use of
the system at speeds above 25
mph (40 km/h)
when the traffic is flowing well.
Control the use of your electrical
equipment
Before moving off, if the passenger
compartment is too warm, ventilate it by
opening the windows and air vents before
using the air conditioning.
Above 30
mph (50 km/h), close the windows
and leave the air vents open.
Consider using equipment that can help
keep the temperature in the passenger
compartment down (sunroof blind and window
blinds, etc.). Switch off the headlamps and front foglamps
when the ambient light level does not require
their use.
Avoid running the engine before moving off,
particularly in winter; your vehicle will warm up
much faster while driving. Unless it has automatic regulation, switch off
the air conditioning as soon as the desired
temperature has been reached.
Switch off the demisting and defrosting
controls, if these are not automatically
managed.
Switch off the heated seat as soon as
possible.
Eco-driving
Page 22 of 416

20
Warning/indicator lampStateCause Action/Observations
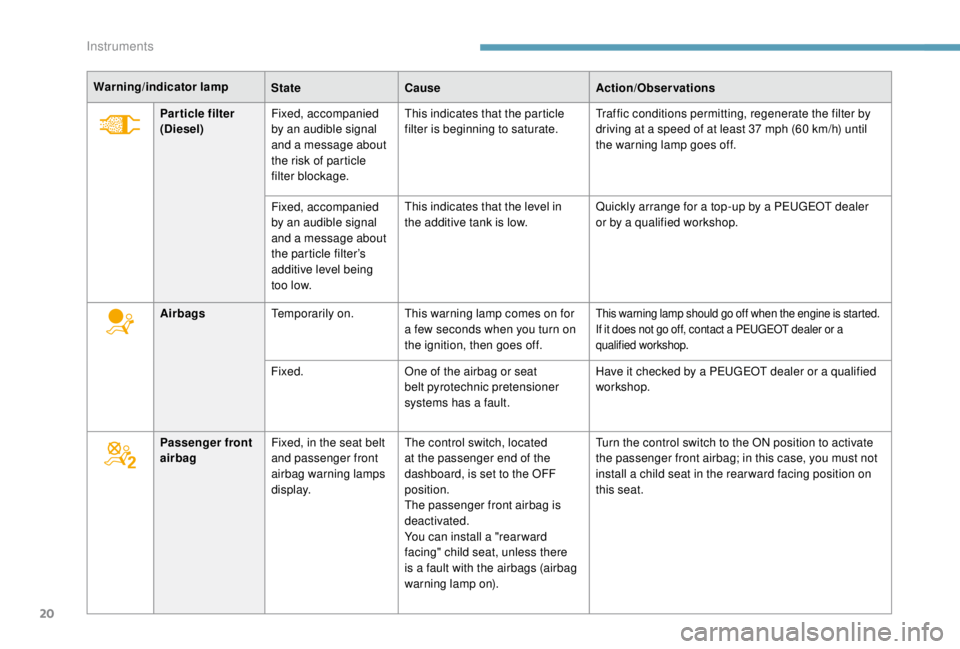
Airbags Temporarily on. This warning lamp comes on for
a few seconds when you turn on
the ignition, then goes off.
This warning lamp should go off when the engine is started.
If it does not go off, contact a PEUGEOT dealer or a
qualified workshop.
Fixed.One of the airbag or seat
belt pyrotechnic pretensioner
systems has a fault. Have it checked by a PEUGEOT dealer or a qualified
workshop.
Passenger front
airbag Fixed, in the seat belt
and passenger front
airbag warning lamps
display. The control switch, located
at the passenger end of the
dashboard, is set to the OFF
position.
The passenger front airbag is
deactivated.
You can install a "rearward
facing" child seat, unless there
is a fault with the airbags (airbag
warning lamp on). Turn the control switch to the ON position to activate
the passenger front airbag; in this case, you must not
install a child seat in the rear ward facing position on
this seat.
Par ticle filter
(Diesel)
Fixed, accompanied
by an audible signal
and a message about
the risk of particle
filter blockage. This indicates that the particle
filter is beginning to saturate.
Traffic conditions permitting, regenerate the filter by
driving at a speed of at least 37 mph (60 km/h) until
the warning lamp goes off.
Fixed, accompanied
by an audible signal
and a message about
the particle filter’s
additive level being
too low. This indicates that the level in
the additive tank is low.
Quickly arrange for a top-up by a PEUGEOT dealer
or by a qualified workshop.
Instruments
Page 100 of 416

98
Make sure that the size, shape and
volume of the loads inside the vehicle are
compatible with the highway code and
safety regulations and do not impair the
driver’s field of vision.
All loads must be appropriately secured
to prevent or minimise displacement and
prevent injury risks.
Install the anti-slip net (delivered with the
vehicle) when the seat is raised and the
partition flap removed.
Never use the net for any other
applications.
Regularly check the condition of the
net. When signs of wear or tear appear,
contact a PEUGEOT dealer to have
it replaced by a net that meets the
specifications required by PEUGEOT for
your vehicle.
Always fit the removable flap back into
place when you are not carrying any long
loads."Swivelling writing table"
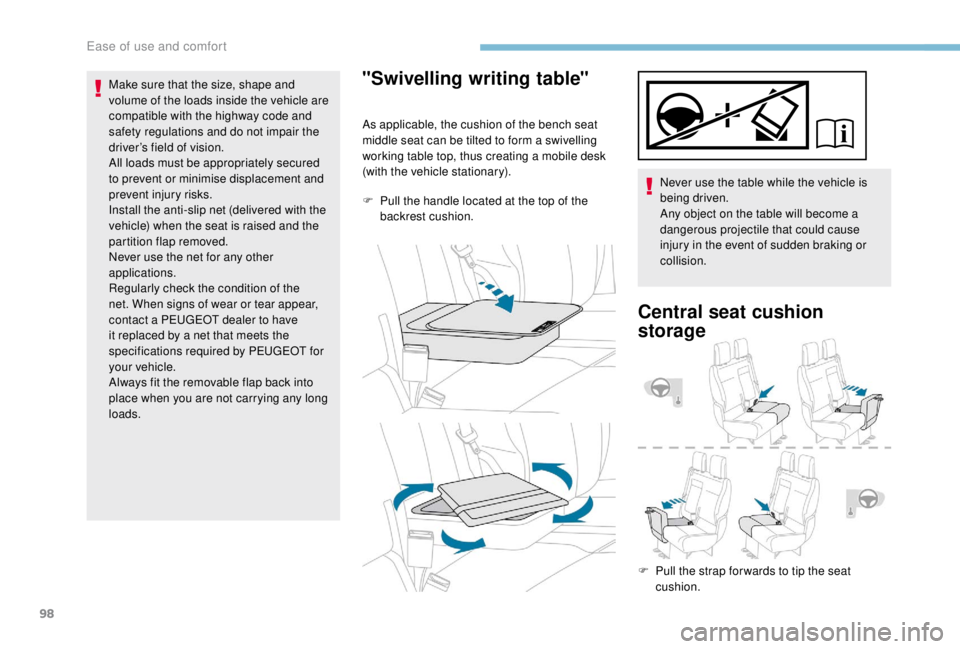
As applicable, the cushion of the bench seat
middle seat can be tilted to form a swivelling
working table top, thus creating a mobile desk
(with the vehicle stationary).
F
P
ull the handle located at the top of the
backrest cushion. Never use the table while the vehicle is
being driven.
Any object on the table will become a
dangerous projectile that could cause
injury in the event of sudden braking or
collision.
Central seat cushion
storage
F Pull the strap for wards to tip the seat
cushion.
Ease of use and comfort
Page 112 of 416

110
Front door pockets
Liquids carried in an open vessel (a cup
or mug) could be spilt, presenting a risk of
damage on contact with the controls in the
dashboard and centre console. Be careful.
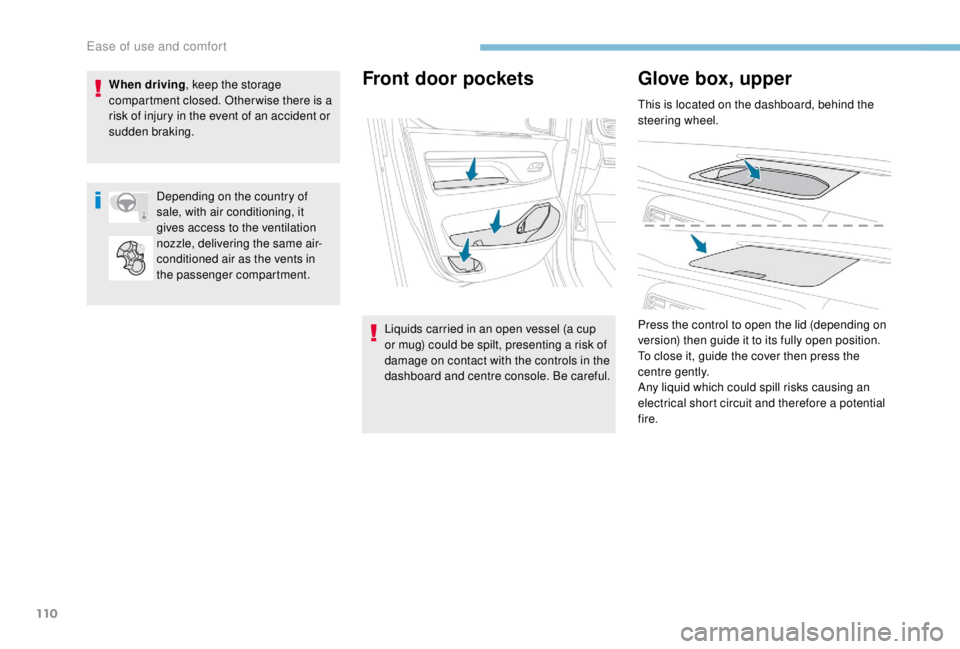
Glove box, upper
This is located on the dashboard, behind the
steering wheel.
Press the control to open the lid (depending on
version) then guide it to its fully open position.
To close it, guide the cover then press the
centre gently.
Any liquid which could spill risks causing an
electrical short circuit and therefore a potential
fire.
When driving
, keep the storage
compartment closed. Otherwise there is a
risk of injury in the event of an accident or
sudden braking.
Depending on the country of
sale, with air conditioning, it
gives access to the ventilation
nozzle, delivering the same air-
conditioned air as the vents in
the passenger compartment.
Ease of use and comfort
Page 116 of 416

114
Fitting the net
Unclip the upper fixing covers and secure the
lower fixings (as previously described).
F
F
old (table position) or remove the seats
and bench seats in rows 2
and 3 (depending
on equipment).
F
C
lose the rear heating and air conditioning
vents (depending on equipment).
F
U
nroll the high load retaining net.
F
P
osition the upper net fixings in the
corresponding anchorages in the roof (first
one side, then the other).
F
F
ully extend the straps.
F
O
n each side, attach the bottom fixings of
the net to the lower anchorages (behind
row 1) or in the stowing rings (behind row 2).
F
T
ension the straps to extend the net.
F
C
heck that the net is attached securely and
properly extended.
Never use the ISOFIX ring for the strap
fixing point of a child seat with Top Tether.
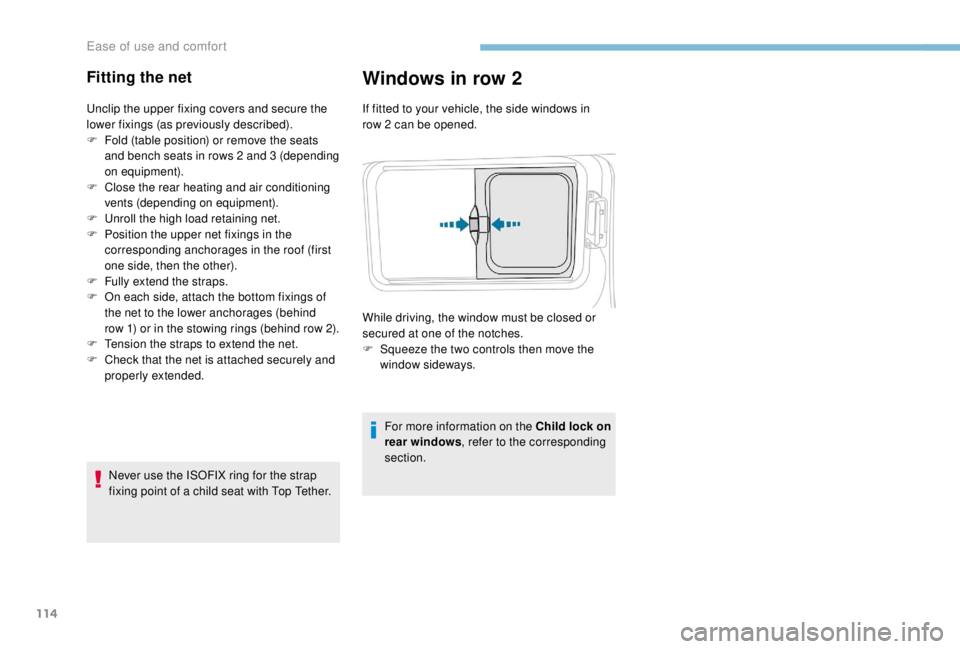
Windows in row 2
If fitted to your vehicle, the side windows in
row 2 can be opened.
For more information on the Child lock on
rear windows , refer to the corresponding
section.
While driving, the window must be closed or
secured at one of the notches.
F
S
queeze the two controls then move the
window sideways.
Ease of use and comfort