2018 PEUGEOT 5008 seat adjustment
[x] Cancel search: seat adjustmentPage 78 of 364
76
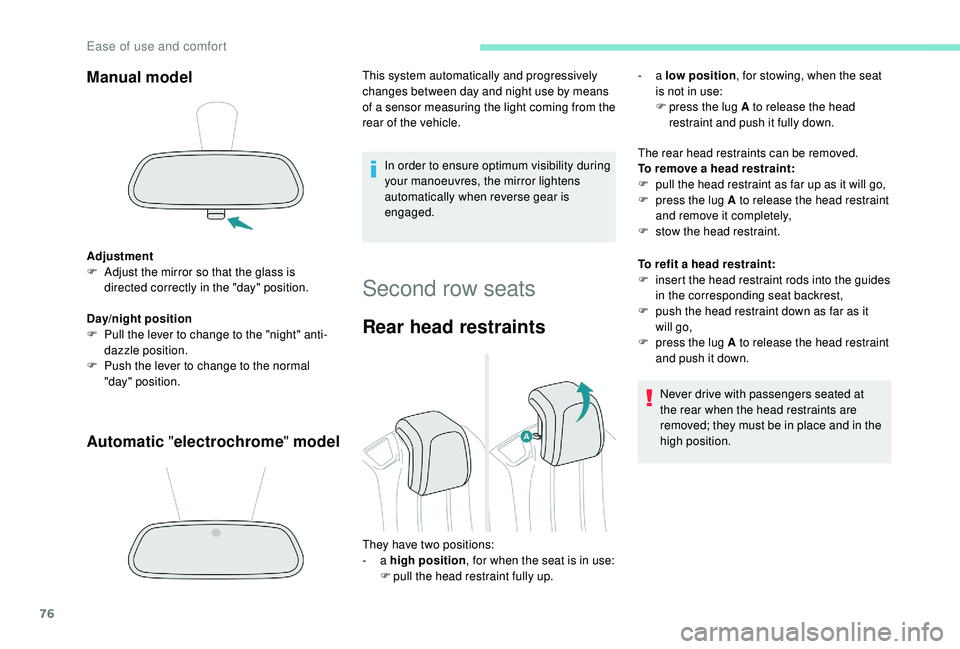
Manual model
Adjustment
F A djust the mirror so that the glass is
directed correctly in the "day" position.
Day/night position
F
P
ull the lever to change to the "night" anti-
dazzle position.
F
P
ush the lever to change to the normal
"day" position.
Automatic "electrochrome " model
In order to ensure optimum visibility during
your manoeuvres, the mirror lightens
automatically when reverse gear is
engaged.
This system automatically and progressively
changes between day and night use by means
of a
s
ensor measuring the light coming from the
rear of the vehicle.
Second row seats
Rear head restraints
The rear head restraints can be removed.
To remove a head restraint:
F
p
ull the head restraint as far up as it will go,
F
p
ress the lug A to release the head restraint
and remove it completely,
F
s
tow the head restraint.
To refit a
head restraint:
F
i
nsert the head restraint rods into the guides
in the corresponding seat backrest,
F
p
ush the head restraint down as far as it
will go,
F
p
ress the lug A to release the head restraint
and push it down.
Never drive with passengers seated at
the rear when the head restraints are
removed; they must be in place and in the
high position.
They have two positions:
-
a high position , for when the seat is in use:
F
p
ull the head restraint fully up. -
a
low position , for stowing, when the seat
is not in use:
F
p
ress the lug A to release the head
restraint and push it fully down.
Ease of use and comfort
Page 79 of 364
77
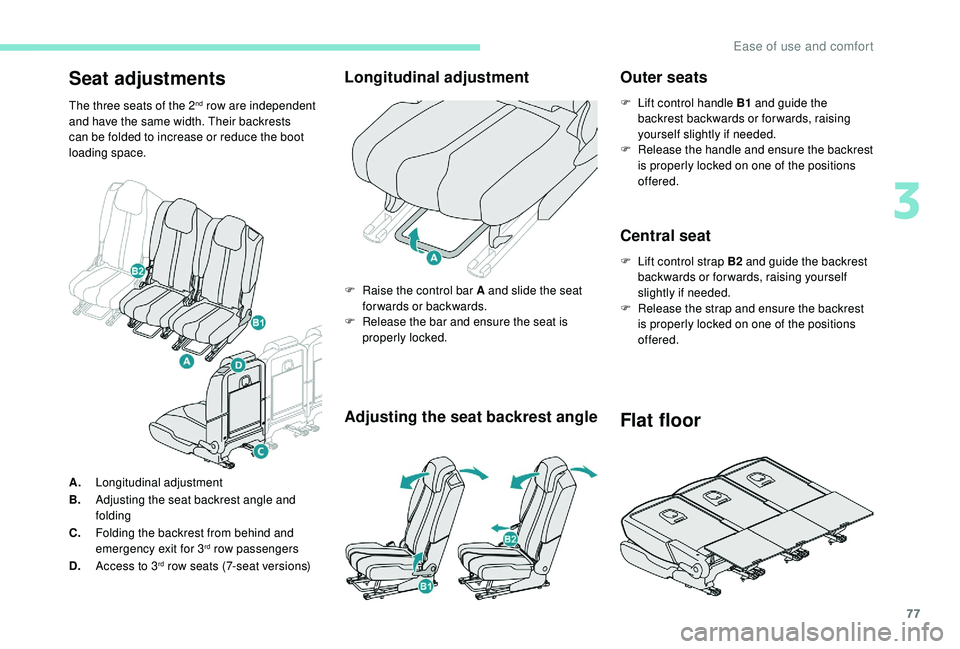
Seat adjustments
The three seats of the 2nd row are independent
and have the same width. Their backrests
can be folded to increase or reduce the boot
loading space.
Longitudinal adjustment
A. Longitudinal adjustment
B. Adjusting the seat backrest angle and
folding
C. Folding the backrest from behind and
emergency exit for 3
rd row passengers
D. Access to 3rd row seats (7-seat versions)
Adjusting the seat backrest angle Outer seats
F Lift control handle B1
and guide the
backrest backwards or for wards, raising
yourself slightly if needed.
F
R
elease the handle and ensure the backrest
is properly locked on one of the positions
offered.
Central seat
F Lift control strap B2 and guide the backrest
backwards or for wards, raising yourself
slightly if needed.
F
R
elease the strap and ensure the backrest
is properly locked on one of the positions
offered.
F
R
aise the control bar A and slide the seat
forwards or backwards.
F
R
elease the bar and ensure the seat is
properly locked.
Flat floor
3
Ease of use and comfort
Page 81 of 364
79
These continuity panels are not designed
to support a weight greater than 30 kg.
Before deploying the continuity panels,
check that the 2
nd row seats are pulled as
far back as possible.
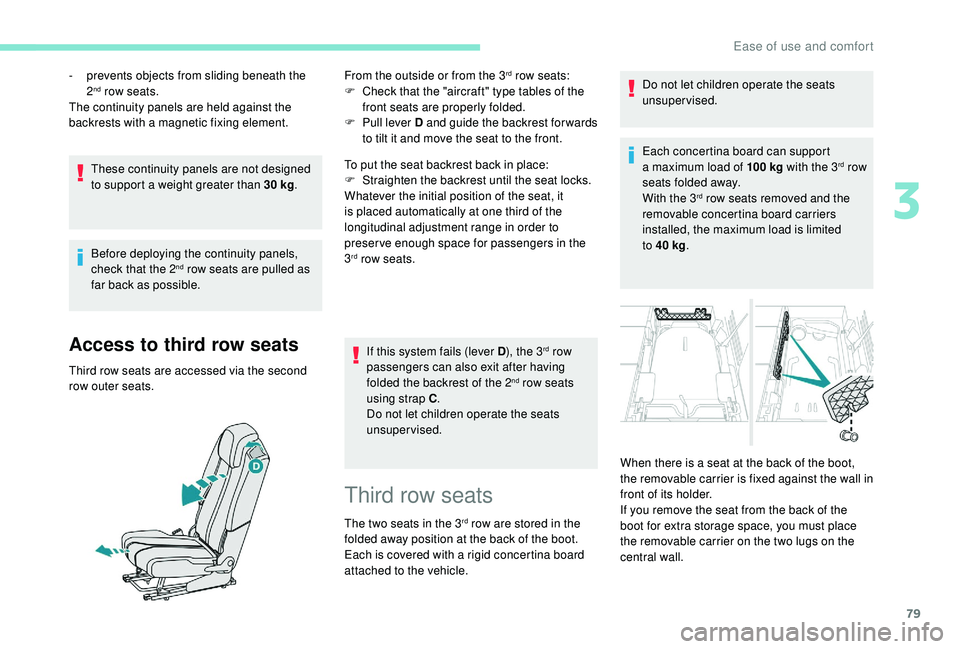
Access to third row seats
Third row seats are accessed via the second
row outer seats. From the outside or from the 3
rd row seats:
F
C
heck that the "aircraft" type tables of the
front seats are properly folded.
F
P
ull lever D and guide the backrest for wards
to tilt it and move the seat to the front.
To put the seat backrest back in place:
F
S
traighten the backrest until the seat locks.
Whatever the initial position of the seat, it
is placed automatically at one third of the
longitudinal adjustment range in order to
preserve enough space for passengers in the
3
rd row seats.
If this system fails (lever D ), the 3
rd row
passengers can also exit after having
folded the backrest of the 2
nd row seats
using strap C .
Do not let children operate the seats
unsupervised.
-
p
revents objects from sliding beneath the
2
nd row seats.
The continuity panels are held against the
backrests with a
magnetic fixing element.
Third row seats
The two seats in the 3rd row are stored in the
folded away position at the back of the boot.
Each is covered with a
rigid concertina board
attached to the vehicle. Do not let children operate the seats
unsupervised.
Each concertina board can support
a
maximum load of 100
kg
with the 3
rd row
seats folded away.
With the 3
rd row seats removed and the
removable concertina board carriers
installed, the maximum load is limited
to 40
kg .
When there is a
seat at the back of the boot,
the removable carrier is fixed against the wall in
front of its holder.
If you remove the seat from the back of the
boot for extra storage space, you must place
the removable carrier on the two lugs on the
central wall.
3
Ease of use and comfort
Page 85 of 364
83
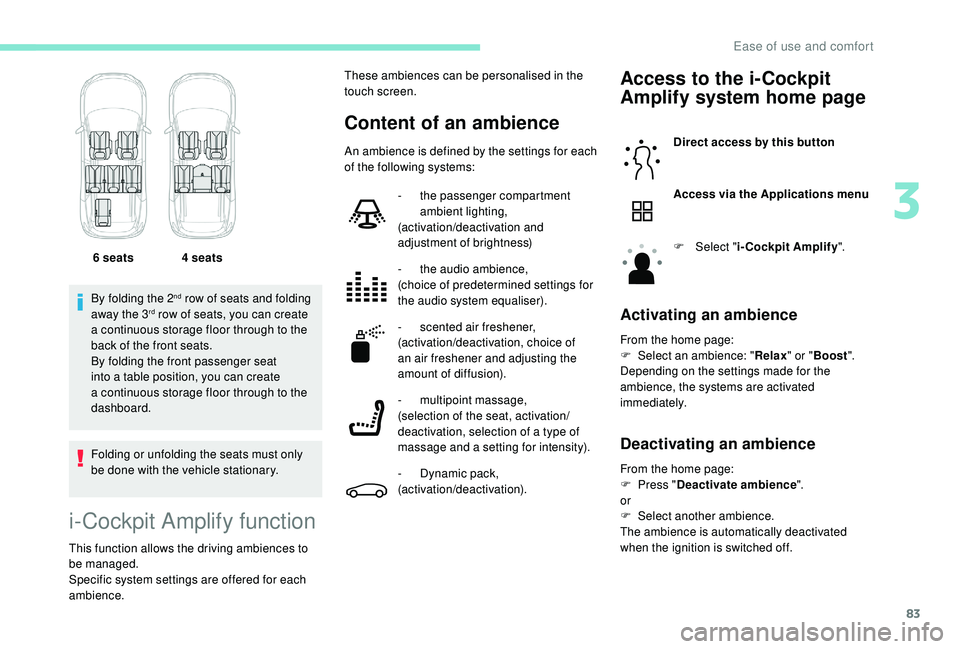
By folding the 2nd row of seats and folding
away the 3rd row of seats, you can create
a
continuous storage floor through to the
back of the front seats.
By folding the front passenger seat
into a
table position, you can create
a
continuous storage floor through to the
dashboard.
Folding or unfolding the seats must only
be done with the vehicle stationary. 6
seats 4 seats
i-Cockpit Amplify function
This function allows the driving ambiences to
be managed.
Specific system settings are offered for each
ambience.
Content of an ambience
Access to the i-Cockpit
Amplify system home page
Direct access by this button
Access via the Applications menu
F
Sel
ect "i-Cockpit Amplify ".
Activating an ambience
From the home page:
F
Sel ect an ambience: " Relax" or "Boost ".
Depending on the settings made for the
ambience, the systems are activated
immediately.
Deactivating an ambience
These ambiences can be personalised in the
touch screen.
An ambience is defined by the settings for each
of the following systems:
-
t
he passenger compartment
ambient lighting,
(activation/deactivation and
adjustment of brightness)
-
t
he audio ambience,
(choice of predetermined settings for
the audio system equaliser).
-
s
cented air freshener,
(activation/deactivation, choice of
an air freshener and adjusting the
amount of diffusion).
-
m
ultipoint massage,
(selection of the seat, activation/
deactivation, selection of a
type of
massage and a
setting for intensity).
-
D
ynamic pack,
(activation/deactivation). From the home page:
F
P
ress "Deactivate ambience ".
or
F
Sel
ect another ambience.
The ambience is automatically deactivated
when the ignition is switched off.
3
Ease of use and comfort
Page 133 of 364
131
F Check that the seat belt is fastened correctly by pulling the strap.
Unfastening
F Press the red button on the buckle.
F G uide the seat belt as it is reeled in.
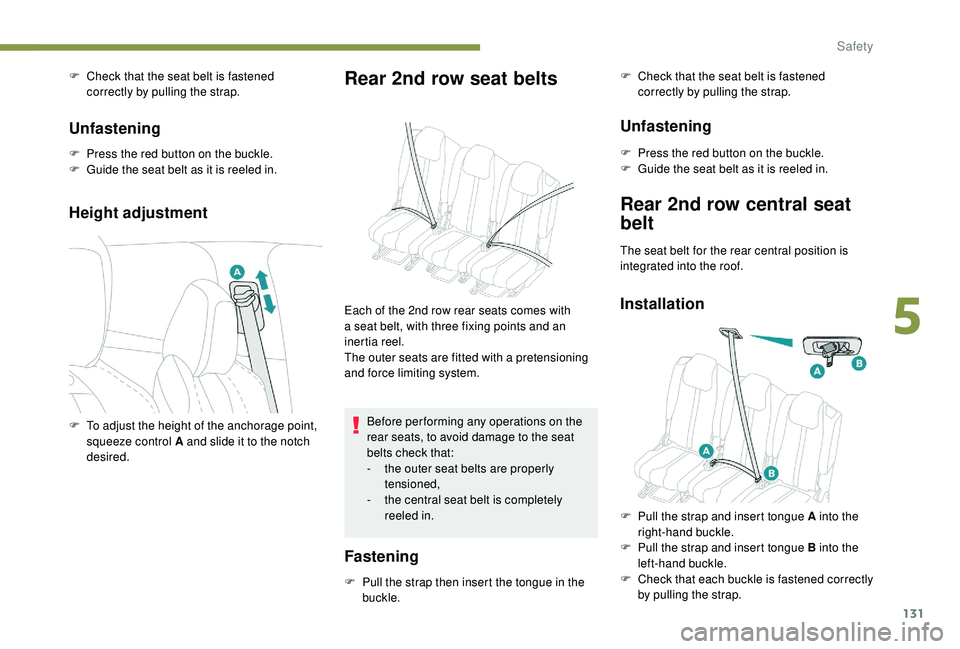
Height adjustment
Rear 2nd row seat belts
F To adjust the height of the anchorage point, squeeze control A and slide it to the notch
desired.
Fastening
F Pull the strap then insert the tongue in the buckle.
Unfastening
F Press the red button on the buckle.
F G uide the seat belt as it is reeled in.
Before per forming any operations on the
rear seats, to avoid damage to the seat
belts check that:
-
t
he outer seat belts are properly
tensioned,
-
t
he central seat belt is completely
reeled in.
Each of the 2nd row rear seats comes with
a
seat belt, with three fixing points and an
inertia reel.
The outer seats are fitted with a
pretensioning
and force limiting system. F
C
heck that the seat belt is fastened
correctly by pulling the strap.
Rear 2nd row central seat
belt
The seat belt for the rear central position is
integrated into the roof.
Installation
F Pull the strap and insert tongue A into the right-hand buckle.
F
P
ull the strap and insert tongue B into the
left-hand buckle.
F
C
heck that each buckle is fastened correctly
by pulling the strap.
5
Safety
Page 135 of 364
133
Advice
The driver must ensure that passengers use
the seat belts correctly and that they are all
fastened before setting off.
Wherever you are seated in the vehicle,
always fasten your seat belt, even for short
journeys.
Do not interchange the seat belt buckles as
they will not fulfil their role fully.
The seat belts are fitted with an inertia reel
permitting automatic adjustment of the length
of the strap to your size. The seat belt is
stowed automatically when not in use.
Before and after use, ensure that the seat belt
is reeled in correctly.
The lower part of the strap must be positioned
as low as possible on the pelvis.
The upper part must be positioned in the
hollow of the shoulder.
The inertia reels have an automatic locking
device at the time of a collision, during
sudden braking or if the vehicle turns over.
You can release the device by pulling the
strap firmly and then releasing it so that it
reels in slightly. In order to be effective, a seat belt must:
-
b e tightened as close to the body as
possible,
-
b
e pulled in front of you with a smooth
movement, checking that it does not twist,
-
b
e used to restrain only one person,
-
n
ot show any signs of cuts or fraying,
-
n
ot be converted or modified to avoid
affecting its performance.
In accordance with current safety regulations,
for all repairs on your vehicle's seat belts, go
to a
qualified workshop with the skills and
equipment needed, which a
PEUGEOT dealer
is able to provide.
Have your seat belts checked regularly by
a
PEUGEOT dealer or a qualified workshop,
particularly if the straps show signs of
damage.
Clean the seat belt straps with soapy water or
a
textile cleaning product, sold by PEUGEOT
dealers.
After folding or moving a
seat or rear bench
seat, ensure that the seat belt is positioned
and reeled in correctly. Recommendations for children
Use a
suitable child seat if the passenger is
less than 12
years old or shorter than one and
a
half metres.
Never use the same seat belt to secure more
than one person.
Never allow a
child to travel on your lap.
For more information on Child seats , refer to
the corresponding section.
In the event of an impact
Depending on the nature and seriousness
of the impact , the pyrotechnic pretensioner
device may be deployed before and
independently of the airbags. Deployment of
the pretensioners is accompanied by a
slight
discharge of harmless smoke and a
noise,
due to the activation of the pyrotechnic
cartridge incorporated in the system.
In all cases, the airbag warning lamp comes
on.
Following an impact, have the seat belts
system checked and, if necessary, replaced,
by a
PEUGEOT dealer or a qualified
workshop.
5
Safety
Page 146 of 364
144
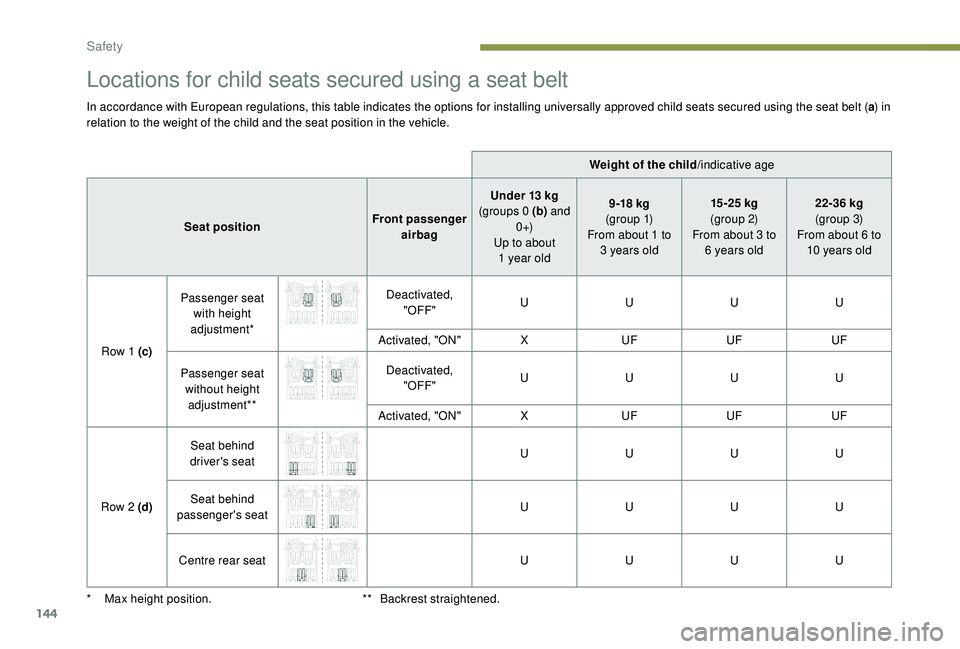
Locations for child seats secured using a seat belt
In accordance with European regulations, this table indicates the options for installing universally approved child seats secured using the seat belt (a) in
relation to the weight of the child and the seat position in the vehicle.
Weight of the child/indicative age
Seat position Front passenger
airbag Under 13
kg
(groups 0 (b) and
0 +)
Up to about 1
year old9 -18
kg
(g r o u p 1)
From about 1
to
3
years old15 -25
kg
(group 2)
From about 3
to
6
years old22-36
kg
(group 3)
From about 6
to
10
years old
Row 1 (c) Passenger seat
with height
adjustment* Deactivated,
"OFF" U
UUU
Activated, "ON" XUF UFUF
Passenger seat without height adjustment** Deactivated,
"OFF" U
UUU
Activated, "ON" XUF UFUF
Row 2 (d) Seat behind
driver's seat U
UUU
Seat behind
passenger's seat U
UUU
Centre rear seat UUUU
*
M
ax height position. **
B
ackrest straightened.
Safety
Page 150 of 364
148
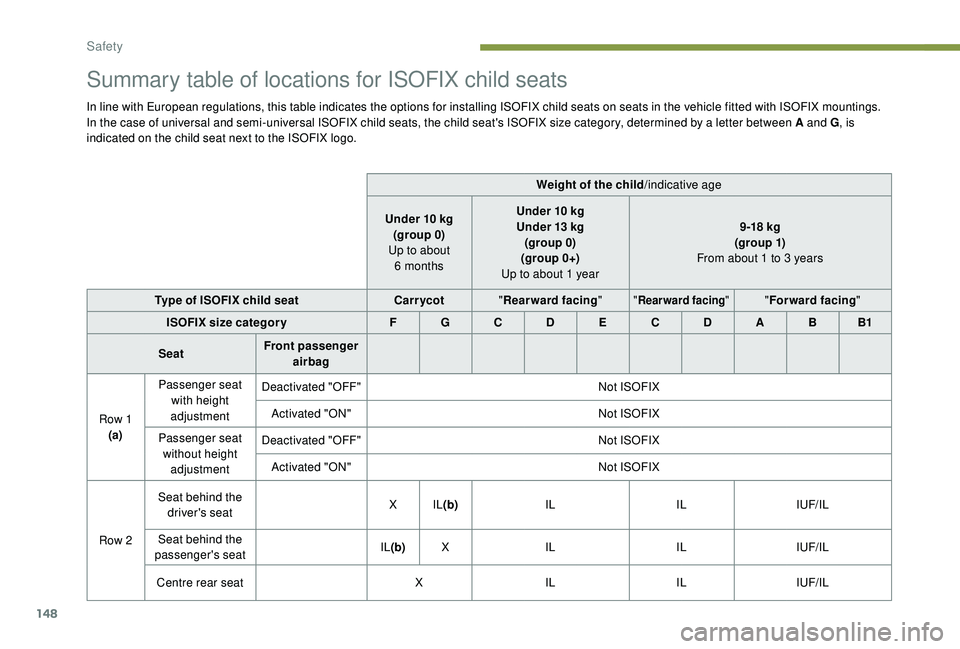
Summary table of locations for ISOFIX child seats
In line with European regulations, this table indicates the options for installing ISOFIX child seats on seats in the vehicle fitted with ISOFIX mountings.
In the case of universal and semi-universal ISOFIX child seats, the child seat's ISOFIX size category, determined by a letter between A and G, is
indicated on the child seat next to the ISOFIX logo.
Weight of the child/indicative age
Under 10
kg
(group 0)
Up to about 6
monthsUnder 10
kg
Under 13
kg
(group 0)
(group 0+)
Up to about 1
year9 -18
kg
(g ro up 1)
From about 1
to 3 years
Type of ISOFIX child seat Carr ycot"Rearward facing "
"Rearward facing ""Forward facing "
ISOFIX size categor y F G C D E C D A B B1
Seat Front passenger
airbag
Row 1 (a) Passenger seat
with height
adjustment Deactivated "OFF"
Not ISOFIX
Activated "ON" Not ISOFIX
Passenger seat without height adjustment Deactivated "OFF"
Not ISOFIX
Activated "ON" Not ISOFIX
Row 2 Seat behind the
driver's seat X
IL(b) IL ILIUF/IL
Seat behind the
passenger's seat IL
(b) X IL ILIUF/IL
Centre rear seat XIL ILIUF/IL
Safety