2018 PEUGEOT 5008 open boot
[x] Cancel search: open bootPage 59 of 364
57
Locking the vehicle with full
alarm system
Activation
Following a vehicle locking request, the
p erimeter monitoring is activated after
5
seconds and the interior volumetric and
anti-tilt monitoring after 45
seconds.If an opening (door, boot or bonnet) is not
fully closed, the vehicle is not locked but
the exterior perimeter monitoring will be
activated after a
delay of 45 seconds at
the same time as the interior volumetric
and anti-tilt monitoring.
Deactivation
F Press the unlocking button on the remote control.
or
F
U
nlock the vehicle with the Keyless Entry
and Starting system.
The monitoring system is deactivated: the
indicator lamp in the button goes off and the
direction indicators flash for about 2
seconds.
When the vehicle automatically locks itself
again (as happens if a
door or boot is not
opened within 30
seconds of unlocking),
the monitoring system is also reactivated
automatically.
Locking the vehicle
with exterior perimeter
monitoring only
Deactivate the interior volumetric and anti-tilt
monitoring to avoid unwanted triggering of the
alarm in certain cases such as:
-
l
eaving a pet in the vehicle,
Deactivating the interior
volumetric and anti-tilt
monitoring
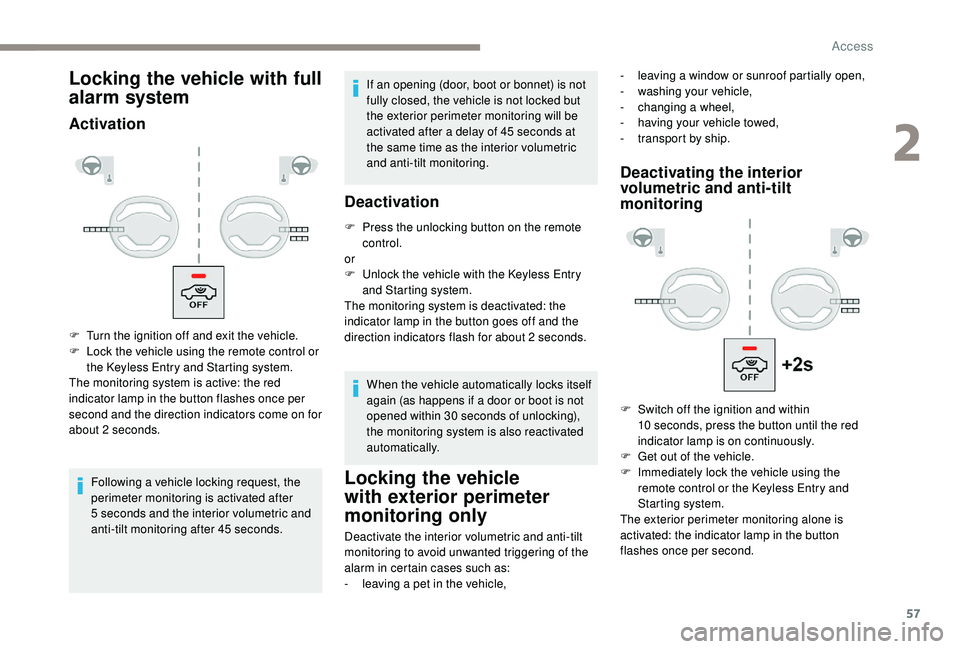
F Turn the ignition off and exit the vehicle.
F L ock the vehicle using the remote control or
the Keyless Entry and Starting system.
The monitoring system is active: the red
indicator lamp in the button flashes once per
second and the direction indicators come on for
about 2
seconds. -
l
eaving a window or sunroof partially open,
-
w
ashing your vehicle,
-
c
hanging a
wheel,
-
h
aving your vehicle towed,
-
t
ransport by ship.
F
S
witch off the ignition and within
10
seconds, press the button until the red
indicator lamp is on continuously.
F
G
et out of the vehicle.
F
I
mmediately lock the vehicle using the
remote control or the Keyless Entry and
Starting system.
The exterior perimeter monitoring alone is
activated: the indicator lamp in the button
flashes once per second.
2
Access
Page 61 of 364
59
From inside
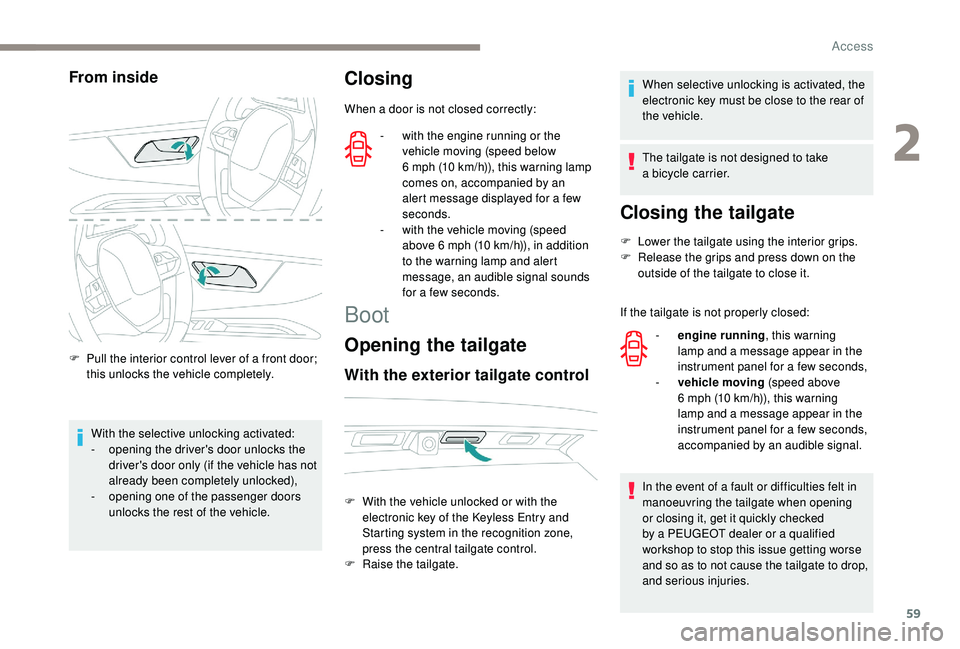
F Pull the interior control lever of a front door;
this unlocks the vehicle completely.
With the selective unlocking activated:
-
o
pening the driver's door unlocks the
driver's door only (if the vehicle has not
already been completely unlocked),
-
o
pening one of the passenger doors
unlocks the rest of the vehicle.
Closing
When a door is not closed correctly:
Boot
Opening the tailgate
With the exterior tailgate control
When selective unlocking is activated, the
electronic key must be close to the rear of
the vehicle.
The tailgate is not designed to take
a
bicycle carrier.
Closing the tailgate
F Lower the tailgate using the interior grips.
F R elease the grips and press down on the
outside of the tailgate to close it.
If the tailgate is not properly closed:
In the event of a
fault or difficulties felt in
manoeuvring the tailgate when opening
or closing it, get it quickly checked
by a
PEUGEOT dealer or a qualified
workshop to stop this issue getting worse
and so as to not cause the tailgate to drop,
and serious injuries.
-
w
ith the engine running or the
vehicle moving (speed below
6
mph (10
km/h)), this warning lamp
comes on, accompanied by an
alert message displayed for a
few
seconds.
-
w
ith the vehicle moving (speed
above 6
mph (10
km/h)), in addition
to the warning lamp and alert
message, an audible signal sounds
for a
few seconds.
F
W
ith the vehicle unlocked or with the
electronic key of the
K
eyless Entry and
Starting system in the recognition zone,
press the central tailgate control.
F
Ra
ise the tailgate. -
e
ngine running , this warning
lamp and a
message appear in the
instrument panel for a
few seconds,
-
v
ehicle moving (speed above
6
mph (10 km/h)), this warning
lamp and a
message appear in the
instrument panel for a
few seconds,
accompanied by an audible signal.
2
Access
Page 63 of 364
61
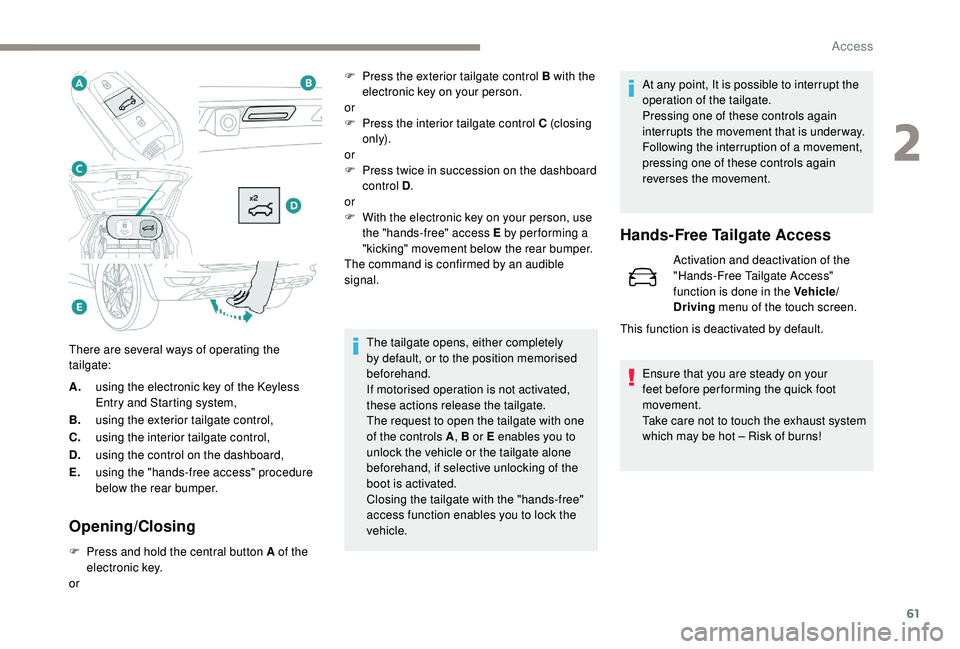
A.using the electronic key of the K eyless
Entry and Starting system,
B. using the exterior tailgate control,
C. using the interior tailgate control,
D. using the control on the dashboard,
E. using the "hands-free access" procedure
below the rear bumper.
Opening/Closing
F Press and hold the central button A of the
electronic key.
or The tailgate opens, either completely
by default, or to the position memorised
beforehand.
If motorised operation is not activated,
these actions release the tailgate.
The request to open the tailgate with one
of the controls A
, B or E enables you to
unlock the vehicle or the tailgate alone
beforehand, if selective unlocking of the
boot is activated.
Closing the tailgate with the "hands-free"
access function enables you to lock the
vehicle. At any point, It is possible to interrupt the
operation of the tailgate.
Pressing one of these controls again
interrupts the movement that is under way.
Following the interruption of a
movement,
pressing one of these controls again
reverses the movement.
Hands-Free Tailgate Access
Activation and deactivation of the
"Hands-Free Tailgate Access"
function is done in the Vehicle/
Driving menu of the touch screen.
Ensure that you are steady on your
feet before per forming the quick foot
movement.
Take care not to touch the exhaust system
which may be hot – Risk of burns!
There are several ways of operating the
tailgate: F
P
ress the exterior tailgate control B with the
electronic key on your person.
or
F
P
ress the interior tailgate control C (closing
only).
or
F
P
ress twice in succession on the dashboard
control D .
or
F
W
ith the electronic key on your person, use
the "hands-free" access E by per forming a
"kicking" movement below the rear bumper.
The command is confirmed by an audible
signal.
This function is deactivated by default.
2
Access
Page 82 of 364
80
Folding the concertina
boards
When the 3rd row seats are straightened, these
folded concertina boards can be left:
-
ei
ther flat behind the seats,
-
o
r in the vertical position,
thus clearing the inside of the seat as a
storage
space.
Installing the seats
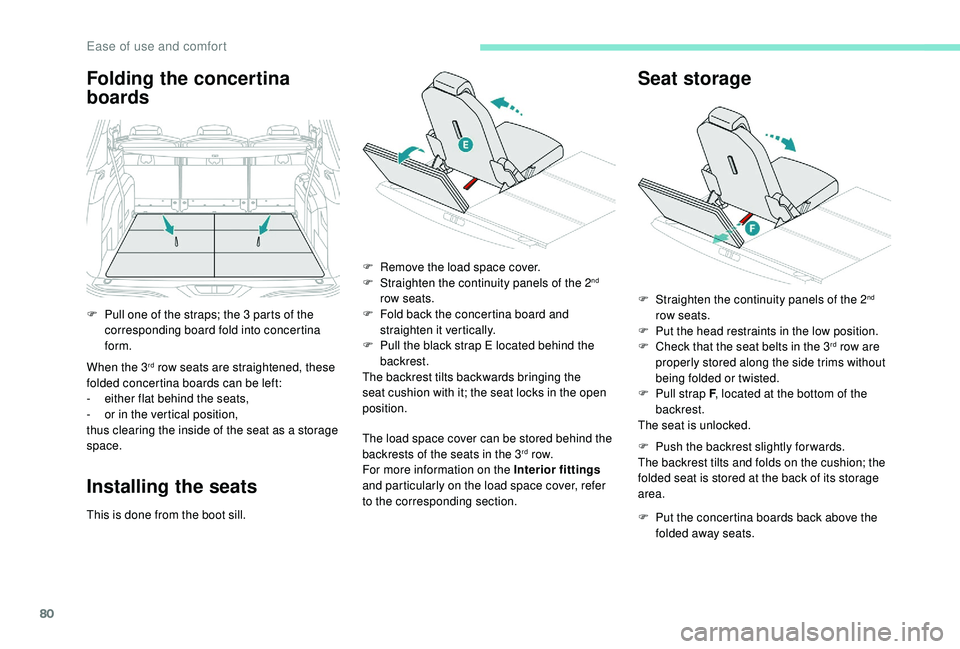
This is done from the boot sill. F
R
emove the load space cover.
F
S
traighten the continuity panels of the 2
nd
row seats.
F
F
old back the concertina board and
straighten it vertically.
F
P
ull the black strap E located behind the
backrest.
The backrest tilts backwards bringing the
seat cushion with it; the seat locks in the open
position.
The load space cover can be stored behind the
backrests of the seats in the 3
rd row.
For more information on the Interior fittings
and particularly on the load space cover, refer
to the corresponding section.
Seat storage
F Pull one of the straps; the 3 parts of the
corresponding board fold into concertina
form. F
S traighten the continuity panels of the 2
nd
row seats.
F
P
ut the head restraints in the low position.
F
C
heck that the seat belts in the 3
rd row are
properly stored along the side trims without
being folded or twisted.
F
P
ull strap F , located at the bottom of the
backrest.
The seat is unlocked.
F
P
ush the backrest slightly for wards.
The backrest tilts and folds on the cushion; the
folded seat is stored at the back of its storage
area.
F
P
ut the concertina boards back above the
folded away seats.
Ease of use and comfort
Page 83 of 364
81
Rear head restraints
Before doing anything to the seats in the
3rd row, straighten the continuity panels of
the seats in the 2nd row.
Do not try to fold a
seat in the 3rd row
without having opened it until the backrest
is fully locked.
Do not leave anything on or underneath
the seats in the 3
rd row when they are
being folded.
Do not guide strap F when storing the
seat – your fingers may get jammed!
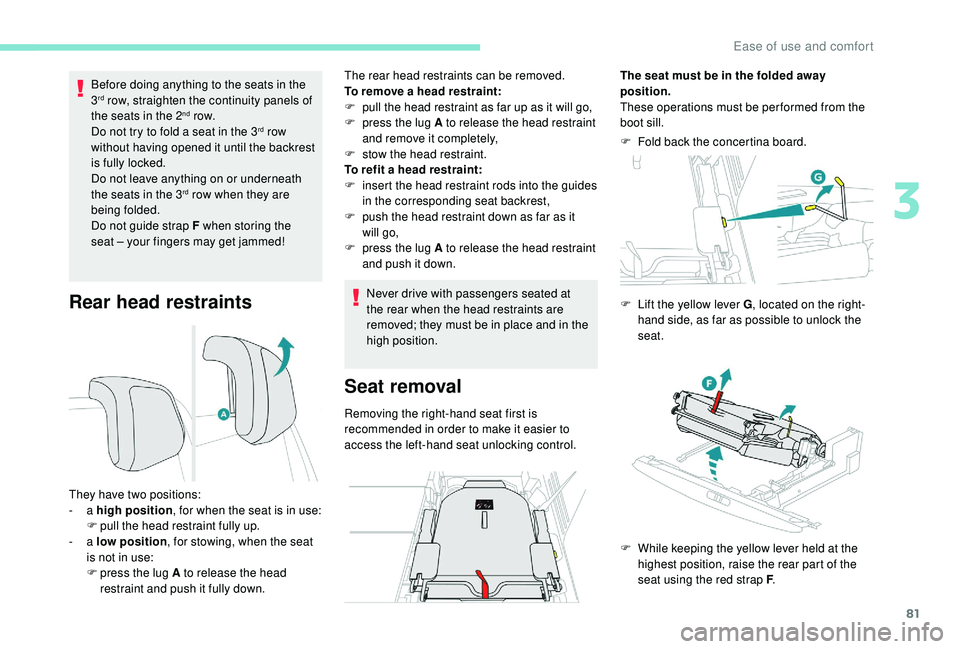
They have two positions:
-
a high position , for when the seat is in use:
F
p
ull the head restraint fully up.
-
a low position , for stowing, when the seat
is not in use:
F
p
ress the lug A to release the head
restraint and push it fully down. The rear head restraints can be removed.
To remove a
head restraint:
F
p
ull the head restraint as far up as it will go,
F
p
ress the lug A to release the head restraint
and remove it completely,
F
s
tow the head restraint.
To refit a head restraint:
F i nsert the head restraint rods into the guides
in the corresponding seat backrest,
F
p
ush the head restraint down as far as it
will go,
F
p
ress the lug A to release the head restraint
and push it down.
Never drive with passengers seated at
the rear when the head restraints are
removed; they must be in place and in the
high position.
Seat removal
Removing the right-hand seat first is
recommended in order to make it easier to
access the left-hand seat unlocking control. F
F
old back the concertina board.
The seat must be in the folded away
position.
These operations must be performed from the
boot sill.
F
L
ift the yellow lever G
, located on the right-
hand side, as far as possible to unlock the
seat.
F
W
hile keeping the yellow lever held at the
highest position, raise the rear part of the
seat using the red strap F .
3
Ease of use and comfort
Page 110 of 364
108
Always guide the blind slowly using the
tab, both up and down.
Storage boxes
Depending on version, the storage boxes are
fitted in the floor, at the foot of the outer seats
on the second row.
On the left side, it may also contain the
temporary puncture repair kit.
To open them, lift the cover by the notch.
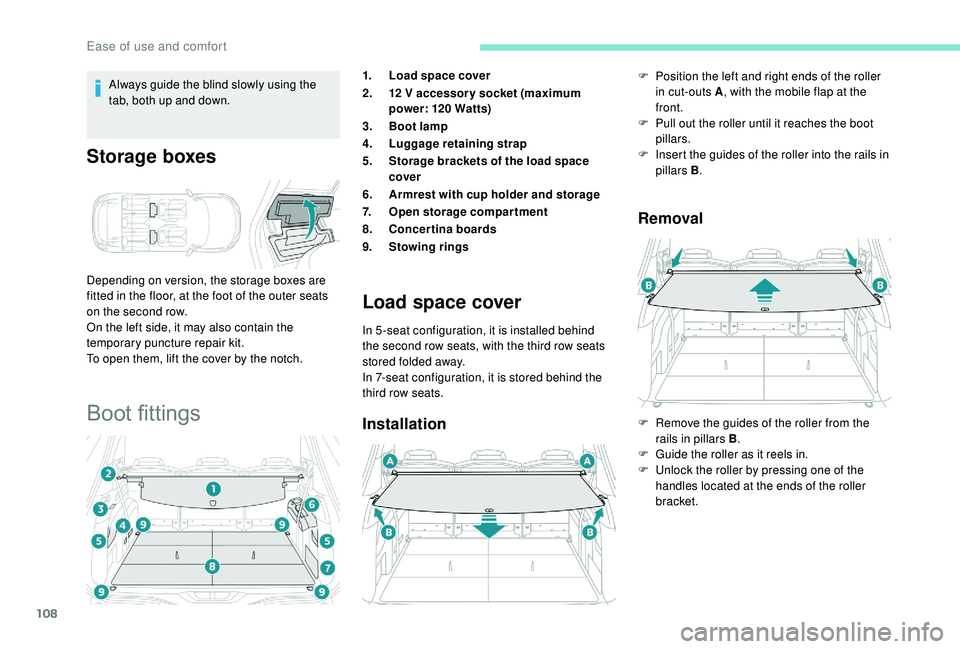
Boot fittings
1.Load space cover
2. 12
V accessor y socket (maximum
power: 120
Watts)
3. Boot lamp
4. Luggage retaining strap
5. Storage brackets of the load space
cover
6. Armrest with cup holder and storage
7. Open storage compartment
8. Concertina boards
9. Stowing rings
Load space cover
In 5 -seat configuration, it is installed behind
the second row seats, with the third row seats
stored folded away.
In 7-seat configuration, it is stored behind the
third row seats.
Installation Removal
F Position the left and right ends of the roller
in cut-outs A , with the mobile flap at the
front.
F
P
ull out the roller until it reaches the boot
pillars.
F
I
nsert the guides of the roller into the rails in
pillars B .
F
R
emove the guides of the roller from the
rails in pillars B .
F
G
uide the roller as it reels in.
F
U
nlock the roller by pressing one of the
handles located at the ends of the roller
bracket.
Ease of use and comfort
Page 112 of 364
110
12 V accessory socket
The connection of an electrical device
not approved by PEUGEOT, such as
a
USB charger, may adversely affect the
operation of vehicle electrical systems,
causing faults such as poor radio
reception or inter ference with displays in
the screens.
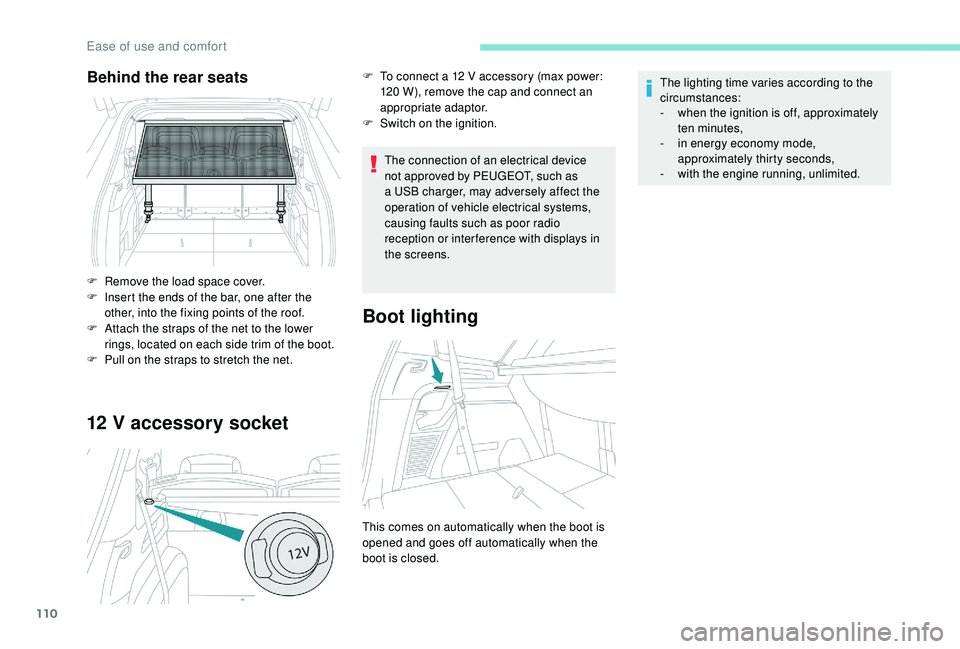
Boot lighting
This comes on automatically when the boot is
opened and goes off automatically when the
boot is closed. The lighting time varies according to the
circumstances:
-
w
hen the ignition is off, approximately
ten minutes,
-
i
n energy economy mode,
approximately thirty seconds,
-
w
ith the engine running, unlimited.
Behind the rear seats
F Remove the load space cover.
F
I nsert the ends of the bar, one after the
other, into the fixing points of the roof.
F
A
ttach the straps of the net to the lower
rings, located on each side trim of the boot.
F
P
ull on the straps to stretch the net. F
T
o connect a 12 V accessory (max power:
120 W), remove the cap and connect an
appropriate adaptor.
F
S
witch on the ignition.
Ease of use and comfort
Page 357 of 364
277
Key ............................................................ 46, 52
Key, electronic ........................................... 49-50
Keyless Entry and Starting
.............................. 49 - 5 0, 52, 15 8 -159
Key not recognised
................................ 16
0 -161
Key with remote control
................................15
6
Kit, hands-free
.................... 2
5 -2 6 , 13 -14, 10 -11
Kit, temporary puncture repair
....... 24
1-243, 245Map reading lamps
............................... 10
4 -105
Markings, identification
.................................273
Massage function
...........................................74
Massage, multi-point
......................................74
Mat
................................................................104
Memorising a
speed
..............................17
5 -176
Menu
...............................................................12K
J
L
M
Labels, identification ..................................... 273
Lamp, boot .................................................... 11 0
Lamps, parking
............................................. 113
Jack
...............................
......
242, 246 -248, 23, 9
Jump starting
................................................
262
Ii-Cockpit amplify function ...7 4, 83 - 84, 103, 170
Ignition ................ ............................. 158, 160, 28
Ignition on ...................................................... 160
Immobiliser, electronic
............................52, 15 6
Indicator, AdBlue
® range ................................. 32
Indicator, coolant temperature ........................ 32
Indicator, engine oil level
.......................... 31, 3 5
Indicator lamps, operation
........................ 11
, 15
Indicators, direction
.............................. 113 , 2 5 3
Inflating tyres
................................................ 236
Inflating tyres (using the kit)
.................. 24
3, 245
Instrument panel
................................ 8 -9, 35 -37
Intelligent Traction Control
............................ 126
Internet browser
.............................................. 16
I
SOFIX
.......................................................... 147
ISOFIX mountings ......................................... 14 6Lamps, rear
...................................................
255
Lane Departure Warning System (LDWS), Active
.........
17, 198 -19 9, 205
Lane Departure Warning System (LDWS) ....................................17, 1 9 8
LEDs – Light-emitting diodes
..................................112, 252-253, 255
Level, brake fluid
...........................................234
Level, Diesel additive
............................234-235
Level, engine coolant
..............................32, 234
Level, engine oil
..............................31, 233-234
Levels and checks
........................23
1-232, 234
Level, screenwash fluid
........................1
20, 234
Light-emitting diodes – LEDs
...............................
.....112, 252-253, 255
Lighting
............................................................26
Lighting, cornering
........................................11 8
Lighting dimmer
..............................................36
Lighting, exterior
...........................................111
Lighting, guide-me home
.................4 8 , 115 -11 6
Lighting, interior
...............................
.....104 -105
Lighting, mood
........................................36, 105
Lighting, welcome
.........................................115
Loading
..................................109 -110, 229 -230
Load reduction mode
....................................227
Locating your vehicle
......................................48
Locking
...............................
.................47, 50, 52
Locking from the inside
...................................55
Locking the doors
........................................... 60
L
ow fuel level
................................................2
20Menu, main
.......................................................
4
M
enus (audio)
........................................
3-5, 4-5
Messages
........................................................
28
Messages, quick ............................................. 28
M irror, rear view ........................................75 -76
Mirrors, door ......................... 74-75, 94, 203 -204
Mirror, vanity
...................................................99
Misfuel prevention
.........................................221
Modularity, seats
.............................................82
Motorised tailgate
..................................... 6
0-62
Mountings, ISOFIX
.......................................14 6
MP3
CD .............................................................9
N
Net ......................................................... 108 -109
Net, high load retaining ..........................109 -110
Number plate lamps
...................................... 256
O
Obstacle detection ........................................ 205
Oil change ............................................. 23
3-234
Oil consumption
.................................... 233-234
Oil, engine
....................................... 12, 233-234
On-board tools
....................................... 241-243
Opening the bonnet
..............................230-231
Opening the boot
...................................... 49, 59
Opening the doors
.................................... 49, 58
Opening the fuel filler flap
.............................220
Opening the windows
..................................... 46
P
ads, brake
........................................... 236-237
Paint
.............................................................. 273
Paint colour code
.......................................... 273
Parcel shelf, rear
........................................... 107
Park Assist
...............................
..............212-213
P
.
Alphabetical index