2018 PEUGEOT 5008 clock
[x] Cancel search: clockPage 97 of 364

95
The volumetric alarm movement detector
may be disrupted by the programmable
heating air flows when it is operating.
To avoid any untimely triggering of the
alarm when using the programmable
heating, it is advisable that the volumetric
monitoring is deactivated.
Adapting the programmable heating
enables you to use it to preheat the
passenger compartment of your vehicle.
Contact a PEUGEOT dealer or a qualified
workshop.
Operating indicator lamp
Always switch off the programmable
heating when refuelling to avoid any risk of
fire or explosion.
The programmable heating is supplied by
the vehicle's fuel tank. Before use, ensure
that there is enough fuel left in the tank. If
the fuel in the tank is at the reser ve level,
we strongly recommend that you do not
programme the heating.
To avoid the risks of poisoning or
asphyxia, the programmable heating must
not be used, even for short periods, in
a
closed environment such as a garage or
workshop which are not equipped with an
exhaust gas extraction system.
Do not park the vehicle on a
flammable
sur face (dry grass, dead leaves, paper,
etc.) – Risk of fire!
Remote control
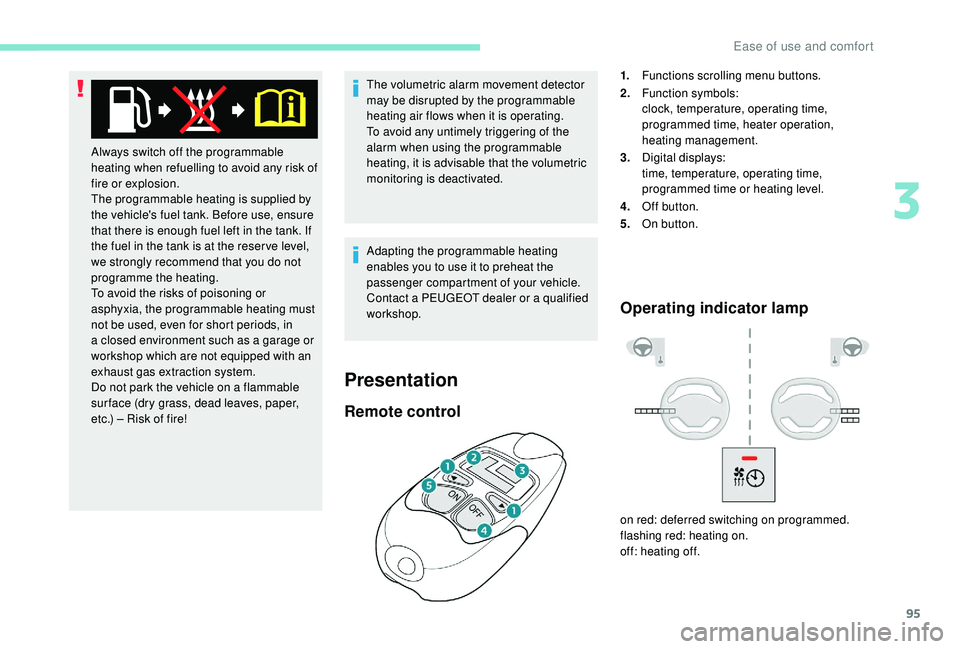
1. Functions scrolling menu buttons.
2. Function symbols:
clock, temperature, operating time,
programmed time, heater operation,
heating management.
3. Digital displays:
time, temperature, operating time,
programmed time or heating level.
4. Off button.
5. On button.
on red: deferred switching on programmed.
flashing red: heating on.
off: heating off.
Presentation
3
Ease of use and comfort
Page 227 of 364

225
Following use
When travelling without a trailer or load
on a
towbar-mounted carrier, the towball
must be removed and the protective plug
inserted in the carrier. This measure
applies particularly where the towball
might obscure visibility of the number
plate or its lighting.
Fitting the towballDuring use
Never release the locking system with
a
trailer or load carrier on the towball.
Never exceed the maximum authorised
weight for the vehicle – the Gross Train
Weight or GTW.
It is essential that the maximum
authorised load be complied with on the
towing device: if it is exceeded, this device
may detach from the vehicle, which is
a
serious accident risk.
Check that the trailer lamps work
c o r r e c t l y.
Before setting off, check the adjustment of
the headlamp beam height.
For more information on Headlamp
adjustment , refer to the corresponding
section. F
B
elow the rear bumper, remove the
protective plug 2
from the towball carrier 1.
F
I
nsert the end of towball 5 into carrier 1 and
push it upwards; the locking will take place
automatically. F
T
he locking wheel 6 turns a quarter of
a
turn anti-clockwise; take care to keep your
hands clear!
F
C
heck that the mechanism has correctly
locked in to place (position A ).
F
C
lose the lock 7 using the key.
7
Practical information
Page 228 of 364

226
Removing the towball
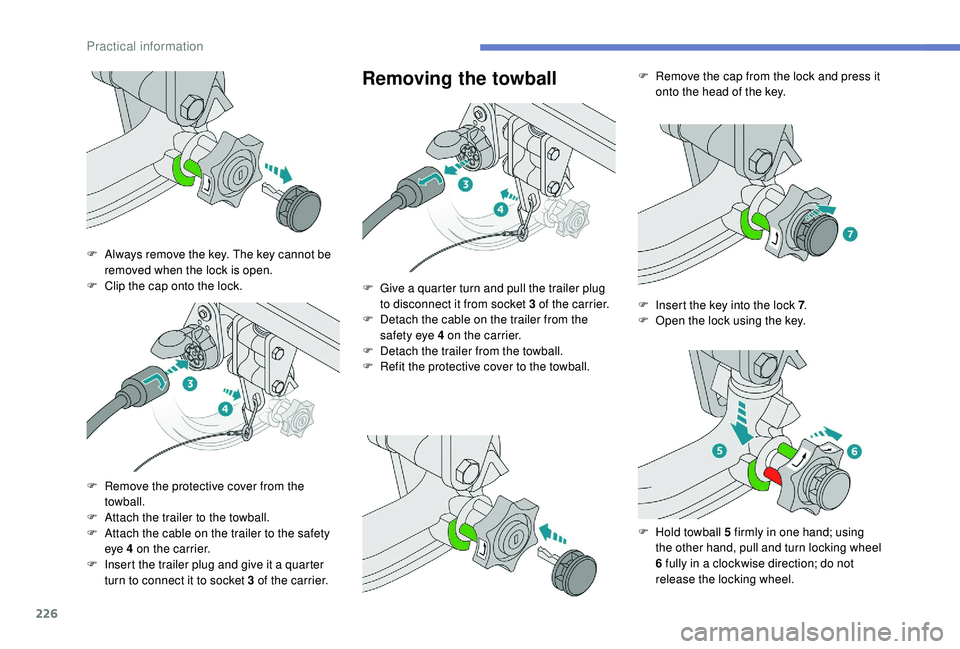
F Always remove the key. The key cannot be removed when the lock is open.
F
C
lip the cap onto the lock.
F
R
emove the protective cover from the
towball.
F
A
ttach the trailer to the towball.
F
A
ttach the cable on the trailer to the safety
eye 4
on the carrier.
F
I
nsert the trailer plug and give it a quarter
turn to connect it to socket 3
of the carrier.F
G
ive a quarter turn and pull the trailer plug
to disconnect it from socket 3
of the carrier.
F
D
etach the cable on the trailer from the
safety eye 4
on the carrier.
F
D
etach the trailer from the towball.
F
R
efit the protective cover to the towball.F
R
emove the cap from the lock and press it
onto the head of the key.
F
I
nsert the key into the lock 7.
F
O
pen the lock using the key.
F
H
old towball 5 firmly in one hand; using
the other hand, pull and turn locking wheel
6
fully in a clockwise direction; do not
release the locking wheel.
Practical information
Page 241 of 364

239
If any AdBlue® is splashed, or if there are
any spillages on the side of the bodywork,
rinse immediately with cold water or wipe
with a
damp cloth.
If the fluid has crystallised, clean it off
using a
sponge and hot water.
Important: in the event of a
top-up after
a
breakdown because of a lack of
AdBlue, you must wait around 5
minutes
before switching on the ignition, without
opening the driver's door, locking the
vehicle, introducing the key into the
ignition switch, or introducing the key of
the
K
eyless Entr y and Star ting system
into the passenger compartment .
Switch on the ignition, then wait for
10
seconds before starting the engine.
F
S
witch off the ignition and remove the key
from the switch to switch off the engine.
or
F
W
ith
K
eyless Entry and Starting, press the
" START/STOP " button to switch off the
engine. F
O
btain an
AdBlue
® container. After first
checking the use-by date, read the
instructions on the label carefully before
pouring the contents of the container or
bottle into your vehicle's AdBlue tank.
Or
F
I
nsert the AdBlue
® pump nozzle and refill
the tank until the nozzle stops automatically. Important:
-
T
o avoid over flowing the AdBlue
® tank,
it is recommended:
•
T
o top up between 10
and 13
litres
using AdBlue
® containers.
Or
•
N
ot to keep on trying after the
nozzle's first automatic stop if you
are refuelling at a
filling station.
-
I
f your vehicle's AdBlue
® tank is
completely empty – which is confirmed
by the alert messages and the
impossibility of starting the engine –
you must add at least 5
litres.
After refilling
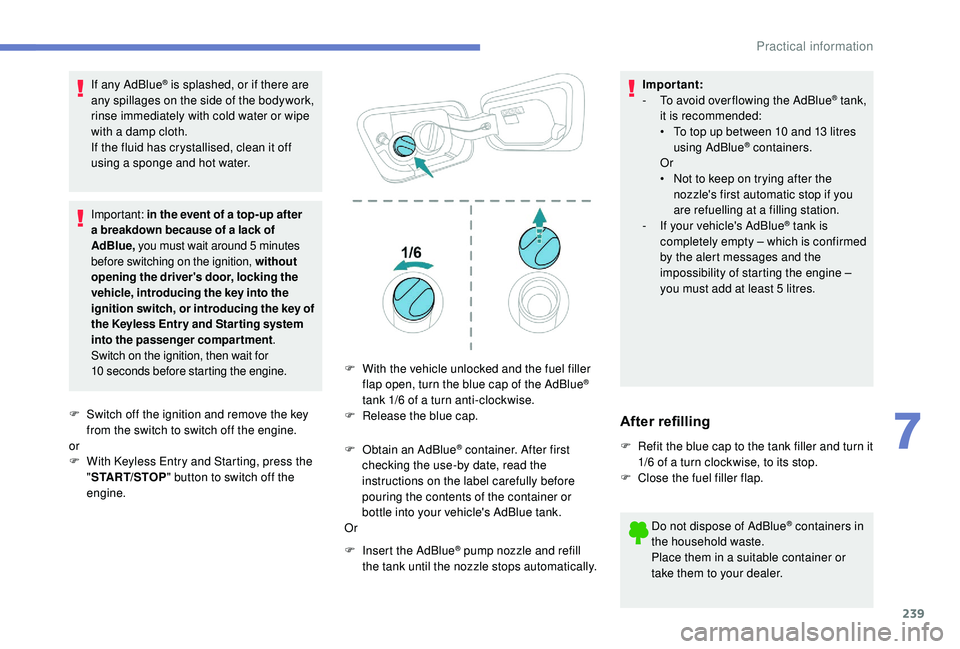
F Refit the blue cap to the tank filler and turn it 1/6 of a turn clockwise, to its stop.
F
C
lose the fuel filler flap.
Do not dispose of AdBlue
® containers in
the household waste.
Place them in a
suitable container or
take them to your dealer.
F
W
ith the vehicle unlocked and the fuel filler
flap open, turn the blue cap of the AdBlue
®
tank 1/6
of a
turn anti-clockwise.
F
R
elease the blue cap.
7
Practical information
Page 242 of 364

240
Warning triangle
As a safety precaution, before leaving your
v ehicle to set up and install the triangle, switch
on the hazard warning lamps and put on your
high visibility vest.
Storage compartment Assembling the triangle
For versions supplied with a triangle as original
e quipment:
F
r
emove the triangle from its case,
F
u
nfold the legs,
F
o
pen out the two sides of the triangle,
F
c
lip them together to complete the
assembly.
For other versions, refer to the instructions
provided with the triangle.
Positioning the triangle
F Place the triangle behind the vehicle, as required by local legislation.
There is a
compartment in the interior trim of
the tailgate to store a
triangle.
F
O
pen the tailgate.
F
R
elease the cover by turning the screw
a
quarter turn anti-clockwise.
Running out of fuel
(Diesel)
On vehicles fitted with Diesel engines, the fuel
system must be primed if you run out of fuel.
If the engine does not start first time, do not
keep trying, but start the procedure again from
the beginning. For more information on Misfuel
prevention (Diesel)
, refer to the
corresponding section.
With 1.6 BlueHDi and
2 .0 BlueHDi 150 S&S engines
F Fill the fuel tank with at least 5 litres of
Diesel.
F
S
witch on the ignition (without starting the
engine).
F
W
ait around 6 seconds and switch off the
ignition.
F
R
epeat the operation 10
times.
F
O
perate the starter to run the engine.
With 1.5 BlueHDi and
2 .0 BlueHDi 180 S&S engines
F Fill the fuel tank with at least 5 litres of
Diesel.
F
S
witch on the ignition (without starting the
engine).
F
W
ait around 1 minute and switch off the
ignition.
F
O
perate the starter to run the engine.
If the engine does not start, repeat the
procedure.
In the event of a breakdown