2018 PEUGEOT 5008 ESP
[x] Cancel search: ESPPage 248 of 364
246
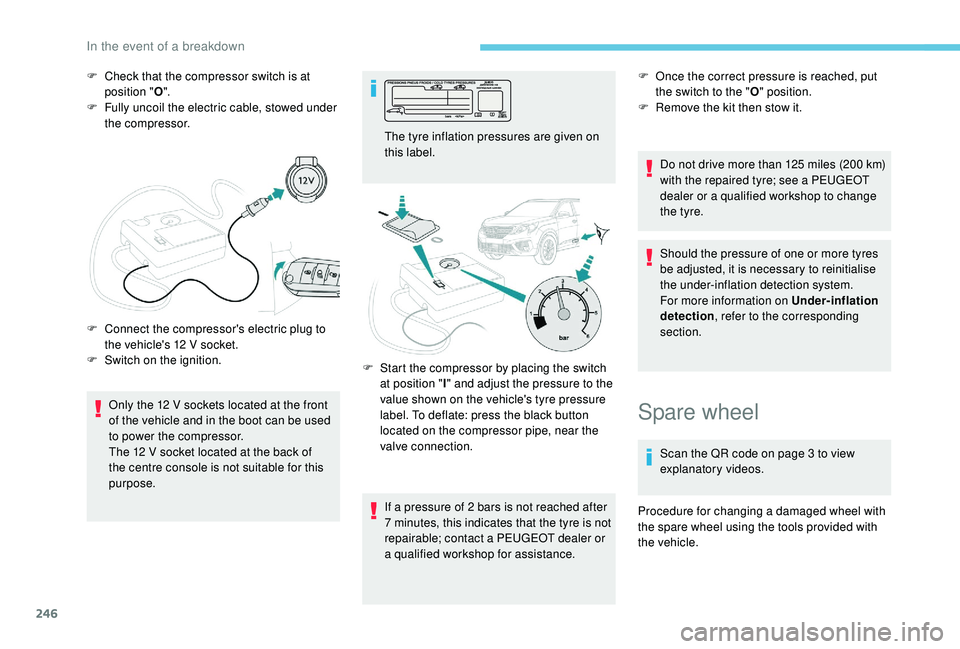
F Check that the compressor switch is at position " O".
F
F
ully uncoil the electric cable, stowed under
the compressor.
Only the 12
V sockets located at the front
of the vehicle and in the boot can be used
to power the compressor.
The 12
V socket located at the back of
the centre console is not suitable for this
purpose.
F
C
onnect the compressor's electric plug to
the vehicle's 12
V socket.
F
S
witch on the ignition. The tyre inflation pressures are given on
this label.
If a
pressure of 2 bars is not reached after
7
minutes, this indicates that the tyre is not
repairable; contact a
PEUGEOT dealer or
a
qualified workshop for assistance.F
O nce the correct pressure is reached, put
the switch to the " O" position.
F
R
emove the kit then stow it.
Do not drive more than 125
miles (200 km)
with the repaired tyre; see a
PEUGEOT
dealer or a
qualified workshop to change
the tyre.
Should the pressure of one or more tyres
be adjusted, it is necessary to reinitialise
the under-inflation detection system.
For more information on Under-inflation
detection , refer to the corresponding
section.
F
S
tart the compressor by placing the switch
at position " I" and adjust the pressure to the
value shown on the vehicle's tyre pressure
label. To deflate: press the black button
located on the compressor pipe, near the
valve connection.
Spare wheel
Scan the QR code on page 3 to view
e xplanatory videos.
Procedure for changing a
damaged wheel with
the spare wheel using the tools provided with
the vehicle.
In the event of a breakdown
Page 255 of 364
253
Model with halogen headlamps
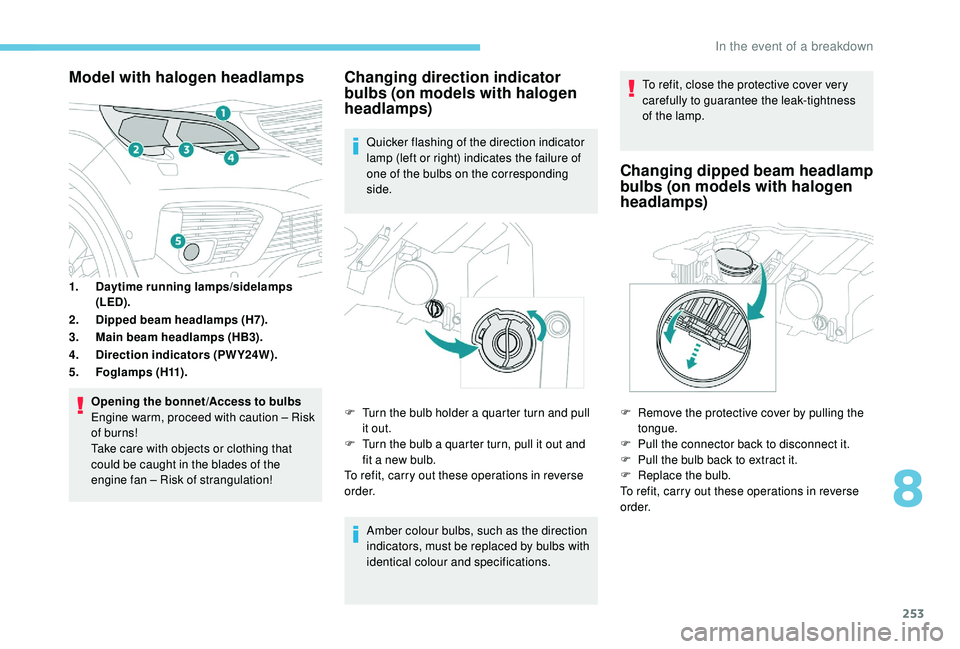
1.Daytime running lamps/sidelamps
(LED).
2. Dipped beam headlamps (H7).
3. Main beam headlamps (HB3).
4. Direction indicators (PWY24W).
5. Fo g l a m p s ( H11) .
Opening the bonnet /Access to bulbs
Engine warm, proceed with caution – Risk
of burns!
Take care with objects or clothing that
could be caught in the blades of the
engine fan – Risk of strangulation!
Changing direction indicator
bulbs (on models with halogen
headlamps)
Quicker flashing of the direction indicator
lamp (left or right) indicates the failure of
one of the bulbs on the corresponding
side.
Amber colour bulbs, such as the direction
indicators, must be replaced by bulbs with
identical colour and specifications. To refit, close the protective cover very
carefully to guarantee the leak-tightness
of the lamp.
Changing dipped beam headlamp
bulbs (on models with halogen
headlamps)
F Remove the protective cover by pulling the
tongue.
F
P
ull the connector back to disconnect it.
F
P
ull the bulb back to extract it.
F
R
eplace the bulb.
To refit, carry out these operations in reverse
o r d e r.
F
T
urn the bulb holder a
quarter turn and pull
it out.
F
T
urn the bulb a
quarter turn, pull it out and
fit a
new bulb.
To refit, carry out these operations in reverse
o r d e r.
8
In the event of a breakdown
Page 259 of 364
257
Changing a wiper blade
Before removing a front
w iper
Removing
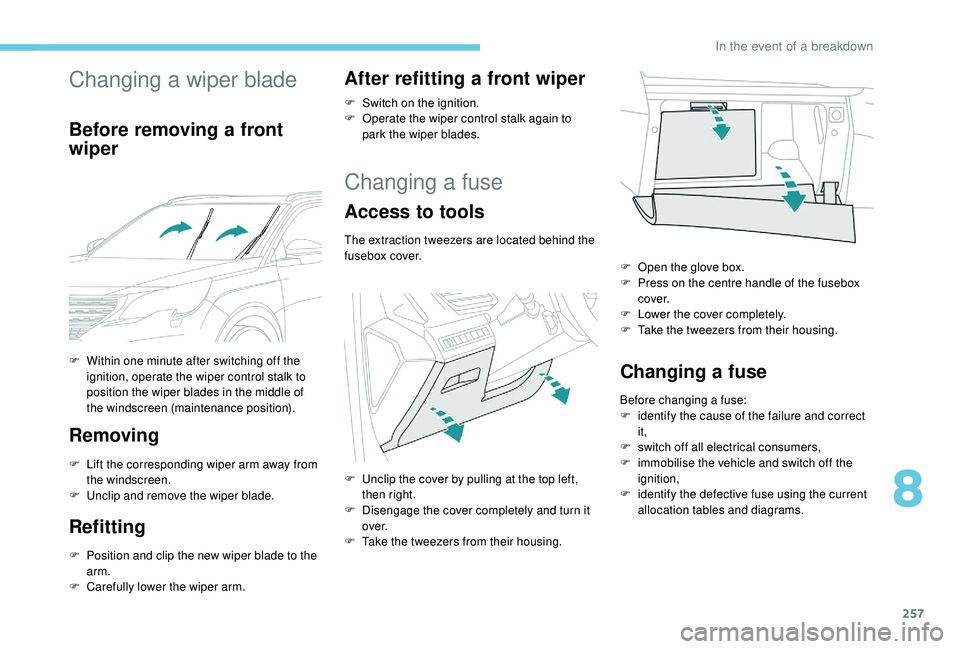
F Lift the corresponding wiper arm away from the windscreen.
F
U
nclip and remove the wiper blade.
Refitting
F Position and clip the new wiper blade to the arm.
F
C
arefully lower the wiper arm.
After refitting a front wiper
F Switch on the ignition.
F O perate the wiper control stalk again to
park the wiper blades.
Changing a fuse
Access to tools
The extraction tweezers are located behind the
fusebox cover.
Changing a fuse
Before changing a fuse:
F i dentify the cause of the failure and correct
it,
F
s
witch off all electrical consumers,
F
i
mmobilise the vehicle and switch off the
ignition,
F
i
dentify the defective fuse using the current
allocation tables and diagrams.
F
W
ithin one minute after switching off the
ignition, operate the wiper control stalk to
position the wiper blades in the middle of
the windscreen (maintenance position).
F
U
nclip the cover by pulling at the top left,
then right.
F
D
isengage the cover completely and turn it
ove r.
F
T
ake the tweezers from their housing. F
O
pen the glove box.
F
P
ress on the centre handle of the fusebox
c ove r.
F
L
ower the cover completely.
F
T
ake the tweezers from their housing.
8
In the event of a breakdown
Page 260 of 364
258
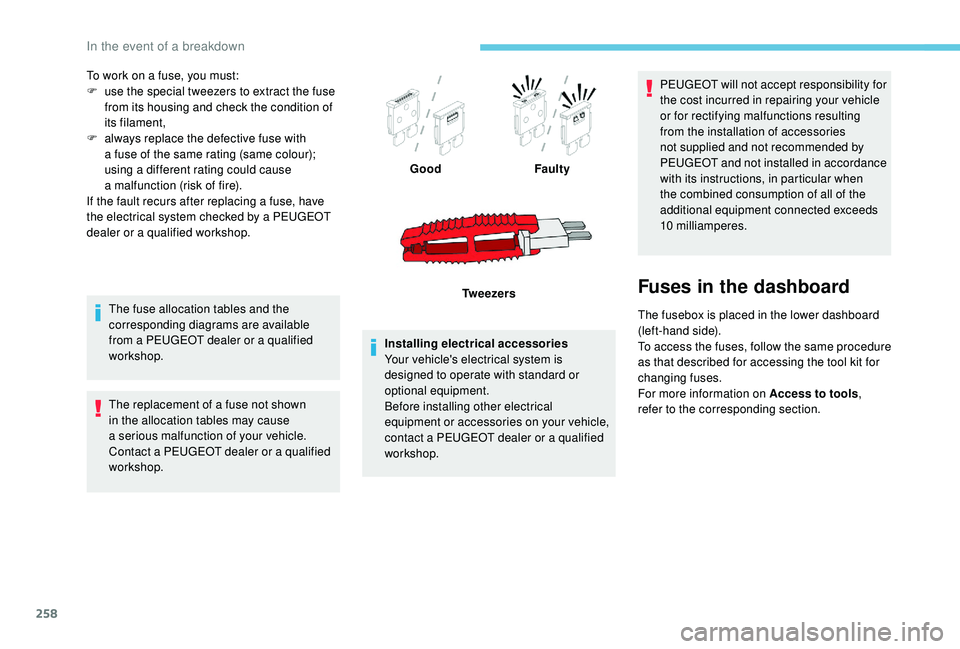
To work on a fuse, you must:
F u se the special tweezers to extract the fuse
from its housing and check the condition of
its filament,
F
a
lways replace the defective fuse with
a
fuse of the same rating (same colour);
using a
different rating could cause
a
malfunction (risk of fire).
If the fault recurs after replacing a
fuse, have
the electrical system checked by a
PEUGEOT
dealer or a
qualified workshop.
The fuse allocation tables and the
corresponding diagrams are available
from a
PEUGEOT dealer or a qualified
workshop.
The replacement of a
fuse not shown
in the allocation tables may cause
a
serious malfunction of your vehicle.
Contact a
PEUGEOT dealer or a qualified
workshop. Installing electrical accessories
Your vehicle's electrical system is
designed to operate with standard or
optional equipment.
Before installing other electrical
equipment or accessories on your vehicle,
contact a
PEUGEOT dealer or a qualified
workshop. PEUGEOT will not accept responsibility for
the cost incurred in repairing your vehicle
or for rectifying malfunctions resulting
from the installation of accessories
not supplied and not recommended by
PEUGEOT and not installed in accordance
with its instructions, in particular when
the combined consumption of all of the
additional equipment connected exceeds
10
milliamperes.
Fuses in the dashboard
The fusebox is placed in the lower dashboard
(left-hand side).
To access the fuses, follow the same procedure
as that described for accessing the tool kit for
changing fuses.
For more information on Access to tools,
refer to the corresponding section.
Good
Faulty
Tw e e z e r s
In the event of a breakdown
Page 267 of 364
265
For right-hand drive vehicles, when the
total distance recorder has reached
62 miles (100 km), it is necessary to wait
approx. 15
minutes before starting the
engine.
However, if minor problems persist following
this operation, contact a
PEUGEOT dealer or
a
qualified workshop.
Referring to the corresponding section, you
must yourself reinitialise or reset certain
systems, such as:
-
t
he key with remote control or electronic key
(depending on version),
-
t
he sunroof and its electric blind,
-
t
he electric windows,
-
t
he date and time,
-
t
he preset radio stations. The Stop & Start system may not be
operational during the trip following the
first engine start.
In this case, the system will only be
available again after a
continuous
period of immobilisation of the vehicle,
a period which depends on the exterior
temperature and the state of charge of the
battery (up to about 8 hours).
Do not force the lever as locking will not
be possible if the clamp is not positioned
correctly; start the procedure again.
Following reconnection of the
battery
After reconnecting the battery, turn on the
ignition and wait 1
minute before starting
the engine, in order to enable the electronic
systems to initialise.
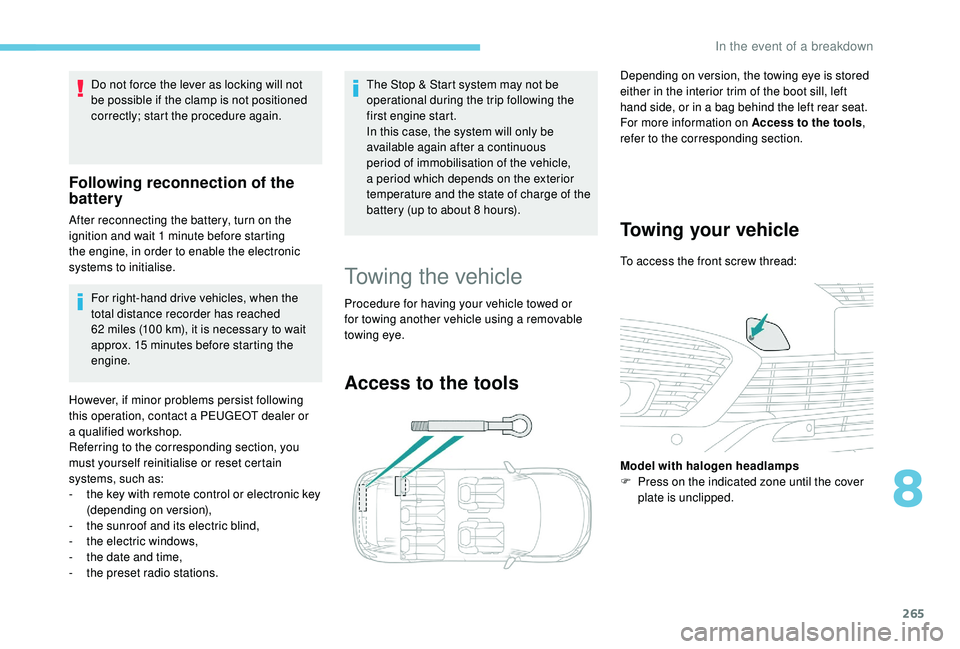
Towing the vehicle
Procedure for having your vehicle towed or
for towing another vehicle using a removable
towing eye.
Access to the tools
Depending on version, the towing eye is stored
either in the interior trim of the boot sill, left
hand side, or in a
bag behind the left rear seat.
For more information on Access to the tools ,
refer to the corresponding section.
Towing your vehicle
To access the front screw thread:
Model with halogen headlamps
F
P
ress on the indicated zone until the cover
plate is unclipped.
8
In the event of a breakdown
Page 269 of 364
267
Engine technical data and
towed loads
Engines
The engine characteristics are given in the
vehicle's registration document, as well as in
sales brochures.The maximum power corresponds to the
value type-approved on a
test bed, under
conditions defined in European legislation
(Directive 1999/99/EC).
For more information, contact a
PEUGEOT
dealer or a
qualified workshop.
Weights and towed loads
The weights and towed loads relating to your
vehicle are given in the registration document,
as well as in sales brochures.
These values are also given on the
manufacturer's plate or label.
For more information, contact a PEUGEOT
dealer or a
qualified workshop. The GTW values and the towable loads
listed are valid for a
maximum altitude of
1,000 metres. The towable load must be
reduced by steps of 10% for each additional
1,000
metres.
The maximum authorised nose weight
corresponds to the weight permitted on the
towbar.
GT W: Gross train weight.
When exterior temperatures are high,
the vehicle per formance may be limited
in order to protect the engine. When the
exterior temperature is higher than 37°C,
limit the towed weight.
Towing using a lightly loaded vehicle can
adversely affect roadholding.
Braking distances are increased when
towing a trailer.
When using a
vehicle to tow, never
exceed a
speed of approximately 60 mph
(100
km/h) (obser ve the local legislation in
f o r c e). If the exterior temperature is high, it is
recommended that the engine be allowed
to idle for 1
to 2 minutes after the vehicle
comes to a stop, to facilitate its cooling.
9
Technical data
Page 278 of 364
2
12:13
18,5 21,5
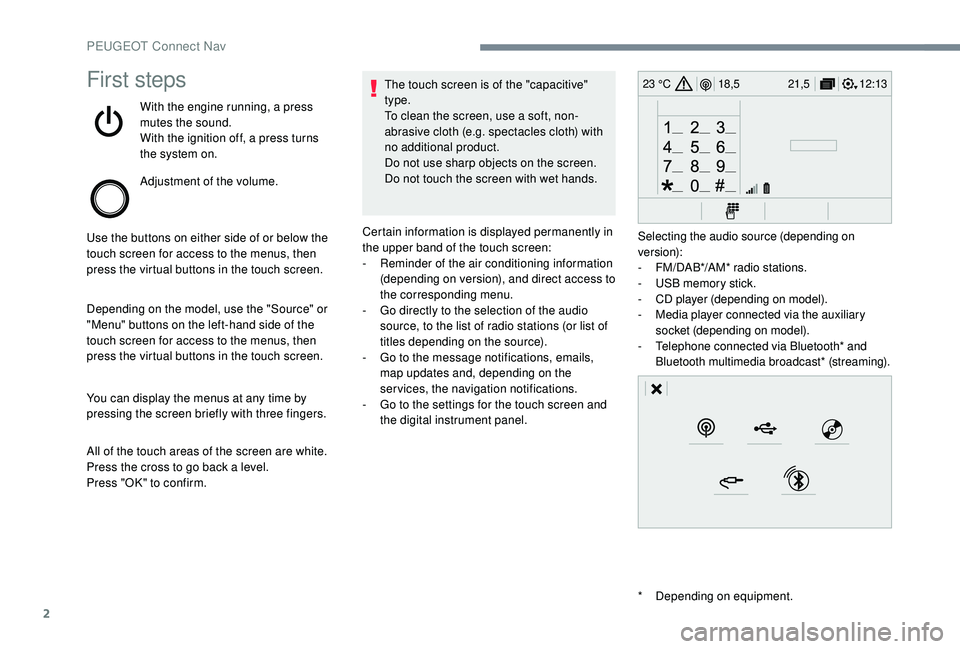
23 °CFirst steps
With the engine running, a press
mutes the sound.
With the ignition off, a press turns
the system on.
Adjustment of the volume.
Use the buttons on either side of or below the
touch screen for access to the menus, then
press the virtual buttons in the touch screen.
Depending on the model, use the "Source" or
"Menu" buttons on the left-hand side of the
touch screen for access to the menus, then
press the virtual buttons in the touch screen.
You can display the menus at any time by
pressing the screen briefly with three fingers.
All of the touch areas of the screen are white.
Press the cross to go back a
level.
Press "OK" to confirm. The touch screen is of the "capacitive"
type.
To clean the screen, use a
soft, non-
abrasive cloth (e.g. spectacles cloth) with
no additional product.
Do not use sharp objects on the screen.
Do not touch the screen with wet hands.
*
D
epending on equipment.
Certain information is displayed permanently in
the upper band of the touch screen:
-
R
eminder of the air conditioning information
(depending on version), and direct access to
the corresponding menu.
-
G
o directly to the selection of the audio
source, to the list of radio stations (or list of
titles depending on the source).
-
G
o to the message notifications, emails,
map updates and, depending on the
services, the navigation notifications.
-
G
o to the settings for the touch screen and
the digital instrument panel. Selecting the audio source (depending on
version):
-
F
M/DAB*/AM* radio stations.
-
U
SB memory stick.
-
C
D player (depending on model).
-
M
edia player connected via the auxiliary
socket (depending on model).
-
T
elephone connected via Bluetooth* and
Bluetooth multimedia broadcast* (streaming).
PEUGEOT Connect Nav
Page 297 of 364
21
Radio
Selecting a station
or Press Radio Media
to display the
primary page.
Press " Frequency ".
Press one of the buttons for an
automatic search for radio stations.
Or Move the cursor for a
manual search
for frequencies up or down.
Or
or Press Radio Media
to display the
primary page.
Press the " OPTIONS" button to go to the
secondary page.
Select "Radio stations " in the
secondary page.
Press " Frequency ". Enter the values using the virtual
keypad.
First enter the units then click on the
decimals zone to enter the figures
after the decimal point.
Press "
OK" to confirm.
Radio reception may be affected by the
use of electrical equipment not approved
by the Brand, such as a
USB charger
connected to the 12
V socket.
The exterior environment (hills, buildings,
tunnels, basement car parks, etc.) may
block reception, including in RDS mode.
This is a
normal effect of the way in
which radio waves are transmitted and
does not indicate any failure of the audio
equipment.
Presetting a station
Select a radio station or frequency.
(refer to the corresponding section)
Press " Presets ". Make a
long press on one of the
buttons to preset the station.
Activating/Deactivating RDS
or Press Radio Media
to display the
primary page.
Press the " OPTIONS" button to go to the
secondary page.
Select "Radio settings ".
Select " General ".
Activate/Deactivate " Station
tracking ".
Press " OK" to confirm.
RDS, if activated, allows you to continue
listening to the same station by automatic
retuning to alternative frequencies. However,
in certain conditions, coverage of an RDS
station may not be assured throughout the
entire country as radio stations do not cover
100% of the territory. This explains the loss
of reception of the station during a
journey.
.
PEUGEOT Connect Nav