2018 Peugeot 308 seats
[x] Cancel search: seatsPage 4 of 360
2
.
.
Head-up digital screen 8
W arning and indicator lamps 1 1
Indicators
29
Manual test
3
5
Distance recorders
3
6
Lighting dimmer
3
6
Ambient lighting
3
6
Trip computer
3
7
Monochrome screen C
3
8
Touch screen
4
0
Remote control
4
8
K
eyless Entry and Starting
5
0
Back-up procedures
5
4
Central locking
5
7
Anti-intrusion security
5
8
Alarm
5
8
Doors
60
Boot
6
1
Hands-free tailgate
62
E
lectric windows
6
5
Panoramic opening sunroof
6
7Driving position
7
0
Front seats
7
1
Steering wheel adjustment
7
6
Mirrors
76
R
ear seats
7
8
i- Cockpit Amplify function
8
0
Heating and Ventilation
8
1
Manual air conditioning 8 4
Semi-automatic mono-zone air conditioning 8 4
Automatic dual-zone air conditioning
8
6
Recirculation of the interior air
9
0
Front demist – defrost
9
0
Heated windscreen
9
1
Rear screen demist – defrost
9
1
Programmable heating
9
2
Front fittings
9
6
Courtesy lamps
1
02
Interior ambient lighting
1
03
Rear fittings
1
04
Boot fittings
1
05Exterior lighting control stalk
1
09
Direction indicators
1
11
Headlamp adjustment
1
12
Automatic illumination of headlamps
1
12
Automatic headlamp dipping
1
14
Cornering lighting
1
16
Wiper control stalk
1
17
Automatic windscreen wipers 1 19
General safety recommendations
1
21
Hazard warning lamps
1
22
H or n
12
2
Emergency or assistance call
1
22
Electronic stability control (ESC)
1
24
Advanced Grip Control
1
27
Hill Assist Descent Control
1
28
Seat belts
1
29
Airbags
133
Child seats
1
37
Deactivating the front passenger airbag
1
38
ISOFIX mountings and child seats
1
43
i-Size child seats
1
46
Child lock
1
49
InstrumentsAccess
Over view
Ease of use and comfort
Lighting and visibility
Safety
Eco-driving
Instruments and controls 4
Contents
Page 7 of 360
5
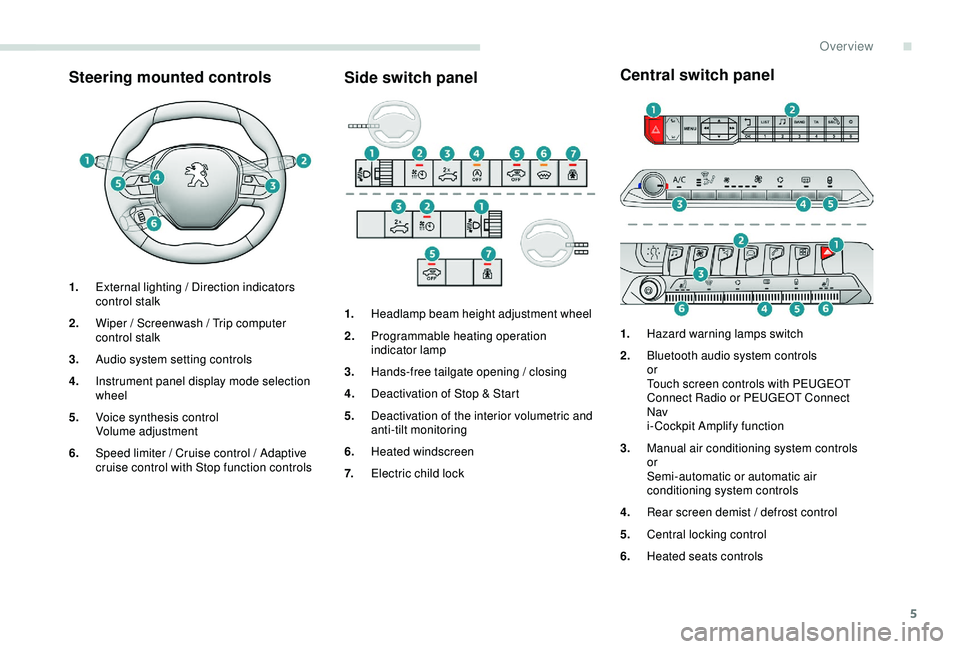
Steering mounted controlsSide switch panelCentral switch panel
1.
External lighting / Direction indicators
control stalk
2. Wiper / Screenwash / Trip computer
control stalk
3. Audio system setting controls
4. Instrument panel display mode selection
wheel
5. Voice synthesis control
Volume adjustment
6. Speed limiter / Cruise control / Adaptive
cruise control with Stop function controls 1.
Headlamp beam height adjustment wheel
2. Programmable heating operation
indicator lamp
3. Hands-free tailgate opening / closing
4. Deactivation of Stop & Start
5. Deactivation of the interior volumetric and
anti-tilt monitoring
6. Heated windscreen
7. Electric child lock 1.
Hazard warning lamps switch
2. Bluetooth audio system controls
or
Touch screen controls with PEUGEOT
Connect Radio or PEUGEOT Connect
Nav
i- Cockpit Amplify function
3. Manual air conditioning system controls
or
Semi-automatic or automatic air
conditioning system controls
4. Rear screen demist / defrost control
5. Central locking control
6. Heated seats controls
.
Over view
Page 9 of 360
7
Limit the causes of excess
consumption
Spread loads throughout the vehicle; place
the heaviest items in the bottom of the boot,
as close as possible to the rear seats.
Limit the loads carried in the vehicle and
reduce wind resistance (roof bars, roof rack,
bicycle carrier, trailer, etc.). Preferably, use a
roof box.
Remove roof bars and roof racks after use.
At the end of winter, remove snow tyres and
refit your summer tyres.
Observe the recommendations
on maintenance
Check the tyre pressures regularly, when cold,
referring to the label in the door aperture,
driver's side.
Carry out this check in particular:
-
b
efore a long journey,
-
a
t each change of season,
-
a
fter a long period out of use.
Do not forget the spare wheel and the tyres on
any trailer or caravan. Have your vehicle ser viced regularly (engine
oil, oil filter, air filter, cabin filter, etc.) and
obser ve the schedule of operations in the
manufacturer's service schedule.
When filling the tank, do not continue after the
3
rd cut-off of the nozzle to avoid over flow.
At the wheel of your new vehicle, it is only
after the first 1,900
miles (3,000 kilometres)
that you will see the fuel consumption settle
down to a consistent average. With a BlueHDi Diesel engine, if the SCR
system is faulty, your vehicle becomes
polluting. As soon as possible, visit a
PEUGEOT dealer or a qualified workshop to
make your vehicle's level of nitrogen oxides
emissions compliant to the standard.
.
Eco-driving
Page 64 of 360
62
Back-up release
To manually unlock the boot in the event of
a battery or central locking failure.
Unlocking
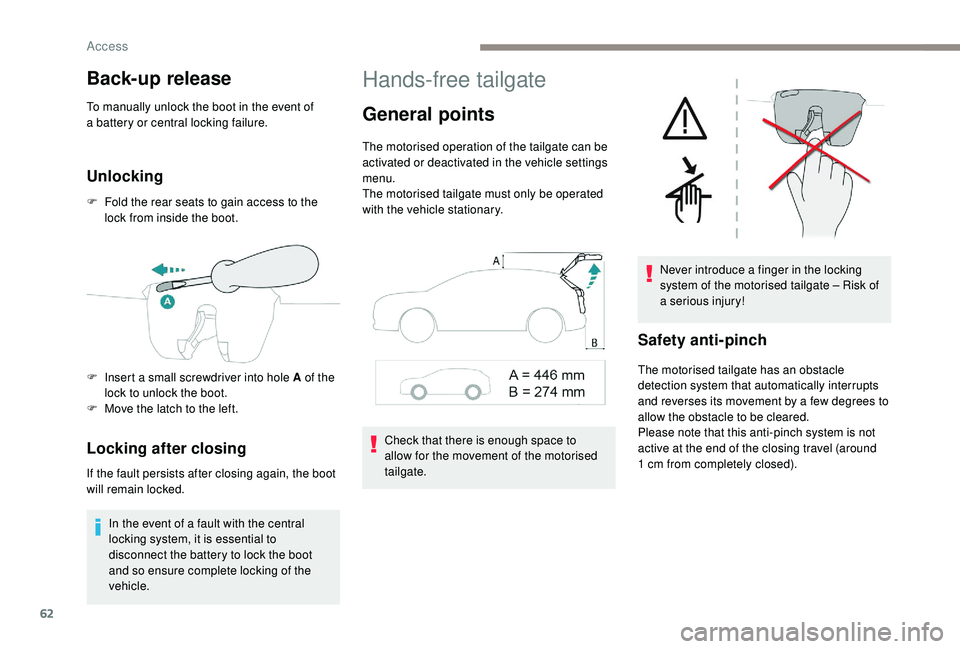
F Fold the rear seats to gain access to the lock from inside the boot.
Locking after closing
If the fault persists after closing again, the boot
will remain locked.
In the event of a fault with the central
locking system, it is essential to
disconnect the battery to lock the boot
and so ensure complete locking of the
vehicle.
Hands-free tailgate
General points
The motorised operation of the tailgate can be
activated or deactivated in the vehicle settings
menu.
The motorised tailgate must only be operated
with the vehicle stationary.
Check that there is enough space to
allow for the movement of the motorised
tailgate. Never introduce a finger in the locking
system of the motorised tailgate – Risk of
a serious injury!
Safety anti-pinch
The motorised tailgate has an obstacle
detection system that automatically interrupts
and reverses its movement by a few degrees to
allow the obstacle to be cleared.
Please note that this anti-pinch system is not
active at the end of the closing travel (around
1
cm from completely closed).
F
I
nsert a small screwdriver into hole A of the
lock to unlock the boot.
F
M
ove the latch to the left.
Access
Page 67 of 360
65
Reinitialising the
motorised tailgate
This operation is necessary where there is no
movement – after detection of an obstacle,
connecting or recharging the battery, etc.
F
O
pen the tailgate manually, if necessary.
F
F
ully close the tailgate manually.
If the problem persists, contact a PEUGEOT
dealer or a qualified workshop.
Precautions in use
In wintry conditions
In the event of an accumulation of snow
on the tailgate, clear the snow before
commanding a motorised opening of the
tailgate.
The formation of ice can block the tailgate
and prevent its opening: wait until the ice
melts with the heating of the passenger
compartment.
When washing
When washing the vehicle in an automatic
car wash, do not forget to lock your vehicle
to avoid the risk of unexpected opening.
Recommendations related
to the "Hands-Free Tailgate
Access" function
If several kicking movements to operate the
tailgate have no effect, wait a few seconds
before trying again.
The function automatically deactivates in heavy
rain or following a build-up of snow.
If it does not work, check that the electronic key
is not exposed to a source of electromagnetic
pollution (smartphone, etc.).
The function may not work correctly with a
prosthetic leg.
The function may not work correctly if your
vehicle is fitted with a towbar. -
y
our vehicle is being serviced,
-
y
ou are accessing the spare wheel
(depending on version).
To avoid such operating problems, keep the
electronic key away from the recognition
zone or deactivate the "Hands-Free Tailgate
Access" function.
In some circumstances, the tailgate may open
or close by itself, particularly if:
-
y
ou hitch or unhitch a trailer,
-
y
ou fit or remove a bicycle carrier,
-
y
ou load or unload bicycles from a bicycle
c a r r i e r,
-
y
ou place or lift something behind the
vehicle,
-
an
animal approaches the rear bumper,
-
y
ou are washing your vehicle,
Electric windows
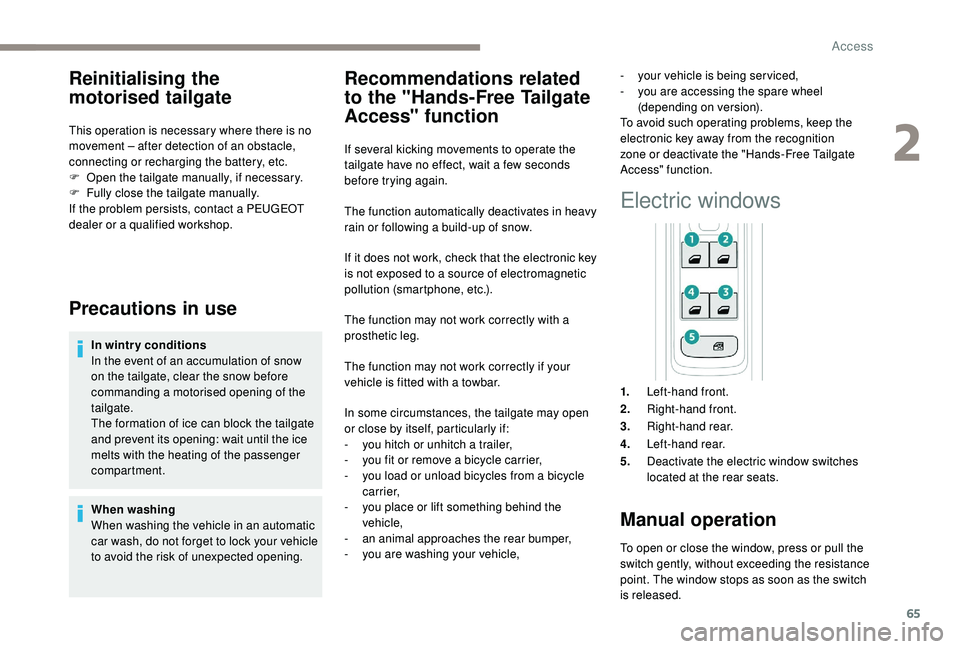
1. Left-hand front.
2. Right-hand front.
3. Right-hand rear.
4. Left-hand rear.
5. Deactivate the electric window switches
located at the rear seats.
Manual operation
To open or close the window, press or pull the
switch gently, without exceeding the resistance
point. The window stops as soon as the switch
is released.
2
Access
Page 72 of 360
70
Driving position
Adopting a good driving position helps improve
your comfort and protection.
It also optimises interior and exterior visibility
as well as access to controls.
Sitting comfortably
Whether or not your vehicle has certain seat
adjustments described in this section depends
on the trim level and country of sale.
Driver's side
As a safety precaution, adjust the seats
only when the vehicle is stationary.If your vehicle has electric seats, the
ignition must be on to adjust them.
Passenger's side
Sit fully back in the seat with your pelvis, back
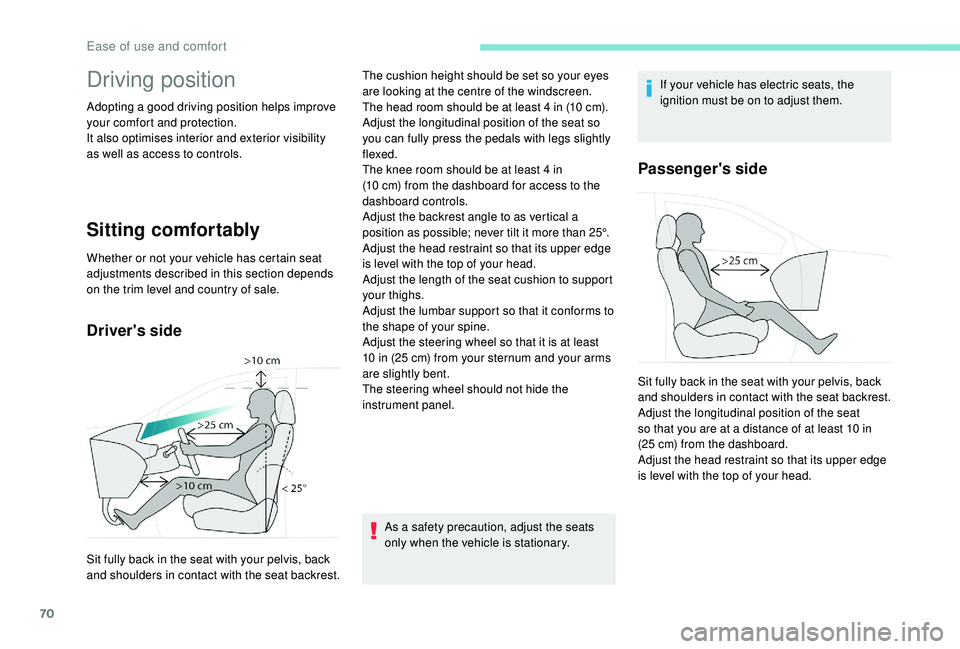
and shoulders in contact with the seat backrest.The cushion height should be set so your eyes
are looking at the centre of the windscreen.
The head room should be at least 4
in (10 cm).
Adjust the longitudinal position of the seat so
you can fully press the pedals with legs slightly
flexed.
The knee room should be at least 4 in
(10 cm) from the dashboard for access to the
dashboard controls.
Adjust the backrest angle to as vertical a
position as possible; never tilt it more than 25°.
Adjust the head restraint so that its upper edge
is level with the top of your head.
Adjust the length of the seat cushion to support
your thighs.
Adjust the lumbar support so that it conforms to
the shape of your spine.
Adjust the steering wheel so that it is at least
10 in (25 cm) from your sternum and your arms
are slightly bent.
The steering wheel should not hide the
instrument panel. Sit fully back in the seat with your pelvis, back
and shoulders in contact with the seat backrest.
Adjust the longitudinal position of the seat
so that you are at a distance of at least 10 in
(25 cm) from the dashboard.
Adjust the head restraint so that its upper edge
is level with the top of your head.
Ease of use and comfort
Page 73 of 360
71
Before moving off
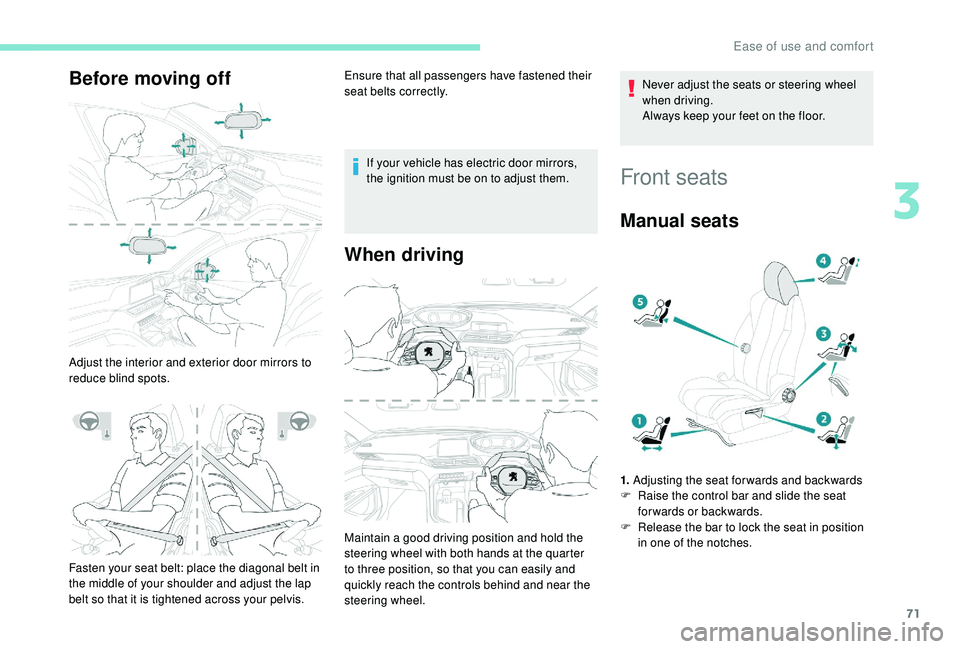
Adjust the interior and exterior door mirrors to
reduce blind spots.Ensure that all passengers have fastened their
seat belts correctly.
If your vehicle has electric door mirrors,
the ignition must be on to adjust them.
When driving
Fasten your seat belt: place the diagonal belt in
the middle of your shoulder and adjust the lap
belt so that it is tightened across your pelvis. Maintain a good driving position and hold the
steering wheel with both hands at the quarter
to three position, so that you can easily and
quickly reach the controls behind and near the
steering wheel. Never adjust the seats or steering wheel
when driving.
Always keep your feet on the floor.
Front seats
Manual seats
1.
Adjusting the seat forwards and backwards
F R aise the control bar and slide the seat
forwards or backwards.
F
R
elease the bar to lock the seat in position
in one of the notches.
3
Ease of use and comfort
Page 74 of 360
72
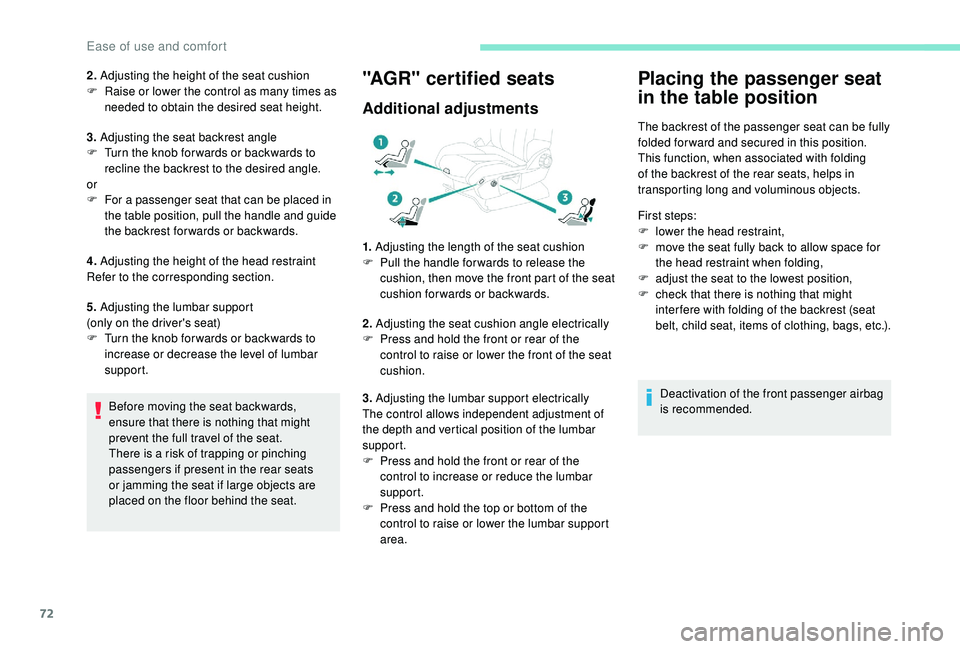
2. Adjusting the height of the seat cushion
F R aise or lower the control as many times as
needed to obtain the desired seat height.
3. Adjusting the seat backrest angle
F
T
urn the knob for wards or backwards to
recline the backrest to the desired angle.
or
F
F
or a passenger seat that can be placed in
the table position, pull the handle and guide
the backrest for wards or backwards.
4. Adjusting the height of the head restraint
Refer to the corresponding section.
5. Adjusting the lumbar support
(only on the driver's seat)
F
T
urn the knob for wards or backwards to
increase or decrease the level of lumbar
support.
Before moving the seat backwards,
ensure that there is nothing that might
prevent the full travel of the seat.
There is a risk of trapping or pinching
passengers if present in the rear seats
or jamming the seat if large objects are
placed on the floor behind the seat."AGR" certified seats
Additional adjustments
1. Adjusting the length of the seat cushion
F P ull the handle for wards to release the
cushion, then move the front part of the seat
cushion forwards or backwards.
2. Adjusting the seat cushion angle electrically
F
P
ress and hold the front or rear of the
control to raise or lower the front of the seat
cushion.
3. Adjusting the lumbar support electrically
The control allows independent adjustment of
the depth and vertical position of the lumbar
support.
F
P
ress and hold the front or rear of the
control to increase or reduce the lumbar
support.
F
P
ress and hold the top or bottom of the
control to raise or lower the lumbar support
area.
Placing the passenger seat
in the table position
The backrest of the passenger seat can be fully
folded for ward and secured in this position.
This function, when associated with folding
of the backrest of the rear seats, helps in
transporting long and voluminous objects.
First steps:
F
l
ower the head restraint,
F
m
ove the seat fully back to allow space for
the head restraint when folding,
F
a
djust the seat to the lowest position,
F
c
heck that there is nothing that might
inter fere with folding of the backrest (seat
belt, child seat, items of clothing, bags, etc.).
Deactivation of the front passenger airbag
is recommended.
Ease of use and comfort