2018 Peugeot 308 seats
[x] Cancel search: seatsPage 76 of 360
74
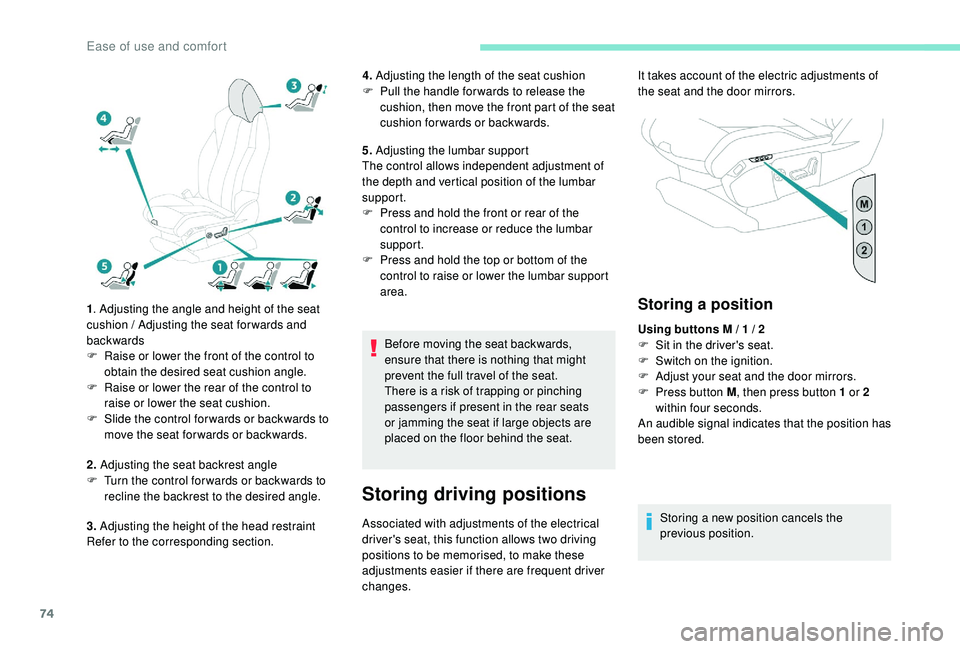
1. Adjusting the angle and height of the seat
cushion / Adjusting the seat forwards and
backwards
F
R
aise or lower the front of the control to
obtain the desired seat cushion angle.
F
R
aise or lower the rear of the control to
raise or lower the seat cushion.
F
S
lide the control for wards or backwards to
move the seat for wards or backwards.
2. Adjusting the seat backrest angle
F
T
urn the control for wards or backwards to
recline the backrest to the desired angle.
3. Adjusting the height of the head restraint
Refer to the corresponding section. 4.
Adjusting the length of the seat cushion
F
P
ull the handle for wards to release the
cushion, then move the front part of the seat
cushion forwards or backwards.
5. Adjusting the lumbar support
The control allows independent adjustment of
the depth and vertical position of the lumbar
support.
F
P
ress and hold the front or rear of the
control to increase or reduce the lumbar
support.
F
P
ress and hold the top or bottom of the
control to raise or lower the lumbar support
area.
Before moving the seat backwards,
ensure that there is nothing that might
prevent the full travel of the seat.
There is a risk of trapping or pinching
passengers if present in the rear seats
or jamming the seat if large objects are
placed on the floor behind the seat.
Storing driving positions
Associated with adjustments of the electrical
driver's seat, this function allows two driving
positions to be memorised, to make these
adjustments easier if there are frequent driver
changes.
Storing a position
Using buttons M / 1 / 2
F S it in the driver's seat.
F
S
witch on the ignition.
F
A
djust your seat and the door mirrors.
F
P
ress button M , then press button 1 or 2
within four seconds.
An audible signal indicates that the position has
been stored.
Storing a new position cancels the
previous position.
It takes account of the electric adjustments of
the seat and the door mirrors.
Ease of use and comfort
Page 77 of 360
75
Recalling a stored position
Ignition on or engine running
F P ress button 1 or 2 to recall the
corresponding position.
An audible signal confirms that adjustment is
complete.
You can interrupt the current movement
by pressing button M , 1 or 2 or by using
one of the seat controls.
A stored position cannot be recalled
while driving.
Recalling stored positions is deactivated
45
seconds after switching off the
ignition.
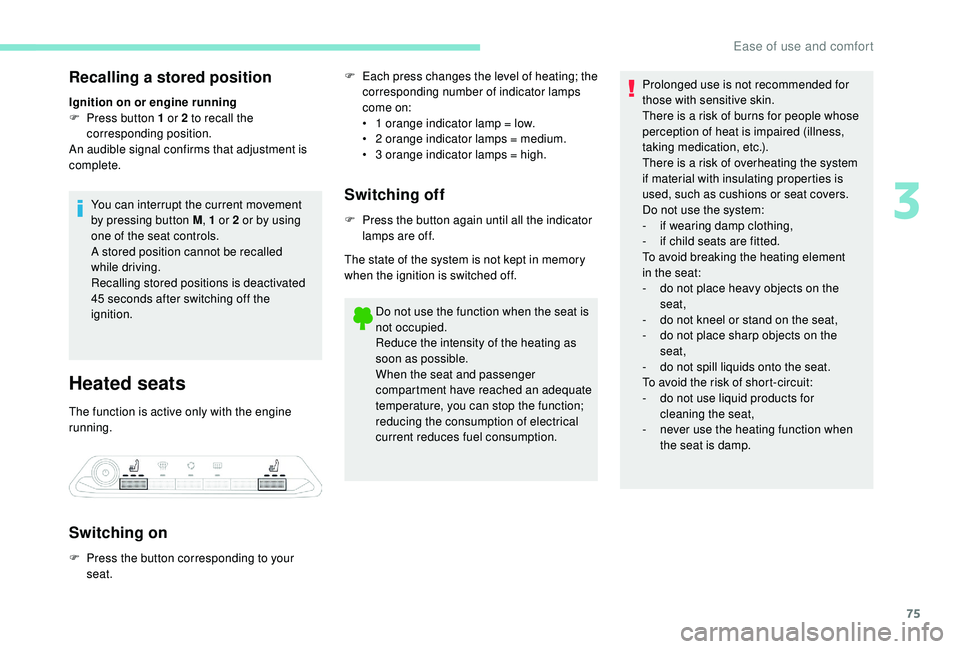
Heated seats
The function is active only with the engine
running.
Switching on
F Each press changes the level of heating; the corresponding number of indicator lamps
come on:
•
1
orange indicator lamp = low.
•
2
orange indicator lamps = medium.
•
3
orange indicator lamps = high.
Switching off
F Press the button again until all the indicator lamps are off.
The state of the system is not kept in memory
when the ignition is switched off.
Do not use the function when the seat is
not occupied.
Reduce the intensity of the heating as
soon as possible.
When the seat and passenger
compartment have reached an adequate
temperature, you can stop the function;
reducing the consumption of electrical
current reduces fuel consumption.
F
P
ress the button corresponding to your
seat. Prolonged use is not recommended for
those with sensitive skin.
There is a risk of burns for people whose
perception of heat is impaired (illness,
taking medication, etc.).
There is a risk of overheating the system
if material with insulating properties is
used, such as cushions or seat covers.
Do not use the system:
-
i f wearing damp clothing,
-
i
f child seats are fitted.
To avoid breaking the heating element
in the seat:
-
d
o not place heavy objects on the
seat,
-
d
o not kneel or stand on the seat,
-
d
o not place sharp objects on the
seat,
-
d
o not spill liquids onto the seat.
To avoid the risk of short-circuit:
-
d
o not use liquid products for
cleaning the seat,
-
n
ever use the heating function when
the seat is damp.
3
Ease of use and comfort
Page 80 of 360
78
Manual model
Adjustment
F A djust the mirror so that the glass is
directed correctly in the "day" position.
Day / night position
F
P
ull the lever to change to the "night" anti-
dazzle position.
F
P
ush the lever to change to the normal
"day" position.
Automatic "electrochrome"
model
In order to ensure optimum visibility
during your manoeuvres, the mirror
lightens automatically when reverse gear
is engaged.
This system automatically and progressively
changes between day and night use by means
of a sensor measuring the light coming from the
rear of the vehicle.
Rear seats
Bench seat with a fixed cushion and split
folding backrests (2/3 -1/3) to adapt the boot
load space.
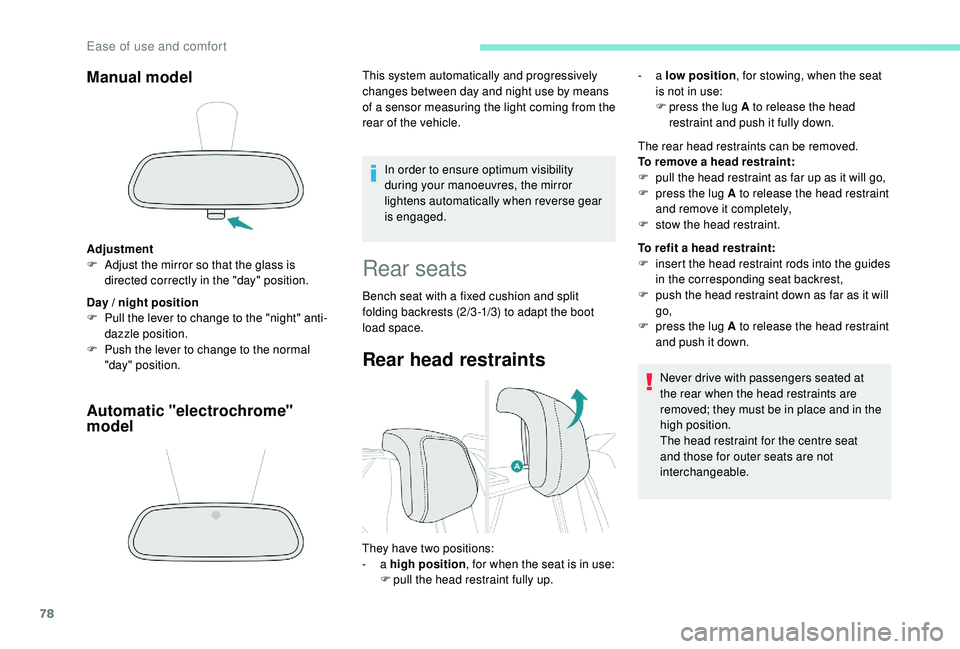
Rear head restraints
The rear head restraints can be removed.
To remove a head restraint:
F
p
ull the head restraint as far up as it will go,
F
p
ress the lug A to release the head restraint
and remove it completely,
F
s
tow the head restraint.
To refit a head restraint:
F
i
nsert the head restraint rods into the guides
in the corresponding seat backrest,
F
p
ush the head restraint down as far as it will
go,
F
p
ress the lug A to release the head restraint
and push it down.
Never drive with passengers seated at
the rear when the head restraints are
removed; they must be in place and in the
high position.
The head restraint for the centre seat
and those for outer seats are not
interchangeable.
They have two positions:
-
a high position , for when the seat is in use:
F
p
ull the head restraint fully up. -
a
low position , for stowing, when the seat
is not in use:
F
p
ress the lug A to release the head
restraint and push it fully down.
Ease of use and comfort
Page 81 of 360
79
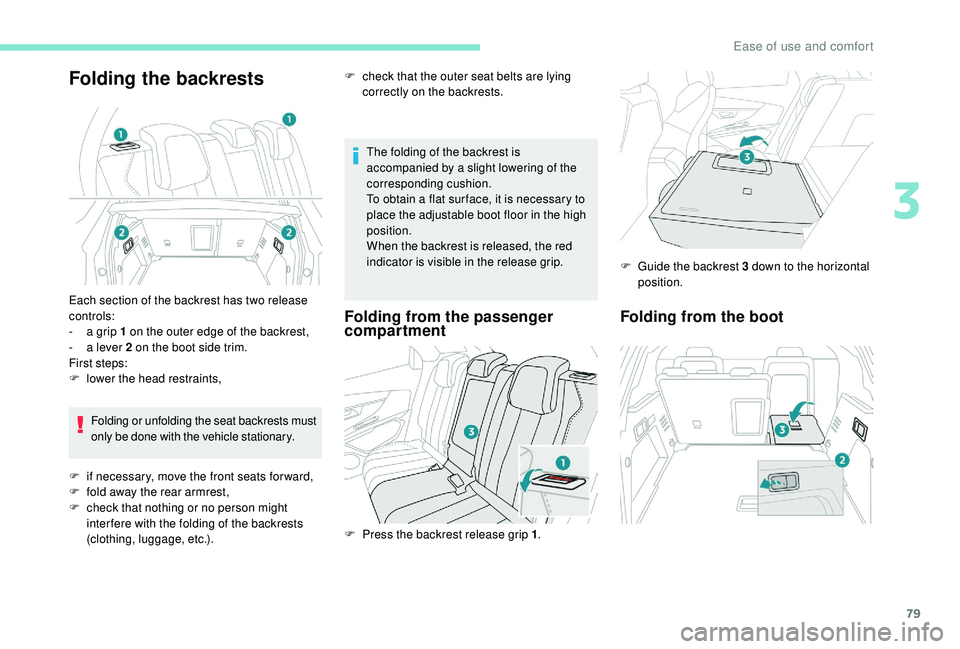
Folding the backrests
The folding of the backrest is
accompanied by a slight lowering of the
corresponding cushion.
To obtain a flat sur face, it is necessary to
place the adjustable boot floor in the high
position.
When the backrest is released, the red
indicator is visible in the release grip.
Folding from the passenger
compartmentFolding from the boot
Each section of the backrest has two release
controls:
-
a g
rip 1 on the outer edge of the backrest,
-
a l
ever 2 on the boot side trim.
First steps:
F
l
ower the head restraints,Folding or unfolding the seat backrests must
only be done with the vehicle stationary.
F
i
f necessary, move the front seats for ward,
F
f
old away the rear armrest,
F
c
heck that nothing or no person might
inter fere with the folding of the backrests
(clothing, luggage, etc.). F
P
ress the backrest release grip 1.F
G
uide the backrest 3 down to the horizontal
position.
F
c
heck that the outer seat belts are lying
correctly on the backrests.
3
Ease of use and comfort
Page 89 of 360
87
�$�8�7�2
�)�$�6�7
�$�8�7�2
�1�2�5�0�$�/
�6�2�)�7
�$�8�7�2
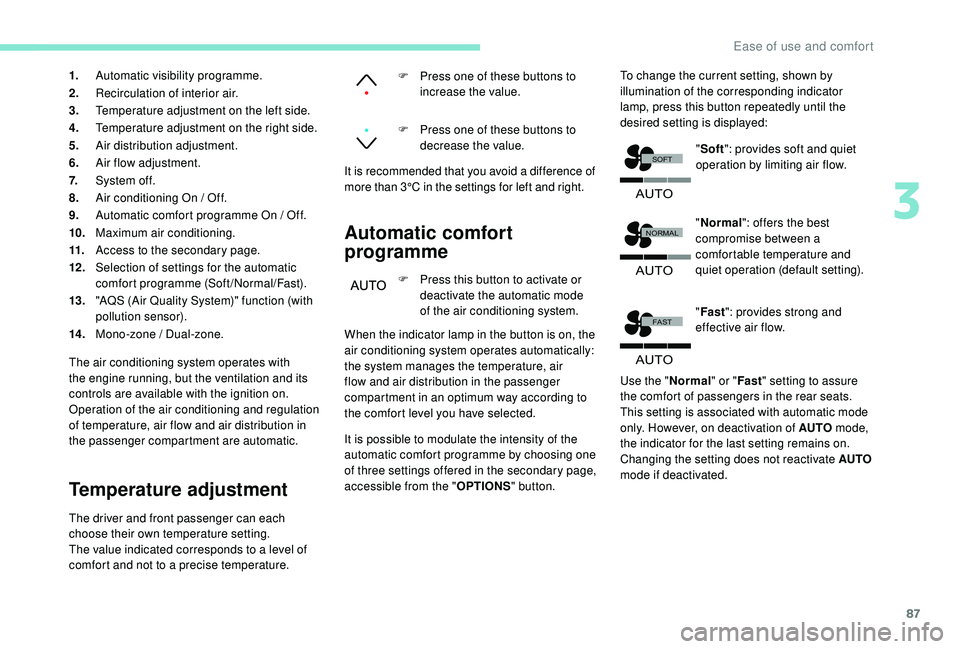
1.Automatic visibility programme.
2. Recirculation of interior air.
3. Temperature adjustment on the left side.
4. Temperature adjustment on the right side.
5. Air distribution adjustment.
6. Air flow adjustment.
7. System of f.
8. Air conditioning On / Off.
9. Automatic comfort programme On / Off.
10. Maximum air conditioning.
11. Access to the secondary page.
12 . Selection of settings for the automatic
comfort programme (Soft/Normal/Fast).
13. "AQS (Air Quality System)" function (with
pollution sensor).
14 . Mono-zone / Dual-zone.
The air conditioning system operates with
the engine running, but the ventilation and its
controls are available with the ignition on.
Operation of the air conditioning and regulation
of temperature, air flow and air distribution in
the passenger compartment are automatic.
Temperature adjustment
The driver and front passenger can each
choose their own temperature setting.
The value indicated corresponds to a level of
comfort and not to a precise temperature.
Automatic comfort
programme
F Press this button to activate or deactivate the automatic mode
of the air conditioning system.
F
P
ress one of these buttons to
increase the value.
F
P
ress one of these buttons to
decrease the value.
It is recommended that you avoid a difference of
more than 3°C in the settings for left and right.
When the indicator lamp in the button is on, the
air conditioning system operates automatically:
the system manages the temperature, air
flow and air distribution in the passenger
compartment in an optimum way according to
the comfort level you have selected.
It is possible to modulate the intensity of the
automatic comfort programme by choosing one
of three settings offered in the secondary page,
accessible from the " OPTIONS" button. To change the current setting, shown by
illumination of the corresponding indicator
lamp, press this button repeatedly until the
desired setting is displayed:
"Normal ": offers the best
compromise between a
comfortable temperature and
quiet operation (default setting).
" Fast ": provides strong and
effective air flow.
Use the " Normal" or "Fast" setting to assure
the comfort of passengers in the rear seats.
This setting is associated with automatic mode
only. However, on deactivation of AUTO mode,
the indicator for the last setting remains on.
Changing the setting does not reactivate AUTO
mode if deactivated. "
Soft ": provides soft and quiet
operation by limiting air flow.
3
Ease of use and comfort
Page 109 of 360
107
High load retaining net
It offers protection to the occupants when
very sharp braking occurs.
Behind the front seats
Once fitted, the net does not prevent
tipping of the backrests.
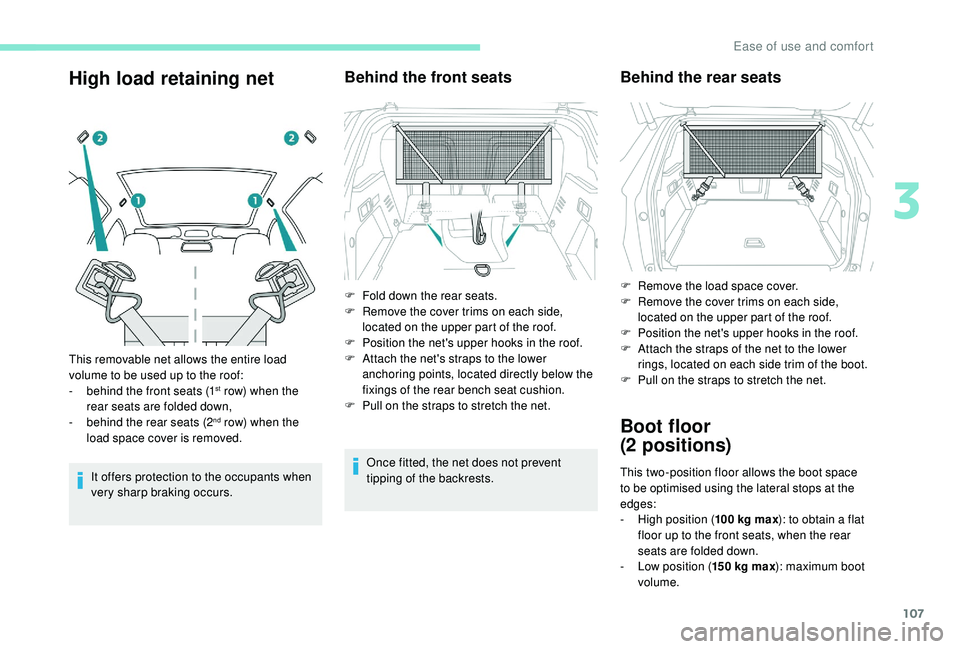
This removable net allows the entire load
volume to be used up to the roof:
-
b
ehind the front seats (1
st row) when the
rear seats are folded down,
-
b
ehind the rear seats (2
nd row) when the
load space cover is removed. F
F
old down the rear seats.
F
R
emove the cover trims on each side,
located on the upper part of the roof.
F
P
osition the net's upper hooks in the roof.
F
A
ttach the net's straps to the lower
anchoring points, located directly below the
fixings of the rear bench seat cushion.
F
P
ull on the straps to stretch the net.
Behind the rear seats
Boot floor
(2
positions)
This two-position floor allows the boot space
to be optimised using the lateral stops at the
edges:
-
Hig
h position ( 100
kg max): to obtain a flat
floor up to the front seats, when the rear
seats are folded down.
-
L
ow position ( 150
kg max): maximum boot
volume.
F
R
emove the load space cover.
F
R
emove the cover trims on each side,
located on the upper part of the roof.
F
P
osition the net's upper hooks in the roof.
F
A
ttach the straps of the net to the lower
rings, located on each side trim of the boot.
F
P
ull on the straps to stretch the net.
3
Ease of use and comfort
Page 131 of 360
129
F When the vehicle begins its descent, you can release the accelerator and brake
pedals; the system regulates the speed:
-
i
f the gearbox is in first or
second gear, the speed
decreases and the warning lamp
flashes rapidly,
-
i
f the gearbox is in neutral or if
the clutch pedal is depressed,
the speed decreases and the
warning lamp flashes slowly;
in this case, the maintained
descent speed is lower.
During a descent, with the vehicle stationary,
if
you release the accelerator and brake pedals,
the system will release the brakes to set the
vehicle gradually in motion.
The brake lamps light up automatically when
the system is regulating.
If the speed exceeds 19
mph (30 km/h),
regulation is paused automatically, the warning
lamp goes back to grey in the instrument panel,
but the indicator lamp in the button remains on.
Switching off
Malfunction
If a fault occurs with the system, this
warning lamp comes on in green,
accompanied by the display of a
message in the instrument panel.
F
P
ress this button until its indicator lamp
goes off; the indicator goes off in the
instrument panel.
Above 43
mph (70 km/h), the system is
automatically deactivated; the indicator lamp in
the button goes off.
Have it checked by a PEUGEOT dealer or a
qualified workshop.
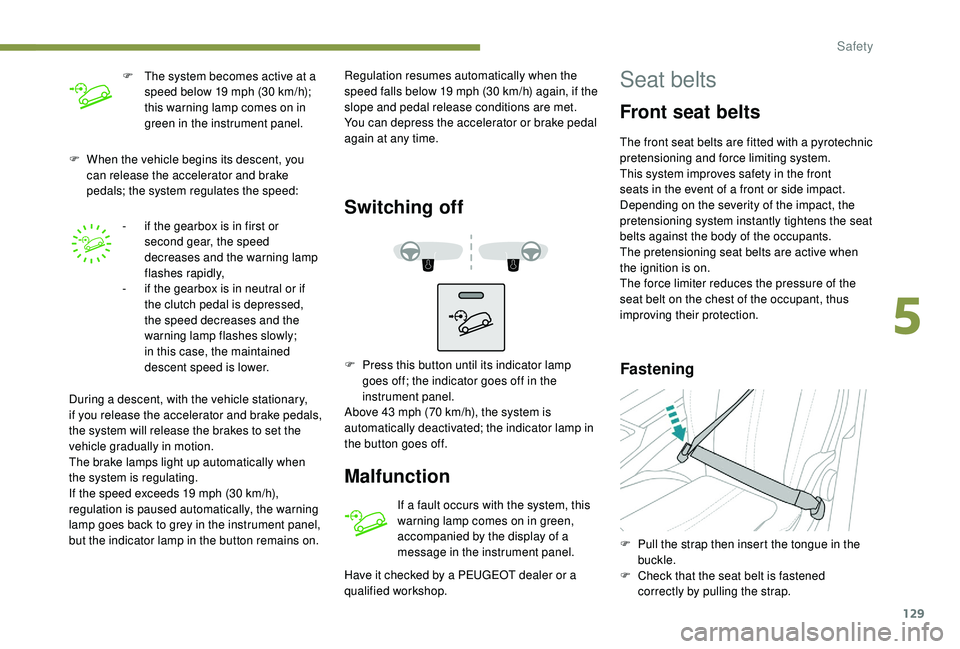
Seat belts
Front seat belts
The front seat belts are fitted with a pyrotechnic
pretensioning and force limiting system.
This system improves safety in the front
seats in the event of a front or side impact.
Depending on the severity of the impact, the
pretensioning system instantly tightens the seat
belts against the body of the occupants.
The pretensioning seat belts are active when
the ignition is on.
The force limiter reduces the pressure of the
seat belt on the chest of the occupant, thus
improving their protection.
Fastening
F Pull the strap then insert the tongue in the buckle.
F
C
heck that the seat belt is fastened
correctly by pulling the strap.
F
T
he system becomes active at a
speed below 19
mph (30
km/h);
this warning lamp comes on in
green in the instrument panel. Regulation resumes automatically when the
speed falls below 19
m
ph (30
k
m/h) again, if the
slope and pedal release conditions are met.
You can depress the accelerator or brake pedal
again at any time.
5
Safety
Page 132 of 360
130
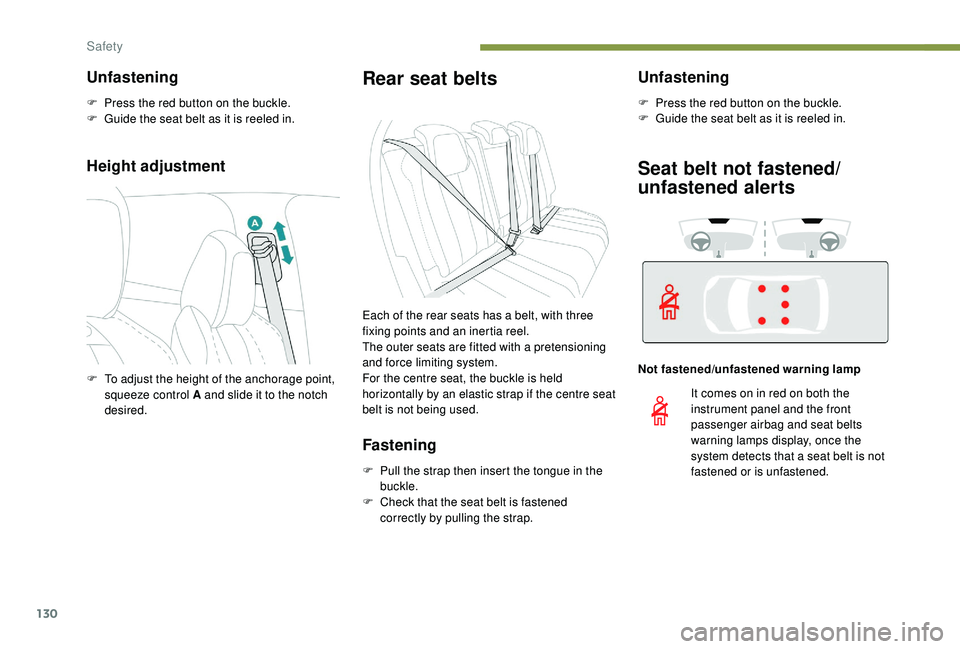
Height adjustment
Rear seat belts
Fastening
F Pull the strap then insert the tongue in the buckle.
F
C
heck that the seat belt is fastened
correctly by pulling the strap.
Unfastening
F Press the red button on the buckle.
F G uide the seat belt as it is reeled in.
Seat belt not fastened/
unfastened alerts
Not fastened/unfastened warning lamp
F
T
o adjust the height of the anchorage point,
squeeze control A and slide it to the notch
desired. Each of the rear seats has a belt, with three
fixing points and an inertia reel.
The outer seats are fitted with a pretensioning
and force limiting system.
For the centre seat, the buckle is held
horizontally by an elastic strap if the centre seat
belt is not being used.
It comes on in red on both the
instrument panel and the front
passenger airbag and seat belts
warning lamps display, once the
system detects that a seat belt is not
fastened or is unfastened.
Unfastening
F Press the red button on the buckle.
F
G uide the seat belt as it is reeled in.
Safety