2018 Peugeot 308 profile
[x] Cancel search: profilePage 39 of 324
37
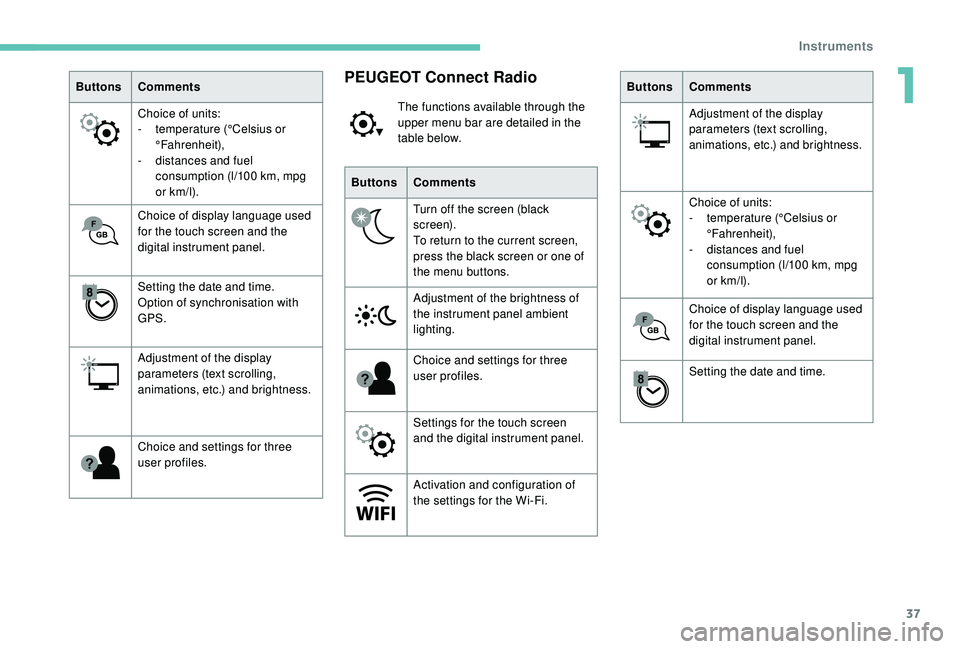
ButtonsComments
Choice of units:
-
t
emperature (°Celsius or
°Fahrenheit),
-
d
istances and fuel
consumption (l/100
km, mpg
or km/l).
Choice of display language used
for the touch screen and the
digital instrument panel.
Setting the date and time.
Option of synchronisation with
GPS.
Adjustment of the display
parameters (text scrolling,
animations, etc.) and brightness.
Choice and settings for three
user profiles.PEUGEOT Connect Radio
The functions available through the
upper menu bar are detailed in the
table below.
Buttons Comments
Turn off the screen (black
screen).
To return to the current screen,
press the black screen or one of
the menu buttons.
Adjustment of the brightness of
the instrument panel ambient
lighting.
Choice and settings for three
user profiles.
Settings for the touch screen
and the digital instrument panel.
Activation and configuration of
the settings for the Wi-Fi. Buttons
Comments
Adjustment of the display
parameters (text scrolling,
animations, etc.) and brightness.
Choice of units:
-
t
emperature (°Celsius or
°Fahrenheit),
-
d
istances and fuel
consumption (l/100
km, mpg
or km/l).
Choice of display language used
for the touch screen and the
digital instrument panel.
Setting the date and time.
1
Instruments
Page 122 of 324
120
The steering mounted controls do not
allow neutral to be selected and reverse
gear to be engaged or disengaged.
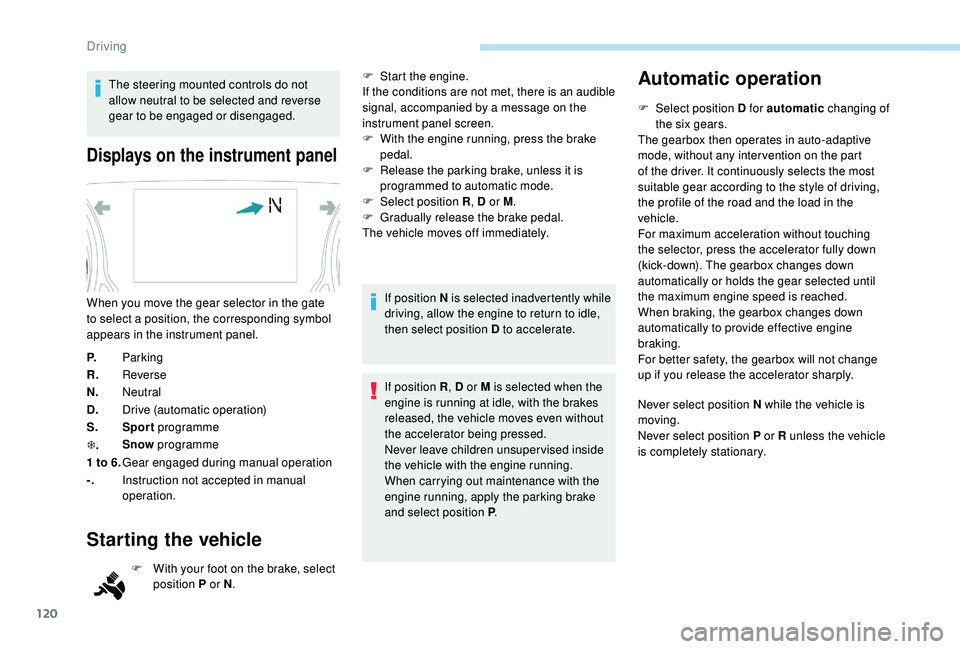
Displays on the instrument panel
P.Parking
R. Reverse
N. Neutral
D. Drive (automatic operation)
S. Sport programme
T . Snow
programme
1 to 6. Gear engaged during manual operation
-. Instruction not accepted in manual
operation.
Starting the vehicle
F With your foot on the brake, select
position P or N .
When you move the gear selector in the gate
to select a position, the corresponding symbol
appears in the instrument panel.
F
S
tart the engine.
If the conditions are not met, there is an audible
signal, accompanied by a message on the
instrument panel screen.
F
W
ith the engine running, press the brake
pedal.
F
R
elease the parking brake, unless it is
programmed to automatic mode.
F
Sel
ect position R
, D or M.
F
G
radually release the brake pedal.
The vehicle moves off immediately.
If position N is selected inadvertently while
driving, allow the engine to return to idle,
then select position D to accelerate.
If position R , D or M is selected when the
engine is running at idle, with the brakes
released, the vehicle moves even without
the accelerator being pressed.
Never leave children unsuper vised inside
the vehicle with the engine running.
When carrying out maintenance with the
engine running, apply the parking brake
and select position P .
Automatic operation
F Select position D for automatic changing of
the six gears.
The gearbox then operates in auto-adaptive
mode, without any inter vention on the part
of the driver. It continuously selects the most
suitable gear according to the style of driving,
the profile of the road and the load in the
vehicle.
For maximum acceleration without touching
the selector, press the accelerator fully down
(kick-down). The gearbox changes down
automatically or holds the gear selected until
the maximum engine speed is reached.
When braking, the gearbox changes down
automatically to provide effective engine
braking.
For better safety, the gearbox will not change
up if you release the accelerator sharply.
Never select position N while the vehicle is
moving.
Never select position P or R unless the vehicle
is completely stationary.
Driving
Page 124 of 324

122
If the selector is not in position P, when the
driver's door is opened or approximately
45
seconds after the ignition is switched
off, an audible signal sounds and a
message appears.
F
R
eturn the gear selector to position
P ; the audible signal stops and the
message disappears.
Operating fault
When the ignition is on, a message
appears in the instrument panel screen
to indicate a gearbox fault.
In this case, the gearbox switches to back-up
mode and is locked in 3
rd gear. You may feel a
substantial jolt when changing from P to R and
from N to R. This will not cause any damage to
the gearbox.
Do not exceed 62
mph (100 km/h), local speed
restrictions permitting.
Have it checked by a PEUGEOT dealer or a
qualified workshop. There is a risk of damage to the gearbox:
-
i
f you press the accelerator and brake
pedals at the same time,
-
i
f you force the selector from position P
to another position when the battery is
flat.
EAT8 automatic gearbox
Eight-speed automatic gearbox with push
selector. It also offers a manual mode with
steering mounted paddle gear changes.
Gearbox selector positions
P. Park.
For parking the vehicle: the front wheels
are blocked.
R. Reverse.
N. Neutral.
For moving the vehicle with the ignition off:
in certain car wash stations, if towing the
vehicle, etc.
D. Automatic mode.
The gearbox manages gear changes
according to the style of driving, the road
profile and the vehicle load.
M. Manual mode.
The driver changes gear using the steering
mounted control paddles.
Push selector
In both cases, apply the parking brake to
immobilise the vehicle, unless it is programmed
to automatic mode.
Driving
Page 126 of 324
124
With the engine running and the brakes
released, if R, D or M is selected, the
vehicle moves off, even without pressing
the accelerator pedal.
Never leave children unsuper vised in the
vehicle when the engine is running.
Never press the accelerator and brake
pedals at the same time – Risk of damage
to the gearbox!
In the event of a battery failure, you
must place the chock supplied with the
vehicle tools against one of the wheels to
immobilise the vehicle.
General information
To unlock the gearbox:
- f rom mode P :
F
f
ully depress the brake pedal,
F
press the Unlock button,
F
s
elect another mode while continuing to
press the brake pedal and the Unlock
button.
-
f
rom the neutral position N , at a speed
below 3
mph (5 km/h):
F
f
ully depress the brake pedal,
F
s
elect another mode while continuing to
press the brake pedal. To select reverse:
F
s
low down until you come to a stop,
F
w
ith your foot on the brake pedal, press the
Unlock button,
F
s
elect mode R while continuing to press the
brake pedal and the Unlock button.
To select manual mode:
F
w
hile having mode D selected in advance,
F
p
ress button M
; the indicator lamp in the
button comes on.
To quit manual mode:
F
p
ush for wards once to go back to D
.
or
F
p
ress button M
; the indicator lamp in the
button goes off.
To switch off the ignition, the vehicle must
be stationary.
Changing to free-wheel
To put the vehicle in free-wheeling mode with
the engine switched off:
F
w
ith the vehicle stationary and the engine
running, select N ,
F
s
witch off the engine,
F
w
ithin five seconds, switch the ignition on
again,
F
w
ith the foot on the brake pedal, push the
selector for ward or back once to confirm N
and manually release the electric parking
brake,
F
s
witch off the ignition.If you open the driver's door when mode N
is engaged, an audible signal will sound. It
will stop when you close the driver's door
again.
Special aspects of automatic
mode
If you exceed the time limit of five seconds,
the gearbox engages mode P
; you should then
restart the procedure.
The gearbox selects the gear that offers
optimum per formance, taking account of the
exterior temperature, the profile of the road, the
load on the vehicle and the style of driving.
For maximum acceleration without touching the
selector, push the accelerator to the floor (kick-
down). The gearbox shifts down automatically
or holds the gear selected until the maximum
engine speed is reached.
The steering mounted controls allow the driver
to temporarily select a gear, if the vehicle
speed and engine speed permit.
Special aspects of manual mode
The change from one gear to another takes
place only if the vehicle speed and engine
speed permit.
Driving
Page 184 of 324
182
Fitting roof bars
Fitting directly to the roof
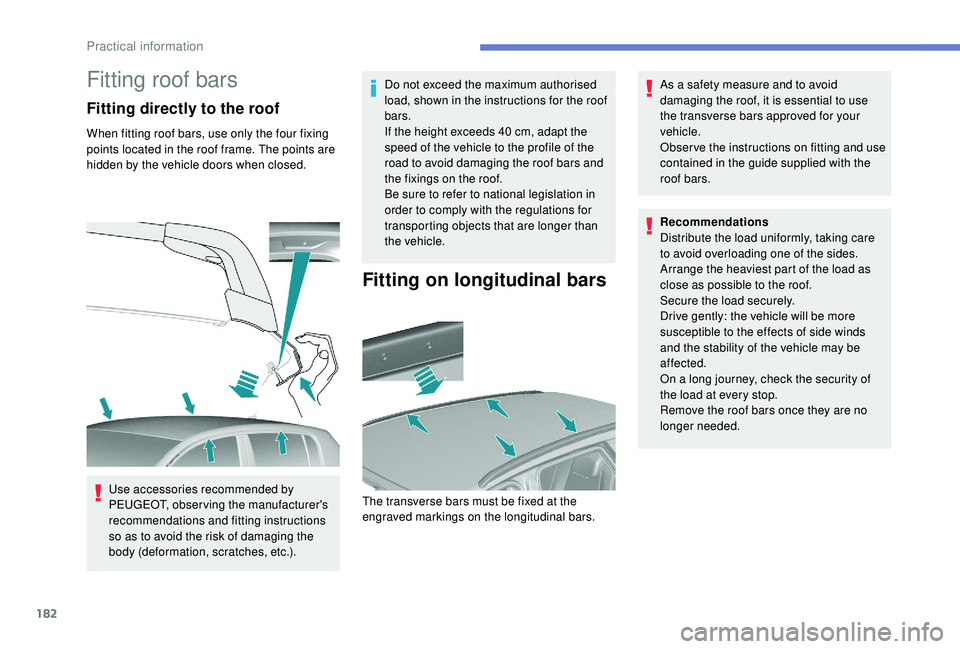
When fitting roof bars, use only the four fixing
points located in the roof frame. The points are
hidden by the vehicle doors when closed.Use accessories recommended by
PEUGEOT,
observing the manufacturer's
recommendations and fitting instructions
so as to avoid the risk of damaging the
body (deformation, scratches, etc.). Do not exceed the maximum authorised
load, shown in the instructions for the roof
bars.
If the height exceeds 40
cm, adapt the
speed of the vehicle to the profile of the
road to avoid damaging the roof bars and
the fixings on the roof.
Be sure to refer to national legislation in
order to comply with the regulations for
transporting objects that are longer than
the vehicle.
Fitting on longitudinal bars
As a safety measure and to avoid
damaging the roof, it is essential to use
the transverse bars approved for your
vehicle.
Obser ve the instructions on fitting and use
contained in the guide supplied with the
roof bars.
The transverse bars must be fixed at the
engraved markings on the longitudinal bars. Recommendations
Distribute the load uniformly, taking care
to avoid overloading one of the sides.
Arrange the heaviest part of the load as
close as possible to the roof.
Secure the load securely.
Drive gently: the vehicle will be more
susceptible to the effects of side winds
and the stability of the vehicle may be
affected.
On a long journey, check the security of
the load at every stop.
Remove the roof bars once they are no
longer needed.
Practical information
Page 246 of 324
10
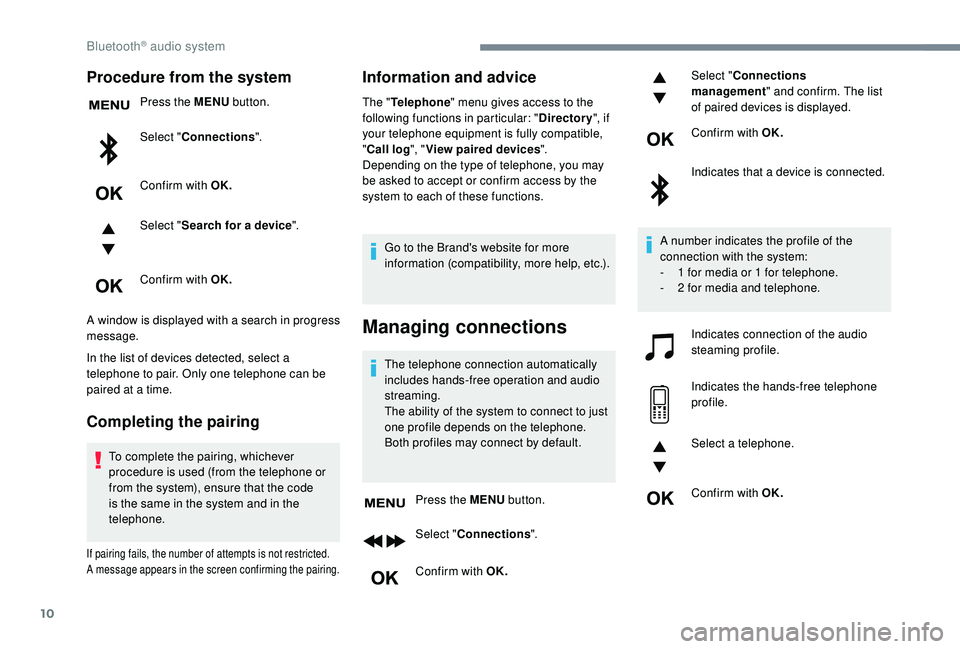
Procedure from the system
Press the MENU button.
Select " Connections ".
Confirm with OK.
Select " Search for a device ".
Confirm with OK.
A window is displayed with a search in progress
message.
In the list of devices detected, select a
telephone to pair. Only one telephone can be
paired at a time.
Completing the pairing
To complete the pairing, whichever
procedure is used (from the telephone or
from the system), ensure that the code
is the same in the system and in the
telephone.
If pairing fails, the number of attempts is not restricted.
A message appears in the screen confirming the pairing.
Information and advice
The " Telephone " menu gives access to the
following functions in particular: " Directory", if
your telephone equipment is fully compatible,
" Call log ", "View paired devices ".
Depending on the type of telephone, you may
be asked to accept or confirm access by the
system to each of these functions.
Go to the Brand's website for more
information (compatibility, more help, etc.).
Managing connections
The telephone connection automatically
includes hands-free operation and audio
streaming.
The ability of the system to connect to just
one profile depends on the telephone.
Both profiles may connect by default.
Press the MENU button.
Select " Connections ".
Confirm with OK. Select "
Connections
management " and confirm. The list
of paired devices is displayed.
Confirm with OK.
Indicates that a device is connected.
A number indicates the profile of the
connection with the system:
-
1 f
or media or 1 for telephone.
-
2 f
or media and telephone.
Indicates connection of the audio
steaming profile.
Indicates the hands-free telephone
profile.
Select a telephone.
Confirm with OK.
Bluetooth® audio system
Page 251 of 324
15
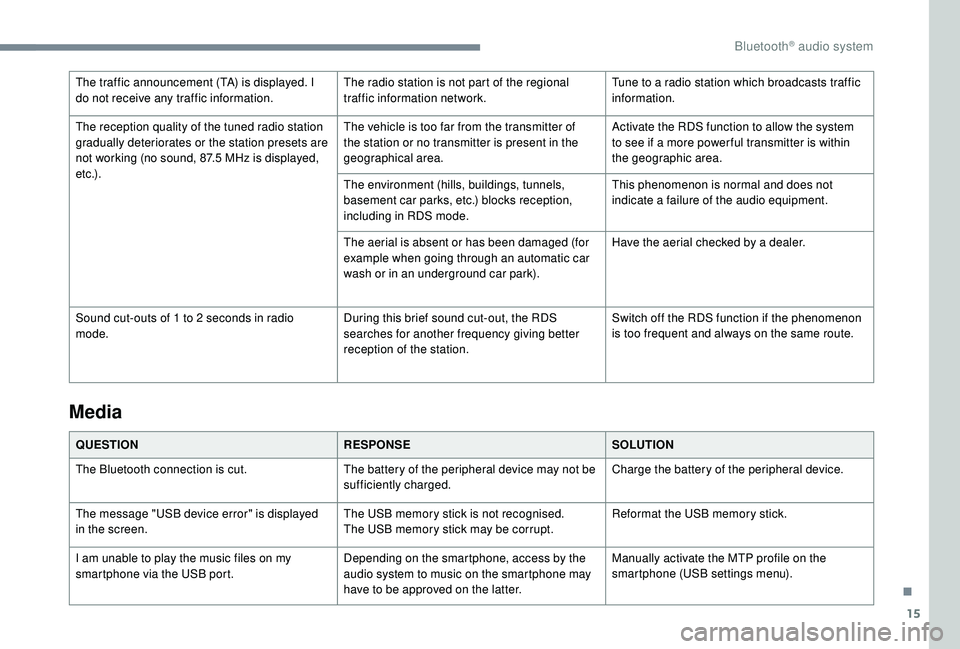
The traffic announcement (TA) is displayed. I
do not receive any traffic information.The radio station is not part of the regional
traffic information network.Tune to a radio station which broadcasts traffic
information.
The reception quality of the tuned radio station
gradually deteriorates or the station presets are
not working (no sound, 87.5
MHz is displayed,
e t c .) . The vehicle is too far from the transmitter of
the station or no transmitter is present in the
geographical area.
Activate the RDS function to allow the system
to see if a more power ful transmitter is within
the geographic area.
The environment (hills, buildings, tunnels,
basement car parks, etc.) blocks reception,
including in RDS mode. This phenomenon is normal and does not
indicate a failure of the audio equipment.
The aerial is absent or has been damaged (for
example when going through an automatic car
wash or in an underground car park). Have the aerial checked by a dealer.
Sound cut-outs of 1 to 2
seconds in radio
mode. During this brief sound cut-out, the RDS
searches for another frequency giving better
reception of the station.Switch off the RDS function if the phenomenon
is too frequent and always on the same route.
Media
QUESTION
RESPONSESOLUTION
The Bluetooth connection is cut. The battery of the peripheral device may not be
sufficiently charged.Charge the battery of the peripheral device.
The message "USB device error" is displayed
in the screen. The USB memory stick is not recognised.
The USB memory stick may be corrupt.Reformat the USB memory stick.
I am unable to play the music files on my
smartphone via the USB port. Depending on the smartphone, access by the
audio system to music on the smartphone may
have to be approved on the latter.Manually activate the MTP profile on the
smartphone (USB settings menu).
.
Bluetooth® audio system
Page 254 of 324

2
First steps
With the engine running, a press
mutes the sound.
With the ignition off, a press turns
the system on.
Adjustment of the volume.
Use the buttons on either side of or below the
touch screen for access to the menus, then
press the virtual buttons in the touch screen.
Depending on the model, use the "Source" or
"Menu" buttons on the left of the touch screen
for access to the menus, then press the virtual
buttons in the touch screen.
You can display the menus at any time by
pressing the screen briefly with three fingers.
All of the touch areas of the screen are white.
Press in the grey zone to go back a level or
confirm.
Press the back arrow to go back a level or
confirm. The touch screen is of the "capacitive"
type.
To clean the screen, use a soft, non-
abrasive cloth (e.g. spectacles cloth) with
no additional product.
Do not use sharp objects on the screen.
Do not touch the screen with wet hands.
*
D
epending on equipment.
Certain information is displayed permanently in
the upper band of the touch screen:
-
R
eminder of the air conditioning information
(depending on version), and direct access to
the corresponding menu.
-
R
eminder of the Radio Media and
Telephone menu information.
-
A
ccess to the Settings of the touch screen
and digital instrument panel.
Selecting the audio source (depending on version):
- F M/DAB*/AM* radio stations.
-
T
elephone connected via Bluetooth* and
Bluetooth multimedia broadcast* (streaming).
-
C
D player (depending on model).
-
U
SB memory stick.
-
M
edia player connected via the auxiliary socket
(depending on model).
In the "Settings" menu you can create
a profile for just one person or a group
of people with common points, with the
possibility of entering a multitude of
settings (radio presets, audio settings,
ambiences, etc.); these settings are taken
into account automatically.
PEUGEOT Connect Radio