2018 Peugeot 308 tow
[x] Cancel search: towPage 201 of 324
199
If after approximately seven minutes this
pressure is not reached, this indicates
that the tyre is not repairable; contact a
PEUGEOT dealer or a qualified workshop
for assistance.
F
R
emove the kit and screw the cap back on
the white pipe. Take care to avoid staining
your vehicle with traces of fluid. Keep the kit
to hand.
Take care, the sealant product is harmful
if swallowed and causes irritation to the
eyes.
Keep this product out of the reach of
children.2. Inflation
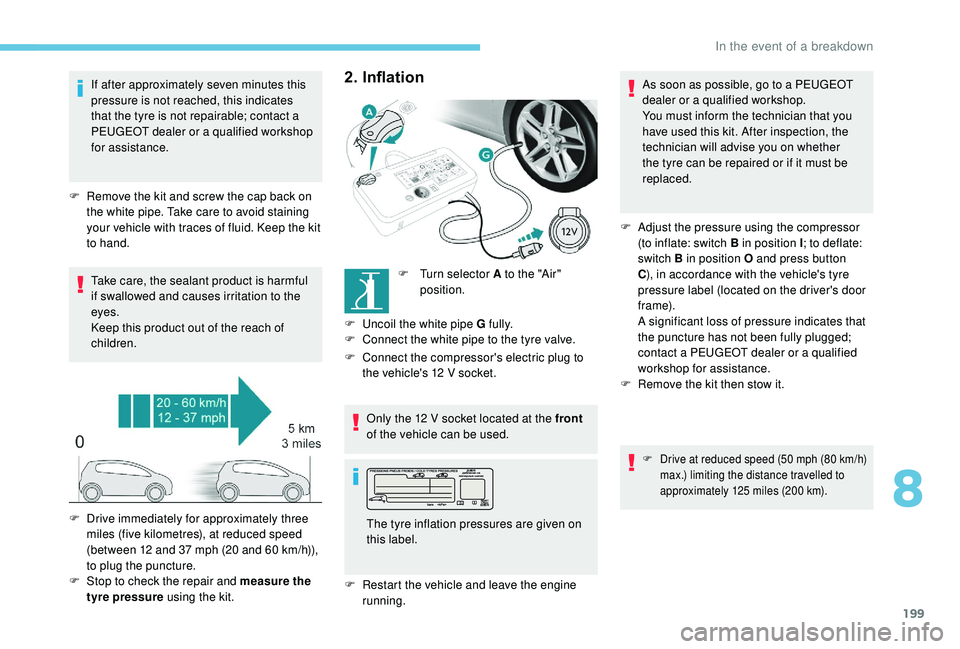
F Turn selector A to the "Air" position.
F
U
ncoil the white pipe G fully.
F
C
onnect the white pipe to the tyre valve.
F
C
onnect the compressor's electric plug to
the vehicle's 12
V socket.
Only the 12
V socket located at the front
of the vehicle can be used.
F
R
estart the vehicle and leave the engine
running.
F
D
rive immediately for approximately three
miles (five kilometres), at reduced speed
(between 12 and 37
mph (20 and 60
km/h)),
to plug the puncture.
F
S
top to check the repair and measure the
tyre pressure using the kit. The tyre inflation pressures are given on
this label. As soon as possible, go to a PEUGEOT
dealer or a qualified workshop.
You must inform the technician that you
have used this kit. After inspection, the
technician will advise you on whether
the tyre can be repaired or if it must be
replaced.
F
A
djust the pressure using the compressor
(to inflate: switch B in position I ; to deflate:
switch B in position O and press button
C ), in accordance with the vehicle's tyre
pressure label (located on the driver's door
f r a m e).
A significant loss of pressure indicates that
the puncture has not been fully plugged;
contact a PEUGEOT dealer or a qualified
workshop for assistance.
F
R
emove the kit then stow it.
F Drive at reduced speed (50 mph (80 km/h)
max.) limiting the distance travelled to
approximately 125
miles (200 km).
8
In the event of a breakdown
Page 203 of 324
201
F Adjust the pressure using the compressor (to inflate: switch B in position " I"; to deflate:
switch B in position " O" and press button
C ), according to the vehicle's tyre pressure
label.
If after approximately seven minutes this
pressure is not reached, this indicates
that the tyre is not repairable; contact a
PEUGEOT dealer or a qualified workshop
for assistance.
F
R
emove the kit then stow it.
Do not drive more than 125
miles (200 km)
with the repaired tyre; see a PEUGEOT
dealer or a qualified workshop to change
the tyre.
Should the pressure of one or more tyres
be adjusted, it is necessary to reinitialise
the under-inflation detection system.
For more information on Tyre under-
inflation detection , refer to the
corresponding section.Spare wheel
Scan the QR code on page 3 to view
explanatory videos.
Procedure for changing a damaged wheel with
the spare wheel using the tools provided with
the vehicle. For more information on the Tool kit , refer
to the corresponding section.
The jack must only be used to change
a wheel with a damaged or punctured tyre.
The jack does not require any
maintenance.
The jack meets European standards,
as defined in the Machinery Directive
2006/42/EC.
Wheel with wheel trim
When refitting the wheel , refit the wheel
trim, starting by placing its aperture in
line with the valve and then pushing it into
place all round its edge with the palm of
your hand. F
P
ark the vehicle without obstructing any
traffic and apply the parking brake.
F F ollow the safety instructions (hazard
warning lamps, warning triangle, wearing
high visibility vest, etc.) according to the
legislation in force in the country where you
are driving.
F
S
witch off the ignition.
Access to the spare wheel
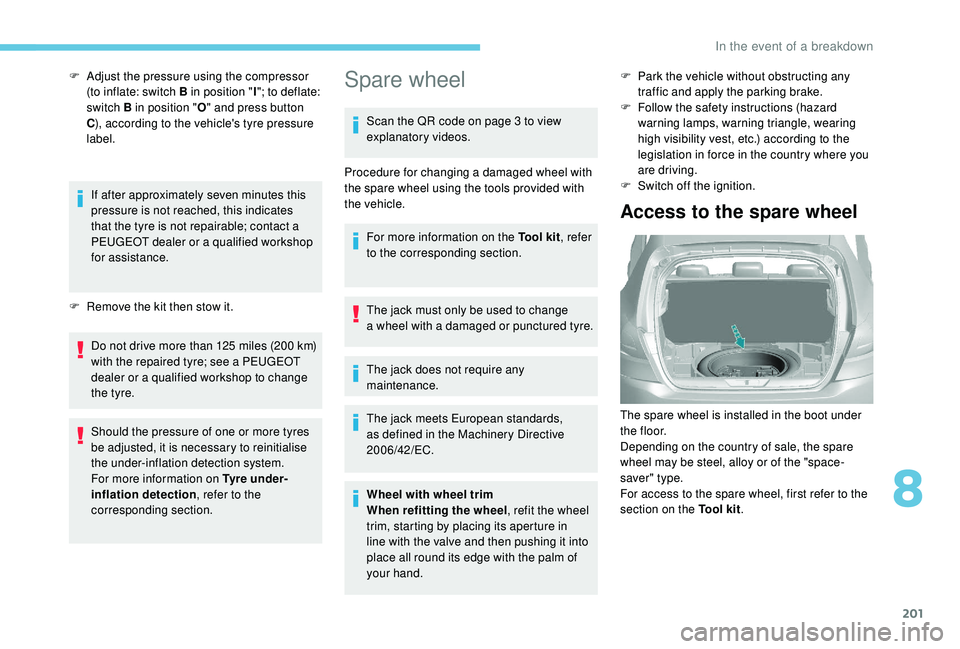
The spare wheel is installed in the boot under
t h e f l o o r.
Depending on the country of sale, the spare
wheel may be steel, alloy or of the "space-
saver" type.
For access to the spare wheel, first refer to the
section on the Tool kit.
8
In the event of a breakdown
Page 204 of 324
202
Removing the wheel
Putting the wheel back in place
F Put the wheel back in its housing.
F G ive the (coloured) nut on the bolt a few
turns to loosen it.
F
P
osition the fastener (nut and bolt) in the
middle of the wheel.
F
T
ighten fully until the central nut clicks to
retain the wheel correctly.
Removing a wheel
Parking the vehicle
Immobilise the vehicle where it does not
block traffic: the ground must be level,
stable and non-slippery.
With a manual parking brake, apply the
parking brake and check that the brake
warning lamp is on.
With an electric parking brake, if not
programmed in automatic mode, apply the
parking brake and check that the brake
warning lamp and the P indicator lamp in
the parking brake control lever are on.
Switch off the ignition.
With a manual gearbox, engage first gear
to block the wheels.
With an automatic gearbox, place the
selector at position P to block the wheels.
The occupants must get out of the vehicle
and wait where they are safe.
Never go underneath a vehicle raised
using a jack; use an axle stand.
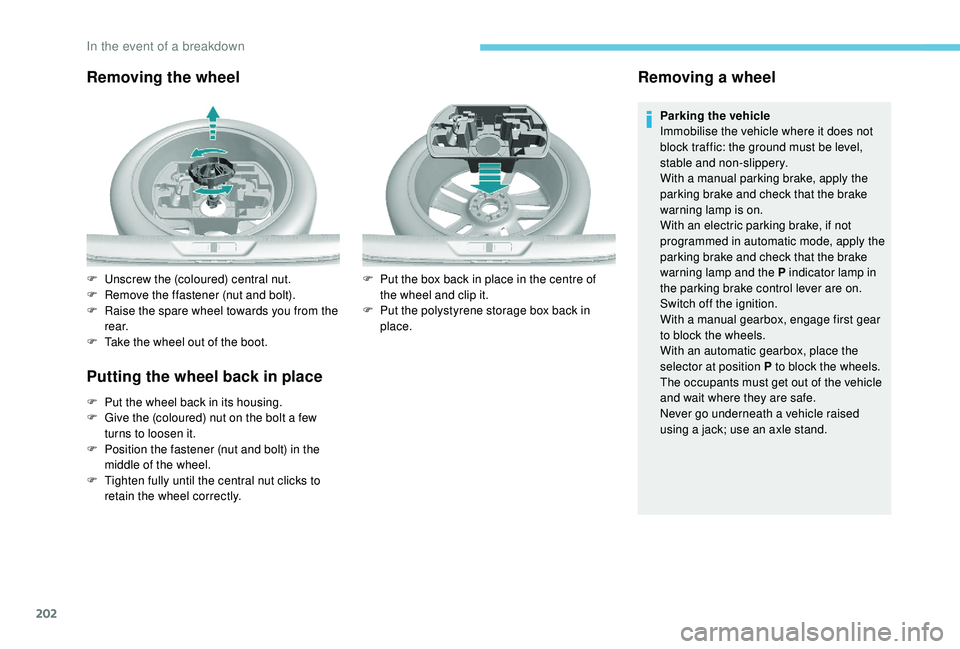
F
U
nscrew the (coloured) central nut.
F
R
emove the ffastener (nut and bolt).
F
R
aise the spare wheel towards you from the
r e a r.
F
T
ake the wheel out of the boot. F
P
ut the box back in place in the centre of
the wheel and clip it.
F
P
ut the polystyrene storage box back in
place.
In the event of a breakdown
Page 207 of 324
205
After changing a wheel
To store the punctured wheel in the boot
correctly, first remove the central cover.
When using the "space-saver" type spare
wheel, do not exceed 50 mph (80 km/h).
Have the tightening of the bolts and the
pressure of the spare wheel checked by a
PEUGEOT dealer or a qualified workshop
without delay.
Have the punctured wheel repaired and
replace it on the vehicle as soon as
possible.
If your vehicle has tyre under-inflation
detection, check the tyre pressures and
reinitialise the system.
For more information on Tyre under-
inflation detection , refer to the
corresponding section.
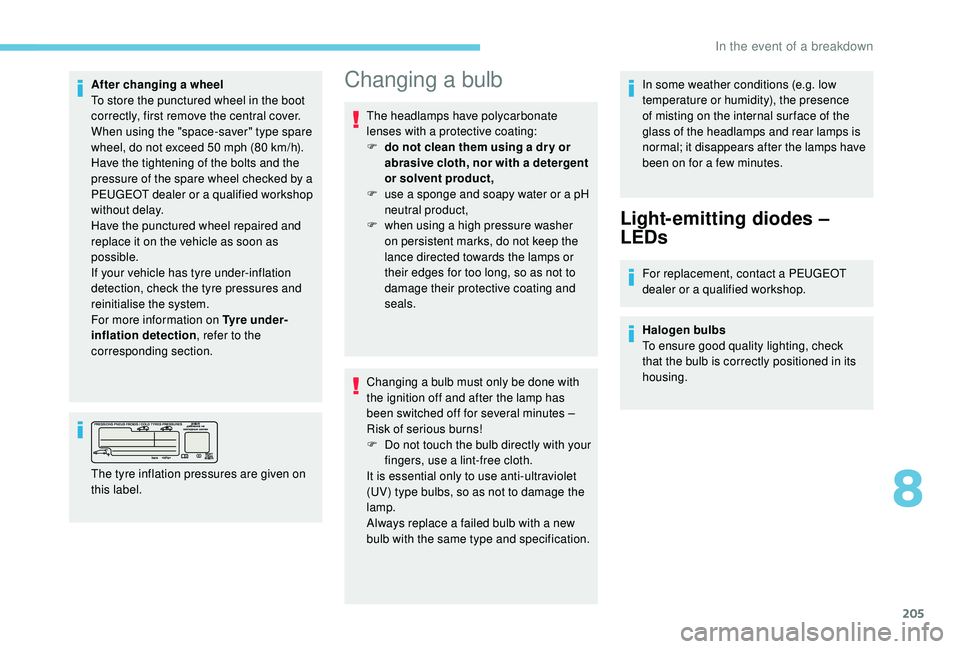
The tyre inflation pressures are given on
this label.Changing a bulb
The headlamps have polycarbonate
lenses with a protective coating:
F
d
o not clean them using a dr y or
abrasive cloth, nor with a detergent
or solvent product,
F
u
se a sponge and soapy water or a pH
neutral product,
F
w
hen using a high pressure washer
on persistent marks, do not keep the
lance directed towards the lamps or
their edges for too long, so as not to
damage their protective coating and
seals.
Changing a bulb must only be done with
the ignition off and after the lamp has
been switched off for several minutes –
Risk of serious burns!
F
D
o not touch the bulb directly with your
fingers, use a lint-free cloth.
It is essential only to use anti-ultraviolet
(UV) type bulbs, so as not to damage the
lamp.
Always replace a failed bulb with a new
bulb with the same type and specification. In some weather conditions (e.g. low
temperature or humidity), the presence
of misting on the internal sur face of the
glass of the headlamps and rear lamps is
normal; it disappears after the lamps have
been on for a few minutes.
Light-emitting diodes –
LEDs
For replacement, contact a PEUGEOT
dealer or a qualified workshop.
Halogen bulbs
To ensure good quality lighting, check
that the bulb is correctly positioned in its
housing.
8
In the event of a breakdown
Page 208 of 324
206
Front lamps
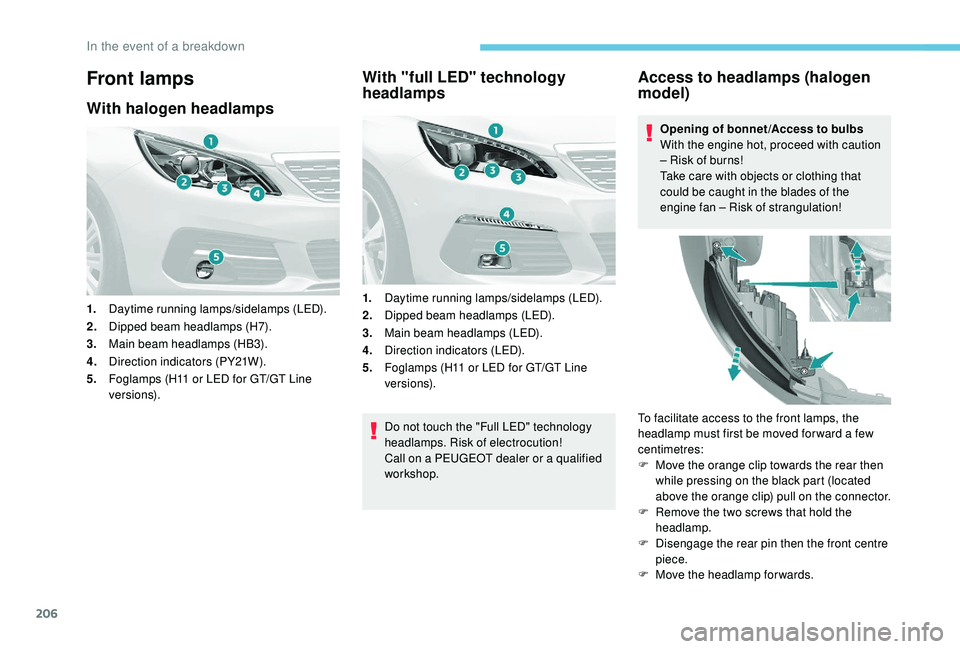
With halogen headlamps
1.Daytime running lamps/sidelamps (LED).
2. Dipped beam headlamps (H7).
3. Main beam headlamps (HB3).
4. Direction indicators (PY21W).
5. Foglamps (H11 or LED for GT/GT Line
ve r s i o n s).
With "full LED" technology
headlamps
1.Daytime running lamps/sidelamps (LED).
2. Dipped beam headlamps (LED).
3. Main beam headlamps (LED).
4. Direction indicators (LED).
5. Foglamps (H11 or LED for GT/GT Line
ve r s i o n s).
Do not touch the "Full LED" technology
headlamps. Risk of electrocution!
Call on a PEUGEOT dealer or a qualified
workshop.
Access to headlamps (halogen
model)
Opening of bonnet /Access to bulbs
With the engine hot, proceed with caution
– Risk of burns!
Take care with objects or clothing that
could be caught in the blades of the
engine fan – Risk of strangulation!
To facilitate access to the front lamps, the
headlamp must first be moved for ward a few
centimetres:
F
M
ove the orange clip towards the rear then
while pressing on the black part (located
above the orange clip) pull on the connector.
F
R
emove the two screws that hold the
headlamp.
F
D
isengage the rear pin then the front centre
piece.
F
M
ove the headlamp for wards.
In the event of a breakdown
Page 209 of 324
207
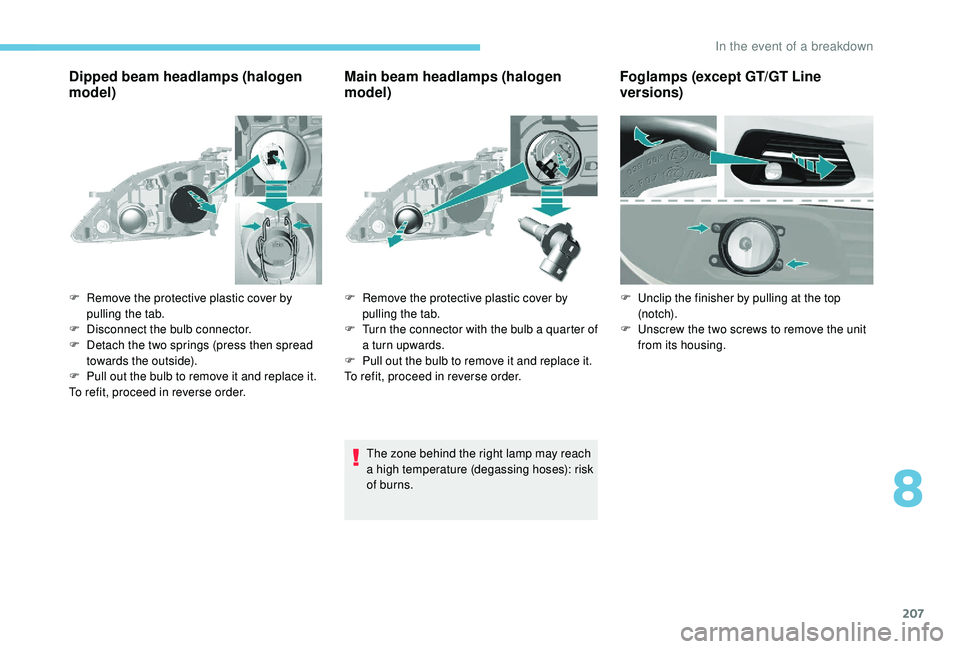
Dipped beam headlamps (halogen
model)Main beam headlamps (halogen
model)
The zone behind the right lamp may reach
a high temperature (degassing hoses): risk
of burns.
F
R
emove the protective plastic cover by
pulling the tab.
F
D
isconnect the bulb connector.
F
D
etach the two springs (press then spread
towards the outside).
F
P
ull out the bulb to remove it and replace it.
To refit, proceed in reverse order. F
R
emove the protective plastic cover by
pulling the tab.
F
T
urn the connector with the bulb a quarter of
a turn upwards.
F
P
ull out the bulb to remove it and replace it.
To refit, proceed in reverse order.
Foglamps (except GT/GT Line
versions)
F Unclip the finisher by pulling at the top (n otc h).
F
U
nscrew the two screws to remove the unit
from its housing.
8
In the event of a breakdown
Page 220 of 324
218
Following reconnection of the battery
Following reconnection of the battery, switch on
the ignition and wait 1 minute before starting to
permit initialisation of the electronic systems. If
minor problems nevertheless persist following
this operation, contact a PEUGEOT dealer or a
qualified workshop.
Referring to the corresponding section, you
must yourself reinitialise (depending on
version):
-
t
he remote control key,
-
t
he electric blind(s),
-
etc.The Stop & Start system may not be
operational during the trip following the
first engine start.
In this case, the system will only be
available again after a continuous
period of immobilisation of the vehicle,
a period which depends on the exterior
temperature and the state of charge of the
battery (up to about 8
hours).
To w i n g
Procedure for having your vehicle towed or
for towing another vehicle using a removable
towing eye.
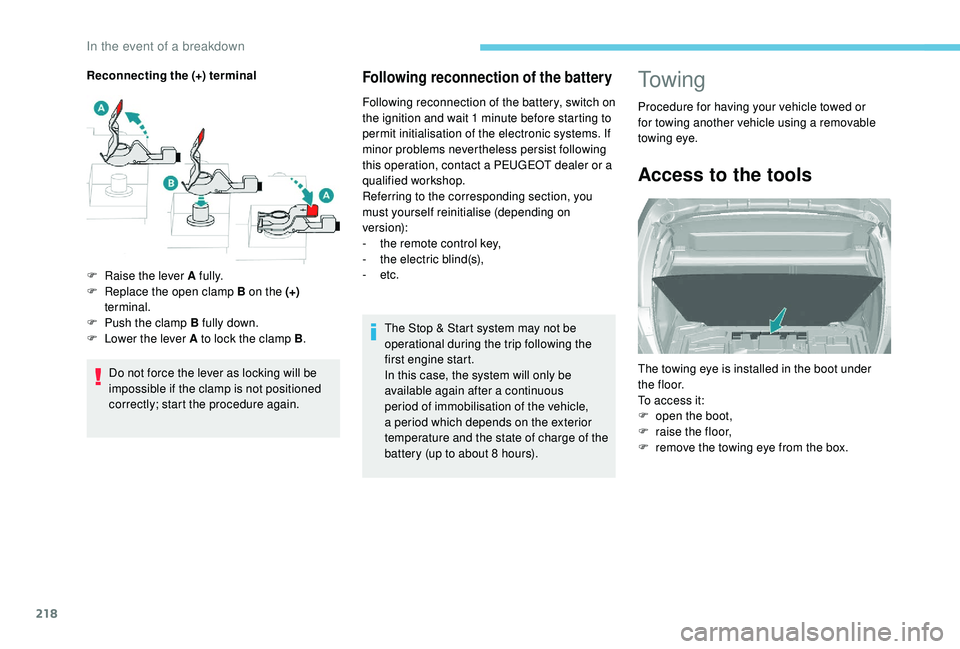
Access to the tools
The towing eye is installed in the boot under
t h e f l o o r.
To access it:
F
o
pen the boot,
F
r
aise the floor,
F
r
emove the towing eye from the box.
Reconnecting the (+) terminal
Do not force the lever as locking will be
impossible if the clamp is not positioned
correctly; start the procedure again.
F
Ra
ise the lever A fully.
F
R
eplace the open clamp B on the (+)
terminal.
F
P
ush the clamp B fully down.
F
L
ower the lever A to lock the clamp B
.
In the event of a breakdown
Page 221 of 324
219
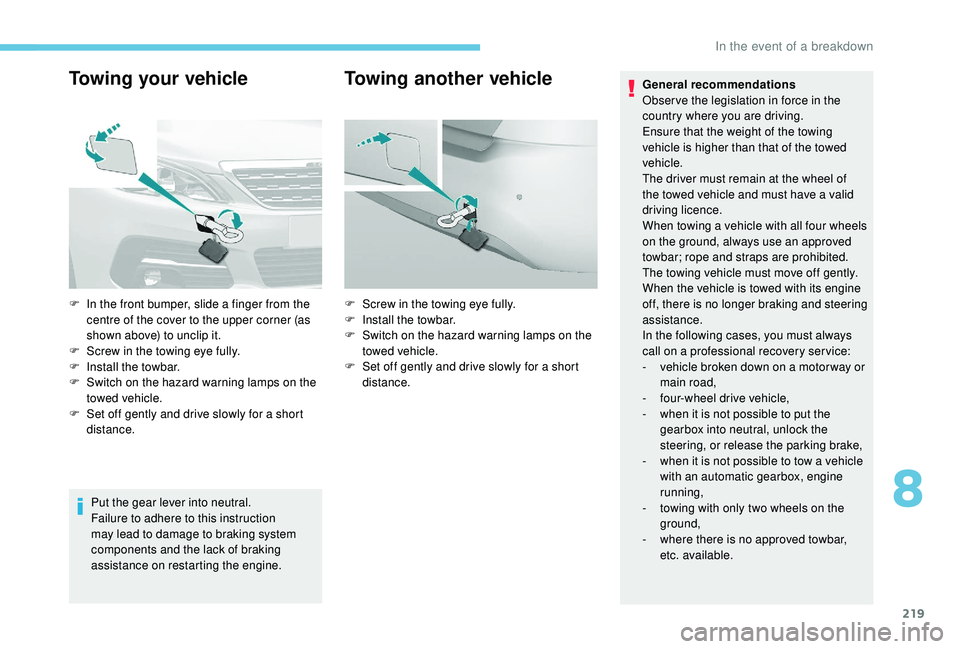
Towing your vehicle
Put the gear lever into neutral.
Failure to adhere to this instruction
may lead to damage to braking system
components and the lack of braking
assistance on restarting the engine.
Towing another vehicleGeneral recommendations
Obser ve the legislation in force in the
country where you are driving.
Ensure that the weight of the towing
vehicle is higher than that of the towed
vehicle.
The driver must remain at the wheel of
the towed vehicle and must have a valid
driving licence.
When towing a vehicle with all four wheels
on the ground, always use an approved
towbar; rope and straps are prohibited.
The towing vehicle must move off gently.
When the vehicle is towed with its engine
off, there is no longer braking and steering
assistance.
In the following cases, you must always
call on a professional recovery ser vice:
-
v
ehicle broken down on a motor way or
main road,
-
f
our-wheel drive vehicle,
-
w
hen it is not possible to put the
gearbox into neutral, unlock the
steering, or release the parking brake,
-
w
hen it is not possible to tow a vehicle
with an automatic gearbox, engine
running,
-
t
owing with only two wheels on the
ground,
-
w
here there is no approved towbar,
etc. available.
F
I
n the front bumper, slide a finger from the
centre of the cover to the upper corner (as
shown above) to unclip it.
F
S
crew in the towing eye fully.
F
I
nstall the towbar.
F
S
witch on the hazard warning lamps on the
towed vehicle.
F
S
et off gently and drive slowly for a short
distance. F
S
crew in the towing eye fully.
F
I
nstall the towbar.
F
S
witch on the hazard warning lamps on the
towed vehicle.
F
S
et off gently and drive slowly for a short
distance.
8
In the event of a breakdown