2018 Peugeot 308 ECU
[x] Cancel search: ECUPage 147 of 324
145
The cruise control operates by day and
night, in fog or moderate rainfall.
However, it is strongly recommended that
you always keep a safe distance from
vehicles ahead, according to the driving
conditions, the weather and the road
sur face.
Use the cruise control only where the
driving conditions allow running at a
constant speed and keeping an adequate
safety distance.
Do not activate the cruise control in urban
areas where pedestrians are likely to
cross the road, in heavy traffic (except for
versions with EAT8 gearbox), on winding
or steep roads, on slippery or flooded
roads, when there is snowfall, if the front
bumper is damaged or when the brake
lamps have failed.
In certain circumstances, it may not
be possible for the speed setting to be
maintained or even reached: loaded
vehicle, ascending a steep hill, etc.The system is not intended for the
following situations:
-
t
he front end of the vehicle has been
modified (addition of long-range
headlamps, painting of the front
bumper),
-
d
riving on a racing track,
-
d
riving on a rolling road,
-
u
se of snow chains, non-slip covers or
studded tyres.
The use of mats not approved by
PEUGEOT may inter fere with the
operation of the cruise control.
To avoid any risk of jamming of the pedals:
-
e
nsure that the mat is secured
c o r r e c t l y,
-
n
ever fit one mat on top of another.
The following situations may interfere with
the operation of the system or prevent it
from working:
-
p
oor visibility (inadequate street
lighting, falling snow, heavy rain, dense
f o g , e t c .),
-
d
azzle (headlamps of an oncoming
vehicle, low sun, reflections on a damp
road, leaving a tunnel, alternating
shade and light, etc.),
-
c
amera or radar masked (mud, frost,
snow, condensation, etc.).
In these situations, detection performance
may be reduced.Malfunction
The adaptive cruise control deactivates
automatically if the use of a "space-saver"
type spare wheel is detected or if there is
a malfunction on the lateral brake lamps or
trailer brake lamps (for approved trailers). If the cruise control
malfunctions, dashes are
displayed instead of the
cruise control speed setting.
If this warning lamp comes
on, accompanied by an alert
message and an audible
signal, this confirms a
malfunction.
Have the system checked by a PEUGEOT
dealer or a qualified workshop.
6
Driving
Page 184 of 324
182
Fitting roof bars
Fitting directly to the roof
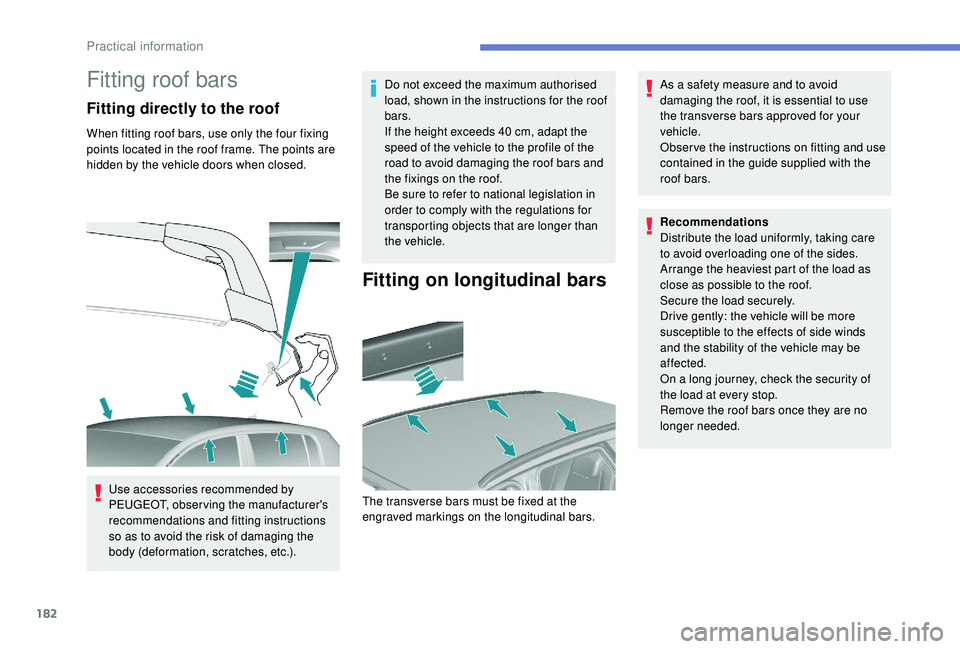
When fitting roof bars, use only the four fixing
points located in the roof frame. The points are
hidden by the vehicle doors when closed.Use accessories recommended by
PEUGEOT,
observing the manufacturer's
recommendations and fitting instructions
so as to avoid the risk of damaging the
body (deformation, scratches, etc.). Do not exceed the maximum authorised
load, shown in the instructions for the roof
bars.
If the height exceeds 40
cm, adapt the
speed of the vehicle to the profile of the
road to avoid damaging the roof bars and
the fixings on the roof.
Be sure to refer to national legislation in
order to comply with the regulations for
transporting objects that are longer than
the vehicle.
Fitting on longitudinal bars
As a safety measure and to avoid
damaging the roof, it is essential to use
the transverse bars approved for your
vehicle.
Obser ve the instructions on fitting and use
contained in the guide supplied with the
roof bars.
The transverse bars must be fixed at the
engraved markings on the longitudinal bars. Recommendations
Distribute the load uniformly, taking care
to avoid overloading one of the sides.
Arrange the heaviest part of the load as
close as possible to the roof.
Secure the load securely.
Drive gently: the vehicle will be more
susceptible to the effects of side winds
and the stability of the vehicle may be
affected.
On a long journey, check the security of
the load at every stop.
Remove the roof bars once they are no
longer needed.
Practical information
Page 195 of 324
193
Tool kit
This is a set of tools provided with the vehicle.
Its content depends on your vehicle's
equipment:
-
t
emporary puncture repair kit,
-
spar
e wheel.
Access to the tools
All of these tools are specific to your
vehicle and may vary depending on
equipment.
Do not use them for any other purposes.
The jack must only be used to change a wheel
with a damaged or punctured tyre.
Do not use any jack other than the one supplied
with this vehicle.
If the vehicle does not have its original jack,
contact a PEUGEOT dealer or a qualified
workshop to obtain the correct jack for it.
The jack meets European standards, as defined
in the Machinery Directive 2006/42/CE.
The jack does not require any maintenance.
List of tools
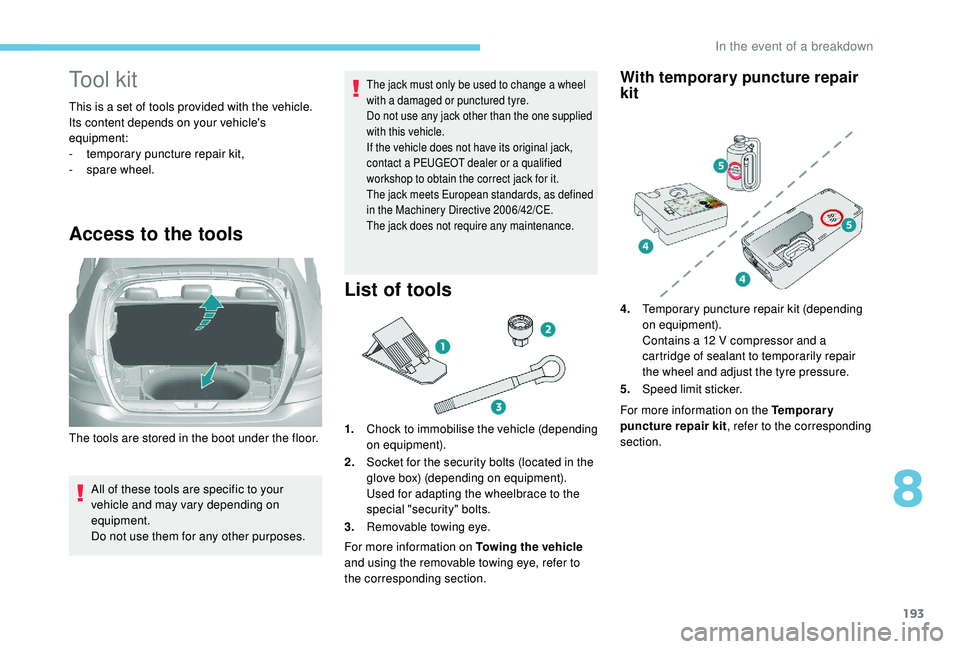
1.Chock to immobilise the vehicle (depending
on equipment).
2. Socket for the security bolts (located in the
glove box) (depending on equipment).
Used for adapting the wheelbrace to the
special "security" bolts.
3. Removable towing eye.
For more information on Towing the vehicle
and using the removable towing eye, refer to
the corresponding section.
With temporary puncture repair
kit
The tools are stored in the boot under the floor. For more information on the Temporary
puncture repair kit
, refer to the corresponding
section. 4. Temporary puncture repair kit (depending
on equipment).
Contains a 12 V compressor and a
cartridge of sealant to temporarily repair
the wheel and adjust the tyre pressure.
5. Speed limit sticker.
8
In the event of a breakdown
Page 197 of 324
195
Avoid removing any foreign bodies which
have penetrated into the tyre.
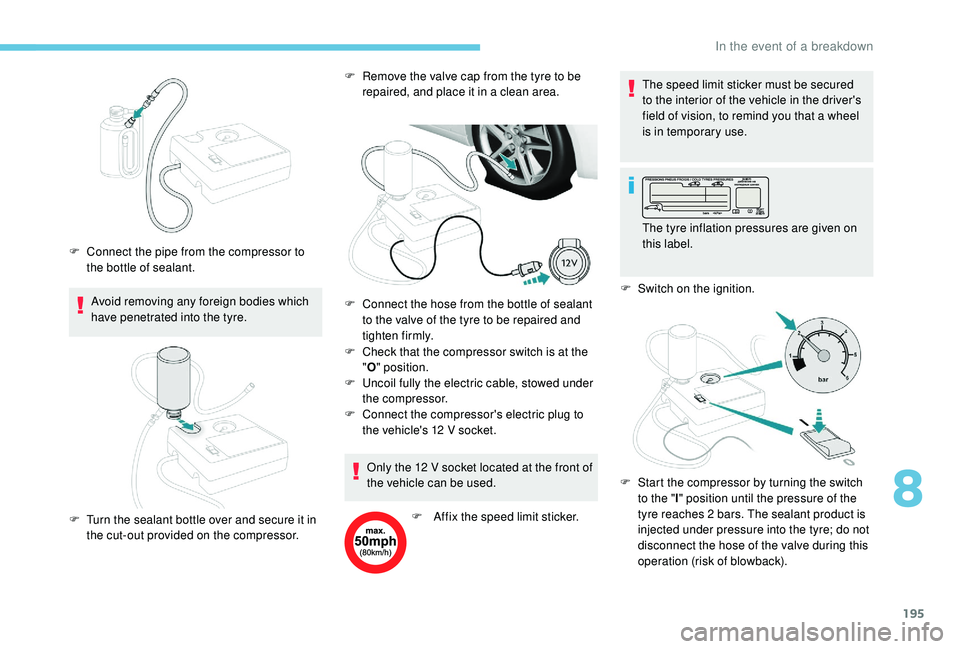
F
C
onnect the pipe from the compressor to
the bottle of sealant. F
R
emove the valve cap from the tyre to be
repaired, and place it in a clean area.
F
C
heck that the compressor switch is at the
" O " position.
F
U
ncoil fully the electric cable, stowed under
the compressor.
F
C
onnect the compressor's electric plug to
the vehicle's 12
V socket.
F
T
urn the sealant bottle over and secure it in
the cut-out provided on the compressor. F
C onnect the hose from the bottle of sealant
to the valve of the tyre to be repaired and
tighten firmly.
Only the 12
V socket located at the front of
the vehicle can be used.
F
A
ffix the speed limit sticker.The speed limit sticker must be secured
to the interior of the vehicle in the driver's
field of vision, to remind you that a wheel
is in temporary use.
The tyre inflation pressures are given on
this label.
F S witch on the ignition.
F
S
tart the compressor by turning the switch
to the " l" position until the pressure of the
tyre reaches 2
bars. The sealant product is
injected under pressure into the tyre; do not
disconnect the hose of the valve during this
operation (risk of blowback).
8
In the event of a breakdown
Page 200 of 324
198
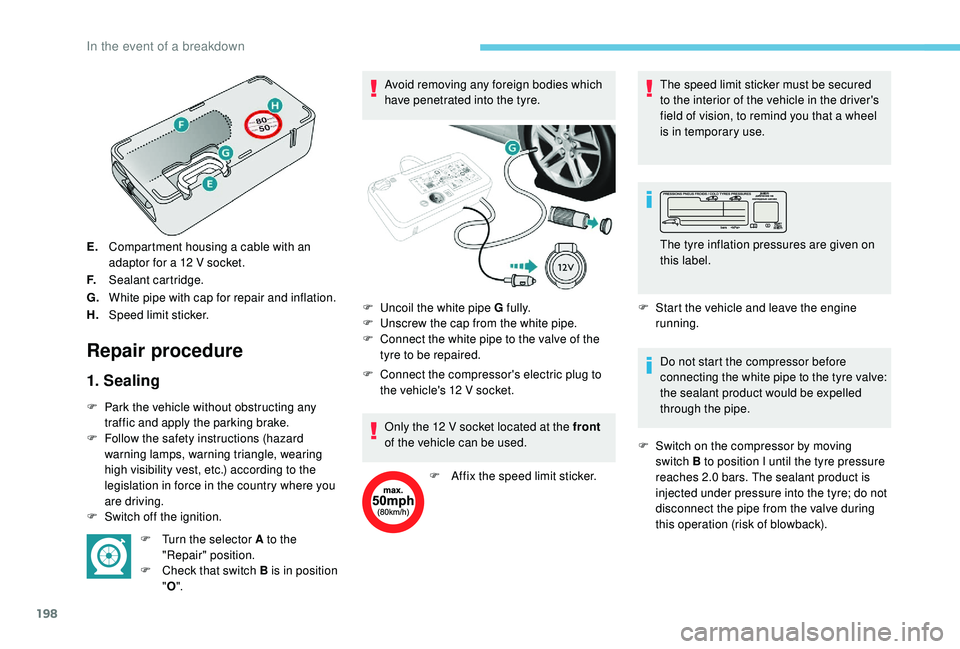
E.Compartment housing a cable with an
adaptor for a 12
V socket.
F. Sealant cartridge.
G. White pipe with cap for repair and inflation.
H. Speed limit sticker.
Repair procedure
1. Sealing
F Park the vehicle without obstructing any
traffic and apply the parking brake.
F
F
ollow the safety instructions (hazard
warning lamps, warning triangle, wearing
high visibility vest, etc.) according to the
legislation in force in the country where you
are driving.
F
S
witch off the ignition. F
T
urn the selector A to the
"Repair" position.
F
C
heck that switch B is in position
" O ". Avoid removing any foreign bodies which
have penetrated into the tyre.
F
C
onnect the compressor's electric plug to
the vehicle's 12 V socket.
Only the 12 V socket located at the front
of the vehicle can be used.
F
A
ffix the speed limit sticker.The speed limit sticker must be secured
to the interior of the vehicle in the driver's
field of vision, to remind you that a wheel
is in temporary use.
F
S
tart the vehicle and leave the engine
running.
Do not start the compressor before
connecting the white pipe to the tyre valve:
the sealant product would be expelled
through the pipe.
F
S
witch on the compressor by moving
switch B to position I until the tyre pressure
reaches 2.0
bars. The sealant product is
injected under pressure into the tyre; do not
disconnect the pipe from the valve during
this operation (risk of blowback).
F
U
ncoil the white pipe G fully.
F
U
nscrew the cap from the white pipe.
F
C
onnect the white pipe to the valve of the
tyre to be repaired. The tyre inflation pressures are given on
this label.
In the event of a breakdown
Page 205 of 324
203
Do not use:
- t he jack for any other purpose than
lifting the vehicle,
-
a j
ack other than the one supplied by
the manufacturer.
F
R
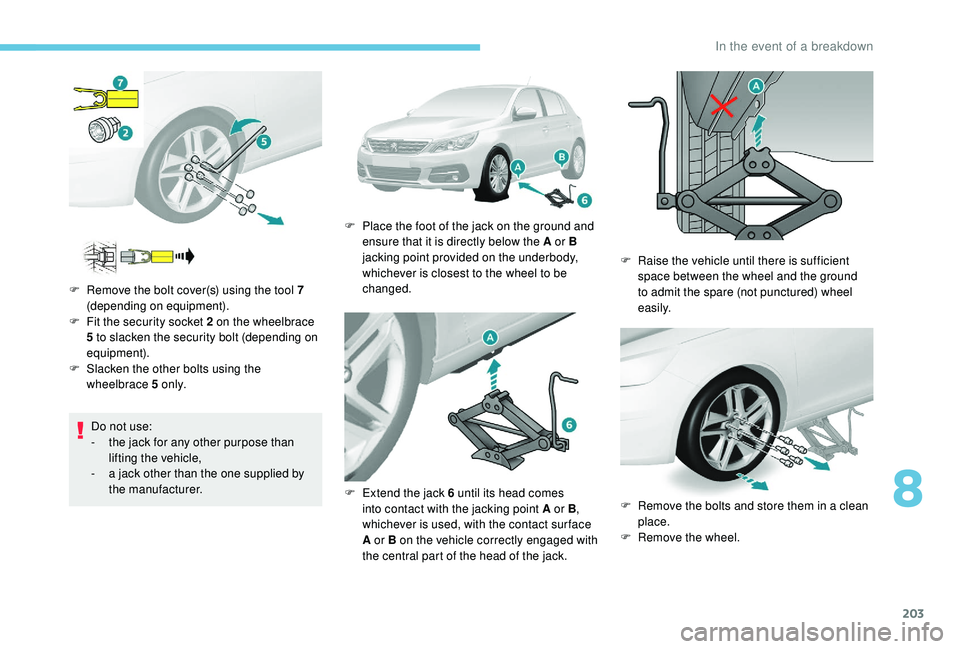
emove the bolt cover(s) using the tool 7
(depending on equipment).
F
F
it the security socket 2 on the wheelbrace
5 to slacken the security bolt (depending on
equipment).
F
S
lacken the other bolts using the
wheelbrace 5 o n l y. F
P
lace the foot of the jack on the ground and
ensure that it is directly below the A or B
jacking point provided on the underbody,
whichever is closest to the wheel to be
changed.
F
E
xtend the jack 6 until its head comes
into contact with the jacking point A or B ,
whichever is used, with the contact sur face
A or B on the vehicle correctly engaged with
the central part of the head of the jack. F
Ra
ise the vehicle until there is sufficient
space between the wheel and the ground
to admit the spare (not punctured) wheel
easily.
F
R
emove the bolts and store them in a clean
place.
F
R
emove the wheel.
8
In the event of a breakdown
Page 206 of 324

204
Ensure that the jack is stable. If the
ground is slippery or loose, the jack may
slip or collapse – Risk of injury!
Take care to place the jack strictly at the
jacking points A or B under the vehicle,
making sure that the contact point on the
vehicle is centred on the head of the jack.
Other wise, there is a risk of damage to the
vehicle and/or the jack collapsing – Risk
of injury!
Fitting a wheel
Fitting the "space-saver " spare wheel
If your vehicle is fitted with alloy wheels,
when tightening the bolts on fitting, it is
normal to notice that the washers do not
come into contact with the "space-saver"
spare wheel. The wheel is secured by the
conical contact of each bolt. F
P
ut the wheel in place on the hub.
F
S
crew in the bolts by hand to the stop.
F
P
re-tighten the security bolt using the
wheelbrace 5 fitted with the security socket
2 (depending on equipment).
F
P
re-tighten the other bolts using the
wheelbrace 5 o n l y.
F
L
ower the vehicle fully.
F
F
old the jack 6 and detach it.F
T
ighten the security bolt using the
wheelbrace 5 fitted with the security socket
2 (depending on equipment).
F
T
ighten the other bolts using the
wheelbrace 5 o n l y.
F
R
efit the bolt cover(s) (depending on
ve r s i o n).
F
S
tore the tools in the box.
In the event of a breakdown
Page 214 of 324
212
Changing a fuse
Before changing a fuse:
F t he cause of the failure must be identified
and rectified,
F
a
ll electrical consumers must be switched
of f,
F
t
he vehicle must be immobilised with the
ignition off,
F
i
dentify the faulty fuse using the existing
allocation tables and diagrams.
To remove or fit a fuse, it is essential to:
F
u
se the special tweezers to extract the fuse
from its housing and check the condition of
its filament.
F
a
lways replace the failed fuse with a fuse
of the same rating (same colour); using a
different rating could cause faults (risk of
f i r e).
If the fault recurs after replacing a fuse, have
the electrical system checked by a PEUGEOT
dealer or a qualified workshop. Replacement with a fuse not shown in the
allocation tables that follow may cause
a serious malfunction of your vehicle.
Contact a PEUGEOT dealer or a qualified
workshop.
Installing electrical accessories
Your vehicle's electrical system is
designed to operate with standard or
optional equipment.
Before installing other electrical
equipment or accessories on your vehicle,
contact a PEUGEOT dealer or a qualified
workshop to check their comparability.
PEUGEOT accepts no responsibility for
the cost incurred in repairing your vehicle
or for rectifying malfunctions resulting
from the installation of accessories
not supplied and not recommended by
PEUGEOT and not installed in accordance
with specifications, in particular when the
combined power consumption of all of the
additional equipment connected exceeds
10
milliamperes.
Good
Failed Tw e e z e r s
Dashboard fuses
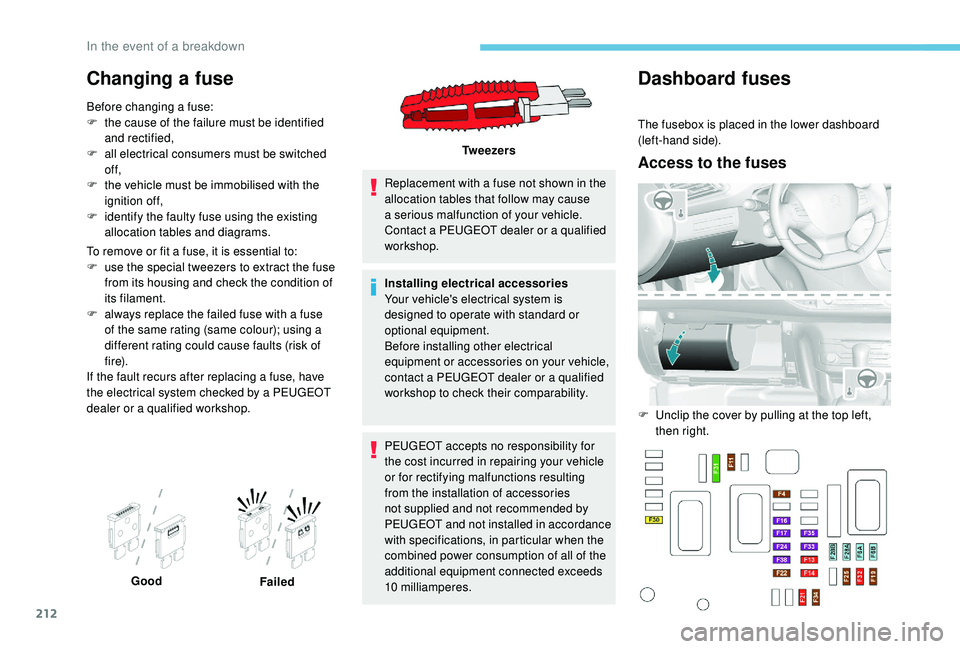
The fusebox is placed in the lower dashboard
(left-hand side).
Access to the fuses
F Unclip the cover by pulling at the top left,
then right.
In the event of a breakdown