2018 Peugeot 308 steering wheel adjustment
[x] Cancel search: steering wheel adjustmentPage 4 of 324

2
.
.
Instrument panel 8
W arning and indicator lamps 9
I
ndicators 23
Distance recorders
2
7
Lighting dimmer
2
8
rip computer
2
8
Monochrome screen C
3
0
Touch screen
3
2
Instruments and controls
4
S
etting the time and date
3
8
Remote control and key
3
9
Keyless Entry and Starting
4
1
Locking/unlocking from the inside
4
3
Back-up procedures
4
4
Doors
4
6
Boot
47
Alarm
48
Electric windows
5
0
PEUGEOT i- Cockpit
5
1
Front head restraints
5
1
Front seats
5
1
Steering wheel adjustment
5
5
Mirrors
5
5
Rear seats (hatchback)
5
6
Rear seats (SW)
5
7
Interior fittings
5
8
Boot fittings (hatchback)
6
2
Boot fittings (SW)
6
2
Heating and Ventilation
6
4
Manual air conditioning
6
6
Manual air conditioning (Touch screen)
6
6
Dual-zone automatic air conditioning (Touch screen) 67Recirculation of interior air 69
Front demist – defrost 7 0
Rear screen demist – defrost
7
0
Panoramic roof
7
1
Courtesy lamps
7
2
Footwell lighting
73
I
nterior ambient lighting
73 E
xterior lighting control stalk
7
4
Automatic illumination of headlamps
7
6
Automatic headlamp dipping
7
6
Guide-me-home lighting
7
8
Exterior welcome lighting
7
8
Direction indicators
7
9
Door mirror spotlamps
7
9
Headlamp adjustment
7
9
Wiper control stalk
8
0
Changing a wiper blade
8
2
Automatic windscreen wipers
8
3
General safety recommendations
8
4
Hazard warning lamps
8
4
Emergency or assistance call
8
5
Horn 86
Electronic stability control (ESC)
8
6
Seat belts
9
0
Airbags
92
Child seats
9
5
Child seat at the front
9
6
Deactivating the front passenger airbag
9
9
ISOFIX mountings and child seats
1
02
Child lock 1 07
InstrumentsAccess
Over view
Ease of use and comfort Lighting and visibility
Safety
Eco-driving
Contents
Page 7 of 324
5
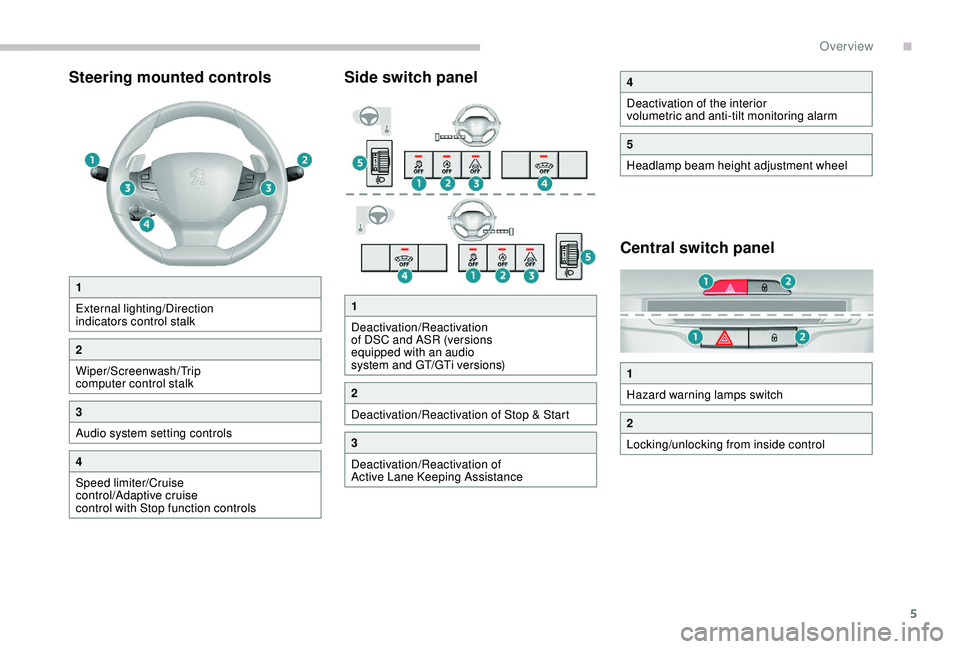
Steering mounted controlsSide switch panel
Central switch panel
1
External lighting/Direction
indicators control stalk
2
Wiper/Screenwash/Trip
computer control stalk
3
Audio system setting controls
4
Speed limiter/Cruise
control/Adaptive cruise
control with Stop function controls
4
Deactivation of the interior
volumetric and anti-tilt monitoring alarm
5
Headlamp beam height adjustment wheel
1
Hazard warning lamps switch
2
Locking/unlocking from inside control
1
Deactivation/Reactivation
of DSC and ASR (versions
equipped with an audio
system and GT/GTi versions)
2
Deactivation/Reactivation of Stop & Start
3
Deactivation/Reactivation of
Active Lane Keeping Assistance
.
Over view
Page 53 of 324
51
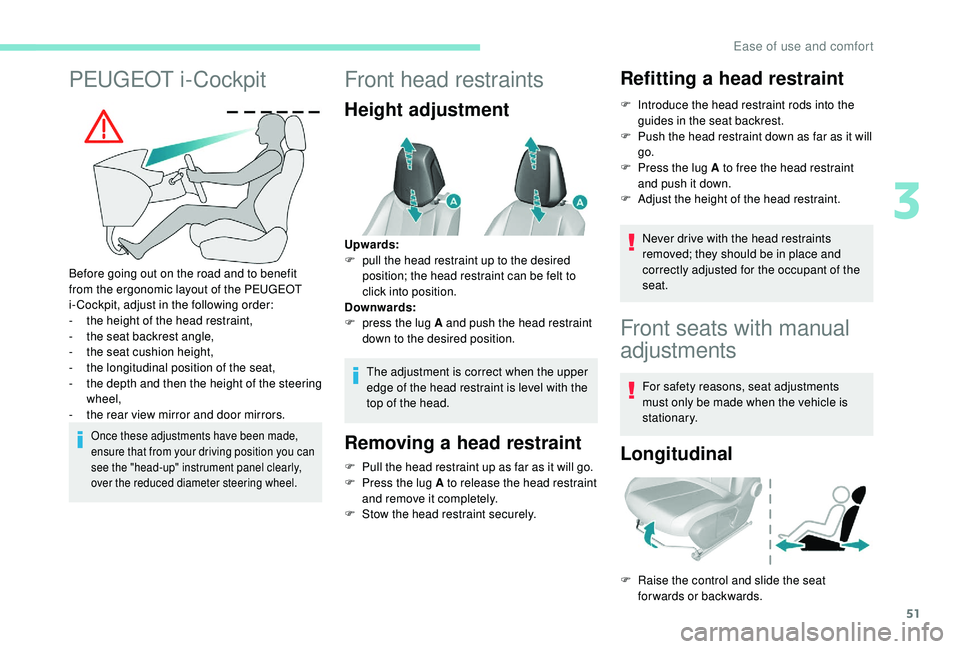
PEUGEOT i-Cockpit
Before going out on the road and to benefit
from the ergonomic layout of the PEUGEOT
i-Cockpit, adjust in the following order:
-
t
he height of the head restraint,
-
t
he seat backrest angle,
-
t
he seat cushion height,
-
t
he longitudinal position of the seat,
-
t
he depth and then the height of the steering
wheel,
-
t
he rear view mirror and door mirrors.
Once these adjustments have been made,
ensure that from your driving position you can
see the "head-up" instrument panel clearly,
over the reduced diameter steering wheel.
Front head restraints
Height adjustment
The adjustment is correct when the upper
edge of the head restraint is level with the
top of the head.
Removing a head restraint
F Pull the head restraint up as far as it will go.
F P ress the lug A to release the head restraint
and remove it completely.
F
S
tow the head restraint securely.
Refitting a head restraint
F Introduce the head restraint rods into the guides in the seat backrest.
F
P
ush the head restraint down as far as it will
go.
F
P
ress the lug A to free the head restraint
and push it down.
F
A
djust the height of the head restraint.
Never drive with the head restraints
removed; they should be in place and
correctly adjusted for the occupant of the
seat.
Upwards:
F
p
ull the head restraint up to the desired
position; the head restraint can be felt to
click into position.
Downwards:
F
p
ress the lug A and push the head restraint
down to the desired position.
Front seats with manual
adjustments
For safety reasons, seat adjustments
must only be made when the vehicle is
stationary.
Longitudinal
F Raise the control and slide the seat forwards or backwards.
3
Ease of use and comfort
Page 57 of 324
55
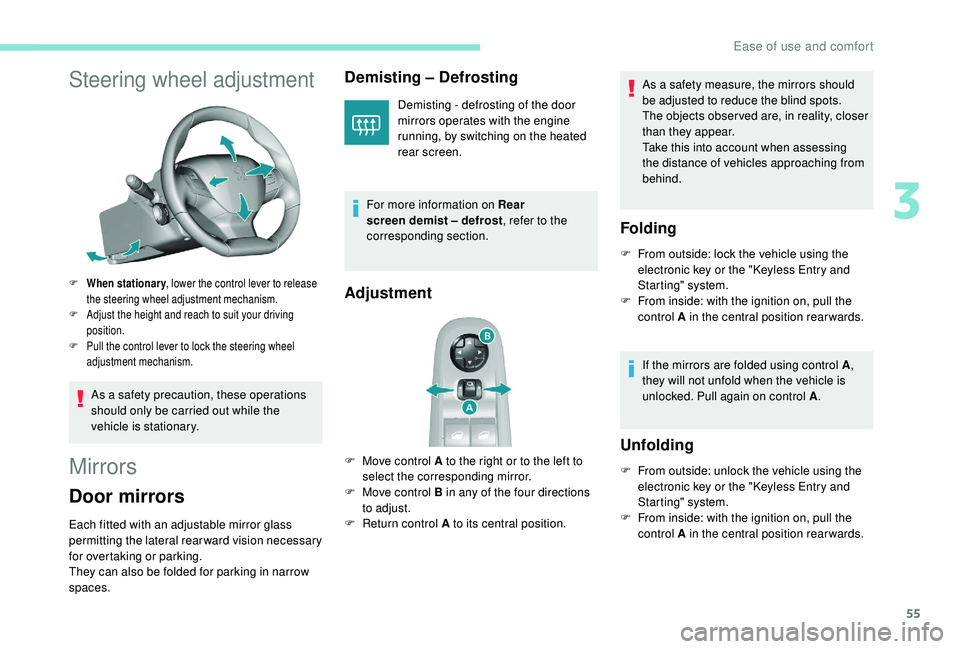
Steering wheel adjustment
F When stationary, lower the control lever to release
the steering wheel adjustment mechanism.
F
A
djust the height and reach to suit your driving
position.
F
P
ull the control lever to lock the steering wheel
adjustment mechanism.
As a safety precaution, these operations
should only be carried out while the
vehicle is stationary.
Mirrors
Door mirrors
Each fitted with an adjustable mirror glass
permitting the lateral rearward vision necessary
for overtaking or parking.
They can also be folded for parking in narrow
spaces.
Demisting – Defrosting
Demisting - defrosting of the door
mirrors operates with the engine
running, by switching on the heated
rear screen.
For more information on Rear
screen demist – defrost , refer to the
corresponding section.
Adjustment
F Move control A to the right or to the left to select the corresponding mirror.
F
M
ove control B in any of the four directions
to adjust.
F
R
eturn control A to its central position. As a safety measure, the mirrors should
be adjusted to reduce the blind spots.
The objects obser ved are, in reality, closer
than they appear.
Take this into account when assessing
the distance of vehicles approaching from
behind.
Folding
F From outside: lock the vehicle using the
electronic key or the " K eyless Entry and
Starting" system.
F
F
rom inside: with the ignition on, pull the
control A in the central position rearwards.
If the mirrors are folded using control A ,
they will not unfold when the vehicle is
unlocked. Pull again on control A .
Unfolding
F From outside: unlock the vehicle using the
electronic key or the " K eyless Entry and
Starting" system.
F
F
rom inside: with the ignition on, pull the
control A in the central position rearwards.
3
Ease of use and comfort
Page 140 of 324
138
Adaptive cruise control
This system provides the following
functions:
-
A
utomatically maintains the vehicle
at the speed set by the driver.
-
A
utomatic adjustment of the
distance between your vehicle and
the one in front.
With the EAT8 automatic gearbox or with the
BlueHDi 150 S&S EAT6 engine, automatic
adjustment can cause your vehicle to come to a
complete stop.
It manages the acceleration and deceleration
of the vehicle by automatically acting on the
engine and the braking system.
Principle of operation
The system automatically adapts the speed of
your vehicle to that of the vehicle in front, to
maintain a constant distance.
If the vehicle in front is driving more slowly, the
system slows, or even stops your vehicle (with
the EAT8 automatic gearbox or the BlueHDi
150 S&S EAT6 engine), using engine braking
and the braking system.
If the vehicle in front accelerates or changes
lane, the cruise control progressively
accelerates your vehicle to return to the
programmed speed.
If the driver operates a direction indicator to
overtake a slower vehicle, the cruise control
allows your vehicle to temporarily approach
the vehicle in front to assist the overtaking
manoeuvre, though never exceeding the
programmed speed.
The brake lamps illuminate as soon as
the braking system is activated with
deceleration of the vehicle. This system is a driving aid that cannot,
in any circumstances, replace the need to
obser ve speed limits and safety distances,
nor the need for vigilance on the part of
the driver.
Some vehicles present on the road may
not be properly seen or may be poorly
interpreted by the camera and/or radar
(e.g. a lorry), which may lead to a poor
assessment of the distances and lead to
the vehicle inappropriately accelerating or
braking.
The driver must be ready at all times
to retake control of their vehicle by
permanently holding both hands on the
steering wheel and keeping their feet near
the brake and accelerator pedals.
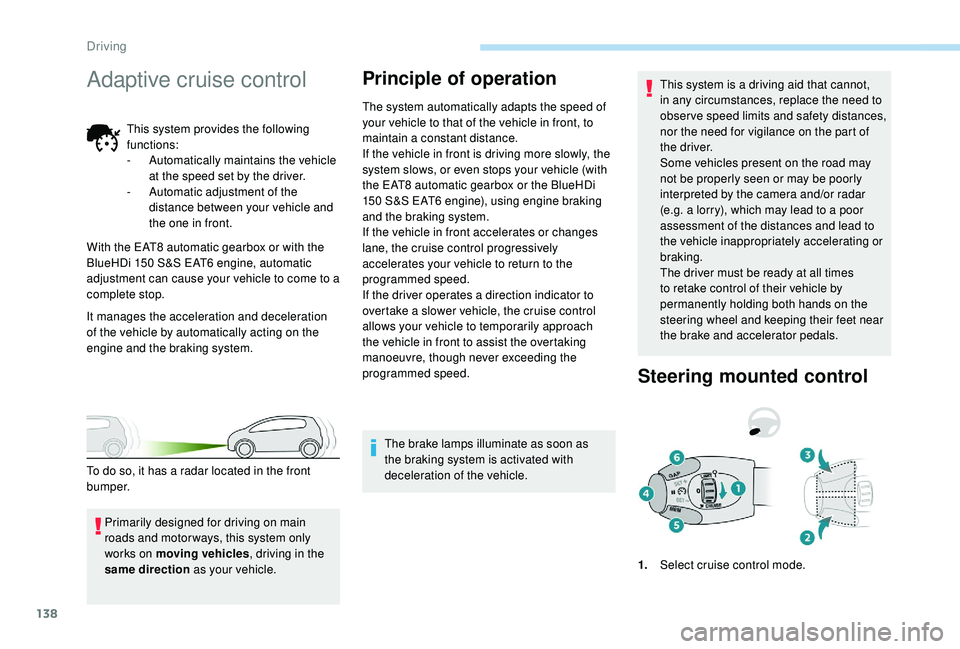
Steering mounted control
1.
Select cruise control mode.
Primarily designed for driving on main
roads and motor ways, this system only
works on moving vehicles
, driving in the
same direction as your vehicle.
To do so, it has a radar located in the front
b u m p e r.
Driving
Page 169 of 324
167
The tyre under-inflation detection system
does not replace the need for vigilance on
the part of the driver.
This system still requires you to check
the tyre inflation pressures (including
the spare wheel) every month as well as
before a long journey.
Driving with under-inflated tyres impairs
handling, extends braking distances and
causes early tyre wear, particularly in
adverse conditions (heavy loads, high
speeds, long journeys).Driving with under-inflated tyres
increases fuel consumption. The tyre pressure specifications for your
vehicle can be found on the tyre pressure
label.
For more information on the
Identification markings
, refer to the
corresponding section.
Tyre pressures should be checked when
the tyres are "cold" (vehicle stopped for
1 hour or after a journey of less than
6 miles (10 km) at moderate speeds).
Other wise (when hot), add 0.3 bar to the
pressures shown on the label.
Snow chains
The system does not have to be
reinitialised after fitting or removing snow
chains.
Under-inflation alert
This warning is indicated by fixed
illumination of this warning lamp, an
audible signal and, depending on
the equipment installed, a message
displayed on the screen.
It compares the information given by the
wheel speed sensors with reference values,
which must be reinitialised after ever y tyre
pressure adjustment or wheel change
.
The system triggers an alert as soon as it
detects a drop in the pressure of one or more
tyres.
F
R
educe speed immediately, avoid excessive
steering movements and sudden braking.
F
S
top the vehicle as soon as it is safe to do
so. The loss of pressure detected does not
always cause visible bulging of the tyre.
Do not satisfy yourself with just a visual
check.
F
I
n the event of a puncture, use the
temporary puncture repair kit or the spare
wheel (depending on equipment),
or
F
i
f you have a compressor, such as the one
in the temporary puncture repair kit, check
the pressures of the four tyres when cold,
or
F
i
f it is not possible to carry out this check
immediately, drive carefully at reduced
speed.
The alert is kept active until the system is
reinitialised.
Reinitialisation
The system must be reinitialised after any
adjustment to the pressure of one or more
tyres, and after changing one or more wheels.
6
Driving