2018 Peugeot 308 instrument panel
[x] Cancel search: instrument panelPage 30 of 324

28
Total distance recorder
It measures the total distance travelled by the
vehicle since its first registration.
Trip distance recorder
It measures the distance travelled since it was
reset by the driver.
F
W
ith the ignition on, press the button until
zeroes appear.
Lighting dimmer
For the manual adjustment of the brightness of
the instrument panel and the touch screen.
Operates only when the vehicle's exterior
lighting is on.
Instrument panel
With the exterior lighting on, press this button
to adjust the brightness of the dashboard
lighting, the touch screen and the ambient
lighting. Release the button when the desired
level is reached.
Touch screen
F Press on the Vehicle/Driving menu.
F I n this menu, select the Vehicle settings
tab, then Comfort lighting .
F
A
djust the brightness (only for the touch
screen) by pressing on the " +" or " -" buttons.
Trip computer
Information displayed about the current journey
(range, current fuel consumption, average fuel
consumption, etc.).
Data displays
With display screen 1 and the audio system:
With display screen
2:
Instruments
Page 32 of 324

30
Tr i p s 1 and 2 are independent but their use is
identical.
For example, trip 1 can be used for daily figures
and trip 2 for monthly figures.
Trip computer, some
definitions
Range
(miles or km)
The distance which can still be
travelled with the fuel remaining in
the tank (related to the average fuel
consumption over the last few miles
(kilometres) travelled).
This value may fluctuate if a change
of driving style or terrain results in a
significant change in the current fuel
consumption.
Dashes are displayed when the range falls
below 19
miles (30 km). After filling with at least
5
litres of fuel, the range is recalculated and is
displayed if it exceeds 62
miles (100 km).
If dashes are displayed continuously while
driving in place of the digits, contact a
PEUGEOT dealer or a qualified workshop.
Current fuel consumption
(mpg or km/l or l/100 km)
C alculated during the last few
seconds.
This function is only displayed from
19
mph (30 km/h).
Average fuel consumption
(mpg or km/l or l/100 km)
C alculated since the last time the
trip recorder was reset to zero.
Average speed
(mph or km/h)
Calculated since the last time the
trip recorder was reset to zero.
Distance travelled
(miles or km)
Calculated since the last time the
trip recorder was reset to zero.
Stop & Start time counter
(minutes/seconds or hours/
minutes)
A time counter calculates the time
spent in STOP mode during a
j o u r n ey.
It resets to zero every time the
ignition is switched on.
Monochrome screen C
Displays in the screen
This displays the following information:
- t he time,
-
t
he date,
-
t
he exterior temperature (this flashes if
there is a risk of ice),
-
par
king sensor information,
-
t
he audio source being listened to,
-
t
elephone or hands-free kit information,
-
t
he trip computer,
-
a
lert messages,
-
s
ettings menus for the screen and the
vehicle equipment.
Controls
From the control panel of your audio system,
you can press:
F
button A to chooses between the display
of audio information in full screen or the
shared display of audio and trip computer
information,
Instruments
Page 35 of 324

33
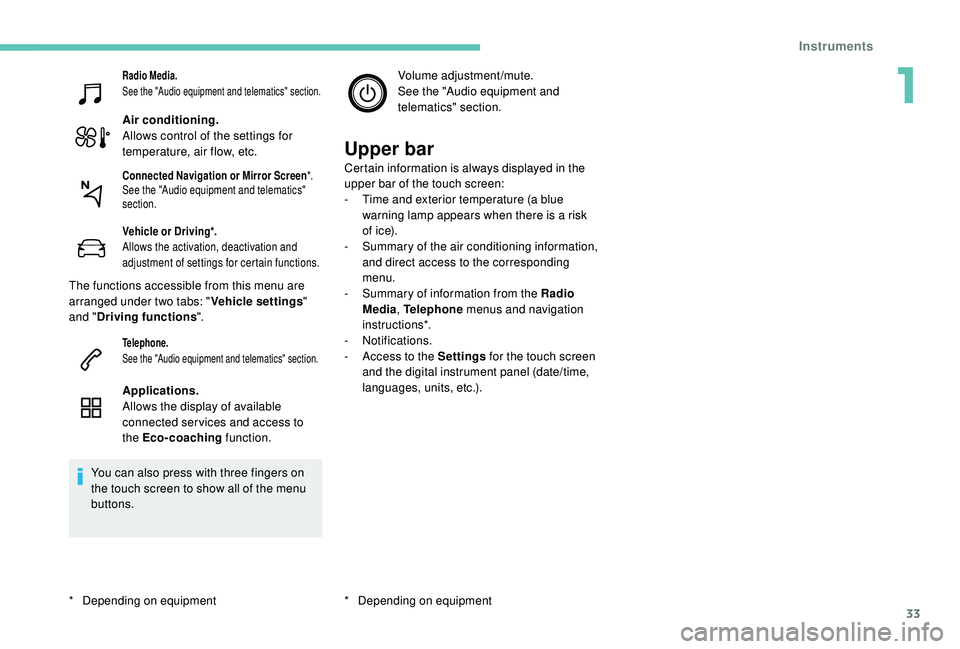
Radio Media.
See the "Audio equipment and telematics" section.
Air conditioning.
Allows control of the settings for
temperature, air flow, etc.
Vehicle or Driving*.
Allows the activation, deactivation and
adjustment of settings for certain functions.
The functions accessible from this menu are
arranged under two tabs: "Vehicle settings"
and " Driving functions ".
Telephone.
See the "Audio equipment and telematics" section.
Applications.
Allows the display of available
connected ser vices and access to
the Eco-coaching function.
You can also press with three fingers on
the touch screen to show all of the menu
buttons. Volume adjustment/mute.
See the "Audio equipment and
telematics" section.
Upper bar
Certain information is always displayed in the
upper bar of the touch screen:
-
T
ime and exterior temperature (a blue
warning lamp appears when there is a risk
of i c e).
-
S
ummary of the air conditioning information,
and direct access to the corresponding
menu.
-
S
ummary of information from the Radio
Media , Telephone menus and navigation
instructions*.
-
Notifications.
-
A
ccess to the Settings for the touch screen
and the digital instrument panel (date/time,
languages, units, etc.).
*
D
epending on equipmentConnected Navigation or Mirror Screen *.
See the "Audio equipment and telematics"
section.
* Depending on equipment
1
Instruments
Page 38 of 324

36
"Driving functions" tab
FunctionsComments
" Park Assist " Activation/deactivation of the function.
" Automatic headlamp dip "Activation/deactivation of the function.
" Stop & Star t " Activation/deactivation of the function.
" Blind spot sensors " Activation/deactivation of the function.
" Traction control" Activation/deactivation of the function.
" Parking sensors " Activation/deactivation of the function.
"
Under-inflation initialisation "Reinitialisation of the under-inflation detection system.
" Adjusting Speeds " Memorisation of speed settings for the speed limiter or
programmable cruise control.
" Diagnostic " Summary of current alerts.
" Active Lane Keeping Assistance "Activation/deactivation of the function.
For more information on one of these
functions, refer to the corresponding
section.
Settings
PEUGEOT Connect Nav
The functions available through the
upper menu bar are detailed in the
table below.
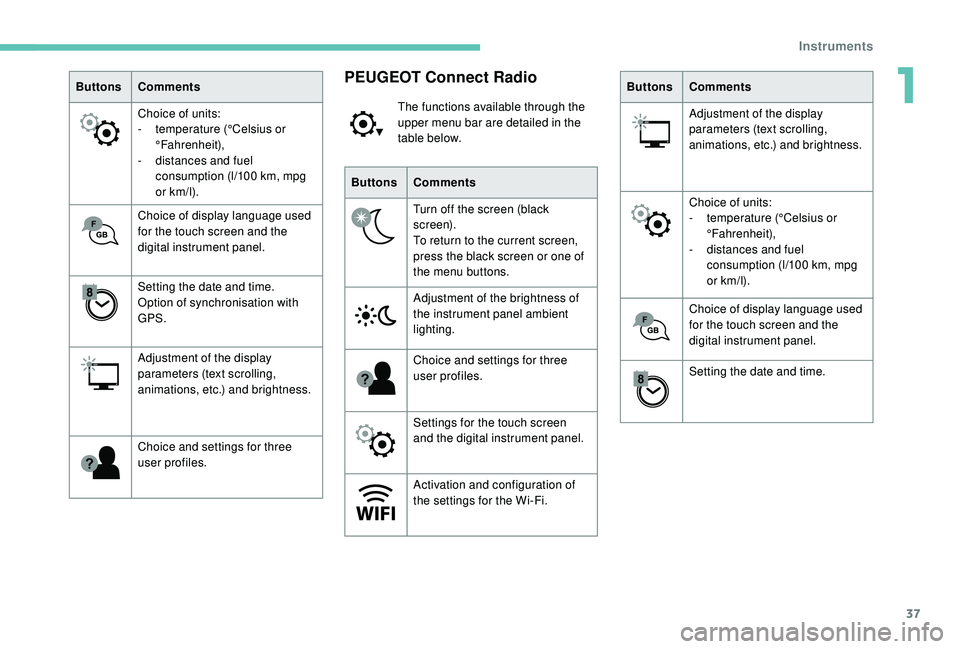
Buttons Comments
Select a theme.
Audio settings (sound ambience,
sound distribution, sound level,
voice volume, ringtone volume).
Switch off the screen.
Settings for the touch screen
and the digital instrument panel.
Instruments
Page 39 of 324

37
ButtonsComments
Choice of units:
-
t
emperature (°Celsius or
°Fahrenheit),
-
d
istances and fuel
consumption (l/100
km, mpg
or km/l).
Choice of display language used
for the touch screen and the
digital instrument panel.
Setting the date and time.
Option of synchronisation with
GPS.
Adjustment of the display
parameters (text scrolling,
animations, etc.) and brightness.
Choice and settings for three
user profiles.PEUGEOT Connect Radio
The functions available through the
upper menu bar are detailed in the
table below.
Buttons Comments
Turn off the screen (black
screen).
To return to the current screen,
press the black screen or one of
the menu buttons.
Adjustment of the brightness of
the instrument panel ambient
lighting.
Choice and settings for three
user profiles.
Settings for the touch screen
and the digital instrument panel.
Activation and configuration of
the settings for the Wi-Fi. Buttons
Comments
Adjustment of the display
parameters (text scrolling,
animations, etc.) and brightness.
Choice of units:
-
t
emperature (°Celsius or
°Fahrenheit),
-
d
istances and fuel
consumption (l/100
km, mpg
or km/l).
Choice of display language used
for the touch screen and the
digital instrument panel.
Setting the date and time.
1
Instruments
Page 47 of 324

45
Central locking not
functioning
Use these procedures in the following cases:
- c entral locking fault,
-
b
attery disconnected or discharged.
In the event of a malfunction with the
central locking system, the battery must
be disconnected to lock the boot and thus
ensure that the vehicle is locked fully.
Driver's door
F Insert the key in the door lock.
F T urn the key towards the front of the vehicle
to unlock it, or towards the rear to lock it.
If fitted to your vehicle, the alarm is not
activated/deactivated when the vehicle is
locked/unlocked.
Opening a door will trigger the alarm,
which can be stopped by switching the
ignition on.
Passenger doorsF Turn the key towards the rear again within 5 seconds to deadlock the vehicle.
F
O
n the rear doors, check that the child lock
is not on.
F
I
nsert the integral key in the latch located
on the edge of the door and turn it an eighth
of a turn to the right for the right-hand side,
and to the left for the left-hand side.
F
C
lose the doors and check from the outside
that the vehicle is locked.
Changing the battery
If the battery is flat, you are informed
by lighting of this warning lamp in the
instrument panel, an audible signal
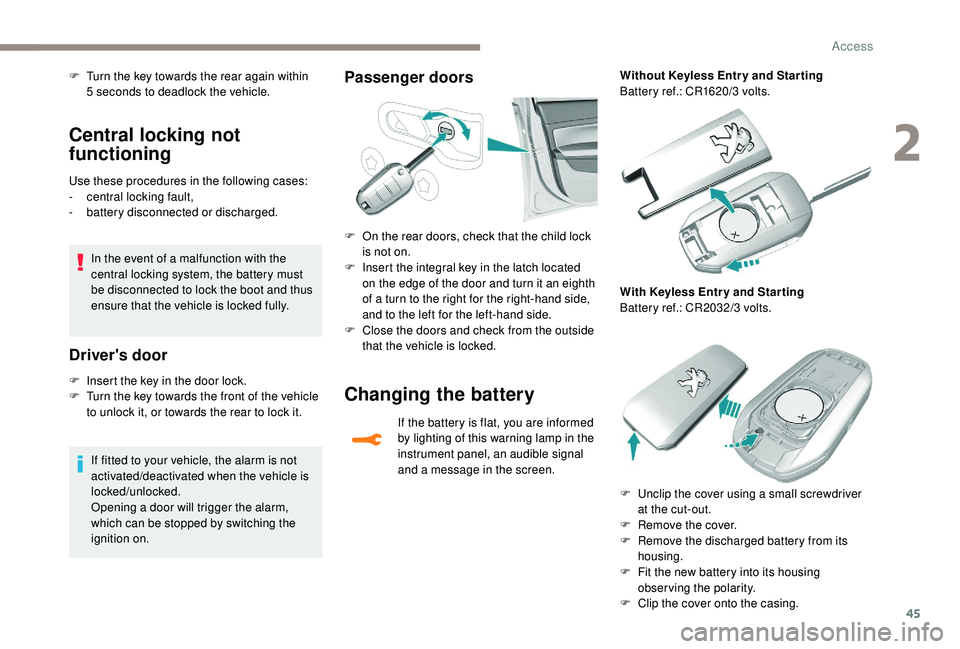
and a message in the screen. Without Keyless Entr y and Star ting
Battery ref.: CR1620/3 volts.
With Keyless Entr y and Star ting
Battery ref.: CR2032/3 volts.
F
U
nclip the cover using a small screwdriver
at the cut-out.
F
R
emove the cover.
F
R
emove the discharged battery from its
housing.
F
F
it the new battery into its housing
observing the polarity.
F
C
lip the cover onto the casing.
2
Access
Page 53 of 324

51
PEUGEOT i-Cockpit
Before going out on the road and to benefit
from the ergonomic layout of the PEUGEOT
i-Cockpit, adjust in the following order:
-
t
he height of the head restraint,
-
t
he seat backrest angle,
-
t
he seat cushion height,
-
t
he longitudinal position of the seat,
-
t
he depth and then the height of the steering
wheel,
-
t
he rear view mirror and door mirrors.
Once these adjustments have been made,
ensure that from your driving position you can
see the "head-up" instrument panel clearly,
over the reduced diameter steering wheel.
Front head restraints
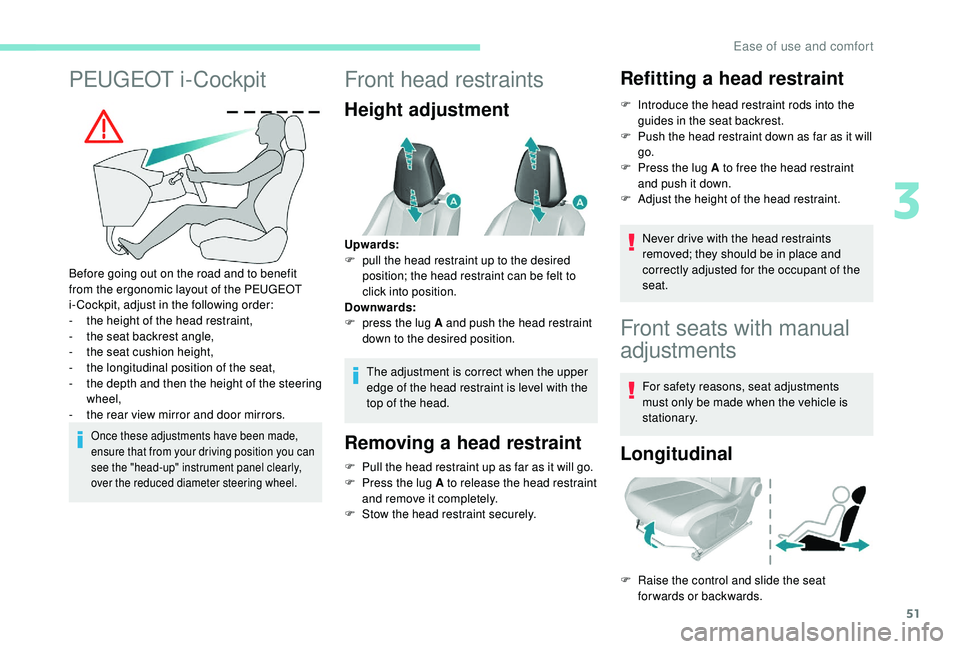
Height adjustment
The adjustment is correct when the upper
edge of the head restraint is level with the
top of the head.
Removing a head restraint
F Pull the head restraint up as far as it will go.
F P ress the lug A to release the head restraint
and remove it completely.
F
S
tow the head restraint securely.
Refitting a head restraint
F Introduce the head restraint rods into the guides in the seat backrest.
F
P
ush the head restraint down as far as it will
go.
F
P
ress the lug A to free the head restraint
and push it down.
F
A
djust the height of the head restraint.
Never drive with the head restraints
removed; they should be in place and
correctly adjusted for the occupant of the
seat.
Upwards:
F
p
ull the head restraint up to the desired
position; the head restraint can be felt to
click into position.
Downwards:
F
p
ress the lug A and push the head restraint
down to the desired position.
Front seats with manual
adjustments
For safety reasons, seat adjustments
must only be made when the vehicle is
stationary.
Longitudinal
F Raise the control and slide the seat forwards or backwards.
3
Ease of use and comfort
Page 76 of 324

74
Exterior lighting control
stalk
Main lighting
Selection of main lighting mode
Without AUTO lighting
With AUTO lighting
Lighting off (ignition off)/Front daytime
running lamps (engine running).
Sidelamps only. Automatic illumination of headlamps.
Dipping the headlamps
Pull the lever to switch the lighting between
dipped and main beam headlamps.
In Lighting off or Sidelamps only modes, the
driver can switch on the main beam headlamps
directly by keeping the lever pulled.
Display
Illumination of the corresponding indicator
lamp in the instrument panel confirms that the
lighting selected is on.
Foglamps
In good or rainy weather, by both day
and night, the front foglamps and the
rear foglamps are prohibited. In these
situations, the power of their beams may
dazzle other drivers. They should only be
used in fog or falling snow.
In these weather conditions, it is your
responsibility to switch on the foglamps
and dipped headlamps manually as the
sunshine sensor may detect sufficient
light.
Switch off the front and rear foglamps
when they are no longer necessary.
Rear foglamp only
Turn the ring to align the desired symbol with
the marking.
Dipped or main beam headlamps.
The main or dipped beam headlamps must be
on.
F
T
o switch it on, turn the ring for wards.
Lighting and visibility