2018 PEUGEOT 3008 fuel type
[x] Cancel search: fuel typePage 11 of 360

9
Customisation of the
instrument panel
** Versions with touch screen. You can modify the appearance of the
instrument panel, by choosing:
-
t
he instrument panel display colour**,
-
a d
isplay mode.
Display language and units
They depend on the configuration of the
multifunction screen (configuration menu).
When travelling abroad, the speed must
be shown in the official units of the
country you are driving in (km/h, km or
mph, miles).
As a safety measure, these adjustments
must be carried out with the vehicle
stationary.
Choosing a display colour
This depends on the ambience activated by the
i- Cockpit Amplify function.
The possible choices are:
F
"Relax ": grey,
F
"Boost ": red,
F
"Normal " (no ambience activated): blue.
For more information on the i-Cockpit Amplify
function , refer to the corresponding section.
Choice of display mode
Each mode corresponds to the type of
information displayed in the instrument panel.
-
"
DIALS": standard display of the analogue
and digital speedometers, the rev counter,
the fuel gauge, the engine coolant
temperature indicator and the distance
recorders.
-
"
NAVIGATION": standard display with, in
addition, the current navigation information
(map and navigation instructions). -
"
DRIVING": standard display with, in
addition, the current driving aid systems
information.
-
"
MINIMAL": minimal display with digital
speedometer and the distance recorders
and, in the event of a warning only, the
fuel gauge and the coolant temperature
i n d i c a t o r.
-
"
TRIP COMPUTER"* minimal display
with, in addition, the rev counter, current
information and the trip recorder selected
(1 or 2).
or
-
"
PERSONAL"**: minimal display with,
in addition, the selection made from the
touch screen of the type of information
displayed in the customisable areas on
the left and right.
To modify the display mode of the instrument
panel:
F
T
urn the wheel located on the left of the
steering wheel to display and scroll through
the different modes on the right-hand side
of the instrument panel.
F
O
nce the selected display mode appears,
press on the wheel to validate.
The new display mode is applied instantly.
To enter settings for the "PERSONAL"
display mode and select the information to
be displayed in the customisable areas of the
instrument panel:
or F
Sel
ect the Settings menu in the
upper bar of the touch screen.
1
Instruments
Page 48 of 360
46
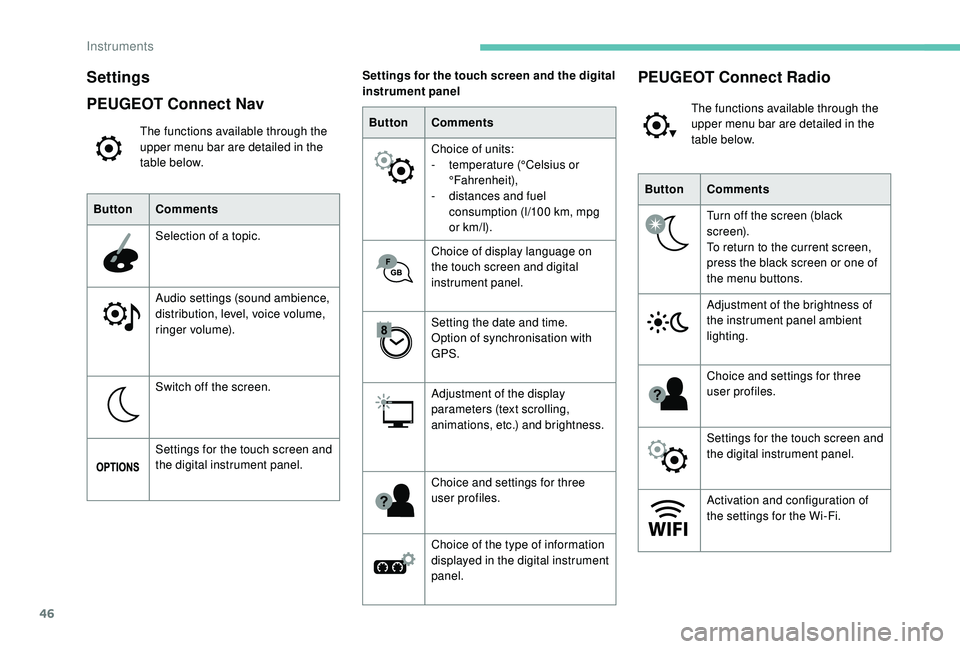
Settings
PEUGEOT Connect Nav
The functions available through the
upper menu bar are detailed in the
table below.
Button Comments
Selection of a topic.
Audio settings (sound ambience,
distribution, level, voice volume,
ringer volume).
Switch off the screen.
Settings for the touch screen and
the digital instrument panel. Button
Comments
Choice of units:
-
t
emperature (°Celsius or
°Fahrenheit),
-
d
istances and fuel
consumption (l/100
km, mpg
or km/l).
Choice of display language on
the touch screen and digital
instrument panel.
Setting the date and time.
Option of synchronisation with
GPS.
Adjustment of the display
parameters (text scrolling,
animations, etc.) and brightness.
Choice and settings for three
user profiles.
Choice of the type of information
displayed in the digital instrument
panel.
Settings for the touch screen and the digital
instrument panel
ButtonComments
Turn off the screen (black
screen).
To return to the current screen,
press the black screen or one of
the menu buttons.
Adjustment of the brightness of
the instrument panel ambient
lighting.
Choice and settings for three
user profiles.
Settings for the touch screen and
the digital instrument panel.
Activation and configuration of
the settings for the Wi-Fi.
PEUGEOT Connect Radio
The functions available through the
upper menu bar are detailed in the
table below.
Instruments
Page 49 of 360

47
ButtonComments
Adjustment of the display
parameters (text scrolling,
animations, etc.) and brightness.
Choice of units:
-
t
emperature (°Celsius or
°Fahrenheit),
-
d
istances and fuel
consumption (l/100
km, mpg
or km/l).
Choice of display language on
the touch screen and digital
instrument panel.
Setting the date and time.
Choice of the type of information
displayed in the digital instrument
panel.
Settings for the touch screen and the digital
instrument panel
1
Instruments
Page 130 of 360

128
Recommendations
Your vehicle is designed principally to
drive on tarmac roads but it allows you to
occasionally drive on other less passable
terrain.
However, it does not permit off-road
driving such as:
-
c
rossing and driving on terrain which
could damage the underbody or strip
away components (fuel pipe, fuel
cooler, etc.) due to obstacles or stones
in particular,
-
d
riving on terrain with steep gradients
and poor grip,
-
c
rossing a stream.
Hill Assist Descent
Control
System that provides assistance when
descending on loose or soft sur faces (gravel,
mud, etc.) or a steep gradient.
This system reduces the risk of slip or loss
of control of the vehicle when descending,
whether going forward or in reverse.
During a descent, it assists the driver in
maintaining a constant speed, depending
on the gear engaged, while progressively
releasing the brakes.For the system to activate, the slope must
be greater than 5%.
The system can be used with the gearbox
in neutral.
Otherwise engage a gear corresponding
to the speed to prevent the engine stalling.
With an automatic gearbox, the system
can be used with the selector at N , D or R.
When the system is regulating, the Active
Safety Brake system is automatically
deactivated. The system is not available:
-
i
f the speed of the vehicle is above
43 mph (70 km/h),
- i f the speed of the vehicle is being
controlled by the Adaptive cruise
control with Stop function, depending
on the type of gearbox.
Switching on
By default, the system is not selected.
The system's status is not saved when the
ignition is switched off.
The driver can select the system when
the engine is running, when the vehicle is
stationary or moving at speeds up to approx.
31
mph (50 km/h).
F
T
o select the system, at a
speed below 31
mph (50 km/h),
press this button until its green
indicator lamp comes on; this
warning lamp comes on in grey
in the instrument panel.
You can deactivate the ASR
and DSC systems by turning
the knob to the "
OFF" position.
The ASR and DSC systems will no longer
act on the engine operation or the brakes
in the event of an involuntary change of
trajectory.
These systems are reactivated
automatically from 31
mph (50
km/h) or
every time the ignition is switched on.
Safety
Page 169 of 360
167
Displays
To show this information on the instrument
panel, select the "PERSONAL" mode and then
the type of information required.This telemetry information (power
output, turbocharger pressure, torque,
longitudinal and lateral acceleration, etc.)
is given as a guide only.
Gear shift indicator
(Depending on engine.)
System which reduces fuel consumption by
recommending the most appropriate gear.
Operation
remains responsible for deciding whether or not
to follow the indications issued by the system.
This function cannot be deactivated.
With an automatic gearbox, the system is
only active in manual mode.
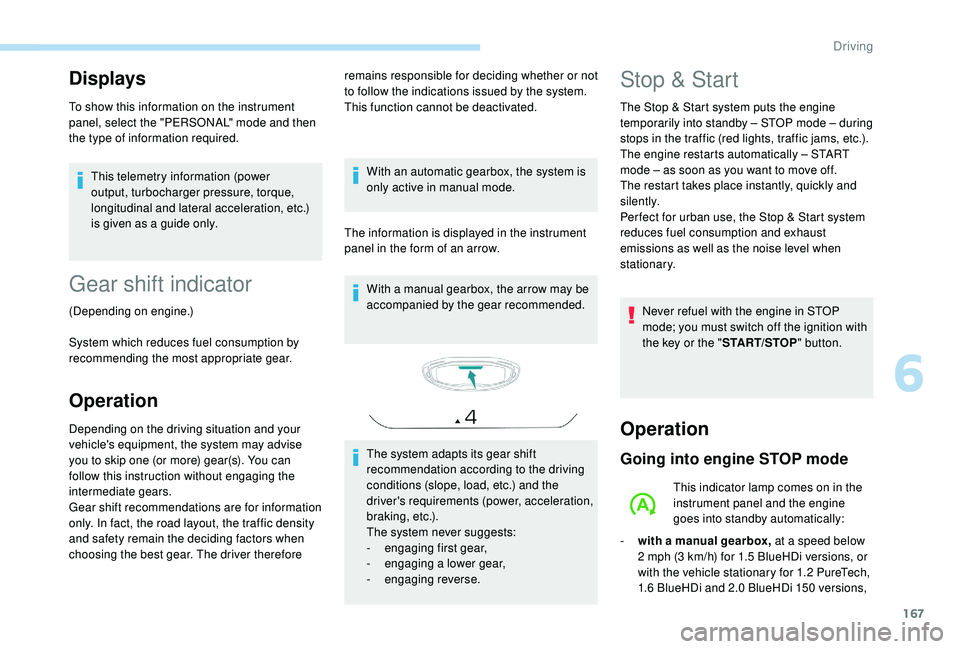
The information is displayed in the instrument
panel in the form of an arrow. With a manual gearbox, the arrow may be
accompanied by the gear recommended.
The system adapts its gear shift
recommendation according to the driving
conditions (slope, load, etc.) and the
driver's requirements (power, acceleration,
b r a k i n g , e t c .) .
The system never suggests:
-
e
ngaging first gear,
-
enga
ging a lower gear,
-
enga
ging reverse.
Depending on the driving situation and your
vehicle's equipment, the system may advise
you to skip one (or more) gear(s). You can
follow this instruction without engaging the
intermediate gears.
Gear shift recommendations are for information
only. In fact, the road layout, the traffic density
and safety remain the deciding factors when
choosing the best gear. The driver therefore Stop & Start
The Stop & Start system puts the engine
t emporarily into standby – STOP mode – during
stops in the traffic (red lights, traffic jams, etc.).
The engine restarts automatically – START
mode – as soon as you want to move off.
The restart takes place instantly, quickly and
silently.
Per fect for urban use, the Stop & Start system
reduces fuel consumption and exhaust
emissions as well as the noise level when
stationary.
Never refuel with the engine in STOP
mode; you must switch off the ignition with
the key or the " START/STOP" button.
Operation
Going into engine STOP mode
This indicator lamp comes on in the
instrument panel and the engine
goes into standby automatically:
-
w
ith a manual gearbox, at a speed below
2
mph (3 km/h) for 1.5 BlueHDi versions, or
with the vehicle stationary for 1.2
PureTech,
1.6
BlueHDi and 2.0 BlueHDi 150 versions,
6
Driving
Page 172 of 360
170
The Stop & Start system requires a
12 V battery of specific technology and
specification.
All work on this type of battery must be
carried out only by a PEUGEOT dealer or
a qualified workshop.
For more information on the 12
V batter y,
refer to the corresponding section.
Under-inflation detection
System which automatically checks the
pressures of the tyres while driving.
The system monitors the pressures in the four
tyres, once the vehicle is moving.
It compares the information given by the wheel
speed sensors with reference values, which
must be reinitialised ever y time the tyre
pressures are adjusted or a wheel changed .
The system triggers an alert as soon as it
detects a drop in the inflation pressure of one
or more tyres. The under-inflation detection system does
not replace the need for vigilance on the
part of the driver.
This system does not avoid the need to
check the tyre pressures (including the
spare wheel) every month as well as
before a long journey.
Driving with under-inflated tyres worsens
road-holding, lengthens braking distances,
causes premature wear of the tyres,
particularly in adverse conditions (heavy
loads, high speeds, long journeys).
Driving with under-inflated tyres
increases fuel consumption.
The inflation pressures defined for your
vehicle can be found on the tyre pressure
label.
For more information on the
Identification markings , refer to the
corresponding section. Checking tyre pressures
This check should be done when the tyres
are "cold" (vehicle stopped for 1
hour or
after a journey of less than 6 miles (10 km)
at moderate speeds).
Other wise, add 0.3 bar to the pressures
shown on the label.
Snow chains
The system does not have to be
reinitialised after fitting or removing snow
chains.
Under-inflation alert
This warning is indicated by
continuous illumination of this lamp,
an audible signal and, depending on
the equipment installed, a message
displayed on the screen.
F
R
educe speed immediately, avoid excessive
steering movements and sudden braking.
F
S
top the vehicle as soon as it is safe to do
so.
The loss of pressure detected does not
always cause visible bulging of the tyre.
Do not satisfy yourself with just a visual
check.
Driving
Page 218 of 360
216
Fuel
Fuel tank capacity: approximately 53 litres.
R eser ve level: 6 litres.
Low fuel level
When the low fuel level is reached
in the fuel tank, this warning lamp
comes on in the instrument panel,
accompanied by the display of a
message and an audible signal.
When it first comes on, about
6
litres of fuel is left in the tank.
If your vehicle is fitted with Stop & Start,
never refuel with the engine in STOP
mode; you must switch off the ignition
using the key, or the START/STOP button
if your vehicle has
K
eyless Entry and
Starting.
Refuelling
If you have put in the wrong fuel for your
vehicle, you must have the fuel tank
drained and filled with the correct fuel
before starting the engine. Once you have finished refuelling:
F
R
efit the filler cap.
F
T
urn it to the right.
F
C
lose the fuel filler flap.Misfuel prevention (Diesel)
(Depending on the country of sale.)
Mechanical device which prevents filling the
tank of a Diesel vehicle with petrol. It avoids
the risk of engine damage that can result from
filling with the wrong fuel.
Until sufficient fuel is added, this warning lamp
appears every time the ignition is switched on,
accompanied by the display of a message and
an audible signal. When driving, this message
and audible signal are repeated with increasing
frequency as the fuel level drops towards 0
.
Refuel as soon as possible to avoid running out
of fuel.
For more information on Running out of fuel
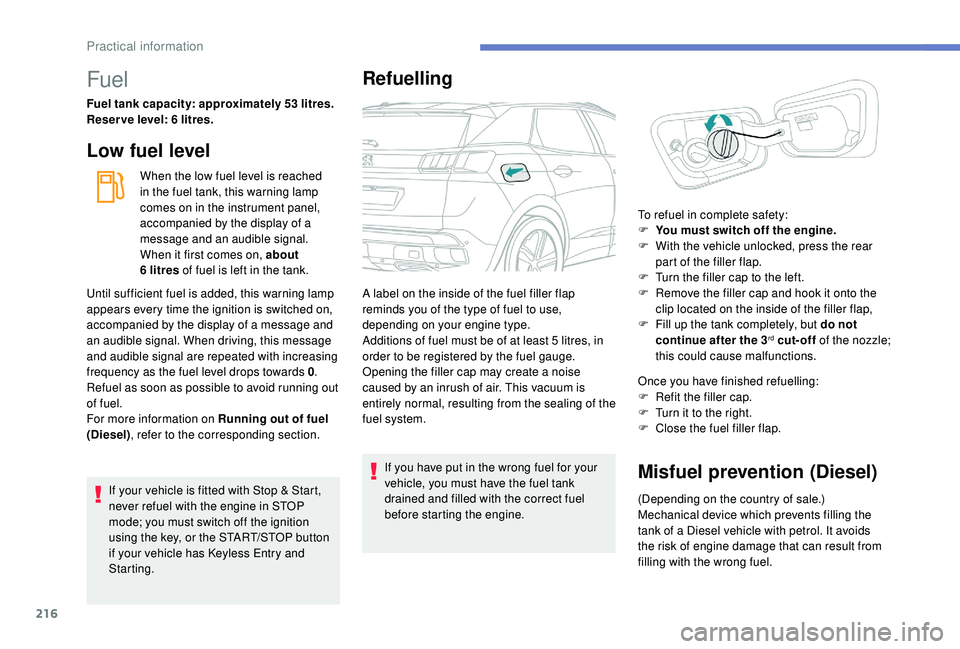
(Diesel) , refer to the corresponding section. A label on the inside of the fuel filler flap
reminds you of the type of fuel to use,
depending on your engine type.
Additions of fuel must be of at least 5
litres, in
order to be registered by the fuel gauge.
Opening the filler cap may create a noise
caused by an inrush of air. This vacuum is
entirely normal, resulting from the sealing of the
fuel system. To refuel in complete safety:
F
Y
ou must switch off the engine.
F
W
ith the vehicle unlocked, press the rear
part of the filler flap.
F
T
urn the filler cap to the left.
F
R
emove the filler cap and hook it onto the
clip located on the inside of the filler flap,
F
F
ill up the tank completely, but do not
continue after the 3
rd cut-off of the nozzle;
this could cause malfunctions.
Practical information
Page 219 of 360
217
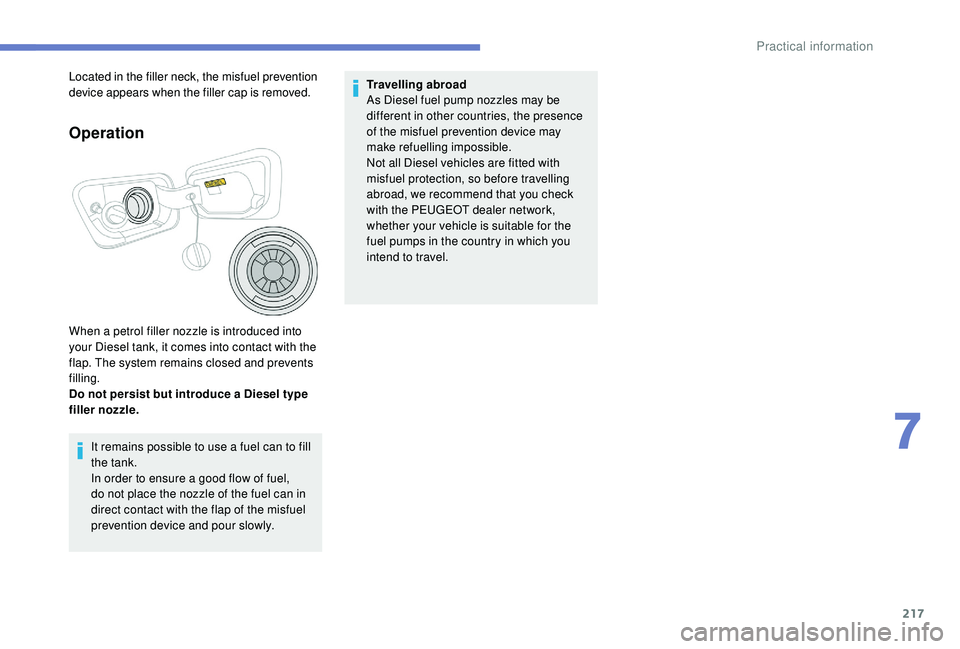
Operation
When a petrol filler nozzle is introduced into
your Diesel tank, it comes into contact with the
flap. The system remains closed and prevents
filling.
Do not persist but introduce a Diesel type
filler nozzle.It remains possible to use a fuel can to fill
the tank.
In order to ensure a good flow of fuel,
do not place the nozzle of the fuel can in
direct contact with the flap of the misfuel
prevention device and pour slowly.
Located in the filler neck, the misfuel prevention
device appears when the filler cap is removed.
Travelling abroad
As Diesel fuel pump nozzles may be
different in other countries, the presence
of the misfuel prevention device may
make refuelling impossible.
Not all Diesel vehicles are fitted with
misfuel protection, so before travelling
abroad, we recommend that you check
with the PEUGEOT dealer network,
whether your vehicle is suitable for the
fuel pumps in the country in which you
intend to travel.
7
Practical information