2018 PEUGEOT 3008 driver seat
[x] Cancel search: driver seatPage 6 of 360
4
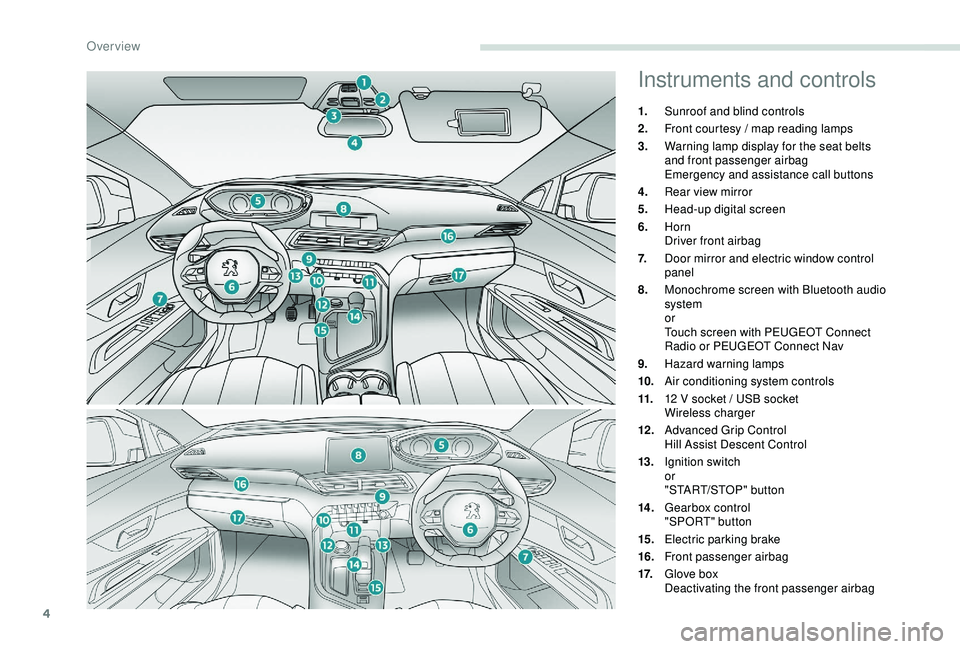
Instruments and controls
1.Sunroof and blind controls
2. Front courtesy / map reading lamps
3. Warning lamp display for the seat belts
and front passenger airbag
Emergency and assistance call buttons
4. Rear view mirror
5. Head-up digital screen
6. Horn
Driver front airbag
7. Door mirror and electric window control
panel
8. Monochrome screen with Bluetooth audio
system
or
Touch screen with PEUGEOT Connect
Radio or PEUGEOT Connect Nav
9. Hazard warning lamps
10. Air conditioning system controls
11. 12
V socket / USB socket
Wireless charger
12 . Advanced Grip Control
Hill Assist Descent Control
13. Ignition switch
or
"START/STOP" button
14 . Gearbox control
"SPORT" button
15. Electric parking brake
16. Front passenger airbag
17. Glove box
Deactivating the front passenger airbag
Over view
Page 9 of 360

7
Limit the causes of excess
consumption
Spread loads throughout the vehicle; place
the heaviest items in the bottom of the boot,
as close as possible to the rear seats.
Limit the loads carried in the vehicle and
reduce wind resistance (roof bars, roof rack,
bicycle carrier, trailer, etc.). Preferably, use a
roof box.
Remove roof bars and roof racks after use.
At the end of winter, remove snow tyres and
refit your summer tyres.
Observe the recommendations
on maintenance
Check the tyre pressures regularly, when cold,
referring to the label in the door aperture,
driver's side.
Carry out this check in particular:
-
b
efore a long journey,
-
a
t each change of season,
-
a
fter a long period out of use.
Do not forget the spare wheel and the tyres on
any trailer or caravan. Have your vehicle ser viced regularly (engine
oil, oil filter, air filter, cabin filter, etc.) and
obser ve the schedule of operations in the
manufacturer's service schedule.
When filling the tank, do not continue after the
3
rd cut-off of the nozzle to avoid over flow.
At the wheel of your new vehicle, it is only
after the first 1,900
miles (3,000 kilometres)
that you will see the fuel consumption settle
down to a consistent average. With a BlueHDi Diesel engine, if the SCR
system is faulty, your vehicle becomes
polluting. As soon as possible, visit a
PEUGEOT dealer or a qualified workshop to
make your vehicle's level of nitrogen oxides
emissions compliant to the standard.
.
Eco-driving
Page 15 of 360
13
Warning / indicator lampStateCause Action / Observations
Door(s) open Fixed, associated with a
message identifying the
d o o r. Speed below 6
mph (10 km/h), a
door or the boot is not properly
closed. Close the door or boot.
Fixed, associated with a
message identifying the
door, together with an
audible signal. Speed above 6
mph (10 km/h), a
door or the boot is not properly
closed.
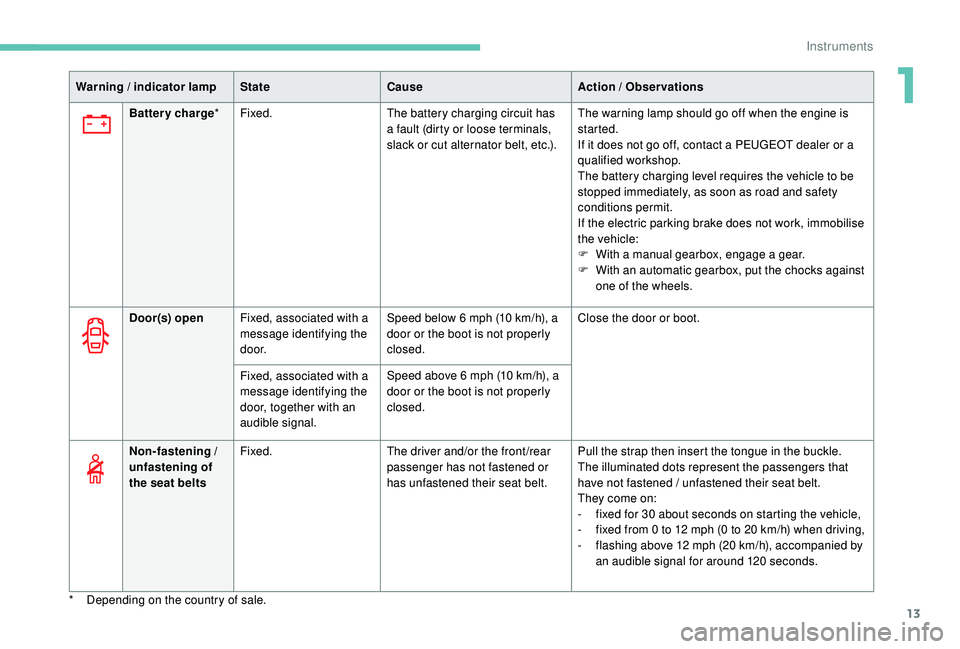
Non-fastening /
unfastening of
the seat belts Fixed.
The driver and/or the front/rear
passenger has not fastened or
has unfastened their seat belt. Pull the strap then insert the tongue in the buckle.
The illuminated dots represent the passengers that
have not fastened / unfastened their seat belt.
They come on:
-
f
ixed for 30 about seconds on starting the vehicle,
-
f
ixed from 0 to 12 mph (0 to 20 km/h) when driving,
-
f
lashing above 12 mph (20 km/h), accompanied by
an audible signal for around 120
seconds.
Battery charge
*Fixed. The battery charging circuit has
a fault (dirty or loose terminals,
slack or cut alternator belt, etc.). The warning lamp should go off when the engine is
started.
If it does not go off, contact a PEUGEOT dealer or a
qualified workshop.
The battery charging level requires the vehicle to be
stopped immediately, as soon as road and safety
conditions permit.
If the electric parking brake does not work, immobilise
the vehicle:
F
W
ith a manual gearbox, engage a gear.
F
W
ith an automatic gearbox, put the chocks against
one of the wheels.
*
D
epending on the country of sale.
1
Instruments
Page 64 of 360
62
Back-up release
To manually unlock the boot in the event of
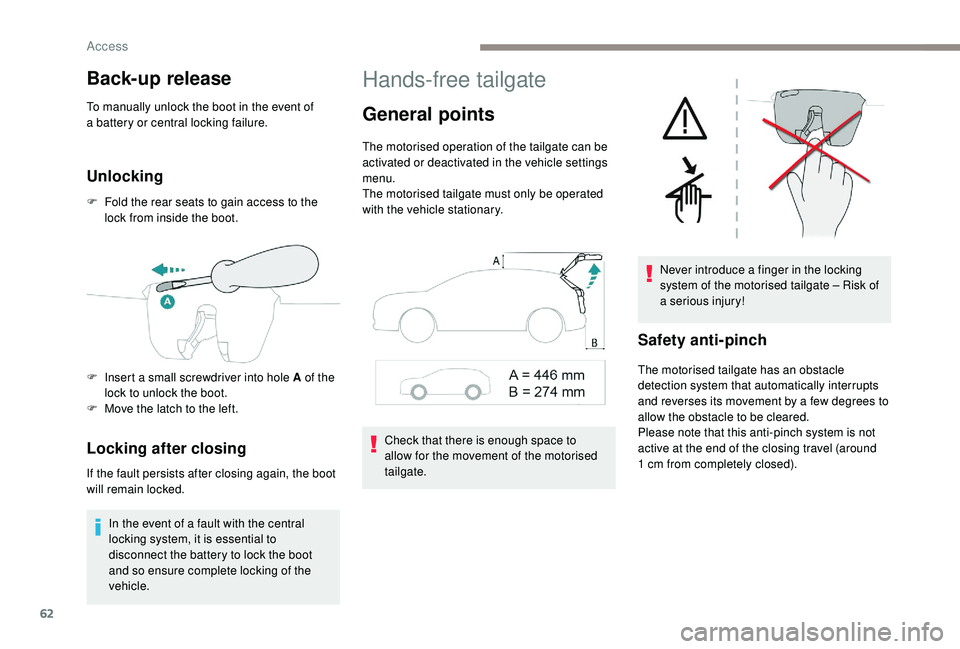
a battery or central locking failure.
Unlocking
F Fold the rear seats to gain access to the lock from inside the boot.
Locking after closing
If the fault persists after closing again, the boot
will remain locked.
In the event of a fault with the central
locking system, it is essential to
disconnect the battery to lock the boot
and so ensure complete locking of the
vehicle.
Hands-free tailgate
General points
The motorised operation of the tailgate can be
activated or deactivated in the vehicle settings
menu.
The motorised tailgate must only be operated
with the vehicle stationary.
Check that there is enough space to
allow for the movement of the motorised
tailgate. Never introduce a finger in the locking
system of the motorised tailgate – Risk of
a serious injury!
Safety anti-pinch
The motorised tailgate has an obstacle
detection system that automatically interrupts
and reverses its movement by a few degrees to
allow the obstacle to be cleared.
Please note that this anti-pinch system is not
active at the end of the closing travel (around
1
cm from completely closed).
F
I
nsert a small screwdriver into hole A of the
lock to unlock the boot.
F
M
ove the latch to the left.
Access
Page 72 of 360
70
Driving position
Adopting a good driving position helps improve
your comfort and protection.
It also optimises interior and exterior visibility
as well as access to controls.
Sitting comfortably
Whether or not your vehicle has certain seat
adjustments described in this section depends
on the trim level and country of sale.
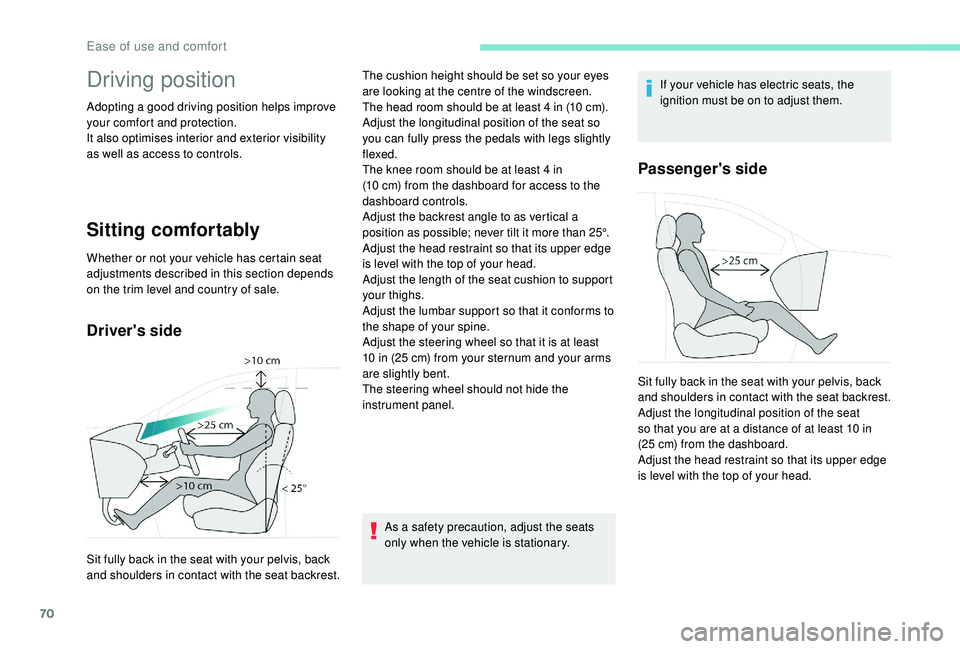
Driver's side
As a safety precaution, adjust the seats
only when the vehicle is stationary.If your vehicle has electric seats, the
ignition must be on to adjust them.
Passenger's side
Sit fully back in the seat with your pelvis, back
and shoulders in contact with the seat backrest.The cushion height should be set so your eyes
are looking at the centre of the windscreen.
The head room should be at least 4
in (10 cm).
Adjust the longitudinal position of the seat so
you can fully press the pedals with legs slightly
flexed.
The knee room should be at least 4 in
(10 cm) from the dashboard for access to the
dashboard controls.
Adjust the backrest angle to as vertical a
position as possible; never tilt it more than 25°.
Adjust the head restraint so that its upper edge
is level with the top of your head.
Adjust the length of the seat cushion to support
your thighs.
Adjust the lumbar support so that it conforms to
the shape of your spine.
Adjust the steering wheel so that it is at least
10 in (25 cm) from your sternum and your arms
are slightly bent.
The steering wheel should not hide the
instrument panel. Sit fully back in the seat with your pelvis, back
and shoulders in contact with the seat backrest.
Adjust the longitudinal position of the seat
so that you are at a distance of at least 10 in
(25 cm) from the dashboard.
Adjust the head restraint so that its upper edge
is level with the top of your head.
Ease of use and comfort
Page 74 of 360

72
2. Adjusting the height of the seat cushion
F R aise or lower the control as many times as
needed to obtain the desired seat height.
3. Adjusting the seat backrest angle
F
T
urn the knob for wards or backwards to
recline the backrest to the desired angle.
or
F
F
or a passenger seat that can be placed in
the table position, pull the handle and guide
the backrest for wards or backwards.
4. Adjusting the height of the head restraint
Refer to the corresponding section.
5. Adjusting the lumbar support
(only on the driver's seat)
F
T
urn the knob for wards or backwards to
increase or decrease the level of lumbar
support.
Before moving the seat backwards,
ensure that there is nothing that might
prevent the full travel of the seat.
There is a risk of trapping or pinching
passengers if present in the rear seats
or jamming the seat if large objects are
placed on the floor behind the seat."AGR" certified seats
Additional adjustments
1. Adjusting the length of the seat cushion
F P ull the handle for wards to release the
cushion, then move the front part of the seat
cushion forwards or backwards.
2. Adjusting the seat cushion angle electrically
F
P
ress and hold the front or rear of the
control to raise or lower the front of the seat
cushion.
3. Adjusting the lumbar support electrically
The control allows independent adjustment of
the depth and vertical position of the lumbar
support.
F
P
ress and hold the front or rear of the
control to increase or reduce the lumbar
support.
F
P
ress and hold the top or bottom of the
control to raise or lower the lumbar support
area.
Placing the passenger seat
in the table position
The backrest of the passenger seat can be fully
folded for ward and secured in this position.
This function, when associated with folding
of the backrest of the rear seats, helps in
transporting long and voluminous objects.
First steps:
F
l
ower the head restraint,
F
m
ove the seat fully back to allow space for
the head restraint when folding,
F
a
djust the seat to the lowest position,
F
c
heck that there is nothing that might
inter fere with folding of the backrest (seat
belt, child seat, items of clothing, bags, etc.).
Deactivation of the front passenger airbag
is recommended.
Ease of use and comfort
Page 75 of 360
73
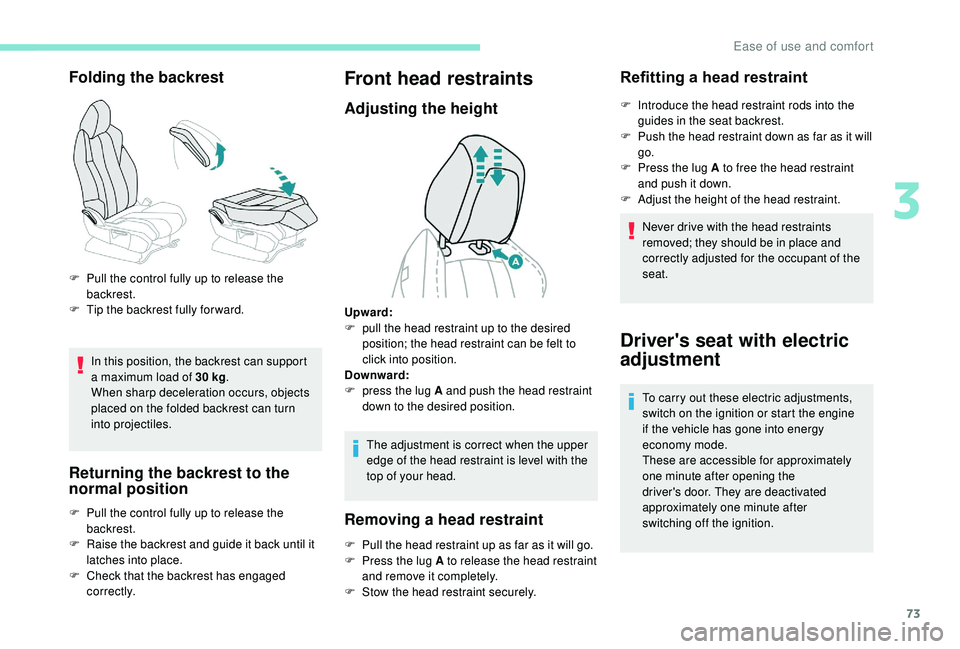
Folding the backrest
In this position, the backrest can support
a maximum load of 30 kg.
When sharp deceleration occurs, objects
placed on the folded backrest can turn
into projectiles.
Returning the backrest to the
normal position
F Pull the control fully up to release the backrest.
F
T
ip the backrest fully for ward.
F
P
ull the control fully up to release the
backrest.
F
R
aise the backrest and guide it back until it
latches into place.
F
C
heck that the backrest has engaged
c o r r e c t l y.
Front head restraints
Adjusting the height
The adjustment is correct when the upper
edge of the head restraint is level with the
top of your head.
Removing a head restraint
F Pull the head restraint up as far as it will go.
F P ress the lug A to release the head restraint
and remove it completely.
F
S
tow the head restraint securely.
Refitting a head restraint
F Introduce the head restraint rods into the guides in the seat backrest.
F
P
ush the head restraint down as far as it will
go.
F
P
ress the lug A to free the head restraint
and push it down.
F
A
djust the height of the head restraint.
Never drive with the head restraints
removed; they should be in place and
correctly adjusted for the occupant of the
seat.
Upward:
F
p
ull the head restraint up to the desired
position; the head restraint can be felt to
click into position.
Downward:
F
p
ress the lug A and push the head restraint
down to the desired position.
Driver's seat with electric
adjustment
To carry out these electric adjustments,
switch on the ignition or start the engine
if the vehicle has gone into energy
economy mode.
These are accessible for approximately
one minute after opening the
driver's door. They are deactivated
approximately one minute after
switching off the ignition.
3
Ease of use and comfort
Page 76 of 360
74
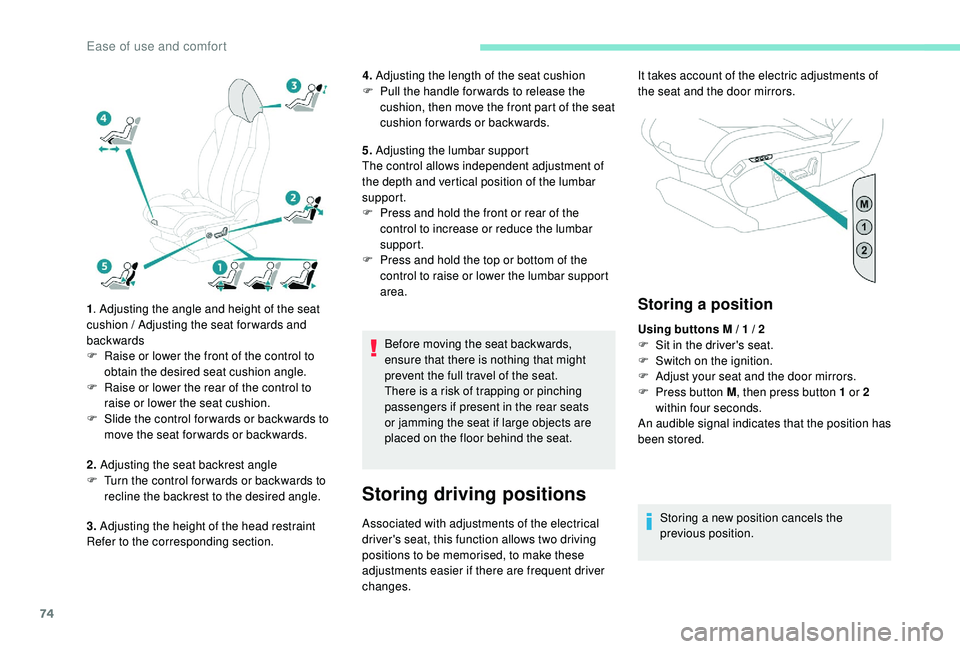
1. Adjusting the angle and height of the seat
cushion / Adjusting the seat forwards and
backwards
F
R
aise or lower the front of the control to
obtain the desired seat cushion angle.
F
R
aise or lower the rear of the control to
raise or lower the seat cushion.
F
S
lide the control for wards or backwards to
move the seat for wards or backwards.
2. Adjusting the seat backrest angle
F
T
urn the control for wards or backwards to
recline the backrest to the desired angle.
3. Adjusting the height of the head restraint
Refer to the corresponding section. 4.
Adjusting the length of the seat cushion
F
P
ull the handle for wards to release the
cushion, then move the front part of the seat
cushion forwards or backwards.
5. Adjusting the lumbar support
The control allows independent adjustment of
the depth and vertical position of the lumbar
support.
F
P
ress and hold the front or rear of the
control to increase or reduce the lumbar
support.
F
P
ress and hold the top or bottom of the
control to raise or lower the lumbar support
area.
Before moving the seat backwards,
ensure that there is nothing that might
prevent the full travel of the seat.
There is a risk of trapping or pinching
passengers if present in the rear seats
or jamming the seat if large objects are
placed on the floor behind the seat.
Storing driving positions
Associated with adjustments of the electrical
driver's seat, this function allows two driving
positions to be memorised, to make these
adjustments easier if there are frequent driver
changes.
Storing a position
Using buttons M / 1 / 2
F S it in the driver's seat.
F
S
witch on the ignition.
F
A
djust your seat and the door mirrors.
F
P
ress button M , then press button 1 or 2
within four seconds.
An audible signal indicates that the position has
been stored.
Storing a new position cancels the
previous position.
It takes account of the electric adjustments of
the seat and the door mirrors.
Ease of use and comfort