2018 PEUGEOT 3008 stop start
[x] Cancel search: stop startPage 169 of 360
167
Displays
To show this information on the instrument
panel, select the "PERSONAL" mode and then
the type of information required.This telemetry information (power
output, turbocharger pressure, torque,
longitudinal and lateral acceleration, etc.)
is given as a guide only.
Gear shift indicator
(Depending on engine.)
System which reduces fuel consumption by
recommending the most appropriate gear.
Operation
remains responsible for deciding whether or not
to follow the indications issued by the system.
This function cannot be deactivated.
With an automatic gearbox, the system is
only active in manual mode.
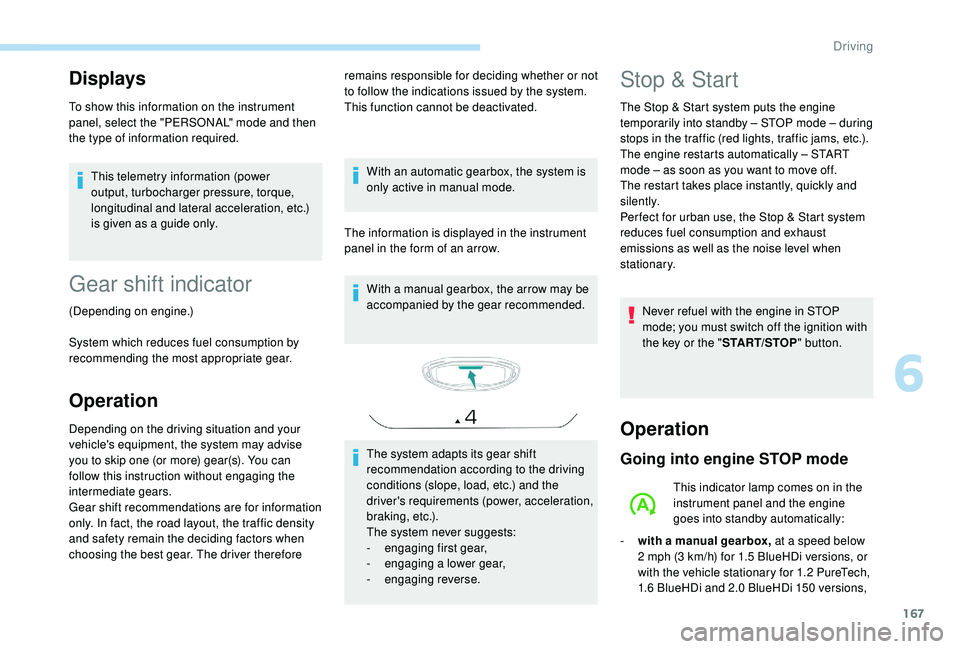
The information is displayed in the instrument
panel in the form of an arrow. With a manual gearbox, the arrow may be
accompanied by the gear recommended.
The system adapts its gear shift
recommendation according to the driving
conditions (slope, load, etc.) and the
driver's requirements (power, acceleration,
b r a k i n g , e t c .) .
The system never suggests:
-
e
ngaging first gear,
-
enga
ging a lower gear,
-
enga
ging reverse.
Depending on the driving situation and your
vehicle's equipment, the system may advise
you to skip one (or more) gear(s). You can
follow this instruction without engaging the
intermediate gears.
Gear shift recommendations are for information
only. In fact, the road layout, the traffic density
and safety remain the deciding factors when
choosing the best gear. The driver therefore Stop & Start
The Stop & Start system puts the engine
t emporarily into standby – STOP mode – during
stops in the traffic (red lights, traffic jams, etc.).
The engine restarts automatically – START
mode – as soon as you want to move off.
The restart takes place instantly, quickly and
silently.
Per fect for urban use, the Stop & Start system
reduces fuel consumption and exhaust
emissions as well as the noise level when
stationary.
Never refuel with the engine in STOP
mode; you must switch off the ignition with
the key or the " START/STOP" button.
Operation
Going into engine STOP mode
This indicator lamp comes on in the
instrument panel and the engine
goes into standby automatically:
-
w
ith a manual gearbox, at a speed below
2
mph (3 km/h) for 1.5 BlueHDi versions, or
with the vehicle stationary for 1.2
PureTech,
1.6
BlueHDi and 2.0 BlueHDi 150 versions,
6
Driving
Page 170 of 360
168
when you place the gear lever in neutral and
release the clutch pedal,
-
w
ith an automatic gearbox, at a speed
below 12
mph (20 km/h) for 1.5 BlueHDi
and 2.0
BlueHDi 180 versions, or with the
vehicle stationary for other versions, when
you depress the brake pedal or place the
gear selector to mode N .
A time counter calculates the time spent in
STOP mode during the journey. It is reset to
zero every time the ignition is switched on with
the key or the " START/STOP" button.
For your comfort, during parking
manoeuvres, STOP mode is not available
for a few seconds after coming out of
reverse gear.
The Stop & Start does not affect the
operation of vehicle systems such as
braking, power steering, etc.
Special cases: STOP mode not
available
- the driver's seat belt is not fastened,
- t he vehicle has not exceeded 6 mph
(10
km/h) since the last engine start (with
the key or the " START/STOP" b u t to n),
-
t
he electric parking brake is applied or
being applied,
-
t
he engine is needed to maintain a
comfortable temperature in the passenger
compartment,
-
d
emisting is active,
-
s
ome temporary conditions (battery charge,
engine temperature, braking assistance,
exterior temperature, etc.) make this
necessary to ensure control of a system.
Going into engine START mode
This indicator lamp goes off and the
engine starts automatically:
Special cases: START mode
triggered automatically
As a safety measure or to maintain comfort
levels in the vehicle, START mode is triggered
automatically when:
-
y
ou open the driver's door,
-
y
ou unfasten the driver's seat belt,
-
t
he speed of the vehicle exceeds 16 mph
(25
km/h) with the 2.0 BlueHDi 180 version
with automatic gearbox in mode D , or 2
mph
(3
km/h) with other versions,
-
t
he electric parking brake is being applied,
-
s
ome specific conditions (battery charge,
engine temperature, braking assistance, air
conditioning setting, etc.) require it for the
control of a system or the vehicle.
In this case, this indicator lamp
flashes for a few seconds, then goes
of f.
STOP mode is not invoked when:
-
t
he vehicle is on a steep slope (rising or
falling),
-
t
he driver's door is open, In this case, this indicator lamp
flashes for a few seconds then goes
of f.
This operation is perfectly normal.
-
w
ith a manual gearbox , when you fully
depress the clutch pedal,
-
W
ith an automatic gearbox:
•
g
ear selector in mode D or M , when you
release the brake pedal, •
o
r gear selector in mode N and brake
pedal released, when you place the gear
selector in mode D or M ,
•
o
r when you engage reverse.
This operation is perfectly normal.
Driving
Page 171 of 360
169
Deactivation / Reactivation
In certain circumstances, such as the need
to maintain the temperature in the passenger
compartment, it may be useful to deactivate
the Stop & Start system.
The system can be deactivated at any time,
once the ignition is switched on.
If the engine is in STOP mode, it restarts
immediately.
The Stop & Start system is reactivated
automatically every time the ignition is
switched on.
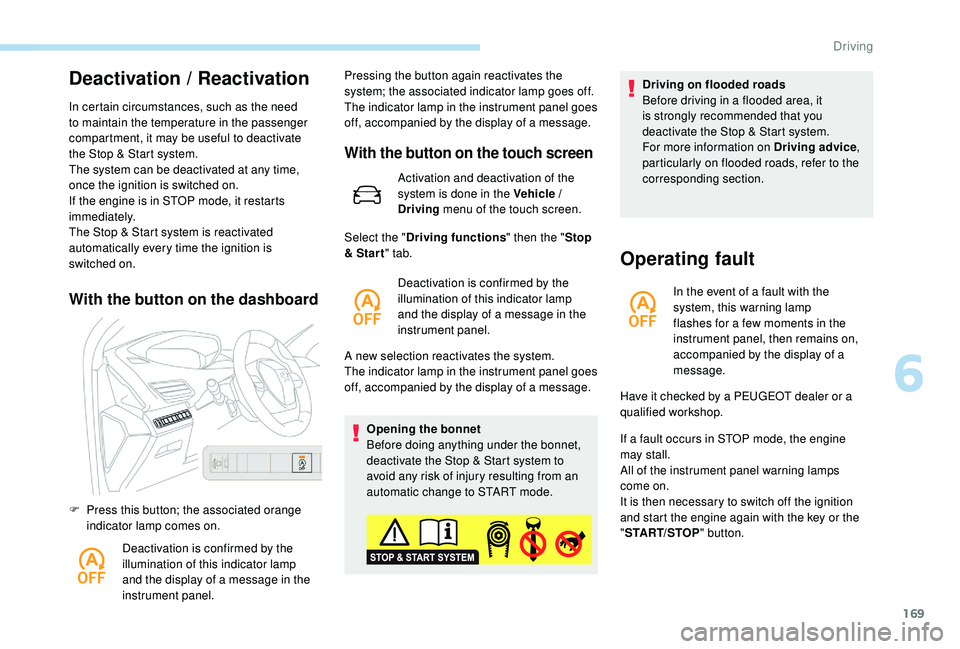
With the button on the dashboard
F Press this button; the associated orange indicator lamp comes on.
Deactivation is confirmed by the
illumination of this indicator lamp
and the display of a message in the
instrument panel. Pressing the button again reactivates the
system; the associated indicator lamp goes off.
The indicator lamp in the instrument panel goes
off, accompanied by the display of a message.
With the button on the touch screen
Activation and deactivation of the
system is done in the Vehicle /
Driving
menu of the touch screen.
A new selection reactivates the system.
The indicator lamp in the instrument panel goes
off, accompanied by the display of a message. Opening the bonnet
Before doing anything under the bonnet,
deactivate the Stop & Start system to
avoid any risk of injury resulting from an
automatic change to START mode.
Select the "
Driving functions " then the "Stop
& Star t " tab.
Deactivation is confirmed by the
illumination of this indicator lamp
and the display of a message in the
instrument panel. Driving on flooded roads
Before driving in a flooded area, it
is strongly recommended that you
deactivate the Stop & Start system.
For more information on Driving advice
,
particularly on flooded roads, refer to the
corresponding section.
Operating fault
In the event of a fault with the
system, this warning lamp
flashes for a few moments in the
instrument panel, then remains on,
accompanied by the display of a
message.
If a fault occurs in STOP mode, the engine
may stall.
All of the instrument panel warning lamps
come on.
It is then necessary to switch off the ignition
and start the engine again with the key or the
" START/STOP " button.
Have it checked by a PEUGEOT dealer or a
qualified workshop.
6
Driving
Page 172 of 360
170
The Stop & Start system requires a
12 V battery of specific technology and
specification.
All work on this type of battery must be
carried out only by a PEUGEOT dealer or
a qualified workshop.
For more information on the 12
V batter y,
refer to the corresponding section.
Under-inflation detection
System which automatically checks the
pressures of the tyres while driving.
The system monitors the pressures in the four
tyres, once the vehicle is moving.
It compares the information given by the wheel
speed sensors with reference values, which
must be reinitialised ever y time the tyre
pressures are adjusted or a wheel changed .
The system triggers an alert as soon as it
detects a drop in the inflation pressure of one
or more tyres. The under-inflation detection system does
not replace the need for vigilance on the
part of the driver.
This system does not avoid the need to
check the tyre pressures (including the
spare wheel) every month as well as
before a long journey.
Driving with under-inflated tyres worsens
road-holding, lengthens braking distances,
causes premature wear of the tyres,
particularly in adverse conditions (heavy
loads, high speeds, long journeys).
Driving with under-inflated tyres
increases fuel consumption.
The inflation pressures defined for your
vehicle can be found on the tyre pressure
label.
For more information on the
Identification markings , refer to the
corresponding section. Checking tyre pressures
This check should be done when the tyres
are "cold" (vehicle stopped for 1
hour or
after a journey of less than 6 miles (10 km)
at moderate speeds).
Other wise, add 0.3 bar to the pressures
shown on the label.
Snow chains
The system does not have to be
reinitialised after fitting or removing snow
chains.
Under-inflation alert
This warning is indicated by
continuous illumination of this lamp,
an audible signal and, depending on
the equipment installed, a message
displayed on the screen.
F
R
educe speed immediately, avoid excessive
steering movements and sudden braking.
F
S
top the vehicle as soon as it is safe to do
so.
The loss of pressure detected does not
always cause visible bulging of the tyre.
Do not satisfy yourself with just a visual
check.
Driving
Page 180 of 360
178
Cruise control
System which automatically
maintains the cruising speed of the
vehicle at a setting programmed by
the driver, without any action on the
accelerator pedal.
The cruise control is switched on manually.
It requires a minimum vehicle speed of 25
mph
(40
km/h).
With a manual gearbox, it requires the
engagement of third gear or higher.
With an automatic gearbox, it requires the
engagement of the selector in mode D or of
second gear or higher in mode M .
Speed regulation remains active after
changing gear on vehicles fitted with a
manual gearbox and Stop & Start.
The operation of the cruise control can be
interrupted (pause):
-
b
y pressing control 4 or by pressing the
brake pedal,
-
a
utomatically, if operation of the dynamic
stability control system is triggered. Switching off the ignition cancels any
programmed speed setting.
The cruise control system is a driving aid
that cannot, in any circumstances, replace
the need to obser ve speed limits, nor the
need for vigilance on the part of the driver.
As a safety measure, you are advised to
keep your feet near the pedals at all times.
Steering mounted control
For more information on Memorising speeds
or Recognition of speed limit signs and
recommendation , refer to the associated
sections.
Displays on the instrument
panel
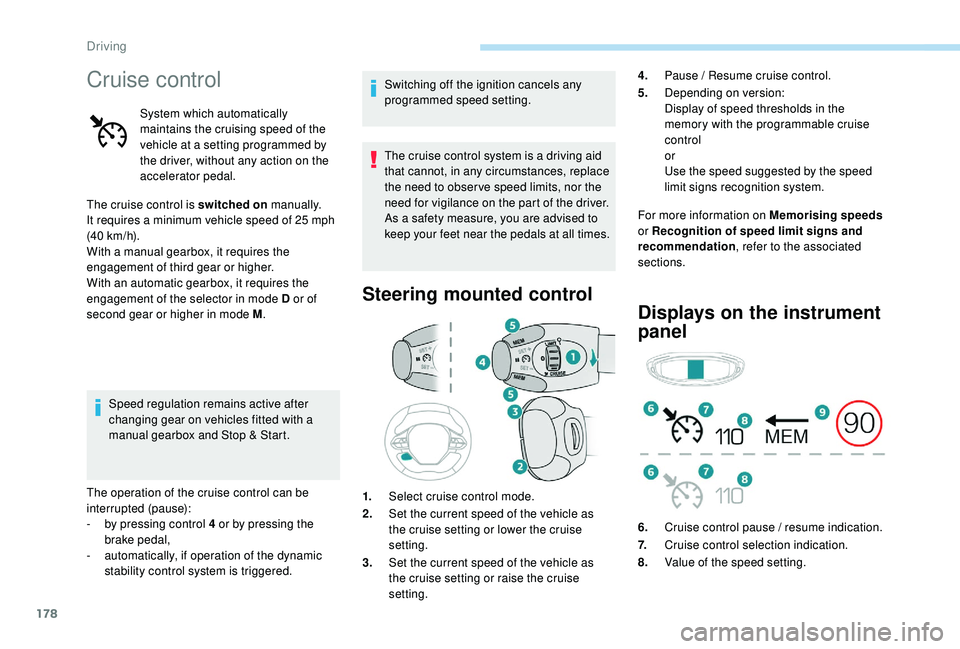
1. Select cruise control mode.
2. Set the current speed of the vehicle as
the cruise setting or lower the cruise
setting.
3. Set the current speed of the vehicle as
the cruise setting or raise the cruise
setting. 4.
Pause / Resume cruise control.
5. Depending on version:
Display of speed thresholds in the
memory with the programmable cruise
control
or
Use the speed suggested by the speed
limit signs recognition system.
6. Cruise control pause / resume indication.
7. Cruise control selection indication.
8. Value of the speed setting.
Driving
Page 193 of 360

191
If the camera and/or radar have
confirmed the presence of a vehicle
or a pedestrian, this warning lamp
flashes once the function is acting
on the vehicle's brakes.
This function, also called automatic emergency
braking, aims to reduce the speed of impact or
avoid a frontal collision by your vehicle where
the driver fails to react.
Using a camera and, depending on the version,
radar, this function acts on the vehicle's braking
system.
Important : if operation of the
automatic emergency braking is
triggered, you should take back
control of your vehicle and brake
with the pedal to add to or finish the
automatic braking action. The driver can take back control of the vehicle
at any time by sharply turning the steering
wheel and/or pressing the accelerator pedal.
The point at which braking is triggered
may be adjusted depending on the driving
actions of the driver, such as movement
of the steering wheel or actions at the
accelerator pedal.
Operation of the function may be felt by
slight vibration in the brake pedal.
If the vehicle comes to a complete stop,
the automatic braking is maintained for 1
to 2 seconds.
With a manual gearbox, in the event of
automatic emergency braking until the
vehicle comes to a complete stop, the
engine may stall.
With an automatic gearbox, in the event
of automatic emergency braking until the
vehicle comes to a complete stop, keep
the brake pedal pressed down to prevent
the vehicle from starting off again.
Specific conditions for
operation
The vehicle's speed must be between 3 mph
a nd 53 mph (5 km/h and 85 km/h) (versions
with camera alone) or 87
mph (140 km/h)
(versions with camera and radar) when a
moving vehicle is detected.
The vehicle's speed must not exceed 50
mph
(80
k
m/h) when a stationary vehicle is detected.
The vehicle's speed must not exceed 37
mph
(60
km/h) when a pedestrian is detected.
The ESC system must not be defective.
The DSC system must not be deactivated.
All passenger seat belts must be fastened.
Driving at a steady speed on roads with few
bends is required.
After an impact, the function automatically
stops operating. Consult a PEUGEOT
dealer or a qualified workshop to have the
system checked.
Deactivation / Activation
By default, the system is automatically
activated at every engine start.
The system can be deactivated or activated via
the vehicle settings menu.
6
Driving
Page 211 of 360
209
180° view
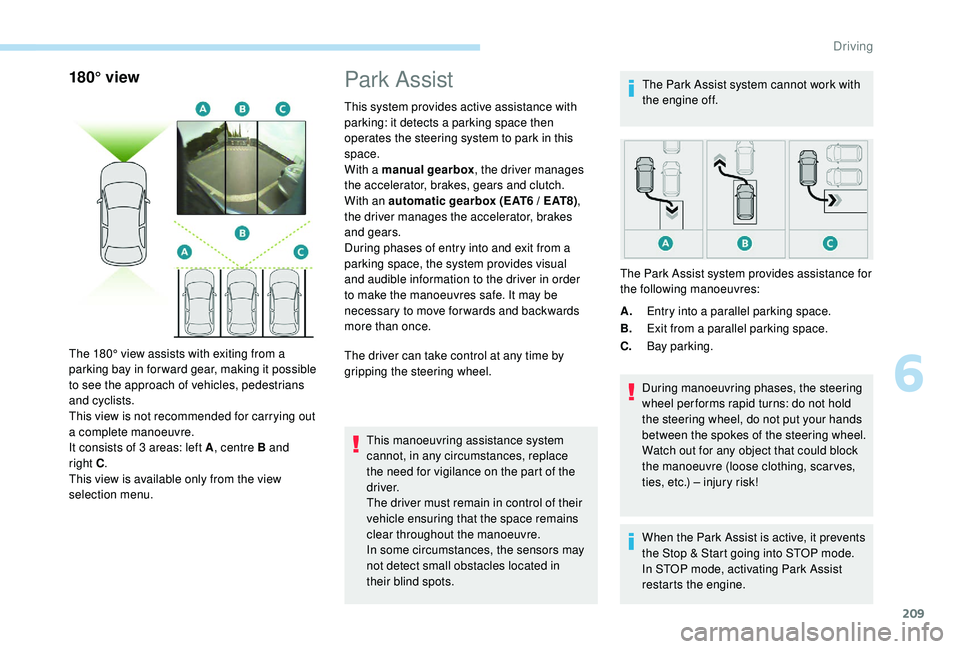
The 180° view assists with exiting from a
parking bay in forward gear, making it possible
to see the approach of vehicles, pedestrians
and cyclists.
This view is not recommended for carrying out
a complete manoeuvre.
It consists of 3 areas: left A, centre B and
right
C.
This view is available only from the view
selection menu.
Park Assist
This system provides active assistance with
parking: it detects a parking space then
operates the steering system to park in this
space.
With a manual gearbox , the driver manages
the accelerator, brakes, gears and clutch.
With an automatic gearbox (EAT6 / EAT8) ,
the driver manages the accelerator, brakes
and gears.
During phases of entry into and exit from a
parking space, the system provides visual
and audible information to the driver in order
to make the manoeuvres safe. It may be
necessary to move for wards and backwards
more than once.
The driver can take control at any time by
gripping the steering wheel.
This manoeuvring assistance system
cannot, in any circumstances, replace
the need for vigilance on the part of the
driver.
The driver must remain in control of their
vehicle ensuring that the space remains
clear throughout the manoeuvre.
In some circumstances, the sensors may
not detect small obstacles located in
their blind spots. The Park Assist system cannot work with
the engine off.
A. Entry into a parallel parking space.
B. Exit from a parallel parking space.
C. Bay parking.
During manoeuvring phases, the steering
wheel per forms rapid turns: do not hold
the steering wheel, do not put your hands
between the spokes of the steering wheel.
Watch out for any object that could block
the manoeuvre (loose clothing, scar ves,
ties, etc.) – injury risk!
When the Park Assist is active, it prevents
the Stop & Start going into STOP mode.
In STOP mode, activating Park Assist
restarts the engine.
The Park Assist system provides assistance for
the following manoeuvres:
6
Driving
Page 218 of 360
216
Fuel
Fuel tank capacity: approximately 53 litres.
R eser ve level: 6 litres.
Low fuel level
When the low fuel level is reached
in the fuel tank, this warning lamp
comes on in the instrument panel,
accompanied by the display of a
message and an audible signal.
When it first comes on, about
6
litres of fuel is left in the tank.
If your vehicle is fitted with Stop & Start,
never refuel with the engine in STOP
mode; you must switch off the ignition
using the key, or the START/STOP button
if your vehicle has
K
eyless Entry and
Starting.
Refuelling
If you have put in the wrong fuel for your
vehicle, you must have the fuel tank
drained and filled with the correct fuel
before starting the engine. Once you have finished refuelling:
F
R
efit the filler cap.
F
T
urn it to the right.
F
C
lose the fuel filler flap.Misfuel prevention (Diesel)
(Depending on the country of sale.)
Mechanical device which prevents filling the
tank of a Diesel vehicle with petrol. It avoids
the risk of engine damage that can result from
filling with the wrong fuel.
Until sufficient fuel is added, this warning lamp
appears every time the ignition is switched on,
accompanied by the display of a message and
an audible signal. When driving, this message
and audible signal are repeated with increasing
frequency as the fuel level drops towards 0
.
Refuel as soon as possible to avoid running out
of fuel.
For more information on Running out of fuel
(Diesel) , refer to the corresponding section. A label on the inside of the fuel filler flap
reminds you of the type of fuel to use,
depending on your engine type.
Additions of fuel must be of at least 5
litres, in
order to be registered by the fuel gauge.
Opening the filler cap may create a noise
caused by an inrush of air. This vacuum is
entirely normal, resulting from the sealing of the
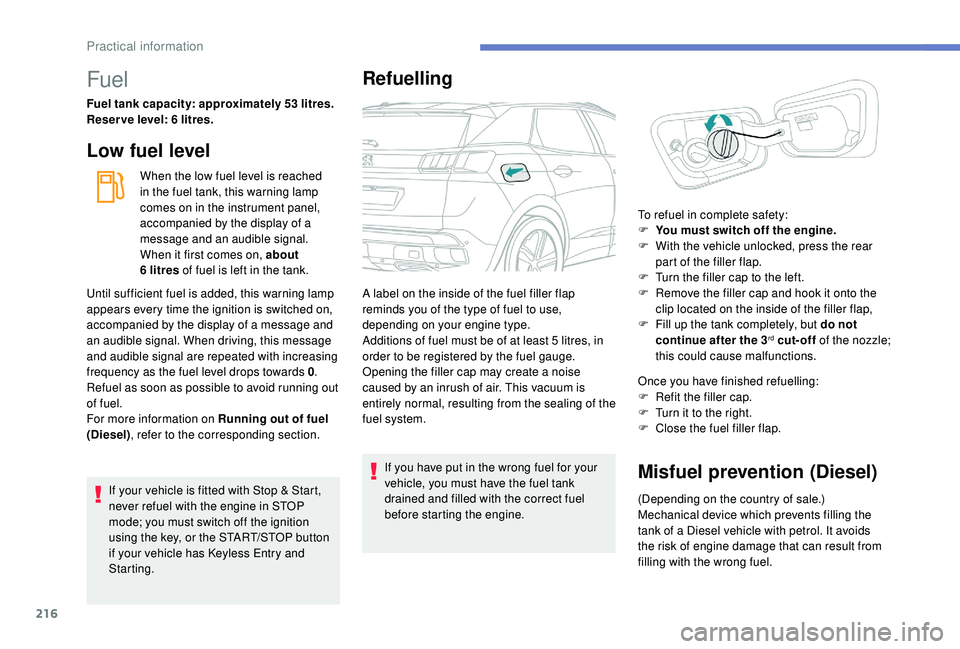
fuel system. To refuel in complete safety:
F
Y
ou must switch off the engine.
F
W
ith the vehicle unlocked, press the rear
part of the filler flap.
F
T
urn the filler cap to the left.
F
R
emove the filler cap and hook it onto the
clip located on the inside of the filler flap,
F
F
ill up the tank completely, but do not
continue after the 3
rd cut-off of the nozzle;
this could cause malfunctions.
Practical information