2018 PEUGEOT 3008 key
[x] Cancel search: keyPage 171 of 360
169
Deactivation / Reactivation
In certain circumstances, such as the need
to maintain the temperature in the passenger
compartment, it may be useful to deactivate
the Stop & Start system.
The system can be deactivated at any time,
once the ignition is switched on.
If the engine is in STOP mode, it restarts
immediately.
The Stop & Start system is reactivated
automatically every time the ignition is
switched on.
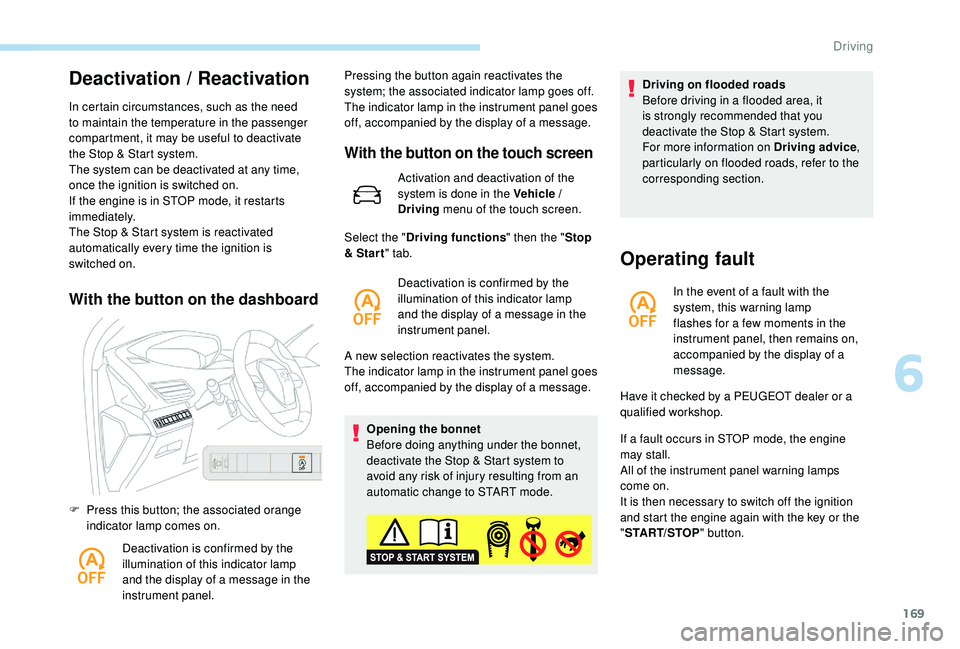
With the button on the dashboard
F Press this button; the associated orange indicator lamp comes on.
Deactivation is confirmed by the
illumination of this indicator lamp
and the display of a message in the
instrument panel. Pressing the button again reactivates the
system; the associated indicator lamp goes off.
The indicator lamp in the instrument panel goes
off, accompanied by the display of a message.
With the button on the touch screen
Activation and deactivation of the
system is done in the Vehicle /
Driving
menu of the touch screen.
A new selection reactivates the system.
The indicator lamp in the instrument panel goes
off, accompanied by the display of a message. Opening the bonnet
Before doing anything under the bonnet,
deactivate the Stop & Start system to
avoid any risk of injury resulting from an
automatic change to START mode.
Select the "
Driving functions " then the "Stop
& Star t " tab.
Deactivation is confirmed by the
illumination of this indicator lamp
and the display of a message in the
instrument panel. Driving on flooded roads
Before driving in a flooded area, it
is strongly recommended that you
deactivate the Stop & Start system.
For more information on Driving advice
,
particularly on flooded roads, refer to the
corresponding section.
Operating fault
In the event of a fault with the
system, this warning lamp
flashes for a few moments in the
instrument panel, then remains on,
accompanied by the display of a
message.
If a fault occurs in STOP mode, the engine
may stall.
All of the instrument panel warning lamps
come on.
It is then necessary to switch off the ignition
and start the engine again with the key or the
" START/STOP " button.
Have it checked by a PEUGEOT dealer or a
qualified workshop.
6
Driving
Page 174 of 360
172
Memorising speeds
Linked to the speed limiter/programmable
cruise control, this function allows speed
settings to be registered which will then be
offered as settings for two systems: the speed
limiter (a maximum speed) and the cruise
control (cruising speed).
You can memorise up to 5 speed limits in the
system.
By default, some speed settings are already
memorised.
As a safety measure, the driver must
only modify the speed settings when
stationary.
Memorising speeds
This function can be accessed in the
Vehicle / Driving menu of the touch
screen. F
T
ick the speed settings 1 to 5 that you want
to use.
F
S
elect the speed setting you want to
change.
"MEM" button
Recognition of
speed limit signs and
recommendation
This system allows the speed limit detected by
the camera to be displayed in the instrument
panel.
Specific speed limits, such as those for heavy
goods vehicles, are not displayed.
The display of the speed limit in the instrument
panel is updated as you pass a speed limit sign
intended for cars (light vehicles).
The units for the speed limits (mph or
km/h) depend on the country you are
driving in.
It should be taken into account so that you
obser ve the speed limit.
For the system to operate correctly when
you change country, the units for speed in
the instrument panel must be those for the
country you are driving in.
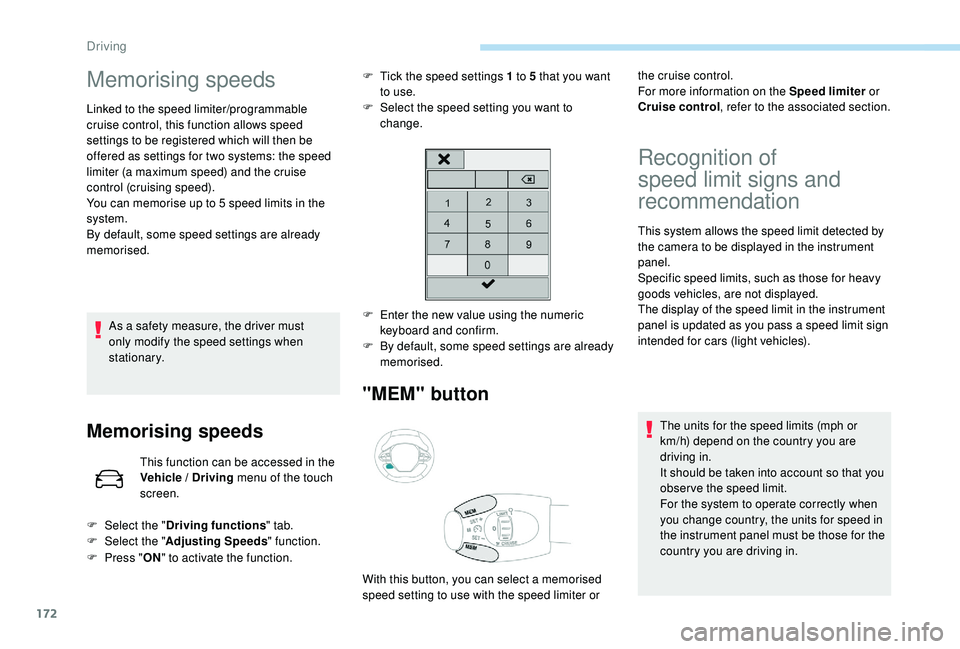
F
E
nter the new value using the numeric
keyboard and confirm.
F
B
y default, some speed settings are already
memorised.
F
Sel
ect the " Driving functions " tab.
F
Sel
ect the " Adjusting Speeds " function.
F
P
ress " ON" to activate the function. the cruise control.
For more information on the Speed limiter
or
Cruise control , refer to the associated section.
With this button, you can select a memorised
speed setting to use with the speed limiter or
Driving
Page 218 of 360
216
Fuel
Fuel tank capacity: approximately 53 litres.
R eser ve level: 6 litres.
Low fuel level
When the low fuel level is reached
in the fuel tank, this warning lamp
comes on in the instrument panel,
accompanied by the display of a
message and an audible signal.
When it first comes on, about
6
litres of fuel is left in the tank.
If your vehicle is fitted with Stop & Start,
never refuel with the engine in STOP
mode; you must switch off the ignition
using the key, or the START/STOP button
if your vehicle has
K
eyless Entry and
Starting.
Refuelling
If you have put in the wrong fuel for your
vehicle, you must have the fuel tank
drained and filled with the correct fuel
before starting the engine. Once you have finished refuelling:
F
R
efit the filler cap.
F
T
urn it to the right.
F
C
lose the fuel filler flap.Misfuel prevention (Diesel)
(Depending on the country of sale.)
Mechanical device which prevents filling the
tank of a Diesel vehicle with petrol. It avoids
the risk of engine damage that can result from
filling with the wrong fuel.
Until sufficient fuel is added, this warning lamp
appears every time the ignition is switched on,
accompanied by the display of a message and
an audible signal. When driving, this message
and audible signal are repeated with increasing
frequency as the fuel level drops towards 0
.
Refuel as soon as possible to avoid running out
of fuel.
For more information on Running out of fuel
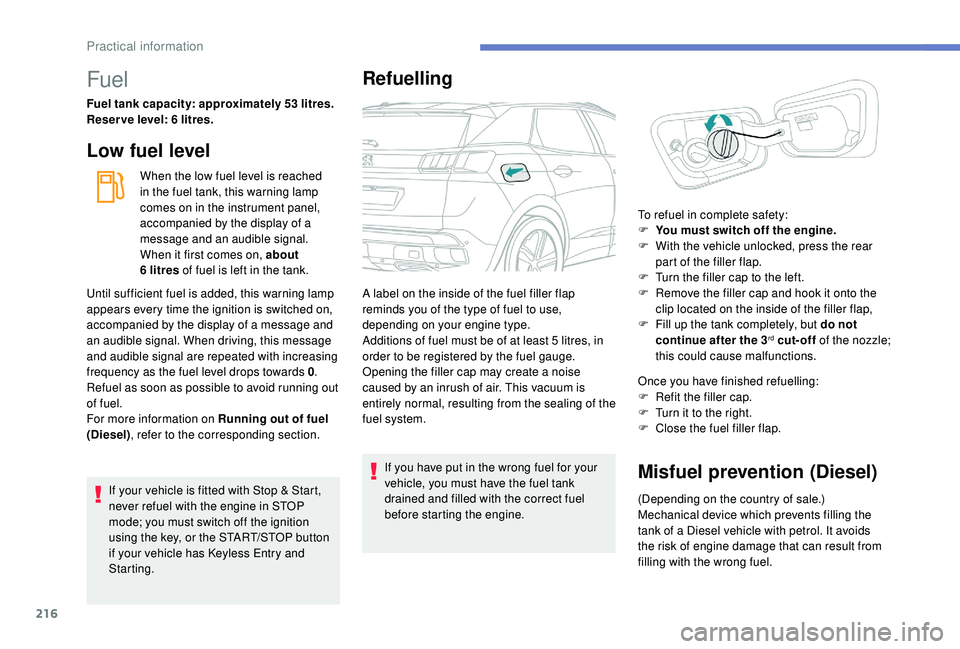
(Diesel) , refer to the corresponding section. A label on the inside of the fuel filler flap
reminds you of the type of fuel to use,
depending on your engine type.
Additions of fuel must be of at least 5
litres, in
order to be registered by the fuel gauge.
Opening the filler cap may create a noise
caused by an inrush of air. This vacuum is
entirely normal, resulting from the sealing of the
fuel system. To refuel in complete safety:
F
Y
ou must switch off the engine.
F
W
ith the vehicle unlocked, press the rear
part of the filler flap.
F
T
urn the filler cap to the left.
F
R
emove the filler cap and hook it onto the
clip located on the inside of the filler flap,
F
F
ill up the tank completely, but do not
continue after the 3
rd cut-off of the nozzle;
this could cause malfunctions.
Practical information
Page 221 of 360
219
Travelling abroad
Cer tain fuels could damage the engine of
your vehicle.
In cer tain countries, the use of a par ticular
fuel may be required (specific octane
rating, specific trade name, etc.) to ensure
correct operation of the engine.
For any additional information, contact a dealer.
Towing device
Load distribution
F Distribute the load in the trailer so that the
heaviest items are as close as possible to
the axle and the nose weight approaches the
maximum permitted without exceeding it.
Air density decreases with altitude, thus
reducing engine performance. The maximum
towed load must be reduced by 10% for every
1,000
metres of altitude. Use towing devices and their genuine
harnesses approved by PEUGEOT. It
is recommended that the installation be
per formed by a PEUGEOT dealer or a
qualified workshop.
If the towbar is not fitted by a
PEUGEOT dealer, it must still be
fitted in accordance with the vehicle
manufacturer's instructions.
Important: for versions equipped with
the motorised tailgate with Hands-Free
Tailgate Access function, if a towing
device other than a genuine PEUGEOT
one is installed, it is imperative to visit
a PEUGEOT dealer or a qualified
workshop to recalibrate the detection
system: risk of Hands-Free Tailgate
Access function failure.
Certain driving assistance or
manoeuvring assistance functions are
automatically disabled if an approved
towbar is used. Observe the maximum authorised
towable weight, indicated on your
vehicle's registration certificate, the
manufacturer's label as well as in the
Technical data
section of this guide.
Complying with the maximum
authorised nose weight (ball joint)
also includes the use of accessories
(bicycle carriers, tow boxes, etc.).
Obser ve the legislation in force in the
country in which you are driving.
Vehicle equipped with motorised
tailgate with "Hands-Free Tailgate
Access" function
To avoid unwanted opening of the tailgate
when using the towing device:
-
d
eactivate the Hands-Free Tailgate
Access function in advance in your
vehicle's configuration menu,
-
o
r remove the electronic key from the
recognition zone, with the tailgate
closed.
7
Practical information
Page 222 of 360
220
Towbar with quickly
detachable towball
No tools are required to install or remove the
towball on this genuine towbar system.
Presentation
Trailers with LED lamps are not
compatible with the wiring harness of this
device.To know the Technical data
, and, in
particular, the towable weights for your
vehicle, refer to the corresponding
section.
To ensure complete safety while driving
with a Towbar system , refer to the
corresponding section.
Before each use
Check that the towball is correctly fitted,
verifying the follow points:
-
t
he green mark on the locking wheel
is in line with the green mark on the
towball,
-
t
he locking wheel is in contact with the
towball (position A ),
-
t
he security key lock is on and the key
removed; the locking wheel can no
longer be operated,
- t he towball must not be able to move
in its carrier; test by shaking it with
your hand.
If the towball is not locked, the trailer can
detach
– accident risk!
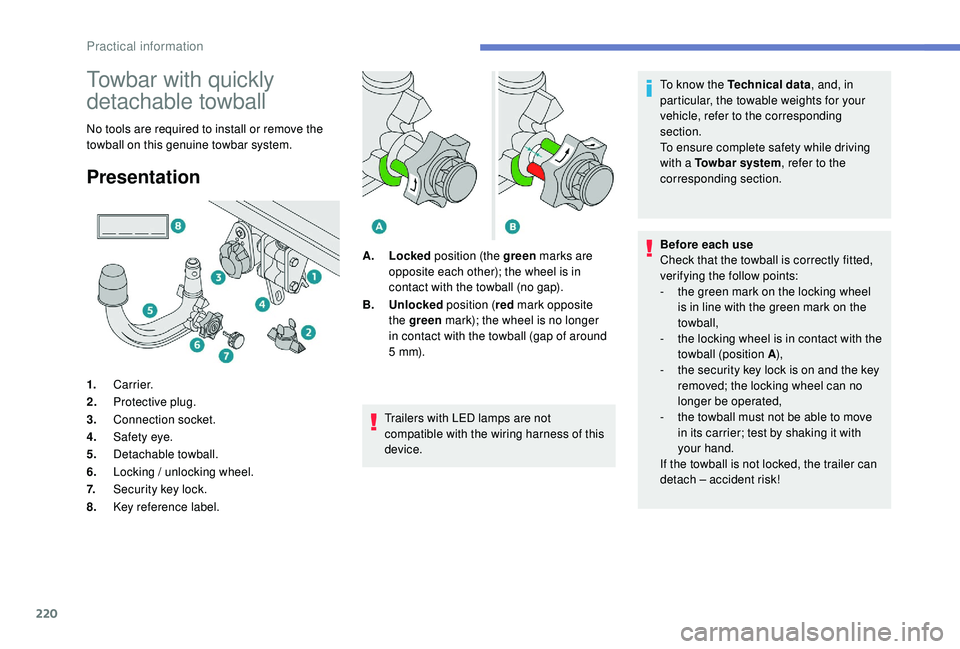
1.
Carrier.
2. Protective plug.
3. Connection socket.
4. Safety eye.
5. Detachable towball.
6. Locking / unlocking wheel.
7. Security key lock.
8. Key reference label. A.
Locked position (the green marks are
opposite each other); the wheel is in
contact with the towball (no gap).
B. Unlocked position (red mark opposite
the green mark); the wheel is no longer
in contact with the towball (gap of around
5
m m).
Practical information
Page 223 of 360
221
During use
Never release the locking system with a
trailer or load carrier on the towball.
Never exceed the maximum authorised
weight for the vehicle – the Gross Train
Weight or GTW.
It is essential that the maximum
authorised load be complied with on
the towing device: if it is exceeded, this
device may detach from the vehicle,
which is a serious accident risk.
Check that the trailer lamps work
c o r r e c t l y.
Before setting off, check the adjustment
of the headlamp beam height.
For more information on Headlamp
adjustment , refer to the corresponding
section.
Following use
When travelling without a trailer or load
on a towbar-mounted carrier, the towball
must be removed and the protective plug
inserted in the carrier. This measure
applies particularly where the towball
might obscure visibility of the number
plate or its lighting.Fitting the towball
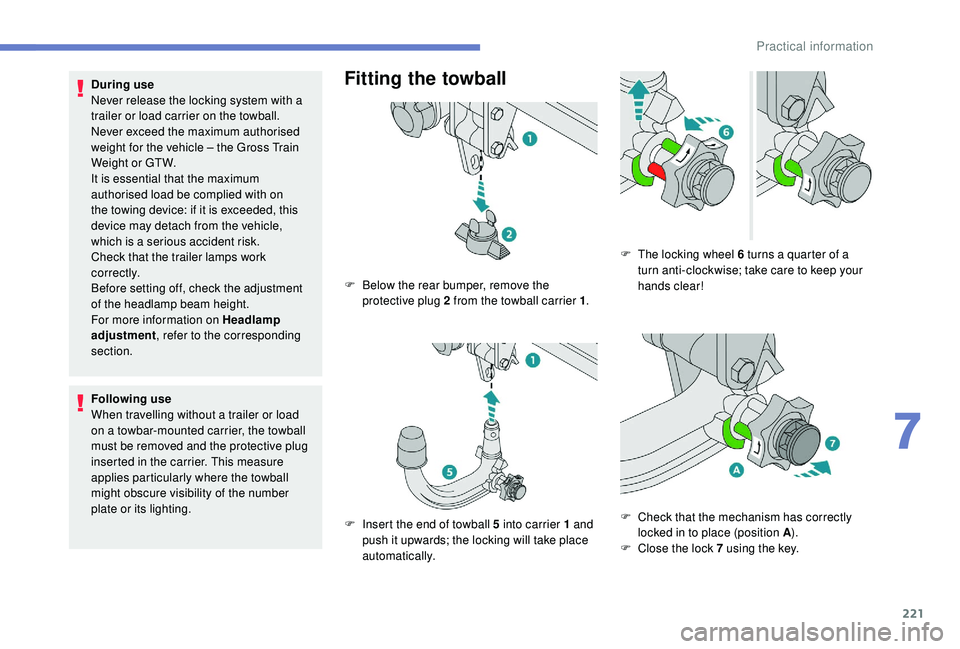
F Below the rear bumper, remove the protective plug 2 from the towball carrier 1 .
F
I
nsert the end of towball 5 into carrier 1 and
push it upwards; the locking will take place
automatically. F
T
he locking wheel 6 turns a quarter of a
turn anti-clockwise; take care to keep your
hands clear!
F
C
heck that the mechanism has correctly
locked in to place (position A ).
F
C
lose the lock 7 using the key.
7
Practical information
Page 224 of 360
222
Removing the towball
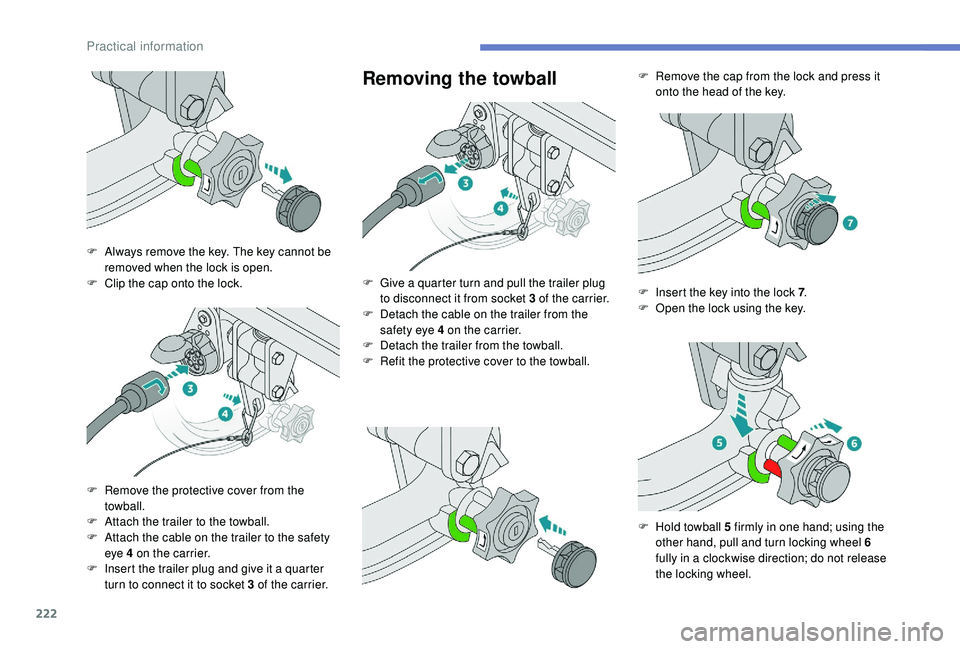
F Always remove the key. The key cannot be removed when the lock is open.
F
C
lip the cap onto the lock.
F
R
emove the protective cover from the
towball.
F
A
ttach the trailer to the towball.
F
A
ttach the cable on the trailer to the safety
eye 4 on the carrier.
F
I
nsert the trailer plug and give it a quarter
turn to connect it to socket 3 of the carrier. F
G
ive a quarter turn and pull the trailer plug
to disconnect it from socket 3 of the carrier.
F
D
etach the cable on the trailer from the
safety eye 4 on the carrier.
F
D
etach the trailer from the towball.
F
R
efit the protective cover to the towball.F
R
emove the cap from the lock and press it
onto the head of the key.
F
I
nsert the key into the lock 7.
F
O
pen the lock using the key.
F
H
old towball 5 firmly in one hand; using the
other hand, pull and turn locking wheel 6
fully in a clockwise direction; do not release
the locking wheel.
Practical information
Page 237 of 360
235
Recommendations on storage
AdBlue® freezes at about -11°C and
deteriorates above 25°C. Containers should
be stored in a cool area and protected from
direct sunlight.
Under these conditions, the fluid can be kept
for at least a year.
If the fluid has frozen, it can be used once it
has completely thawed out.
Never store AdBlue
® containers in your
vehicle.
Precautions for use
In certain conditions (high temperature, for
example), the risk of release of ammonia
cannot be excluded: do not inhale the fluid.
Ammonia vapour has an irritant effect on
mucous membranes (eyes, nose and throat).
Keep AdBlue
® out of the reach of children,
in its original container.
Procedure
Before starting the top up procedure, ensure
that the vehicle is parked on a flat and level
sur face.
In winter, check that the temperature of the
vehicle is above -11°C. If not, in freezing
weather, the AdBlue
® cannot be poured into the
tank. Park your vehicle somewhere warmer for
a few hours before topping up.
In the event of an AdBlue
® breakdown,
confirmed by the message "Add AdBlue:
Starting impossible", you must top up with
at least 5
litres.
Never pour AdBlue
® into the Diesel fuel
tank. If any AdBlue
® is splashed, or if there
are any spillages on the side of the body,
rinse immediately with cold water or wipe
with a damp cloth.
If the fluid has crystallised, clean it off
using a sponge and hot water.
Important: in the event of a top-up after
a breakdown because of a lack of
AdBlue, you must wait around 5
minutes
before switching on the ignition, without
opening the driver's door, locking
the vehicle, introducing the key into
the ignition switch, or introducing
the key of the
K
eyless Entr y and
Star ting system into the passenger
compartment .
Switch on the ignition, then wait for
10
seconds before starting the engine.
F
S
witch off the ignition and remove the key
from the switch to switch off the engine.
or
F
W
ith
K
eyless Entry and Starting, press the
" START/STOP " button to switch off the
engine.
AdBlue
® is a urea-based solution. This fluid
is non-flammable, colourless and odourless
(stored in a cool place).
In the event of contact with the skin, wash the
affected area with soap and running water. In
the event of contact with the eyes, immediately
rinse the eyes with large amounts of water
or with an eye wash solution for at least
15
minutes. If a burning sensation or irritation
persists, get medical attention.
If swallowed, immediately wash out the mouth
with clean water and then drink plenty of water.
7
Practical information