2018 PEUGEOT 3008 key
[x] Cancel search: keyPage 68 of 360
66
Automatic operation
To open or close the window, press or pull the
switch fully, beyond the resistance point: the
window opens or closes completely when the
switch is released. Pressing the switch again
stops the movement of the window.The electric window switches remain
operational for approximately 45
seconds
after switching off the ignition.
Once this time has elapsed, the electric
windows will not operate. To reactivate
them, switch the ignition on again.
Safety anti-pinch
When the window rises and meets an obstacle,
it stops and immediately partially lowers again.
In the event of unwanted opening of the
window on closing, press the switch until the
window opens completely, then pull the switch
immediately until the window closes. Continue
to hold the switch for approximately one second
after the window has closed.
The safety anti-pinch function is not active
during this operation.
Deactivating the rear
controls for the rear
windows
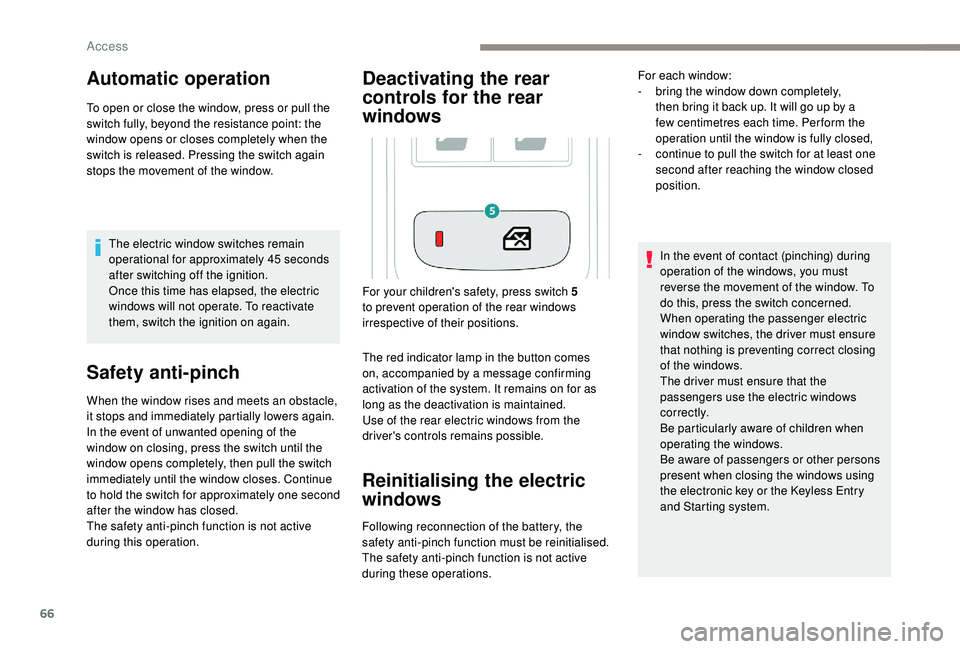
The red indicator lamp in the button comes
on, accompanied by a message confirming
activation of the system. It remains on for as
long as the deactivation is maintained.
Use of the rear electric windows from the
driver's controls remains possible.
Reinitialising the electric
windows
Following reconnection of the battery, the
safety anti-pinch function must be reinitialised.
The safety anti-pinch function is not active
during these operations. In the event of contact (pinching) during
operation of the windows, you must
reverse the movement of the window. To
do this, press the switch concerned.
When operating the passenger electric
window switches, the driver must ensure
that nothing is preventing correct closing
of the windows.
The driver must ensure that the
passengers use the electric windows
c o r r e c t l y.
Be particularly aware of children when
operating the windows.
Be aware of passengers or other persons
present when closing the windows using
the electronic key or the
K
eyless Entry
and Starting system.
For your children's safety, press switch 5
to prevent operation of the rear windows
irrespective of their positions. For each window:
-
b
ring the window down completely,
then bring it back up. It will go up by a
few centimetres each time. Per form the
operation until the window is fully closed,
-
c
ontinue to pull the switch for at least one
second after reaching the window closed
position.
Access
Page 71 of 360

69
Reinitialisation
Following reconnection of the battery or in the
event of a fault or jerky movement of the blind,
the blind must be reinitialised:
F
p
ress the rear of button A until the blind is
fully open,
F
p
ress and hold the rear of button A again for
at least 3
seconds.
During simultaneous closing of the
sunroof and the blind, if the blind catches
up with the sunroof, the blind then
suspends its movement and automatically
resumes when the sunroof stops.
When locking the vehicle, pressing and
holding the locking button simultaneously
closes the windows and the sunroof
and then the blind. The movements are
interrupted when you release the locking
button. Never leave the electronic key inside the
vehicle if you get out of the vehicle, even
for a short time.
In the event of contact (pinching) when
closing the sunroof or blind, you should
reverse the movement of the sunroof or
blind. To do this, press the control button
in question.
The driver must ensure that passengers
use the sunroof and blind correctly.
Be particularly aware of children when
operating the sunroof or blind.
2
Access
Page 79 of 360
77
Adjustment
As a safety measure, the mirrors should
be adjusted to reduce the "blind spots".
The objects obser ved are, in reality,
closer than they appear.
Take this into account in order to
correctly judge the distance of vehicles
approaching from behind.
Folding
Unfolding
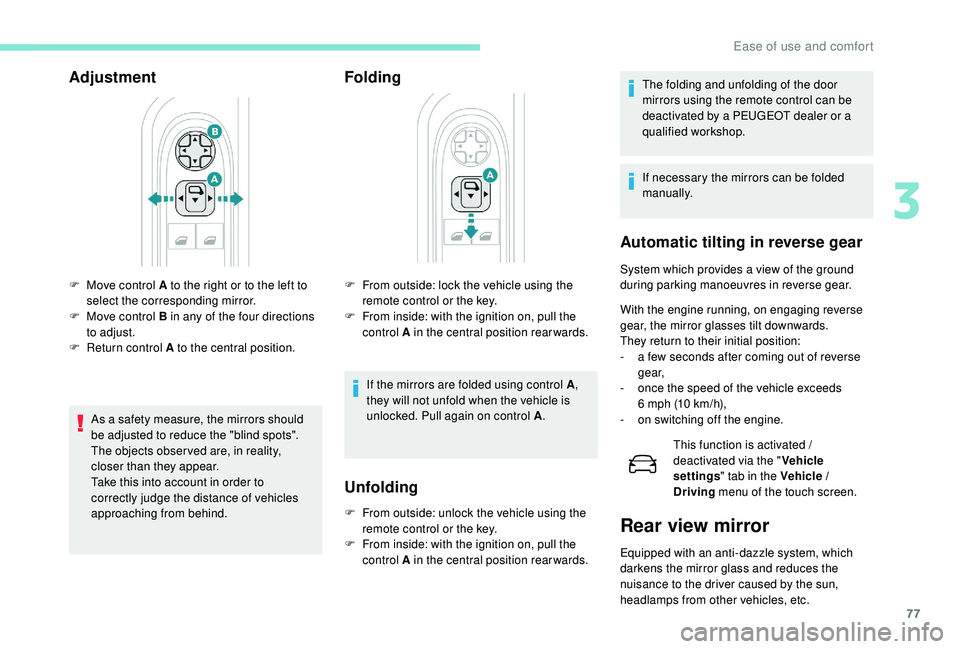
F Move control A to the right or to the left to select the corresponding mirror.
F
M
ove control B in any of the four directions
to adjust.
F
R
eturn control A to the central position. F
F rom outside: lock the vehicle using the
remote control or the key.
F
F
rom inside: with the ignition on, pull the
control A in the central position rearwards.
If the mirrors are folded using control A ,
they will not unfold when the vehicle is
unlocked. Pull again on control A .
F
F
rom outside: unlock the vehicle using the
remote control or the key.
F
F
rom inside: with the ignition on, pull the
control A in the central position rearwards. The folding and unfolding of the door
mirrors using the remote control can be
deactivated by a PEUGEOT dealer or a
qualified workshop.
If necessary the mirrors can be folded
manually.
Automatic tilting in reverse gear
System which provides a view of the ground
during parking manoeuvres in reverse gear.
With the engine running, on engaging reverse
gear, the mirror glasses tilt downwards.
They return to their initial position:
-
a f
ew seconds after coming out of reverse
g e a r,
-
o
nce the speed of the vehicle exceeds
6
mph (10 km/h),
-
o
n switching off the engine. This function is activated /
deactivated via the " Vehicle
settings " tab in the Vehicle /
Driving menu of the touch screen.
Rear view mirror
Equipped with an anti-dazzle system, which
darkens the mirror glass and reduces the
nuisance to the driver caused by the sun,
headlamps from other vehicles, etc.
3
Ease of use and comfort
Page 101 of 360
99
This system allows the wireless charging of a
portable device, such as a smartphone, using
the principle of magnetic induction, based on
the Qi 1.1 standard.
The portable device to be charged must be
compatible with the Qi standard, either by
design or by using a compatible holder or shell.
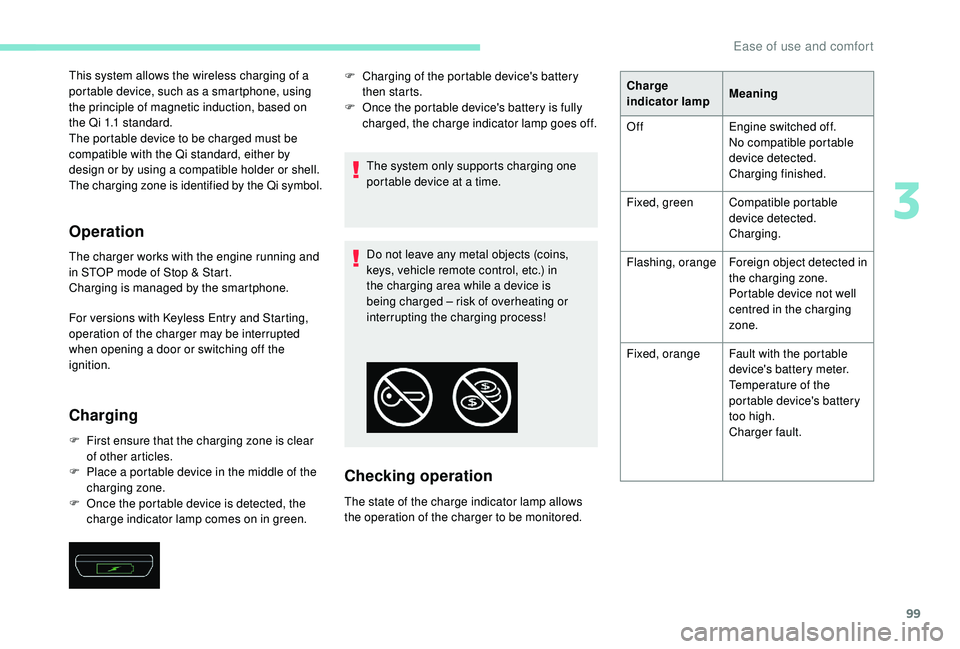
The charging zone is identified by the Qi symbol.
Operation
The charger works with the engine running and
in STOP mode of Stop & Start.
Charging is managed by the smartphone.
For versions with
K
eyless Entry and Starting,
operation of the charger may be interrupted
when opening a door or switching off the
ignition.
Charging
F First ensure that the charging zone is clear of other articles.
F
P
lace a portable device in the middle of the
charging zone.
F
O
nce the portable device is detected, the
charge indicator lamp comes on in green. The system only supports charging one
portable device at a time.
Do not leave any metal objects (coins,
keys, vehicle remote control, etc.) in
the charging area while a device is
being charged – risk of overheating or
interrupting the charging process!
Checking operation
The state of the charge indicator lamp allows
the operation of the charger to be monitored. F
C
harging of the portable device's battery
then starts.
F
O
nce the portable device's battery is fully
charged, the charge indicator lamp goes off. Charge
indicator lamp
Meaning
Off Engine switched off.
No compatible portable
device detected.
Charging finished.
Fixed, green Compatible portable
device detected.
Charging.
Flashing, orange Foreign object detected in
the charging zone.
Portable device not well
centred in the charging
zone.
Fixed, orange Fault with the portable
device's battery meter.
Temperature of the
portable device's battery
too high.
Charger fault.
3
Ease of use and comfort
Page 104 of 360
102
Refitting
To refit the mat on the driver's side:
F p osition the mat correctly,
F
r
eattach the fixings by pressing,
F
c
heck that the mat is secured correctly.
To avoid any risk of jamming of the pedals:
-
o
nly use mats which are suited to the
fixings already present in the vehicle;
these fixings must be used,
-
n
ever place one mat on top of another.
The use of mats not approved by
PEUGEOT may inter fere with access to
the pedals and hinder the operation of the
cruise control / speed limiter.
The mats approved by PEUGEOT have
two fixings located below the seat.
Courtesy lampsFront and rear courtesy lamps
In this position, the courtesy
lamp comes on gradually:
When fitting the mat for the first time, on the
driver's side use only the fixings provided in the
wallet attached.
The other mats are simply placed on the carpet.
Removing
To remove the mat on the driver's side:
F
m ove the seat as far back as possible,
F
un
clip the fixings,
F
r
emove the mat.
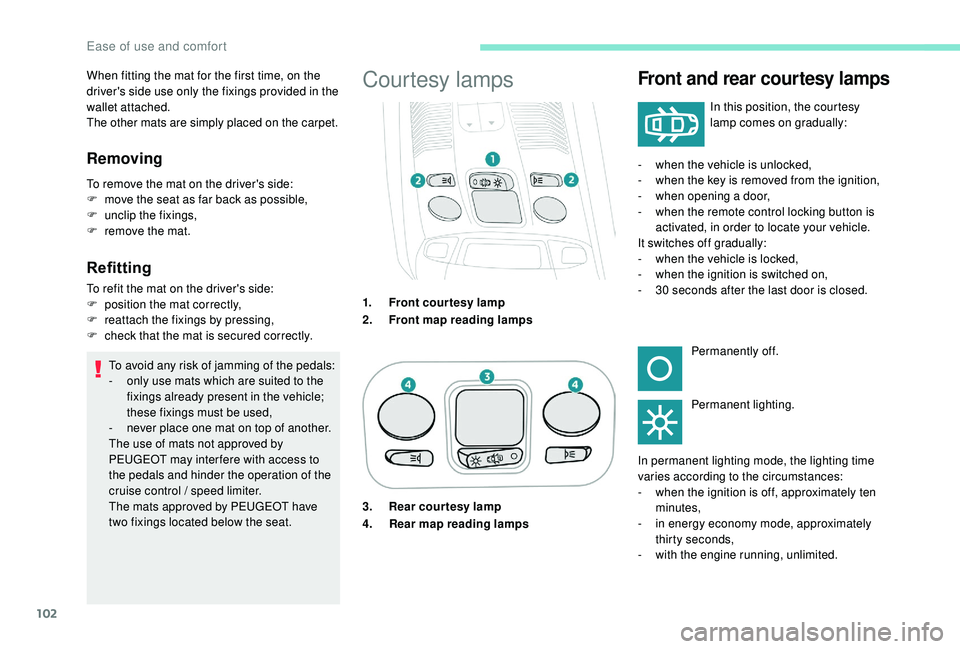
1.Front courtesy lamp
2. Front map reading lamps -
w
hen the vehicle is unlocked,
- w hen the key is removed from the ignition,
- w hen opening a door,
-
w
hen the remote control locking button is
activated, in order to locate your vehicle.
It switches off gradually:
-
w
hen the vehicle is locked,
-
w
hen the ignition is switched on,
-
3
0 seconds after the last door is closed.Permanently off.
Permanent lighting.
In permanent lighting mode, the lighting time
varies according to the circumstances:
-
w
hen the ignition is off, approximately ten
minutes,
-
i
n energy economy mode, approximately
thirty seconds,
-
w
ith the engine running, unlimited.
3. Rear courtesy lamp
4.
Rear map reading lamps
Ease of use and comfort
Page 136 of 360
134
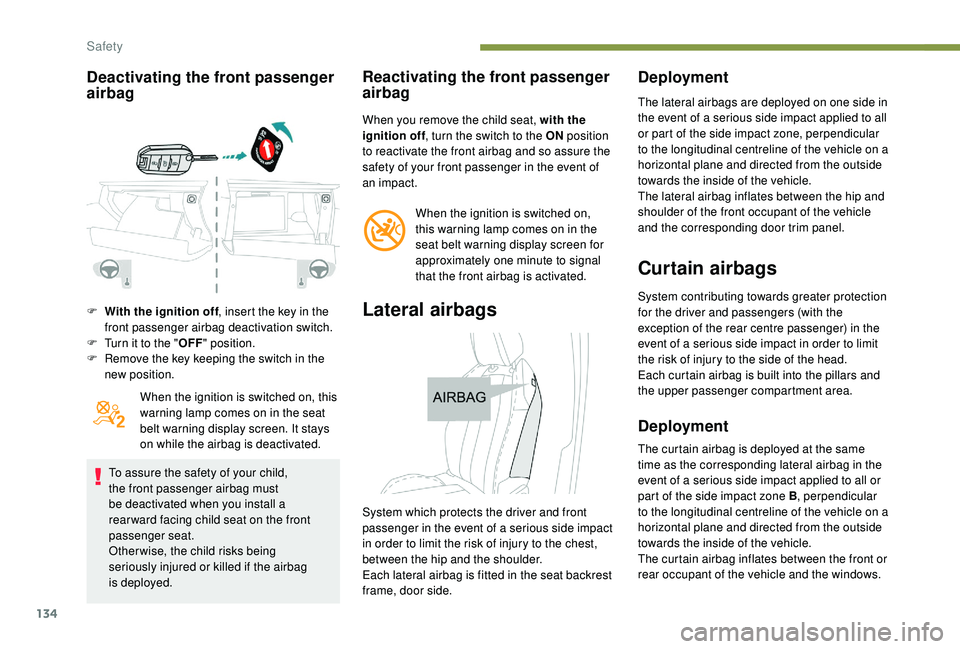
Deactivating the front passenger
airbag
F With the ignition off, insert the key in the
front passenger airbag deactivation switch.
F
T
urn it to the " OFF" position.
F
R
emove the key keeping the switch in the
new position.
When the ignition is switched on, this
warning lamp comes on in the seat
belt warning display screen. It stays
on while the airbag is deactivated.
To assure the safety of your child,
the front passenger airbag must
be deactivated when you install a
rear ward facing child seat on the front
passenger seat.
Otherwise, the child risks being
seriously injured or killed if the airbag
is deployed.
Reactivating the front passenger
airbag
When you remove the child seat, with the
ignition off , turn the switch to the ON position
to reactivate the front airbag and so assure the
safety of your front passenger in the event of
an impact.
When the ignition is switched on,
this warning lamp comes on in the
seat belt warning display screen for
approximately one minute to signal
that the front airbag is activated.
Lateral airbags
Deployment
The lateral airbags are deployed on one side in
the event of a serious side impact applied to all
or part of the side impact zone, perpendicular
to the longitudinal centreline of the vehicle on a
horizontal plane and directed from the outside
towards the inside of the vehicle.
The lateral airbag inflates between the hip and
shoulder of the front occupant of the vehicle
and the corresponding door trim panel.
Curtain airbags
System contributing towards greater protection
for the driver and passengers (with the
exception of the rear centre passenger) in the
event of a serious side impact in order to limit
the risk of injury to the side of the head.
Each curtain airbag is built into the pillars and
the upper passenger compartment area.
Deployment
The curtain airbag is deployed at the same
time as the corresponding lateral airbag in the
event of a serious side impact applied to all or
part of the side impact zone B , perpendicular
to the longitudinal centreline of the vehicle on a
horizontal plane and directed from the outside
towards the inside of the vehicle.
The curtain airbag inflates between the front or
rear occupant of the vehicle and the windows.
System which protects the driver and front
passenger in the event of a serious side impact
in order to limit the risk of injury to the chest,
between the hip and the shoulder.
Each lateral airbag is fitted in the seat backrest
frame, door side.
Safety
Page 150 of 360
148
Advice
The incorrect installation of a child seat in a
vehicle compromises the child's protection
in the event of an accident.
Ensure that there is no seat belt or seat
belt buckle under the child seat, as this
could destabilise it.
Remember to fasten the seat belts or the
child seat harnesses keeping the slack
relative to the child's body to a minimum,
even for short journeys.
When installing a child seat using the seat
belt, ensure that the seat belt is tightened
correctly on the child seat and that it
secures the child seat firmly on the seat
of your vehicle. If your passenger seat is
adjustable, move it forwards if necessary.
At rear seating positions, always leave
sufficient space between the front seat
and:
-
a r
ear ward facing child seat,
-
t
he child's feet for a child seat fitted
forward facing.
To do this, move the front seat for wards
and, if necessary, move its backrest into
the upright position.
For optimal installation of the forward
facing child seat, verify that its backrest is
as close as possible to the backrest of the
vehicle seat, if possible in contact with it. The head restraint must be removed before
installing a child seat with a backrest on a
passenger seat.
Ensure that the head restraint is stored or
attached securely to prevent it from being
thrown around the vehicle in the event of
sharp braking. Refit the head restraint when
the child seat is removed.
Children in front
The legislation on carrying children on the
front passenger seat is specific to each
country. Refer to the legislation in force in
your country.
Deactivate the front passenger airbag when
a
rear ward facing child seat is installed on
the front passenger seat.
Otherwise, the child would risk being seriously
injured or killed if the airbag were deployed.
Installing a booster seat
The chest part of the seat belt must be
positioned on the child's shoulder without
touching the neck.
Ensure that the lap part of the seat belt
passes correctly over the child's thighs.
PEUGEOT recommends using a booster seat
with a backrest equipped with a belt guide at
shoulder level. As a safety precaution, do not leave:
-
a c hild or children alone and unattended in
a vehicle,
-
a c
hild or an animal in a vehicle which
is exposed to the sun, with the windows
closed,
-
t
he keys within reach of children inside the
vehicle.
To prevent accidental opening of the doors
and rear windows, use the child lock.
Take care not to open the rear windows by
more than one third.
To protect young children from the rays of the
sun, fit side blinds on the rear windows.
Safety
Page 151 of 360
149
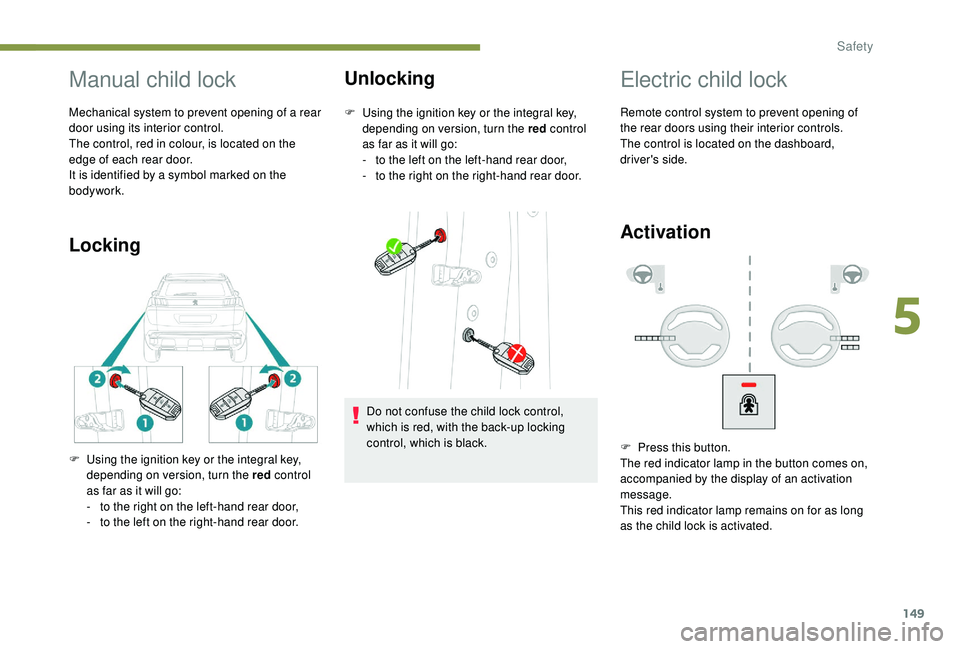
Manual child lock
Mechanical system to prevent opening of a rear
door using its interior control.
The control, red in colour, is located on the
edge of each rear door.
It is identified by a symbol marked on the
bodywork.
LockingUnlocking
F Using the ignition key or the integral key,
depending on version, turn the red control
as far as it will go:
-
t
o the left on the left-hand rear door,
-
t
o the right on the right-hand rear door.
F
U
sing the ignition key or the integral key,
depending on version, turn the red control
as far as it will go:
-
t
o the right on the left-hand rear door,
-
t
o the left on the right-hand rear door. Do not confuse the child lock control,
which is red, with the back-up locking
control, which is black.
Electric child lock
Remote control system to prevent opening of
the rear doors using their interior controls.
The control is located on the dashboard,
driver's side.
Activation
F Press this button.
The red indicator lamp in the button comes on,
accompanied by the display of an activation
message.
This red indicator lamp remains on for as long
as the child lock is activated.
5
Safety