2018 PEUGEOT 3008 display
[x] Cancel search: displayPage 210 of 360
208
With the engine running and the
speed below 12 mph (20 km/h), the
system is activated via the Vehicle /
Driving menu of the touch screen:
F
Sel
ect " Panoramic visual aid ".
AUTO mode is displayed by default, with front
vision, if the gearbox is in neutral or with a
gear engaged, or with rear vision, if reverse is
engaged.
The system is deactivated:
-
a
utomatically above about 19 mph (30 km/h)
(the image disappears temporarily from
12
mph (20 km/h)),
-
b
y pressing the red cross in the top left-
hand corner of the touch screen.
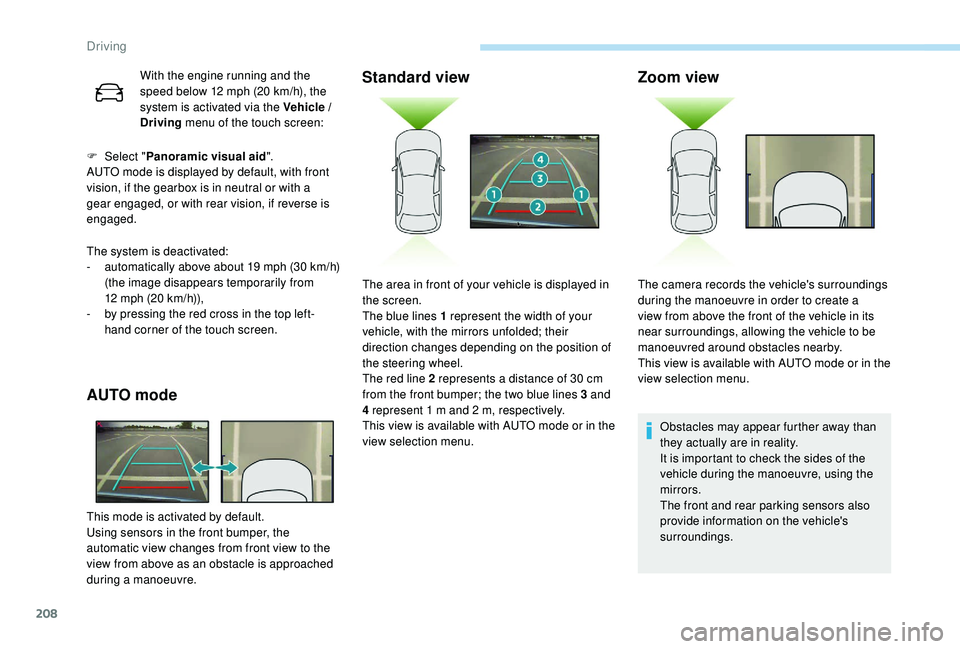
AUTO mode
This mode is activated by default.
Using sensors in the front bumper, the
automatic view changes from front view to the
view from above as an obstacle is approached
during a manoeuvre.
Standard view Zoom view
Obstacles may appear further away than
they actually are in reality.
It is important to check the sides of the
vehicle during the manoeuvre, using the
mirrors.
The front and rear parking sensors also
provide information on the vehicle's
surroundings.
The area in front of your vehicle is displayed in
the screen.
The blue lines 1 represent the width of your
vehicle, with the mirrors unfolded; their
direction changes depending on the position of
the steering wheel.
The red line 2 represents a distance of 30
cm
from the front bumper; the two blue lines 3 and
4 represent 1
m and 2
m, respectively.
This view is available with AUTO mode or in the
view selection menu. The camera records the vehicle's surroundings
during the manoeuvre in order to create a
view from above the front of the vehicle in its
near surroundings, allowing the vehicle to be
manoeuvred around obstacles nearby.
This view is available with AUTO mode or in the
view selection menu.
Driving
Page 212 of 360
210
The Park Assist system takes control
of the assistance for a maximum of
4 manoeuvre cycles. The function is
deactivated after these 4 cycles. If you
think that your vehicle is not positioned
correctly, you should then take control of
the steering to carry out the manoeuvre.
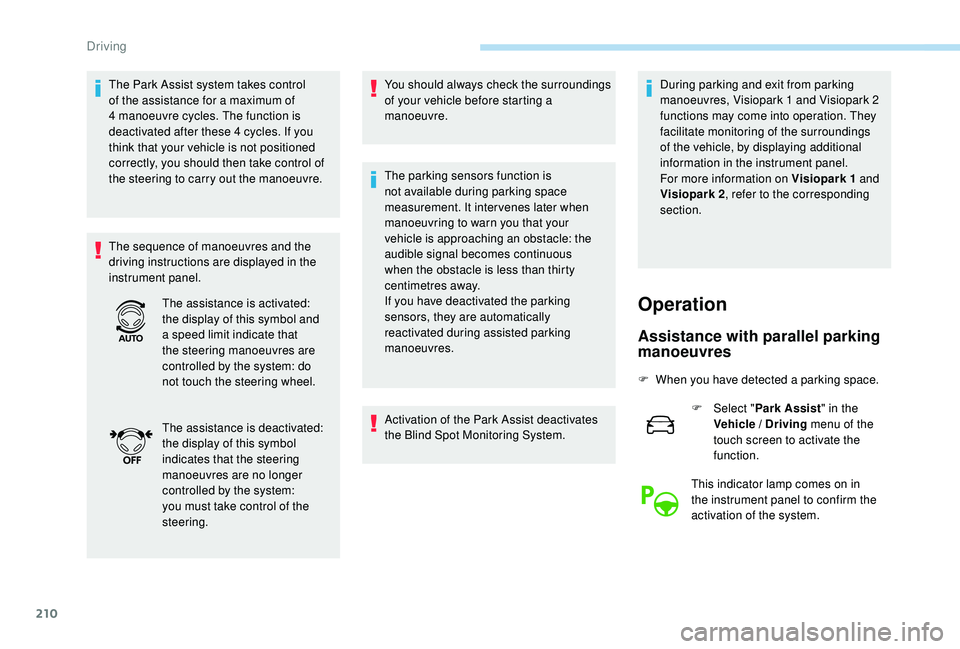
The sequence of manoeuvres and the
driving instructions are displayed in the
instrument panel.You should always check the surroundings
of your vehicle before starting a
manoeuvre.
The parking sensors function is
not available during parking space
measurement. It intervenes later when
manoeuvring to warn you that your
vehicle is approaching an obstacle: the
audible signal becomes continuous
when the obstacle is less than thirty
centimetres away.
If you have deactivated the parking
sensors, they are automatically
reactivated during assisted parking
manoeuvres.
Activation of the Park Assist deactivates
the Blind Spot Monitoring System.During parking and exit from parking
manoeuvres, Visiopark 1 and Visiopark 2
functions may come into operation. They
facilitate monitoring of the surroundings
of the vehicle, by displaying additional
information in the instrument panel.
For more information on Visiopark 1
and
Visiopark 2 , refer to the corresponding
section.
Operation
Assistance with parallel parking
manoeuvres
F When you have detected a parking space.
F
Sel
ect "Park Assist " in the
Vehicle / Driving menu of the
touch screen to activate the
function.
This indicator lamp comes on in
the instrument panel to confirm the
activation of the system.
The assistance is activated:
the display of this symbol and
a speed limit indicate that
the steering manoeuvres are
controlled by the system: do
not touch the steering wheel.
The assistance is deactivated:
the display of this symbol
indicates that the steering
manoeuvres are no longer
controlled by the system:
you must take control of the
steering.
Driving
Page 213 of 360
211
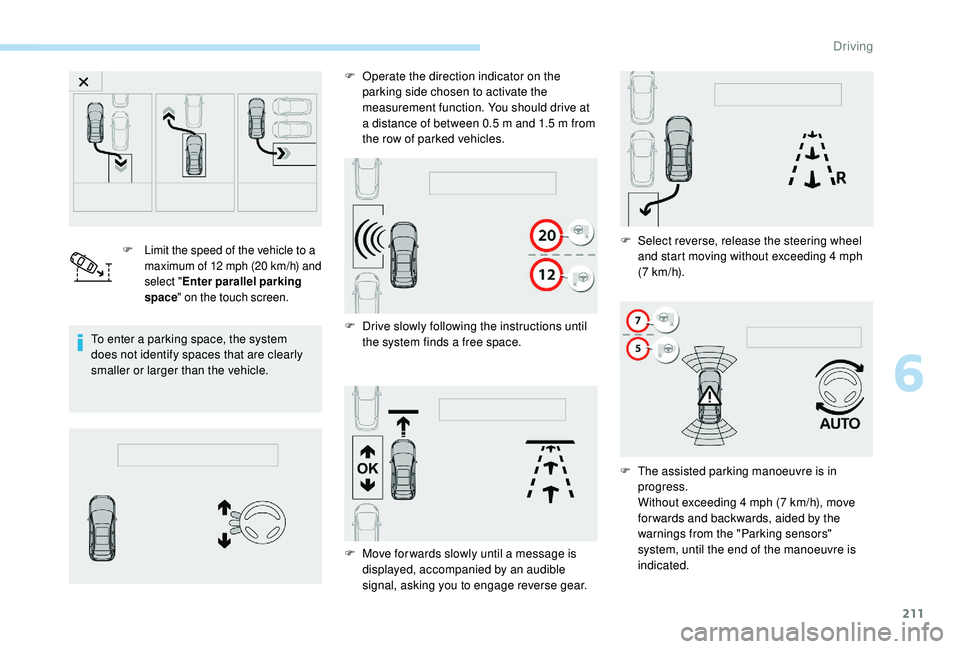
F Limit the speed of the vehicle to a maximum of 12 mph (20 km/h) and
select " Enter parallel parking
space " on the touch screen.
To enter a parking space, the system
does not identify spaces that are clearly
smaller or larger than the vehicle. F
O
perate the direction indicator on the
parking side chosen to activate the
measurement function. You should drive at
a distance of between 0.5 m and 1.5 m from
the row of parked vehicles.
F D rive slowly following the instructions until
the system finds a free space. F
S
elect reverse, release the steering wheel
and start moving without exceeding 4 mph
(7
km/h).
F
M
ove for wards slowly until a message is
displayed, accompanied by an audible
signal, asking you to engage reverse gear. F
T
he assisted parking manoeuvre is in
progress.
Without exceeding 4
mph (7 km/h), move
for wards and backwards, aided by the
warnings from the "Parking sensors"
system, until the end of the manoeuvre is
indicated.
6
Driving
Page 214 of 360
212
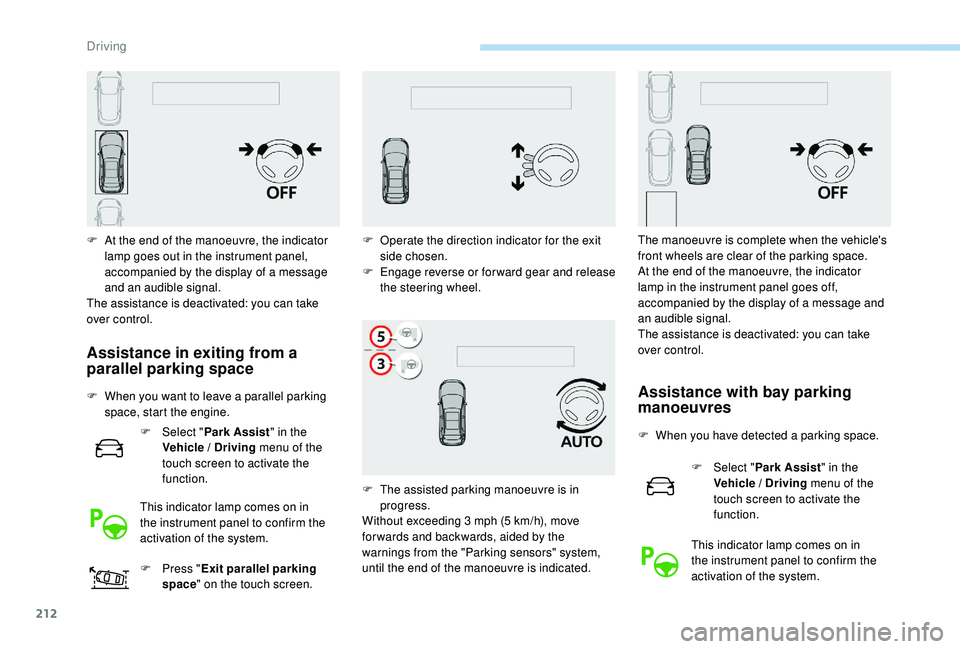
F At the end of the manoeuvre, the indicator lamp goes out in the instrument panel,
accompanied by the display of a message
and an audible signal.
The assistance is deactivated: you can take
over control.
Assistance in exiting from a
parallel parking space
F When you want to leave a parallel parking space, start the engine.
F
Sel
ect "Park Assist " in the
Vehicle / Driving menu of the
touch screen to activate the
function.
This indicator lamp comes on in
the instrument panel to confirm the
activation of the system.
F
P
ress "Exit parallel parking
space " on the touch screen.Assistance with bay parking
manoeuvres
F When you have detected a parking space.
F
Sel
ect "Park Assist " in the
Vehicle / Driving menu of the
touch screen to activate the
function.
This indicator lamp comes on in
the instrument panel to confirm the
activation of the system.
F
O
perate the direction indicator for the exit
side chosen.
F
E
ngage reverse or forward gear and release
the steering wheel.
F
T
he assisted parking manoeuvre is in
progress.
Without exceeding 3
mph (5
km/h), move
for wards and backwards, aided by the
warnings from the "Parking sensors" system,
until the end of the manoeuvre is indicated. The manoeuvre is complete when the vehicle's
front wheels are clear of the parking space.
At the end of the manoeuvre, the indicator
lamp in the instrument panel goes off,
accompanied by the display of a message and
an audible signal.
The assistance is deactivated: you can take
over control.
Driving
Page 215 of 360
213
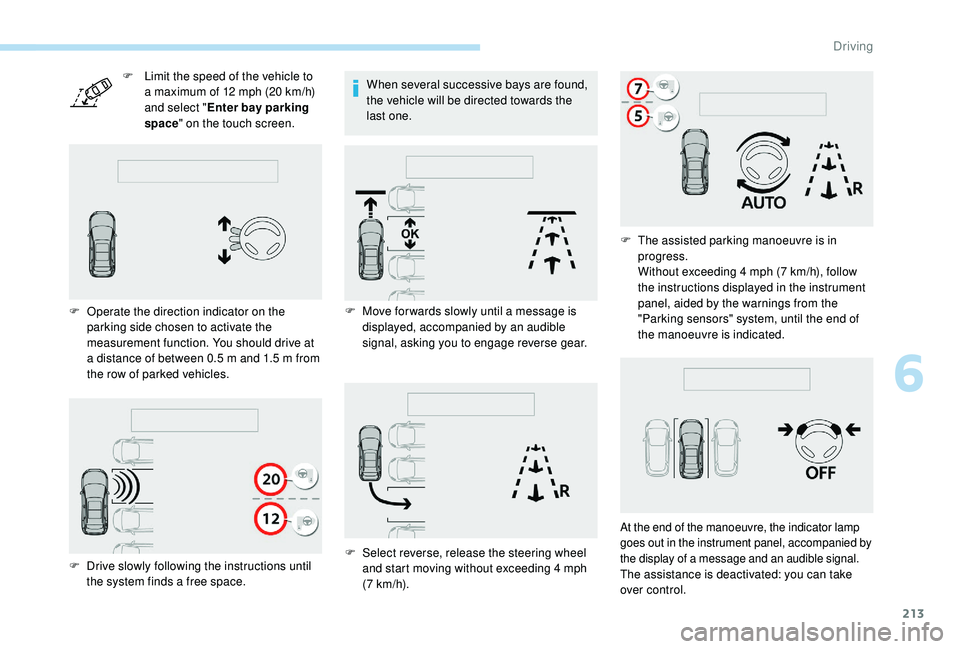
F Limit the speed of the vehicle to a maximum of 12 mph (20 km/h)
and select " Enter bay parking
space " on the touch screen.
F
O
perate the direction indicator on the
parking side chosen to activate the
measurement function. You should drive at
a distance of between 0.5
m and 1.5 m from
the row of parked vehicles. When several successive bays are found,
the vehicle will be directed towards the
last one.
F
D
rive slowly following the instructions until
the system finds a free space. F
M
ove for wards slowly until a message is
displayed, accompanied by an audible
signal, asking you to engage reverse gear.
F
S
elect reverse, release the steering wheel
and start moving without exceeding 4
mph
(7
km/h).F
T
he assisted parking manoeuvre is in
progress.
Without exceeding 4
mph (7 km/h), follow
the instructions displayed in the instrument
panel, aided by the warnings from the
"Parking sensors" system, until the end of
the manoeuvre is indicated.
At the end of the manoeuvre, the indicator lamp
goes out in the instrument panel, accompanied by
the display of a message and an audible signal.
The assistance is deactivated: you can take
over control.
6
Driving
Page 216 of 360
214
During a bay parking manoeuvre, the
Park Assist system is automatically
deactivated once the rear of the vehicle is
within 20 inches (50 cm) of an obstacle.
Deactivation
The system is deactivated by pressing the
control.
The system is deactivated automatically:
-
o
n switching off the ignition,
-
i
f the engine stalls,
-
i
f no manoeuvre is per formed within
5
minutes of selecting the type of manoeuvre
-
a
fter a prolonged stop of the vehicle during a
manoeuvre,
-
i
f the wheel anti-slip regulation (ASR) is
triggered,
-
i
f the speed of the vehicle exceeds the stated
limit,
-
w
hen the driver interrupts movement of the
steering wheel,
-
a
fter 4 manoeuvre cycles,
-
o
n opening the driver's door,
-
i
f one of the front wheels encounters an
obstacle.
The indicator lamp in the instrument panel goes
off and a message is displayed accompanied by
an audible signal.
The driver should then take back control of the
vehicle's steering. If the system is deactivated during a
manoeuvre, the driver should reactivate it
to repeat the measurement.
Deactivation
The system is switched off automatically:
-
w hen towing a trailer, connected electrically,
-
i
f the driver's door is opened,
-
i
f the speed of the vehicle is above 43 mph
(70
km/h).
To switch the system off for a prolonged period,
contact a PEUGEOT dealer or a qualified
workshop.
Operating faults
In the event of a fault, this warning
lamp flashes for a few seconds,
accompanied by an audible signal.
In the event of a fault with the
power steering, this warning lamp
is displayed in the instrument panel,
accompanied by a message.
If the lateral distance between your vehicle
and the space is too great, the system may
not be able to measure the space.
Any object projecting beyond the
dimensions of the vehicle (e.g. a ladder on
the roof or a towball) will not be taken into
account by the Park Assist system during
a manoeuvre.
In bad weather or in winter, ensure that
the sensors are not covered by dirt, ice
or
snow.
In the event of a fault, have the system
checked by a PEUGEOT dealer or a
qualified workshop.
High pressure jet washing
When washing your vehicle, keep the lance at
least 12
inches (30 cm) away from the sensors.
If the fault occurs during the use of the system,
the warning lamp goes off.
Contact a PEUGEOT dealer or a qualified
workshop.
Driving
Page 218 of 360
216
Fuel
Fuel tank capacity: approximately 53 litres.
R eser ve level: 6 litres.
Low fuel level
When the low fuel level is reached
in the fuel tank, this warning lamp
comes on in the instrument panel,
accompanied by the display of a
message and an audible signal.
When it first comes on, about
6
litres of fuel is left in the tank.
If your vehicle is fitted with Stop & Start,
never refuel with the engine in STOP
mode; you must switch off the ignition
using the key, or the START/STOP button
if your vehicle has
K
eyless Entry and
Starting.
Refuelling
If you have put in the wrong fuel for your
vehicle, you must have the fuel tank
drained and filled with the correct fuel
before starting the engine. Once you have finished refuelling:
F
R
efit the filler cap.
F
T
urn it to the right.
F
C
lose the fuel filler flap.Misfuel prevention (Diesel)
(Depending on the country of sale.)
Mechanical device which prevents filling the
tank of a Diesel vehicle with petrol. It avoids
the risk of engine damage that can result from
filling with the wrong fuel.
Until sufficient fuel is added, this warning lamp
appears every time the ignition is switched on,
accompanied by the display of a message and
an audible signal. When driving, this message
and audible signal are repeated with increasing
frequency as the fuel level drops towards 0
.
Refuel as soon as possible to avoid running out
of fuel.
For more information on Running out of fuel
(Diesel) , refer to the corresponding section. A label on the inside of the fuel filler flap
reminds you of the type of fuel to use,
depending on your engine type.
Additions of fuel must be of at least 5
litres, in
order to be registered by the fuel gauge.
Opening the filler cap may create a noise
caused by an inrush of air. This vacuum is
entirely normal, resulting from the sealing of the
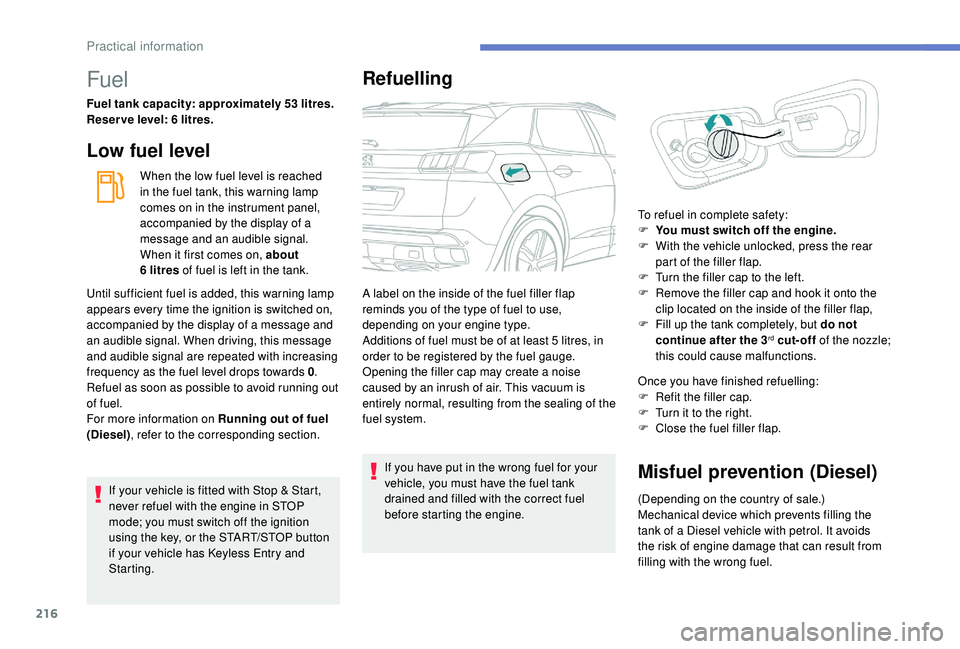
fuel system. To refuel in complete safety:
F
Y
ou must switch off the engine.
F
W
ith the vehicle unlocked, press the rear
part of the filler flap.
F
T
urn the filler cap to the left.
F
R
emove the filler cap and hook it onto the
clip located on the inside of the filler flap,
F
F
ill up the tank completely, but do not
continue after the 3
rd cut-off of the nozzle;
this could cause malfunctions.
Practical information
Page 257 of 360
255
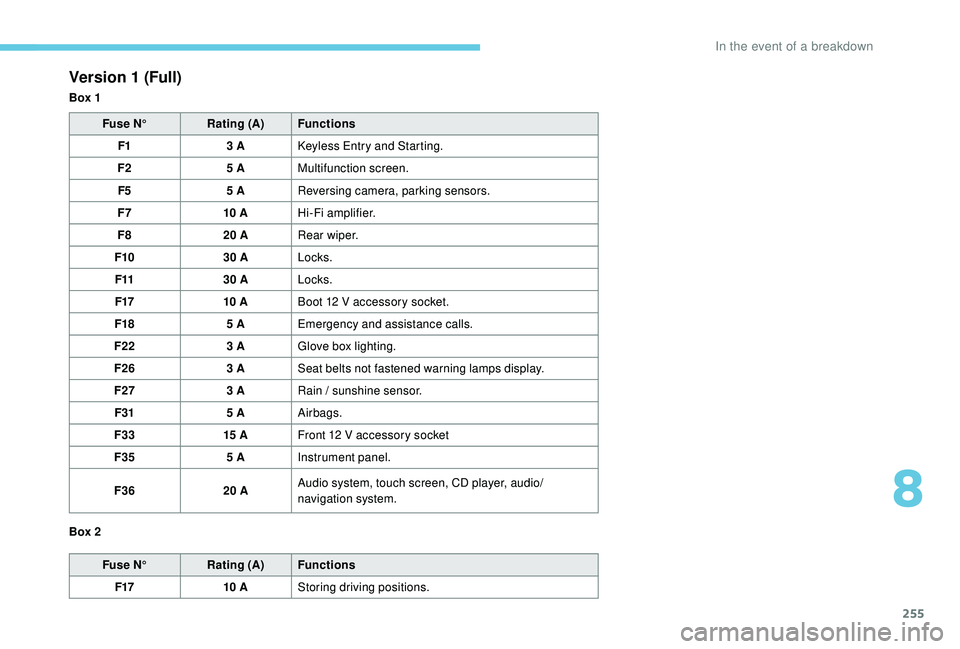
Version 1 (Full)
Box 1Fuse N° Rating (A) Functions
F1 3
A
K
eyless Entry and Starting.
F2 5
AMultifunction screen.
F5 5
AReversing camera, parking sensors.
F7 10
AHi-Fi amplifier.
F8 20
ARear wiper.
F10 30
ALocks.
F11 30
ALocks.
F17 10
ABoot 12
V accessory socket.
F18 5
AEmergency and assistance calls.
F22 3
AGlove box lighting.
F26 3
ASeat belts not fastened warning lamps display.
F27 3
ARain / sunshine sensor.
F31 5
AAirbags.
F33 15
AFront 12
V accessory socket
F35 5
AInstrument panel.
F36 20
AAudio system, touch screen, CD player, audio/
navigation system.
Fuse N° Rating (A) Functions
F17 10
AStoring driving positions.
Box 2
8
In the event of a breakdown