2018 PEUGEOT 3008 oil change
[x] Cancel search: oil changePage 9 of 360

7
Limit the causes of excess
consumption
Spread loads throughout the vehicle; place
the heaviest items in the bottom of the boot,
as close as possible to the rear seats.
Limit the loads carried in the vehicle and
reduce wind resistance (roof bars, roof rack,
bicycle carrier, trailer, etc.). Preferably, use a
roof box.
Remove roof bars and roof racks after use.
At the end of winter, remove snow tyres and
refit your summer tyres.
Observe the recommendations
on maintenance
Check the tyre pressures regularly, when cold,
referring to the label in the door aperture,
driver's side.
Carry out this check in particular:
-
b
efore a long journey,
-
a
t each change of season,
-
a
fter a long period out of use.
Do not forget the spare wheel and the tyres on
any trailer or caravan. Have your vehicle ser viced regularly (engine
oil, oil filter, air filter, cabin filter, etc.) and
obser ve the schedule of operations in the
manufacturer's service schedule.
When filling the tank, do not continue after the
3
rd cut-off of the nozzle to avoid over flow.
At the wheel of your new vehicle, it is only
after the first 1,900
miles (3,000 kilometres)
that you will see the fuel consumption settle
down to a consistent average. With a BlueHDi Diesel engine, if the SCR
system is faulty, your vehicle becomes
polluting. As soon as possible, visit a
PEUGEOT dealer or a qualified workshop to
make your vehicle's level of nitrogen oxides
emissions compliant to the standard.
.
Eco-driving
Page 230 of 360
228
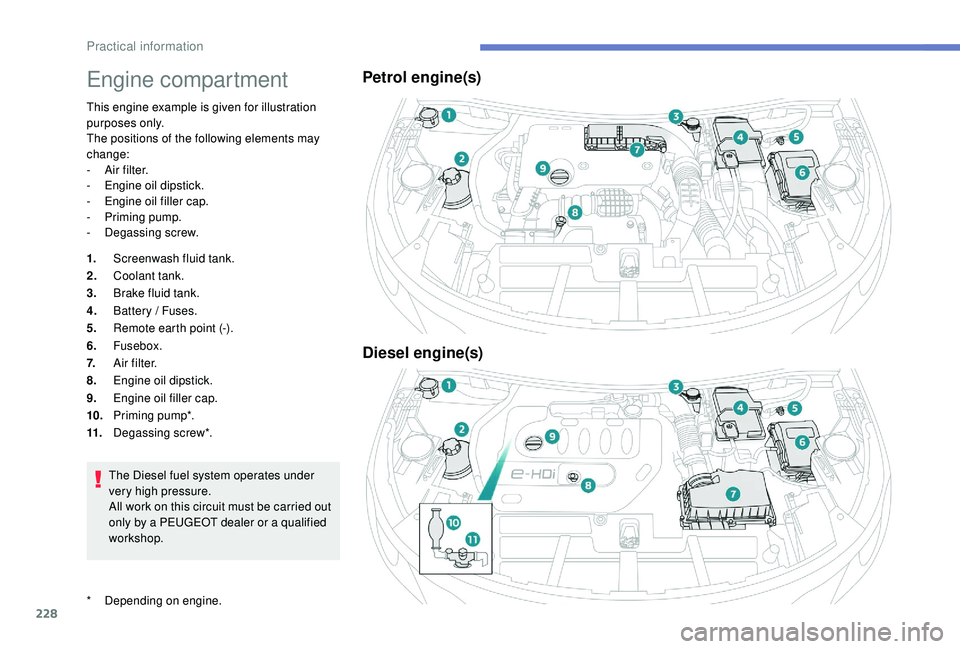
Engine compartment
This engine example is given for illustration
purposes only.
The positions of the following elements may
change:
-
A
ir filter.
-
E
ngine oil dipstick.
-
E
ngine oil filler cap.
-
P
riming pump.
-
D
egassing screw.
1. Screenwash fluid tank.
2. Coolant tank.
3. Brake fluid tank.
4. Battery / Fuses.
5. Remote earth point (-).
6. Fusebox.
7. A i r f i l t e r.
8. Engine oil dipstick.
9. Engine oil filler cap.
10. Priming pump*.
11. Degassing screw*.
The Diesel fuel system operates under
very high pressure.
All work on this circuit must be carried out
only by a PEUGEOT dealer or a qualified
workshop.
Petrol engine(s)
Diesel engine(s)
* Depending on engine.
Practical information
Page 231 of 360
229
Checking levels
Check all of these levels regularly, in line with
the manufacturer's service schedule. Top them
up if necessary, unless other wise indicated.
If a level drops significantly, have the
corresponding system checked by a PEUGEOT
dealer or a qualified workshop.The fluid must comply with the
manufacturer's recommendations and
with the vehicle's engine.
Take care when working under the
bonnet, as certain areas of the engine
may be extremely hot (risk of burns) and
the cooling fan could start at any time
(even with the ignition off).
Used products
Avoid prolonged contact of used oil or
fluids with the skin.
Most of these fluids are harmful to health
or indeed very corrosive. Do not discard used oil or fluids into
sewers or onto the ground.
Take used oil to a PEUGEOT dealer or
a qualified workshop and dispose of it in
the containers reser ved for this purpose.
Engine oil level
The check is carried out either when
the ignition is switched on using the
oil level indicator in the instrument
panel for vehicles equipped with an
electric gauge, or using the dipstick.
To ensure that the reading is correct, your
vehicle must be parked on a level sur face
with the engine stopped for more than
30
minutes.
It is normal to top up the oil level between
two ser vices (or oil changes). PEUGEOT
recommends that you check the level, and top
up if necessary, every 3,000
miles (5,000 km).
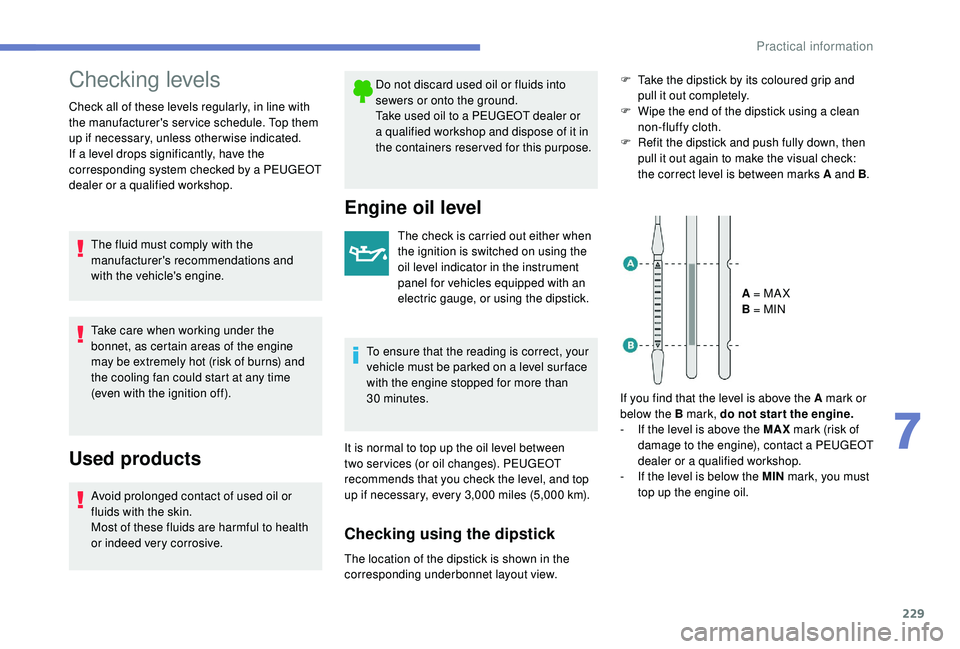
Checking using the dipstick
F Take the dipstick by its coloured grip and pull it out completely.
F
W
ipe the end of the dipstick using a clean
non-fluffy cloth.
F
R
efit the dipstick and push fully down, then
pull it out again to make the visual check:
the correct level is between marks A and B .
A = MA X
B = MIN
If you find that the level is above the A mark or
below the B mark, do not star t the engine.
-
I
f the level is above the MAX mark (risk of
damage to the engine), contact a PEUGEOT
dealer or a qualified workshop.
-
I
f the level is below the MIN mark, you must
top up the engine oil.
The location of the dipstick is shown in the
corresponding underbonnet layout view.
7
Practical information
Page 232 of 360
230
Topping up the engine oil level
The location of the oil filler cap is shown in the
corresponding underbonnet layout view.
F
U
nscrew the oil filler cap to access the filler
opening.
F
A
dd oil in small quantities, avoiding any
spills on engine components (risk of fire).
F
W
ait a few minutes before checking the
level again using the dipstick.
F
A
dd more oil if necessary.
F
A
fter checking the level, carefully refit the oil
filler cap and the dipstick in its tube.
After topping up the oil, the check when
switching on the ignition with the oil
level indicator in the instrument panel
is not valid during the 30
minutes after
topping up.
Engine oil change
In order to maintain the reliability of the engine
and emissions control system, never use
additives in the engine oil.
Brake fluid level
The brake fluid level should be close
to the "MA X" mark. If it is not, check
the brake pad wear.
Changing the fluid
Refer to the manufacturer's service schedule
for details of the inter val for this operation.
Fluid specification
This fluid must conform to the manufacturer's
recommendations.
Coolant level
Check the coolant level regularly.
It is normal to top up the fluid
between two services. A low coolant level presents a risk of serious
damage to your engine.
The coolant level should be close to the "MA X"
mark but should never exceed it.
If the level is close to or below the "MIN" mark,
it is essential to top up.
When the engine is hot, the temperature of the
coolant is regulated by the fan.
In addition, as the cooling system is
pressurised, wait at least one hour after
switching off the engine before carrying out any
work.
To avoid the risk of scalding when you need to
top up in an emergency, place a cloth around
the cap and unscrew the cap by two turns to
allow the pressure to drop.
Once the pressure has dropped, remove the
cap and top up to the required level.
The cooling fan may star t after
switching off the engine: take care
with articles and clothing that might
be caught by the fan blades.Fluid specification
This fluid must conform to the manufacturer's
recommendations.
Oil grade
Before topping up the oil or changing the oil,
check that the oil is the correct grade for your
engine and conforms to the manufacturer's
recommendations.
The check and top up must only be done with
the engine cold.
Practical information
Page 234 of 360
232
Air filter
Depending on the environment
(e.g. dusty atmosphere) and the
use of the vehicle (e.g. city driving),
replace it twice as often, if
necessary.
Oil filter
Change the oil filter each time the
engine oil is changed.
Particle filter (Diesel)
The start of saturation of the particle
filter is indicated by the temporary
illumination of this warning lamp
accompanied by a message about
the risk of the filter clogging up.
As soon as the traffic conditions permit,
regenerate the filter by driving at a speed
of at least 37
mph (60 km/h) until the
warning lamp goes off.
If the warning lamp stays on, this indicates
a low Diesel additive level.
For more information on Checking levels ,
refer to the corresponding section. On a new vehicle, the first particle
filter regeneration operations may be
accompanied by a "burning" smell, which
is per fectly normal.
Following prolonged operation of the
vehicle at very low speed or at idle,
you may, in exceptional circumstances,
notice the emission of water vapour at the
exhaust on acceleration. This does not
affect the behaviour of the vehicle or the
environment.
Manual gearbox
The gearbox does not require any
maintenance (no oil change).
Automatic gearbox
The gearbox does not require any
maintenance (no oil change).
Brake pads
Brake wear depends on the style
of driving, particularly in the case
of vehicles used in town, over short
distances. It may be necessary to
have the condition of the brakes
checked, even between vehicle
services.
Unless there is a leak in the circuit, a drop in
the brake fluid level indicates that the brake
pads are worn.
Brake disc wear
For information on checking brake
disc wear, contact a PEUGEOT
dealer or a qualified workshop.
Electric parking brake
This system does not require any
routine servicing. However, in the
event of a problem, have the system
checked by a PEUGEOT dealer or a
qualified workshop.
Practical information
Page 245 of 360
243
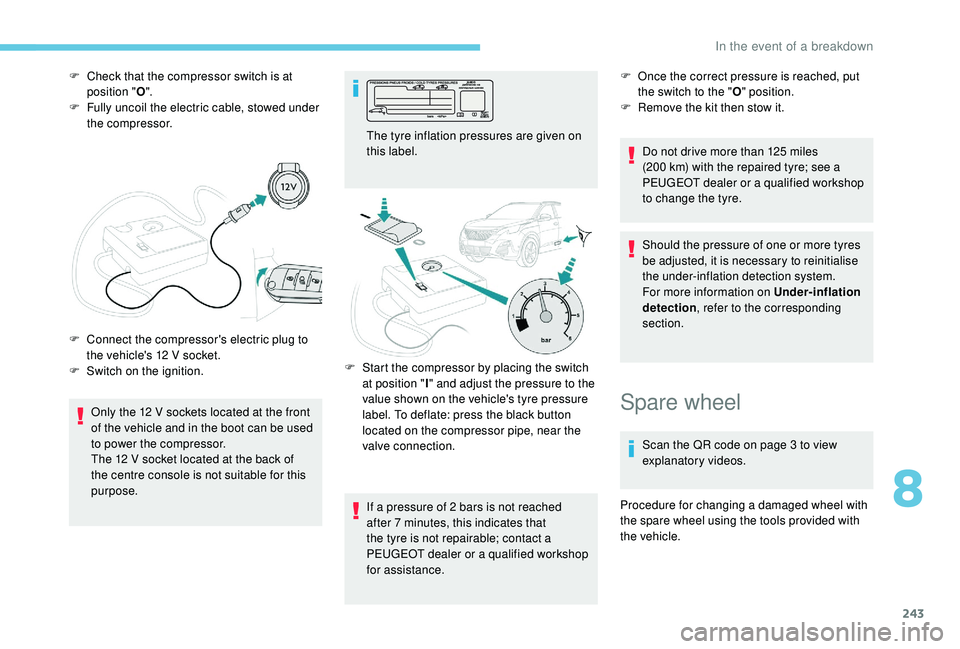
F Check that the compressor switch is at position " O".
F
F
ully uncoil the electric cable, stowed under
the compressor.
Only the 12
V sockets located at the front
of the vehicle and in the boot can be used
to power the compressor.
The 12
V socket located at the back of
the centre console is not suitable for this
purpose.
F
C
onnect the compressor's electric plug to
the vehicle's 12
V socket.
F
S
witch on the ignition. The tyre inflation pressures are given on
this label.
If a pressure of 2
bars is not reached
after 7
minutes, this indicates that
the tyre is not repairable; contact a
PEUGEOT dealer or a qualified workshop
for assistance. F
O nce the correct pressure is reached, put
the switch to the " O" position.
F
R
emove the kit then stow it.
Do not drive more than 125
miles
(200
km) with the repaired tyre; see a
PEUGEOT dealer or a qualified workshop
to change the tyre.
Should the pressure of one or more tyres
be adjusted, it is necessary to reinitialise
the under-inflation detection system.
For more information on Under-inflation
detection , refer to the corresponding
section.
F
S
tart the compressor by placing the switch
at position " I" and adjust the pressure to the
value shown on the vehicle's tyre pressure
label. To deflate: press the black button
located on the compressor pipe, near the
valve connection.
Spare wheel
Scan the QR code on page 3 to view
explanatory videos.
Procedure for changing a damaged wheel with
the spare wheel using the tools provided with
the vehicle.
8
In the event of a breakdown
Page 353 of 360
269
Massage function ...........................................76
M assage, multi-point ...................................... 76
Mat
......................................................... 101-102
Memorising a speed
..................................... 17
2
Menu
............................................................... 12
Menu, main
....................................................... 4
M
enus (audio)
........................................ 3-5, 4-5
Messages
........................................................ 28
Messages, quick
............................................. 28
M
irror, rear view ......................................... 7 7-78
Mirrors, door ......................... 76 -77, 91, 200-201
Mirror, vanity
................................................... 97
Misfuel prevention
.................................. 216 -217
Motorised tailgate
..................................... 6
2- 64
Mountings, ISOFIX
....................................... 143
MP3 CD
............................................................. 9
N
Net, high load retaining .................................107
Number plate lamps ...................................... 252
O
Obstacle detection ........................................ 202
Oil change ............................................. 2
29-230
Oil consumption
.................................... 229-230
Oil, engine
....................................... 12, 229-230
On-board tools
.............................. 108, 238-240
Opening the bonnet
..............................226-227
Opening the boot
...................................... 51, 61
Opening the doors
.................................... 51, 60
Opening the fuel filler flap
.............................216
Opening the windows
..................................... 48
L
Labels, identification ..................................... 269
Lamp, boot .................................................... 108
Lamps, parking
............................................. 111
Lamps, rear
................................................... 250
Lane Departure Warning System (LDWS)
.................................... 17, 19 4
Lane Departure Warning System (LDWS), Active
................17, 195 , 202
LEDs
– Light-emitting diodes
.......111,
248, 250
Level, brake fluid
........................................... 230
Level, Diesel additive
.............................231-232
Level, engine coolant
..............................32, 230
Level, engine oil
.............................. 31, 229-230
Levels and checks
..............................
..228 -231
Level, screenwash fluid
........................11
8, 231
Light-emitting diodes
– LEDs
.......111,
248, 250
Lighting
............................................................ 26
Lighting, cornering
................................. 11 6 -117
Lighting dimmer
.............................................. 36
Lighting, exterior
........................................... 109
Lighting, guide-me home
.................50, 113 -114
Lighting, interior
...............................
......102-103
Lighting, mood
........................................ 36, 103
Lighting, welcome
......................................... 113
Loading
......................................... 107, 225-226
Load reduction mode
.................................... 223
Locating your vehicle
...................................... 50
Locking
...............................
................49, 52 , 54
Locking from the inside
...................................57
Locking the doors
........................................... 62
L
ong objects, transporting
............................105
Low fuel level
................................................ 2
16
M
Map reading lamps ................................10 2-103
Markings, identification .................................269
I
i- Cockpit amplify
function ...............76, 80 - 81 , 10 0 -101 , 166 -167
Ignition
................
............................. 15 4, 15 6 , 28
Ignition on ...................................................... 15 6
Immobiliser, electronic
............................54, 152
Indicator, AdBlue
® range ................................. 32
Indicator, coolant temperature ........................ 32
Indicator, engine oil level
.......................... 31, 35
Indicator lamps, operation
........................ 11,
15
Indicators, direction
.............................. 111, 249
Inflating tyres
................................................ 233
Inflating tyres (using the kit)
.................. 24
0, 242
Instrument panel
................................ 8-9, 35 -37
Intelligent Traction Control
............................ 125
Internet browser
.............................................. 16
I
SOFIX
.......................................................... 14 4
ISOFIX mountings ......................................... 143
J
Jack .....................................239 -240 , 243, 23, 9
Jump starting ................................................ 258
K
Key ........................................................... 48, 54
Key, electronic ............................................ 51- 5 2
Keyless Entry and Starting ....51 - 5 2, 54 , 15 4 -15 5Key not recognised ................................ 15 6 -157
Key with remote control ................................15
2
Kit, hands-free
.................... 2
5 -26, 13 -14 , 1 0 -11
Kit, temporary puncture repair
...... 2
38-240, 242
.
Alphabetical index