2018 PEUGEOT 3008 Courtesy lamp
[x] Cancel search: Courtesy lampPage 4 of 360
2
.
.
Head-up digital screen 8
W arning and indicator lamps 1 1
Indicators
29
Manual test
3
5
Distance recorders
3
6
Lighting dimmer
3
6
Ambient lighting
3
6
Trip computer
3
7
Monochrome screen C
3
8
Touch screen
4
0
Remote control
4
8
K
eyless Entry and Starting
5
0
Back-up procedures
5
4
Central locking
5
7
Anti-intrusion security
5
8
Alarm
5
8
Doors
60
Boot
6
1
Hands-free tailgate
62
E
lectric windows
6
5
Panoramic opening sunroof
6
7Driving position
7
0
Front seats
7
1
Steering wheel adjustment
7
6
Mirrors
76
R
ear seats
7
8
i- Cockpit Amplify function
8
0
Heating and Ventilation
8
1
Manual air conditioning 8 4
Semi-automatic mono-zone air conditioning 8 4
Automatic dual-zone air conditioning
8
6
Recirculation of the interior air
9
0
Front demist – defrost
9
0
Heated windscreen
9
1
Rear screen demist – defrost
9
1
Programmable heating
9
2
Front fittings
9
6
Courtesy lamps
1
02
Interior ambient lighting
1
03
Rear fittings
1
04
Boot fittings
1
05Exterior lighting control stalk
1
09
Direction indicators
1
11
Headlamp adjustment
1
12
Automatic illumination of headlamps
1
12
Automatic headlamp dipping
1
14
Cornering lighting
1
16
Wiper control stalk
1
17
Automatic windscreen wipers 1 19
General safety recommendations
1
21
Hazard warning lamps
1
22
H or n
12
2
Emergency or assistance call
1
22
Electronic stability control (ESC)
1
24
Advanced Grip Control
1
27
Hill Assist Descent Control
1
28
Seat belts
1
29
Airbags
133
Child seats
1
37
Deactivating the front passenger airbag
1
38
ISOFIX mountings and child seats
1
43
i-Size child seats
1
46
Child lock
1
49
InstrumentsAccess
Over view
Ease of use and comfort
Lighting and visibility
Safety
Eco-driving
Instruments and controls 4
Contents
Page 6 of 360
4
Instruments and controls
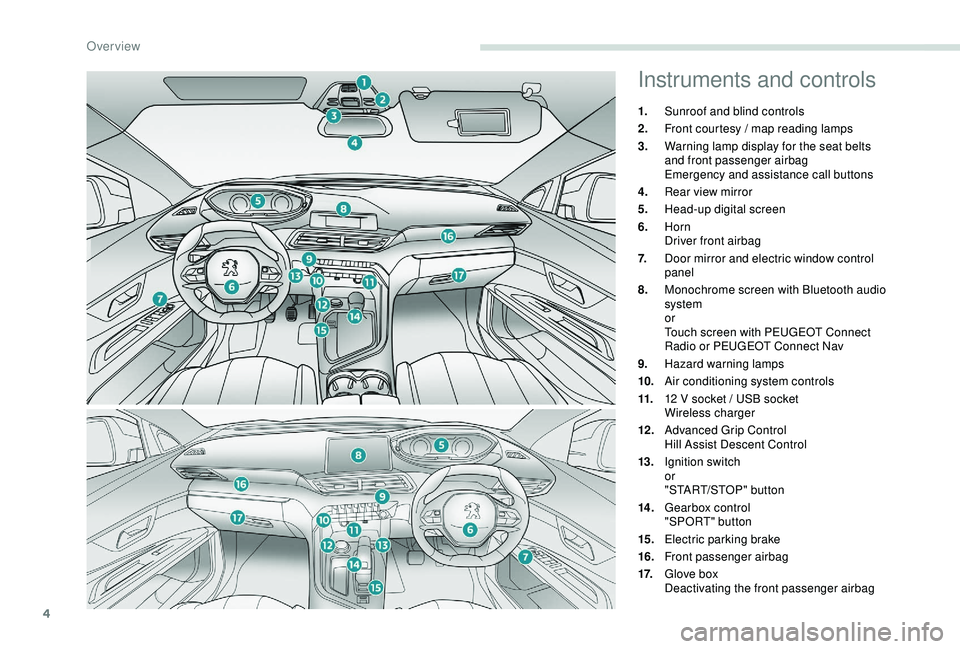
1.Sunroof and blind controls
2. Front courtesy / map reading lamps
3. Warning lamp display for the seat belts
and front passenger airbag
Emergency and assistance call buttons
4. Rear view mirror
5. Head-up digital screen
6. Horn
Driver front airbag
7. Door mirror and electric window control
panel
8. Monochrome screen with Bluetooth audio
system
or
Touch screen with PEUGEOT Connect
Radio or PEUGEOT Connect Nav
9. Hazard warning lamps
10. Air conditioning system controls
11. 12
V socket / USB socket
Wireless charger
12 . Advanced Grip Control
Hill Assist Descent Control
13. Ignition switch
or
"START/STOP" button
14 . Gearbox control
"SPORT" button
15. Electric parking brake
16. Front passenger airbag
17. Glove box
Deactivating the front passenger airbag
Over view
Page 52 of 360
50
This function allows you to identify your vehicle
from a distance, particularly in poor light. Your
vehicle must be locked.
Welcome lightingSelective unlocking and
opening of the tailgate
The settings for the selective tailgate unlocking
and motorised operation are made in the
vehicle configuration menu.
By default, selective tailgate unlocking is
activated and the motorised function is
deactivated.
F
M
ake a long press on the button
to unlock the boot and trigger the
motorised opening of the tailgate.
If selective unlocking of the tailgate is
deactivated, pressing the unlocking button
unlocks the whole vehicle.
If motorised operation of the tailgate
is deactivated, pressing the unlocking
button releases the tailgate.
To lock the vehicle, it is necessary to
close the tailgate again.
Locating your vehicle
F Press this button.
This will switch on the courtesy lamps and door
mirror spot lamps and the direction indicators
will flash for around ten seconds.
Keyless Entry and
Starting
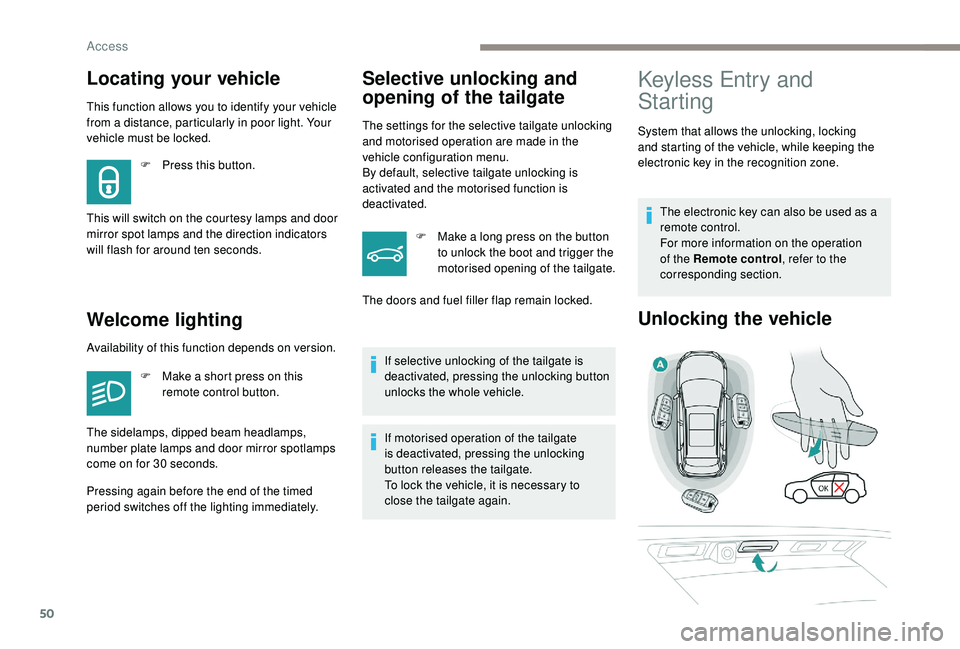
System that allows the unlocking, locking
and starting of the vehicle, while keeping the
electronic key in the recognition zone. The electronic key can also be used as a
remote control.
For more information on the operation
of the Remote control , refer to the
corresponding section.
Unlocking the vehicle
The doors and fuel filler flap remain locked.
Availability of this function depends on version. F
M
ake a short press on this
remote control button.
The sidelamps, dipped beam headlamps,
number plate lamps and door mirror spotlamps
come on for 30
seconds.
Pressing again before the end of the timed
period switches off the lighting immediately.
Access
Page 104 of 360
102
Refitting
To refit the mat on the driver's side:
F p osition the mat correctly,
F
r
eattach the fixings by pressing,
F
c
heck that the mat is secured correctly.
To avoid any risk of jamming of the pedals:
-
o
nly use mats which are suited to the
fixings already present in the vehicle;
these fixings must be used,
-
n
ever place one mat on top of another.
The use of mats not approved by
PEUGEOT may inter fere with access to
the pedals and hinder the operation of the
cruise control / speed limiter.
The mats approved by PEUGEOT have
two fixings located below the seat.
Courtesy lampsFront and rear courtesy lamps
In this position, the courtesy
lamp comes on gradually:
When fitting the mat for the first time, on the
driver's side use only the fixings provided in the
wallet attached.
The other mats are simply placed on the carpet.
Removing
To remove the mat on the driver's side:
F
m ove the seat as far back as possible,
F
un
clip the fixings,
F
r
emove the mat.
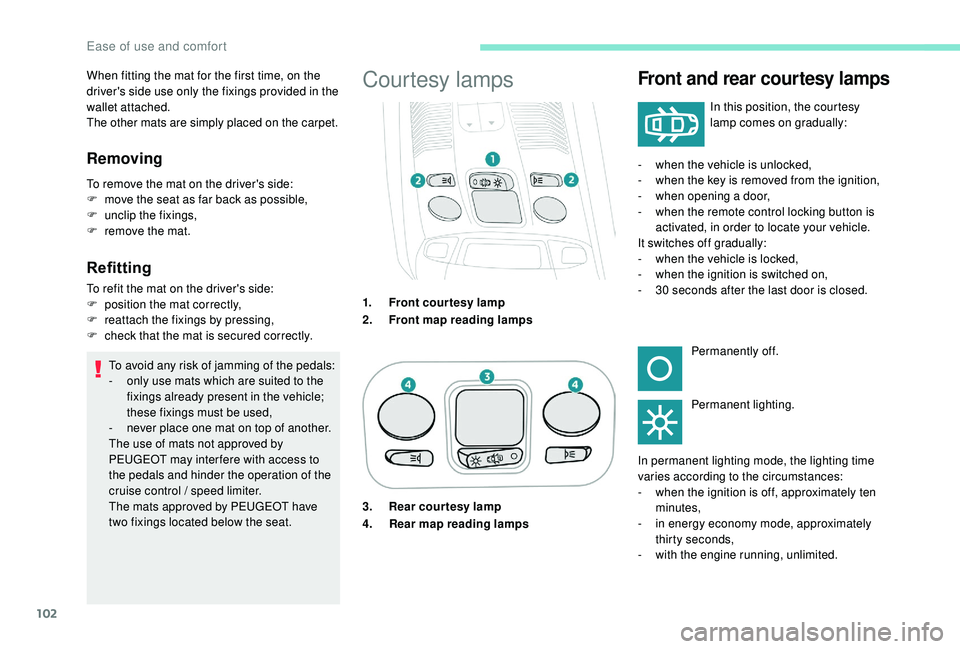
1.Front courtesy lamp
2. Front map reading lamps -
w
hen the vehicle is unlocked,
- w hen the key is removed from the ignition,
- w hen opening a door,
-
w
hen the remote control locking button is
activated, in order to locate your vehicle.
It switches off gradually:
-
w
hen the vehicle is locked,
-
w
hen the ignition is switched on,
-
3
0 seconds after the last door is closed.Permanently off.
Permanent lighting.
In permanent lighting mode, the lighting time
varies according to the circumstances:
-
w
hen the ignition is off, approximately ten
minutes,
-
i
n energy economy mode, approximately
thirty seconds,
-
w
ith the engine running, unlimited.
3. Rear courtesy lamp
4.
Rear map reading lamps
Ease of use and comfort
Page 105 of 360
103
Front and rear map reading
lamps
Take care not to put anything in contact
with the courtesy lamps.F
W
ith the ignition on, operate the
corresponding switch.
When the courtesy lamp is in the
"permanent lighting" position, the rear
courtesy lamp also comes on, except if it
is in the "permanently off " position.
To switch off the rear courtesy lamp, put it
in the "permanently off " position.
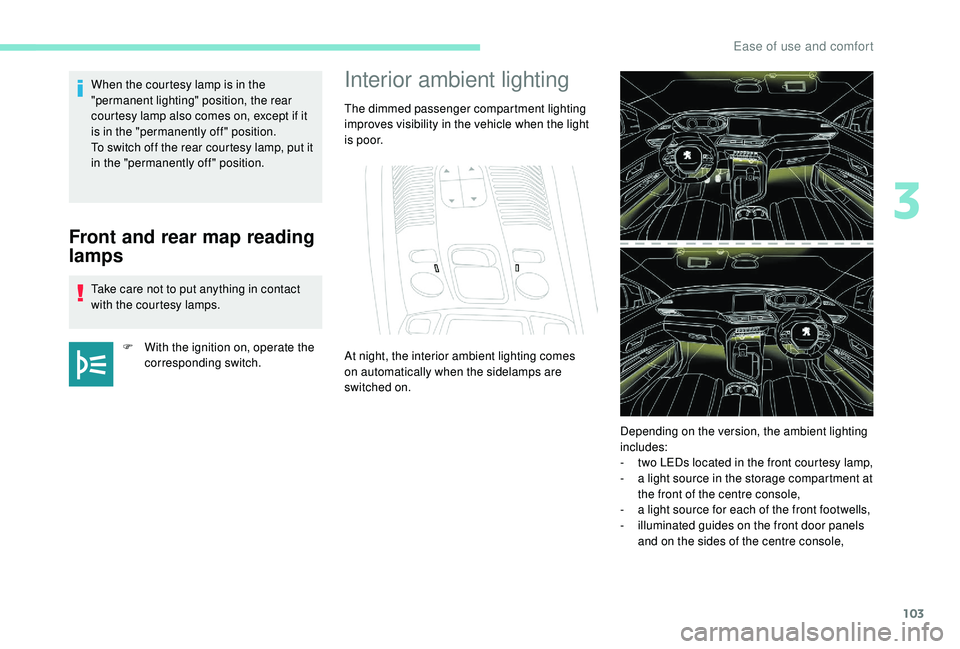
Interior ambient lighting
The dimmed passenger compartment lighting
improves visibility in the vehicle when the light
i s p o o r.
At night, the interior ambient lighting comes
on automatically when the sidelamps are
switched on.
Depending on the version, the ambient lighting
includes:
-
t
wo LEDs located in the front courtesy lamp,
-
a l
ight source in the storage compartment at
the front of the centre console,
-
a l
ight source for each of the front footwells,
-
i
lluminated guides on the front door panels
and on the sides of the centre console,
3
Ease of use and comfort
Page 116 of 360
114
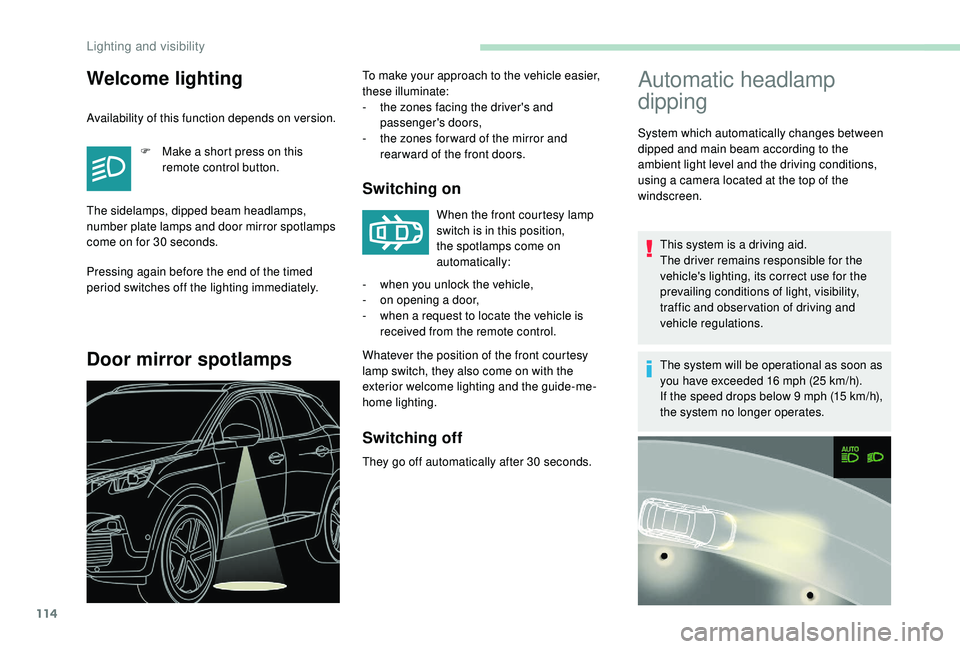
Automatic headlamp
dipping
System which automatically changes between
dipped and main beam according to the
ambient light level and the driving conditions,
using a camera located at the top of the
windscreen.This system is a driving aid.
The driver remains responsible for the
vehicle's lighting, its correct use for the
prevailing conditions of light, visibility,
traffic and obser vation of driving and
vehicle regulations.
The system will be operational as soon as
you have exceeded 16
mph (25 km/h).
If the speed drops below 9
mph (15 km/h),
the system no longer operates.
Welcome lighting
Availability of this function depends on version.
F
M
ake a short press on this
remote control button.
The sidelamps, dipped beam headlamps,
number plate lamps and door mirror spotlamps
come on for 30
seconds.
Pressing again before the end of the timed
period switches off the lighting immediately.
Door mirror spotlamps
To make your approach to the vehicle easier,
these illuminate:
-
t
he zones facing the driver's and
passenger's doors,
-
t
he zones for ward of the mirror and
rear ward of the front doors.
Switching on
When the front courtesy lamp
switch is in this position,
the spotlamps come on
automatically:
Whatever the position of the front courtesy
lamp switch, they also come on with the
exterior welcome lighting and the guide-me-
home lighting. -
w
hen you unlock the vehicle,
-
o
n opening a door,
-
w
hen a request to locate the vehicle is
received from the remote control.
Switching off
They go off automatically after 30 seconds.
Lighting and visibility
Page 156 of 360
154
Switching off the engine
F Stop the vehicle.
F W ith the engine running in idle, turn the key
to position 1 .
F
R
emove the key from the ignition switch.
F
T
o lock the steering column, turn the
steering wheel until it locks.
To facilitate unlocking of the steering
column, it is recommended that the
wheels be returned to the straight ahead
position before switching off the engine.
F
C
heck that the parking brake is correctly
applied, particularly on sloping ground.
Never switch off the ignition before the
vehicle is at a complete stop. With the
engine off, the braking and steering
assistance systems are also cut off: risk
of loss of control of the vehicle.
When you leave the vehicle, keep the key
with you and lock the vehicle.
Energy economy mode
After switching off the engine (position 1 –
Sto p), for a maximum of 30
minutes you
can still use functions such as the audio and
telematic system, the wipers, dipped beam
headlamps, courtesy lamps, etc.
For more information on Energy
economy mode , refer to the
corresponding section.
Key left in
If the key has been left in the ignition
switch at position 2 (Ignition on) , the
ignition will be switched off automatically
after one hour.
To switch the ignition back on, turn the
key to position 1 (Stop) , then back to
position 2 (Ignition on) .
Starting / Switching off
the engine with
K
eyless
Entry and Starting
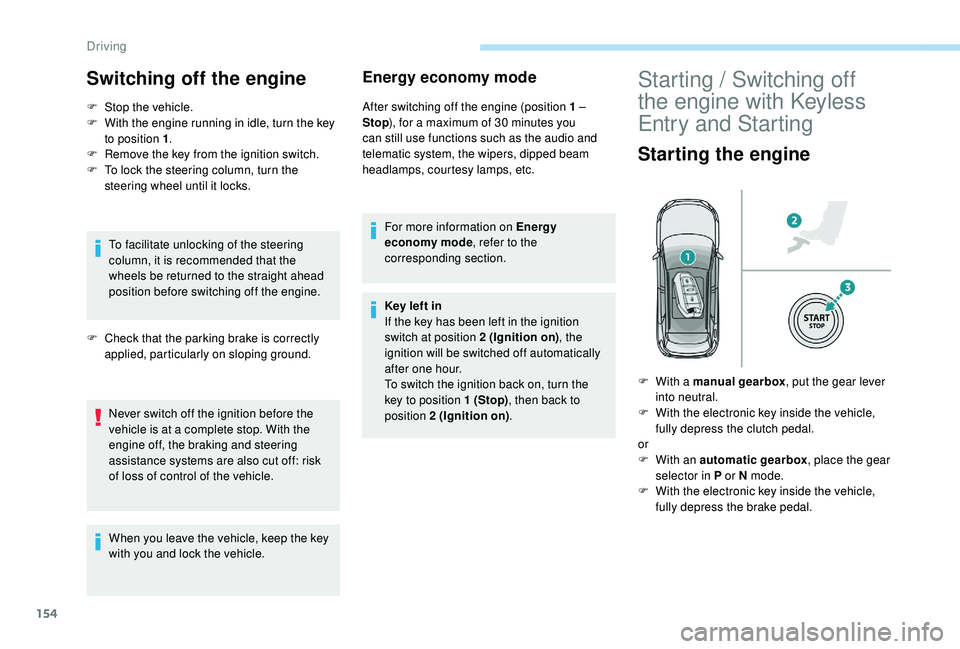
Starting the engine
F With a manual gearbox , put the gear lever
into neutral.
F
W
ith the electronic key inside the vehicle,
fully depress the clutch pedal.
or
F
W
ith an automatic gearbox , place the gear
selector in P or N mode.
F
W
ith the electronic key inside the vehicle,
fully depress the brake pedal.
Driving
Page 225 of 360
223
Maintenance
Correct operation is only possible if the towball
and its carrier are kept clean.
Before cleaning the vehicle with a high-
pressure jet wash, the towball must be removed
and the protective plug fitted to the carrier.Apply the label provided to a clearly visible
area, close to the carrier or in the boot.
Go to a PEUGEOT dealer or a qualified
workshop for any work on the towbar
system.
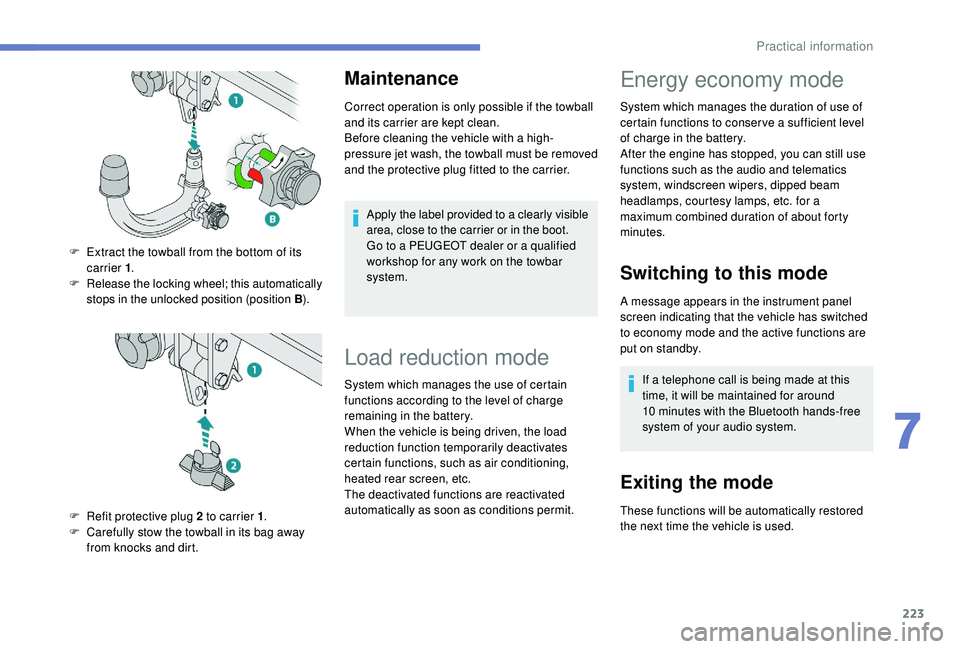
F
E
xtract the towball from the bottom of its
carrier 1 .
F
R
elease the locking wheel; this automatically
stops in the unlocked position (position B ).
F
R
efit protective plug 2 to carrier 1 .
F
C
arefully stow the towball in its bag away
from knocks and dirt.
Load reduction mode
System which manages the use of certain
functions according to the level of charge
remaining in the battery.
When the vehicle is being driven, the load
reduction function temporarily deactivates
certain functions, such as air conditioning,
heated rear screen, etc.
The deactivated functions are reactivated
automatically as soon as conditions permit.
Energy economy mode
System which manages the duration of use of
certain functions to conser ve a sufficient level
of charge in the battery.
After the engine has stopped, you can still use
functions such as the audio and telematics
system,
windscreen wipers, dipped beam
headlamps,
courtesy lamps, etc. for a
maximum combined duration of about forty
minutes.
Switching to this mode
A message appears in the instrument panel
screen indicating that the vehicle has switched
to economy mode and the active functions are
put on standby.
If a telephone call is being made at this
time, it will be maintained for around
10
minutes with the Bluetooth hands-free
system of your audio system.
Exiting the mode
These functions will be automatically restored
the next time the vehicle is used.
7
Practical information