Page 112 of 180
110
Refitting the wheel
The jack must only be used to change a wheel
w ith a damaged or punctured tyre.
The jack does not require any maintenance.
The jack meets European standards, as defined
in the Machinery Directive 2006/42/CE.
Certain parts of the jack such as the screw
thread or the joints could cause injury:
avoid touching them.
Carefully remove all traces of lubrication
grease.
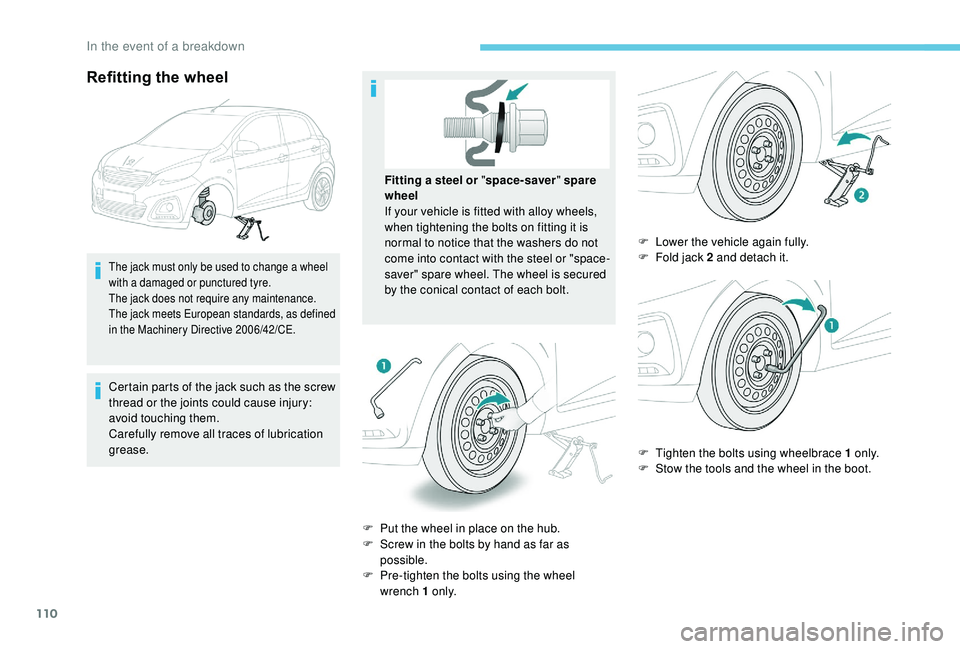
F
P
ut the wheel in place on the hub.
F
S
crew in the bolts by hand as far as
possible.
F
P
re-tighten the bolts using the wheel
wrench 1
o n l y.F
L
ower the vehicle again fully.
F
F
old jack 2 and detach it.
F
T
ighten the bolts using wheelbrace 1 o n l y.
F
S
tow the tools and the wheel in the boot.
Fitting a
steel or "
space-saver " spare
wheel
If your vehicle is fitted with alloy wheels,
when tightening the bolts on fitting it is
normal to notice that the washers do not
come into contact with the steel or "space-
saver" spare wheel. The wheel is secured
by the conical contact of each bolt.
In the event of a breakdown
Page 113 of 180
111
After changing a wheel
Have the tightness of the bolts and the
pressure of the spare wheel checked by
a
PEUGEOT dealer or a qualified workshop
without delay.
Have the punctured wheel repaired and
replace it on the vehicle as soon as possible.
When using the "space-saver" type spare
wheel, do not exceed 50 mph (80 km/h).
When you drive with the spare wheel
fitted, you should deactivate the lane
departure warning system.
Changing a bulb
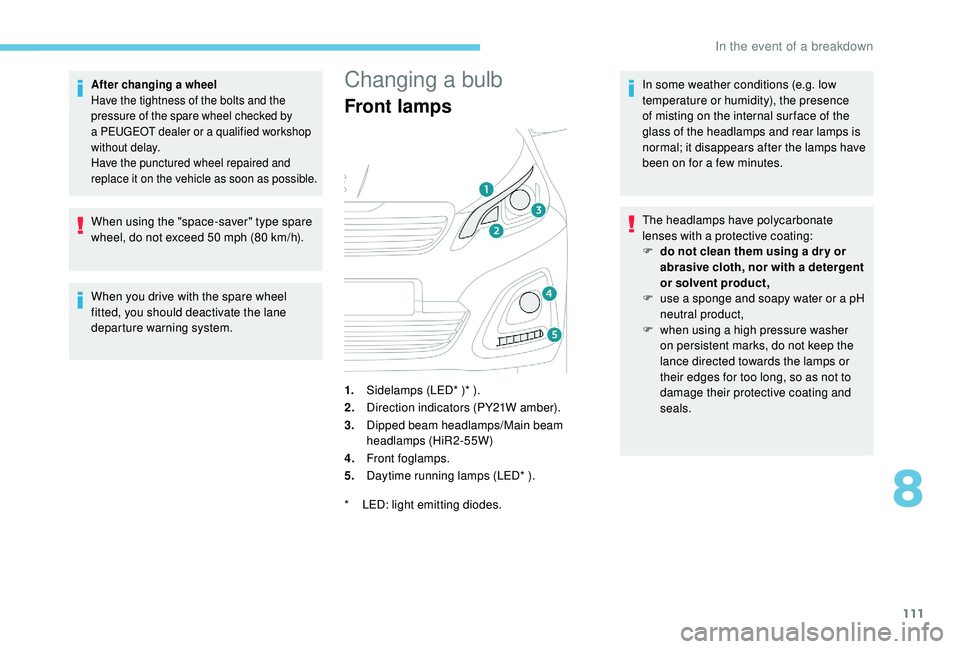
1.Sidelamps (LED* )* ).
2. Direction indicators (PY21W amber).
3. Dipped beam headlamps/Main beam
headlamps (HiR2-55W)
4. Front foglamps.
5. Daytime running lamps (LED* ). In some weather conditions (e.g. low
temperature or humidity), the presence
of misting on the internal sur face of the
glass of the headlamps and rear lamps is
normal; it disappears after the lamps have
been on for a
few minutes.
*
L
ED: light emitting diodes. The headlamps have polycarbonate
lenses with a
protective coating:
F
d
o not clean them using a dr y or
abrasive cloth, nor with a detergent
or solvent product,
F
u
se a sponge and soapy water or a pH
neutral product,
F
w
hen using a high pressure washer
on persistent marks, do not keep the
lance directed towards the lamps or
their edges for too long, so as not to
damage their protective coating and
seals.
Front lamps
8
In the event of a breakdown
Page 115 of 180
113
LED daytime running lamps
Rear lamps
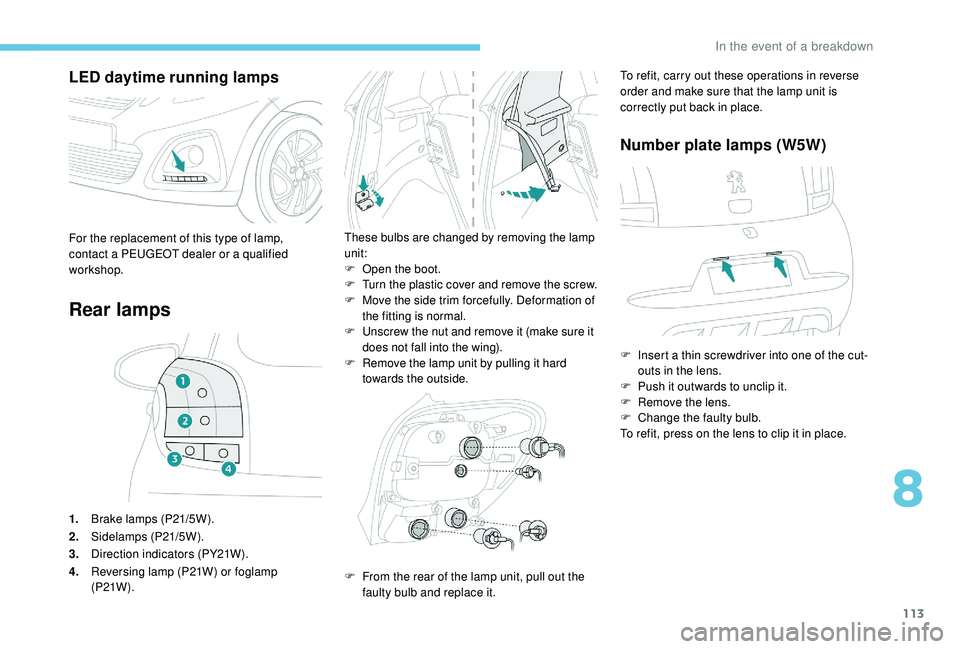
1.Brake lamps (P21/5W).
2. Sidelamps (P21/5W).
3. Direction indicators (PY21W).
4. Reversing lamp (P21W) or foglamp
(P21W ).
These bulbs are changed by removing the lamp
unit:
F
O
pen the boot.
F
T
urn the plastic cover and remove the screw.
F
M
ove the side trim forcefully. Deformation of
the fitting is normal.
F
U
nscrew the nut and remove it (make sure it
does not fall into the wing).
F
R
emove the lamp unit by pulling it hard
towards the outside.For the replacement of this type of lamp,
contact a PEUGEOT dealer or a qualified
workshop.
F
F
rom the rear of the lamp unit, pull out the
faulty bulb and replace it. To refit, carry out these operations in reverse
order and make sure that the lamp unit is
correctly put back in place.
Number plate lamps (W5W)
F Insert a
thin screwdriver into one of the cut-
outs in the lens.
F
P
ush it outwards to unclip it.
F
R
emove the lens.
F
C
hange the faulty bulb.
To refit, press on the lens to clip it in place.
8
In the event of a breakdown
Page 116 of 180
114
Third brake lamp (4 W5W bulbs)D irection indicator side repeaters
(WY5W amber)
Changing a fuse
The fuseboxes are located below the
dashboard in the passenger compartment and
beside the battery in the engine compartment.
Access to the tools
The extraction tweezers are attached to the
fusebox under the bonnet. When you unclip the plastic cover, make
sure not to remove the seal.
F
W
ith the boot open, unclip the plastic cover.
F
P
ress on the metal tabs to disengage the
lamp unit.
F
R
emove the lamp unit from outside of the
tailgate.
F
R
emove the bulb holder by squeezing the
two plastic tabs.
F
C
hange the defective bulb(s).
To refit, carry out these operations in reverse
o r d e r. F
P
ush the repeater to the front or to the rear
and disengage it by pulling it towards you.
F
D
isconnect the bulb holder and replace it.
F
U
nclip the plastic cover, located at the
bottom of the windscreen, by pressing on
both tabs.
In the event of a breakdown
Page 125 of 180
123
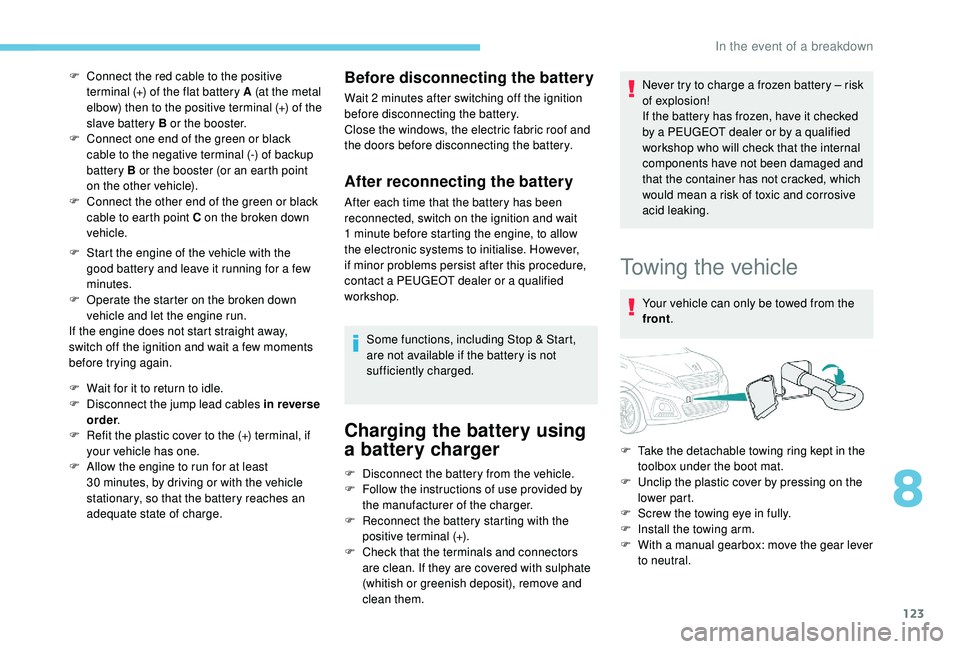
F Connect the red cable to the positive terminal (+) of the flat battery A (at the metal
elbow) then to the positive terminal (+) of the
slave battery B or the booster.
F
C
onnect one end of the green or black
cable to the negative terminal (-) of backup
battery B or the booster (or an earth point
on the other vehicle).
F
C
onnect the other end of the green or black
cable to earth point C on the broken down
vehicle.
F
S
tart the engine of the vehicle with the
good battery and leave it running for a
few
minutes.
F
O
perate the starter on the broken down
vehicle and let the engine run.
If the engine does not start straight away,
switch off the ignition and wait a
few moments
before trying again.
F
W
ait for it to return to idle.
F
D
isconnect the jump lead cables in reverse
order .
F
R
efit the plastic cover to the (+) terminal, if
your vehicle has one.
F
A
llow the engine to run for at least
30
minutes, by driving or with the vehicle
stationary, so that the battery reaches an
adequate state of charge.Before disconnecting the battery
Wait 2 minutes after switching off the ignition
b efore disconnecting the battery.
Close the windows, the electric fabric roof and
the doors before disconnecting the battery.
After reconnecting the battery
After each time that the battery has been
reconnected, switch on the ignition and wait
1
minute before starting the engine, to allow
the electronic systems to initialise. However,
if minor problems persist after this procedure,
contact a
PEUGEOT dealer or a qualified
workshop.
Some functions, including Stop & Start,
are not available if the battery is not
sufficiently charged.
Charging the battery using
a battery charger
Never try to charge a frozen battery – risk
o f explosion!
If the battery has frozen, have it checked
by a
PEUGEOT dealer or by a qualified
workshop who will check that the internal
components have not been damaged and
that the container has not cracked, which
would mean a
risk of toxic and corrosive
acid leaking.
Towing the vehicle
Your vehicle can only be towed from the
front .
F
D
isconnect the battery from the vehicle.
F
F
ollow the instructions of use provided by
the manufacturer of the charger.
F
R
econnect the battery starting with the
positive terminal (+).
F
C
heck that the terminals and connectors
are clean. If they are covered with sulphate
(whitish or greenish deposit), remove and
clean them. F
T
ake the detachable towing ring kept in the
toolbox under the boot mat.
F
U
nclip the plastic cover by pressing on the
lower part.
F
S
crew the towing eye in fully.
F
I
nstall the towing arm.
F
W
ith a manual gearbox: move the gear lever
to neutral.
8
In the event of a breakdown
Page 126 of 180
124
Failure to follow this instruction may cause
damage to some components (braking,
transmission, etc.) and the absence of
braking assistance when the engine is
restarted.
F
U
nlock the steering and release the parking
brake.
F
S
witch on the hazard warning lamps on
both vehicles.
Never use the radiator crossmember.
When towing, the speed limiter must be
deactivated, as well as the "Active City
Brake" system if so equipped. General recommendations
Obser ve the legislation in force in the
country where you are driving.
Ensure that the weight of the towing
vehicle is higher than that of the towed
vehicle.
The driver must remain at the wheel of
the towed vehicle and must have a
valid
driving licence.
When towing a
vehicle with all four
wheels on the ground, always use an
approved towing arm; rope and straps are
prohibited.
The towing vehicle must move off gently.
When the vehicle is towed with its engine
off, there is no longer braking and steering
assistance.
In the following cases, you must always
call on a
professional recovery ser vice:
-
v
ehicle broken down on a motor way or
fast road,
-
w
hen it is not possible to put the
gearbox into neutral, unlock the
steering, or release the parking brake,
-
t
owing with only two wheels on the
ground,
-
w
here there is no approved towbar
available.
F
W
ith an ETG gearbox: move the selector to
position N .
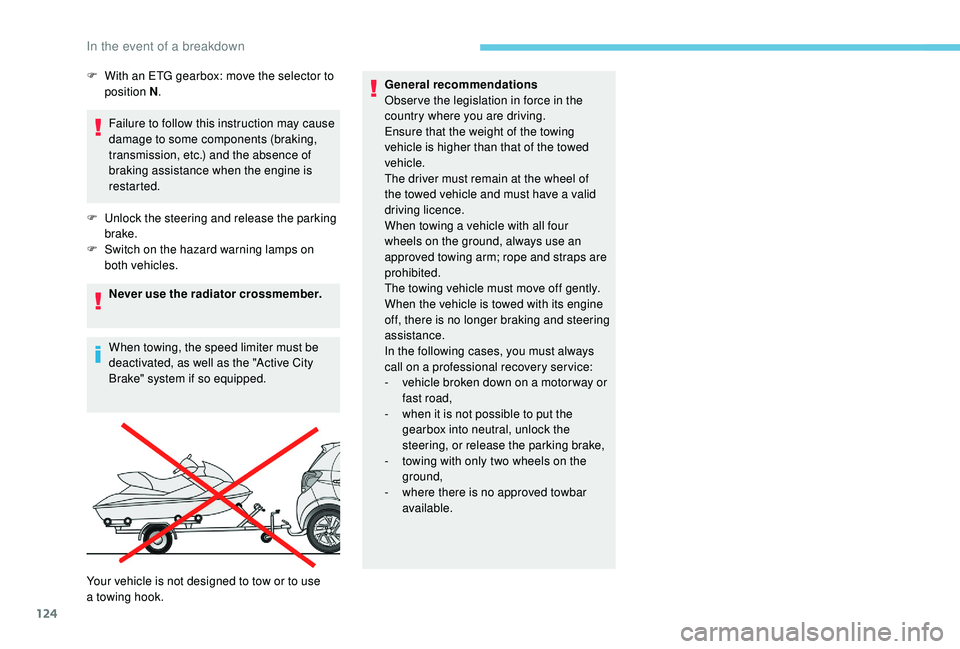
Your vehicle is not designed to tow or to use
a
towing hook.
In the event of a breakdown
Page 127 of 180
125
Engine specifications
The engine specifications are given in the
vehicle's registration document, as well as in
sales brochures.The maximum power corresponds to the
value type-approved on a
test bed, under
conditions defined in European legislation
(Directive 1999/99/EC).
For more information, contact a
PEUGEOT
dealer or a
qualified workshop.
Engines
Petrol engines VTi 72VTi 72 S&S
Gearboxes BVM (Manual
5-speed) ETG (Electronic
5-speed) BVM (Manual
5-speed)
Code 1KR1KR
Model codes:
P… SCFBD…B1A
…H1A …P1A
…W1A SCFBD …B1C
…H1C …P1C
…W1C SCFB4 …B1B
…H1B …P1B
…W1B
Cubic capacity (cm
3) 998 998998
EU standard max.
power (kW) 53
5353
Fuel Unleaded
…B1: 3-door version
…H1: 5-door version
…P1: 3-door convertible version
…W1: 5-door convertible version
The design of your vehicle does not permit
mounting of a
towbar.
9
Technical data
Page 166 of 180
18
Towards points of interest
(POI)
Points of interest (POI) are listed in different
categories.Press "N AV I".
Select " Navigation ".
Select " Go to".
Select " POI"
Choose the search option and select the POI in
the list of categories: "Nearby ", or
"Nearby town "
or "Nearby destination ",
or
Enter a name on the virtual keypad using the
option " Search by name ".
Press " OK" to confirm.To a point on the map
Press " N AV I".
Select " Navigation ".
Select " Go to".
Select " Choice on the map ".
Explore the map by sliding a
finger on the
screen.
Tap on the desired item to position the cursor. Press the button "
Go to" on the left-
hand side of the map.
Choose your route from the list offered.
Press "OK" to start the navigation.
Scroll through the list using the arrows and
select the desired address.
7-inch touch screen tablet