2018 PEUGEOT 108 gearbox
[x] Cancel search: gearboxPage 5 of 180

3
.
bit.ly/helpPSA
.
Starting/Switching off the engine with the
key 73
Starting/Switching off the engine with the
system
K
eyless Entry and Starting
7
3
Manual parking brake
7
6
5-speed manual gearbox
7
6
ETG gearbox
7
6
Gear shift indicator
7
9
Hill start assist
8
0
Stop & Start
8
1
Speed Limit recognition and
recommendation
82
Speed limiter
8
4
Active City Brake
8
6
Lane departure warning system
9
0
Reversing camera
9
1
Under-inflation detection
9
2
Fuel tank
9
6
Compatibility of fuels
9
7
Snow chains
9
7
Energy economy mode
9
8
Fitting roof bars
9
8
Bonnet
98
Engine compartment
9
9
Checking levels
9
9
Checks
10
2Temporary puncture repair kit 1
04
Spare wheel
1
07
Changing a
bulb
1
11
Changing a
fuse
1
14
12
V battery
1
21
Towing the vehicle
1
23
Engine specifications
1
25
Engines
1
25
Dimensions
126
Identification markings
1
27
Driving
Practical information In the event of a
breakdown
Technical data Alphabetical index
Audio equipment and telematics
Radio
7-inch touch screen tablet
Access to additional videos
.
Contents
Page 6 of 180

4
Instruments and controls1
Door mirrors
Electric windows
Central locking
2
Bonnet release
3
Dashboard fuses
4
Instrument panel
Rev counter
Central display
Warning and indicator lamps
Indicators
Trip computer
5
Courtesy lamp
Fabric electric roof opening control
Speed Limit recognition and
recommendation
Active City Brake
Rear view mirror
Sun visor
6
Touch screen
Radio
Setting the time
7
Heating, ventilation
Manual air conditioning
Automatic air conditioning
Front demist/defrost
Rear screen demisting/defrosting
8
12 V accessory socket
USB port
Auxiliary Jack socket
9
Manual gearbox
ETG gearbox
Gear efficiency indicator
Hill start assist
10
Manual parking brake
11
Front passenger airbag
12
Side vents
13
Glove box
Deactivating the front passenger airbag
Reinitialisation of the under-inflation
detection system
Over view
Page 7 of 180

5
Instruments and controls (continued)1
Lighting controls
Direction indicators
2
Stop & Start
Active City Brake
Electric mirrors adjustment
Headlamp adjustment
Deactivating the DSC/TRC systems.
Front foglamps (accessory)
3
Opening the fuel filler flap
4
ETG gearbox steering mounted control
paddles
5
Steering wheel height adjustment
Horn
Driver front airbag
6
Steering mounted controls
-
T
ouch screen, Radio
-
L
ane Departure Warning System
7
Speed limiter
8
Wiper control stalk
9
Ignition, starting/switching off (key)
Ignition, starting/switching off ("Keyless
Entry and Starting" system)
10
Hazard warning lamps
.
Over view
Page 8 of 180

6
Eco- driving
Optimise the use of your
gearbox
With a manual gearbox, move off gently
an d change up without waiting. During
acceleration change up early.
With an ETG gearbox, give preference to
automatic mode (Easy) and avoid pressing the
accelerator pedal heavily or suddenly.
Drive smoothly
Maintain a safe distance between vehicles,
u se engine braking rather than the
brake pedal, and press the accelerator
progressively. These practices contribute
towards a
reduction in fuel consumption and
CO
2 emissions and also help reduce the
b
ackground traffic noise.
Control the use of your electrical
equipment
Before moving off, if the passenger
compartment is too warm, ventilate it by
opening the windows and air vents before
using the air conditioning.
Above 30
mph (50 km/h), close the windows
and leave the air vents open.
Consider using equipment that can help
keep the temperature in the passenger
compartment down (sunroof and window
b l i n d s …) .
Unless it has automatic regulation, switch off
the air conditioning as soon as the desired
temperature has been reached.
Switch off the demisting and defrosting
controls, if not automatic.
Switch off the heated seat as soon as
possible. Switch off the headlamps and front foglamps
when the ambient light level does not require
their use.
Avoid running the engine before moving off,
particularly in winter; your vehicle will warm up
much faster while driving.
As a
passenger, if you avoid connecting your
multimedia devices (film, music, video game,
etc.), you will contribute towards limiting the
consumption of electrical energy, and so of
fuel.
Disconnect your portable devices before
leaving the vehicle.
Eco-driving is a
range of everyday practices
that allow the motorist to optimise their fuel
consumption and CO
2 emissions.
T
he gear shift indicator invites you to engage
the most suitable gear: as soon as the
indication is displayed in the instrument panel,
follow it straight away.
For vehicles fitted with an ETG gearbox, this
indicator only appears in manual mode.
Eco-driving
Page 10 of 180

8
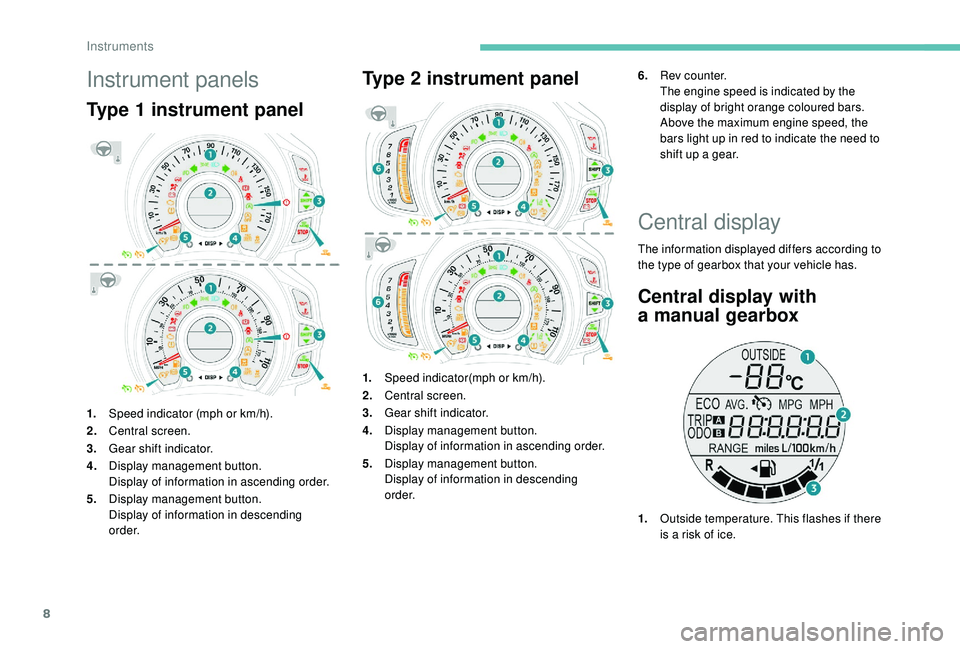
Instrument panels
Type 1 instrument panel
1.Speed indicator (mph or km/h).
2. Central screen.
3. Gear shift indicator.
4. Display management button.
Display of information in ascending order.
5. Display management button.
Display of information in descending
o r d e r.
Type 2 instrument panel
1.Speed indicator(mph or km/h).
2. Central screen.
3. Gear shift indicator.
4. Display management button.
Display of information in ascending order.
5. Display management button.
Display of information in descending
o r d e r. 6.
Rev counter.
The engine speed is indicated by the
display of bright orange coloured bars.
Above the maximum engine speed, the
bars light up in red to indicate the need to
shift up a gear.
Central display
The information displayed differs according to
the type of gearbox that your vehicle has.
Central display with
a
manual gearbox
1. Outside temperature. This flashes if there
is a
risk of ice.
Instruments
Page 11 of 180

9
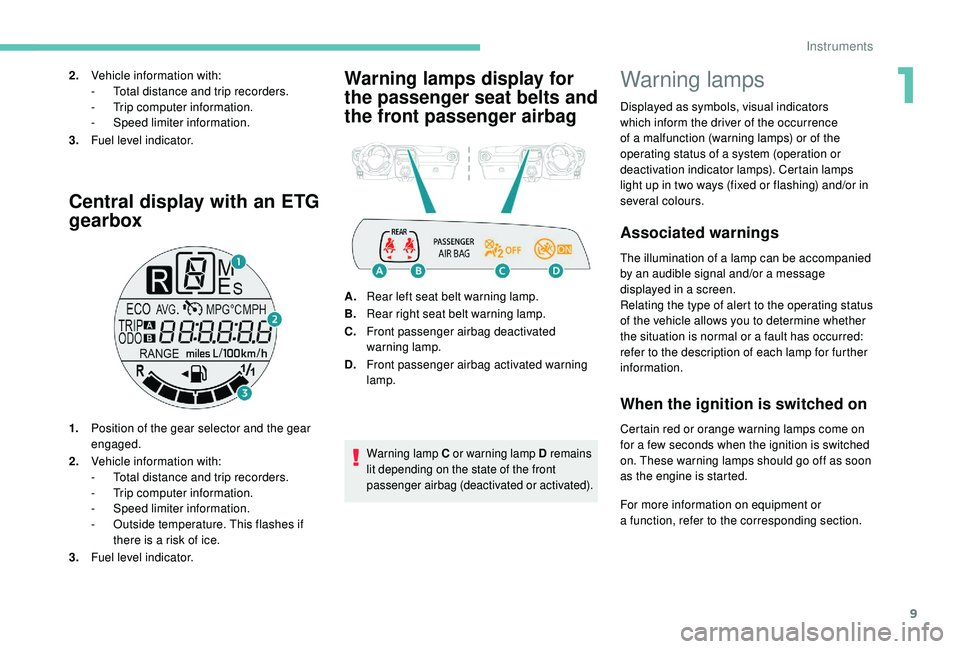
Central display with an ETG
gearbox
1.Position of the gear selector and the gear
engaged.
2. Vehicle information with:
-
T
otal distance and trip recorders.
-
T
rip computer information.
-
S
peed limiter information.
-
O
utside temperature. This flashes if
there is a
risk of ice.
3. Fuel level indicator.
Warning lamps display for
the passenger seat belts and
the front passenger airbag2.Vehicle information with:
-
T otal distance and trip recorders.
-
T
rip computer information.
-
S
peed limiter information.
3. Fuel level indicator.
A.Rear left seat belt warning lamp.
B. Rear right seat belt warning lamp.
C. Front passenger airbag deactivated
warning lamp.
D. Front passenger airbag activated warning
lamp.
Warning lamp C or warning lamp D remains
lit depending on the state of the front
passenger airbag (deactivated or activated).
Warning lamps
Displayed as symbols, visual indicators
which inform the driver of the occurrence
of a
malfunction (warning lamps) or of the
operating status of a
system (operation or
deactivation indicator lamps). Certain lamps
light up in two ways (fixed or flashing) and/or in
several colours.
Associated warnings
The illumination of a lamp can be accompanied
b y an audible signal and/or a message
displayed in a
screen.
Relating the type of alert to the operating status
of the vehicle allows you to determine whether
the situation is normal or a
fault has occurred:
refer to the description of each lamp for further
information.
When the ignition is switched on
Certain red or orange warning lamps come on
for a few seconds when the ignition is switched
on. These warning lamps should go off as soon
as the engine is started.
For more information on equipment or
a
function, refer to the corresponding section.
1
Instruments
Page 14 of 180

12
Warning/indicator lampStateCause Actions/Observations
Front seat belts Flashing,
accompanied by an
audible signal. The driver has not fastened or has
unfastened his/her seat belt.
The front passenger has unfastened
his/her seat belt.
Airbags Fixed. One of the airbags or seat belt
pretensioners is faulty. Carry out (3).
ETG gearbox Fixed. The ETG gearbox has a
fault. Quickly carry out (3).
Clutch Flashing,
accompanied by an
audible signal. The temperature of the clutch is too
high.
Carry out (1), place the selector of the ETG
gearbox in position N and wait 15
minutes until the
temperature of the clutch has dropped.
Power steering Flashing or fixed,
accompanied by an
audible signal. The power steering has a
fault. Drive carefully at moderate speed, then carry out (3).
Battery charge Fixed. The battery charging circuit has
a
fault (dirty terminals, slack or cut
alternator belt, etc.). Clean and retighten the lugs. If the warning
lamp does not go off when the engine is started,
carry out (2).
Door(s) open/
Boot open Fixed, accompanied
by an audible signal. A door or the boot is still open.
Close the access concerned.
Instruments
Page 46 of 180

44
When fitting the mat for the first time, on the
driver's side use only the fixings provided in the
wallet attached.
The other mats are simply placed on the
carpet.
RemovingRefitting
To refit the mat on the driver's side:
F
p osition the mat correctly,
F
p
ut on the fixings again by pressing,
F
c
heck that the mat is secured correctly.
To avoid any risk of jamming of the pedals:
-
o
nly use mats which are suited to the
fixings already present in the vehicle;
these fixings must be used,
-
n
ever place one mat on top of another.
The use of mats not approved by
PEUGEOT may inter fere with access to
the pedals and hinder the operation of the
speed limiter or the ETG gearbox.
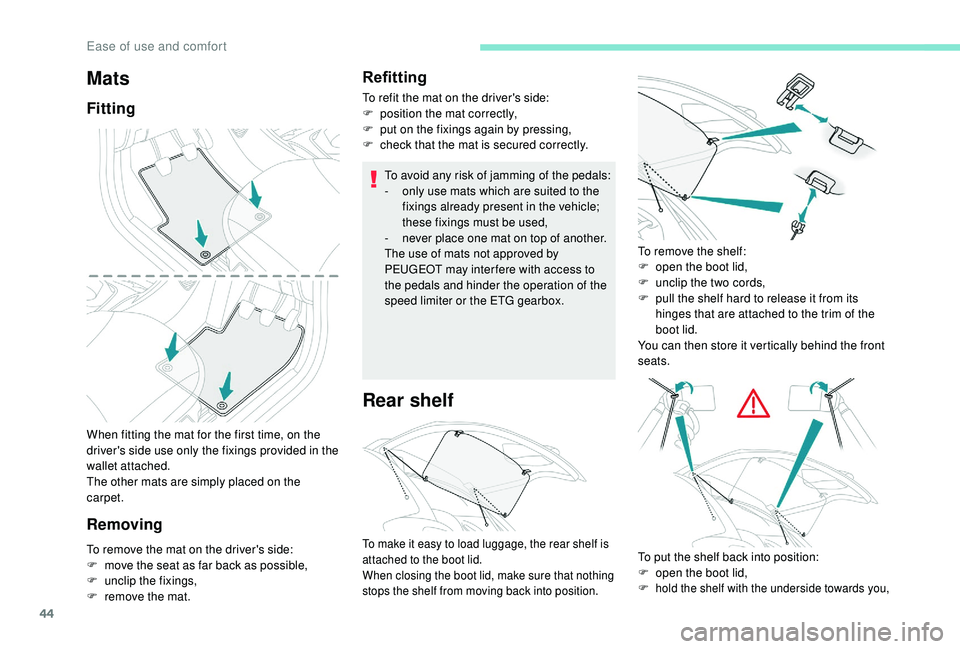
Rear shelf
Mats
Fitting
To remove the mat on the driver's side:
F
m ove the seat as far back as possible,
F
un
clip the fixings,
F
r
emove the mat. To remove the shelf:
F
o
pen the boot lid,
F
u
nclip the two cords,
F
p
ull the shelf hard to release it from its
hinges that are attached to the trim of the
boot lid.
You can then store it vertically behind the front
seats.To make it easy to load luggage, the rear shelf is
attached to the boot lid.
When closing the boot lid, make sure that nothing
stops the shelf from moving back into position.To put the shelf back into position:
F o pen the boot lid,
F
hold the shelf with the underside towards you,
Ease of use and comfort