2018 PEUGEOT 108 steering
[x] Cancel search: steeringPage 79 of 180
77
M.Manual mode with sequential changing of
the gears: move the selector backwards
and then to the left to select this mode.
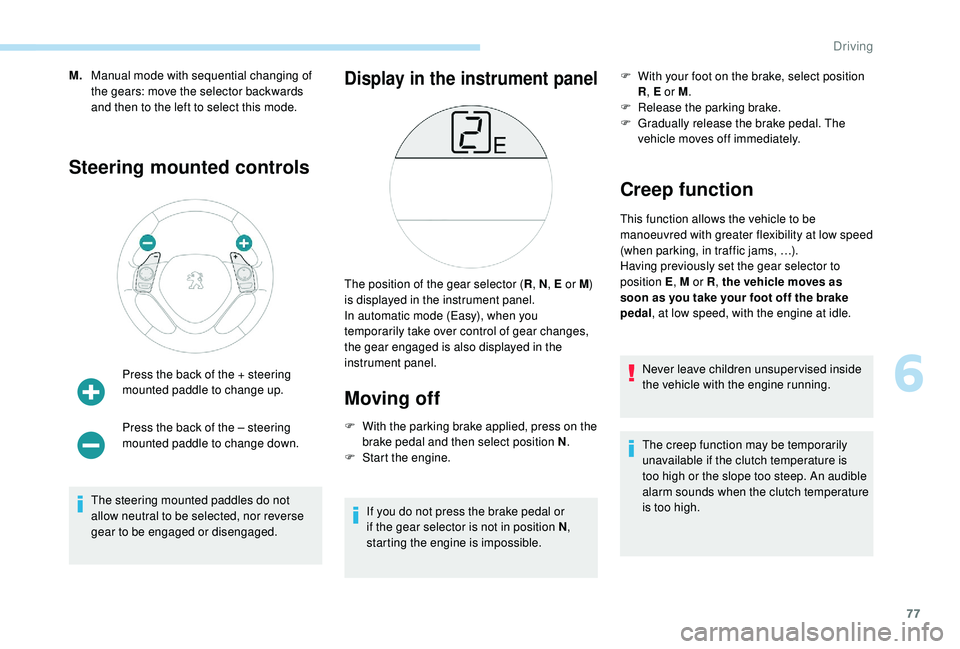
Steering mounted controls
Press the back of the + steering
mounted paddle to change up.
Press the back of the – steering
mounted paddle to change down.
The steering mounted paddles do not
allow neutral to be selected, nor reverse
gear to be engaged or disengaged.
Display in the instrument panel
Moving off
F With the parking brake applied, press on the brake pedal and then select position N .
F
S
tart the engine.
If you do not press the brake pedal or
if the gear selector is not in position N ,
starting the engine is impossible. F
W
ith your foot on the brake, select position
R , E or M .
F
R
elease the parking brake.
F
G
radually release the brake pedal. The
vehicle moves off immediately.
Creep function
This function allows the vehicle to be
manoeuvred with greater flexibility at low speed
(when parking, in traffic jams, …).
Having previously set the gear selector to
position E , M or R, the vehicle moves as
soon as you take your foot off the brake
pedal , at low speed, with the engine at idle.
Never leave children unsuper vised inside
the vehicle with the engine running.
The creep function may be temporarily
unavailable if the clutch temperature is
too high or the slope too steep. An audible
alarm sounds when the clutch temperature
is too high.
The position of the gear selector (
R, N , E or M)
is displayed in the instrument panel.
In automatic mode (Easy), when you
temporarily take over control of gear changes,
the gear engaged is also displayed in the
instrument panel.
6
Driving
Page 80 of 180
78
F Select position E with the gear selector.
The gearbox then operates in auto-adaptive
mode, without any action needed from the
driver.
It continuously selects the gear best adapted to
the following parameters:
-
f
uel consumption optimisation,
-
s
tyle of driving,
-
r
oad conditions,
-
v
ehicle load.
To obtain the best acceleration, for instance
when overtaking another vehicle, press hard on
the accelerator pedal and go through the point
of resistance.
At any time, you can change the mode by
moving the gear selector from position E to
position M and vice versa.
Never select neutral (position N ) when the
vehicle is moving.
Temporary control of gear
changing
You can temporarily take control of gear
changes using the steering mounted control
paddles + and -.
Manual mode
During braking or deceleration, the gearbox
changes down automatically to be in the
correct gear for the vehicle to accelerate again.
Under strong acceleration, the gearbox will not
change up without action by the driver at the
gear selector or the controls under the steering
wheel (unless the engine speed is close to its
maximum speed).Automatic mode (EASY)The gear change requests are acted upon only
if the engine speed allows. If they are rejected,
an audible signal sounds.
The gear engaged is displayed in the
instrument panel.
This function allows you to anticipate certain
situations, such as overtaking another vehicle
or approaching a
bend in the road.
After a
few moments with no action on the
control paddles, the gearbox returns to
automatic operation.
F
M
ove the gear selector to position M .
F
C
hange gears using:
-
t
he gear selector, by moving it:
-
b
ackwards, + to change up a gear,
-
f
or wards, - to change down a gear,
-
o
r the steering mounted control paddles +
or -.
The gear engaged is displayed.
The gear change requests are acted upon only
if the engine speed allows.
It is not necessary to release the accelerator
when changing gear. If a
change is rejected, an
audible signal sounds. You can change mode at any time by moving
the gear selector from position M to position E
and vice versa.
Never select neutral (position N ) when the
vehicle is moving.
Reverse gear
To engage reverse gear, the vehicle must be
stationary with your foot on the brake pedal.
F
Sel
ect position R .
An audible signal indicates that reverse gear
has been engaged.
Stopping the vehicle
The vehicle can be stopped regardless of the
position of the gear selector ( N, E or R ).
However, if the driver's door is opened when
the gear selector is not in position N , an audible
signal will sound.
Driving
Page 83 of 180
81
Operation
Going into engine STOP mode
This indicator lamp comes on in the
instrument panel and the engine
goes into standby automatically:
-
w
hen the vehicle is stationary, you put the
gearbox into neutral and release the clutch
pedal.
Stop & Starttime counters
A partial time counter counts the periods in
STOP mode during a journey. For your convenience during parking
manoeuvres, STOP mode is not available
for a
few seconds after coming out of
reverse gear.
Stop & Start does not change features
of the vehicle such as braking, power
steering…
Never refuel with the engine in STOP
mode; you must switch off the ignition.
Special cases: STOP mode not
available
Stop & Start
The Stop & Start system puts the engine
temporarily into standby – STOP mode – during
traffic stops (red lights, traffic jams, etc.). The
engine restarts automatically – START mode
– as soon as you want to move off. Restarting
occurs instantly, quickly and silently.
Per fect for urban use, the Stop & Start system
reduces fuel consumption and exhaust
emissions as well as the noise level when
stationary. -
t
he engine is needed to maintain
a comfortable temperature in the passenger
compartment,
-
d
emisting is active,
-
s
ome special conditions (battery charge,
engine temperature, braking assistance,
vehicle stopped on a
steep slope, high
altitude…) where the engine is needed to
assure control of a
system.
Going into engine START mode
This indicator lamp goes off and the
engine restarts automatically:
-
w
hen you fully depress the clutch pedal.
Special case: START invoked
automatically
START mode is invoked automatically if:
- y
ou open the driver's door,
-
y
ou open the bonnet,
-
y
ou unfasten the driver's seat belt,
-
s
ome temporary conditions apply (battery
charge, engine temperature, braking
assistance, vehicle on a
steep slope,
adjustment of the air conditioning, …) where
it is necessary for control of a
system or of
the vehicle.
It is displayed in the trip computer as soon as
the Stop & Start acts.
Press one of the "
DISP" buttons to return to the
previous display.
A global time counter counts the periods in
STOP mode since the last reset to zero.
When it is displayed, press for more than two
seconds on one of the " DISP" buttons to reset
to zero.
STOP mode does not activate, mainly when:
-
t
he driver's door is open,
-
t
he driver's seat belt is not fastened,
6
Driving
Page 86 of 180

84
- when towing,
- d riving with a space-saver type spare wheel
or snow chains fitted,
-
p
uncture repair using the temporary repair
kit,
-
y
oung drivers, etc.
The following situations may inter fere with the
operation of the system or prevent it working:
-
p
oor visibility (inadequate street lighting,
falling snow, rain, fog),
-
w
indscreen area located in front of the
camera: dirty, misted, frost-covered, snow-
covered, damaged or covered by a
sticker,
-
f
ault with the camera,
-
h
idden road signs (other vehicles,
vegetation, snow),
-
s
peed limit signs that do not conform to the
standard, are damaged or distorted.
If an app on your smart phone is used
via Mirror Screen, the sign displayed by
the system may be temporarily hidden. It
will be redisplayed as soon as you pass
another sign.Speed limiter
System which prevents the
vehicle from exceeding the speed
programmed by the driver.
The limiter is switched on manually: this
can be done regardless of the vehicle speed.
However, if you are travelling at less than
18
mph (30 km/h), the programmed speed will
be set at 18
mph (30 km/h).
The speed limiter is paused using the control.
The programmed speed can be exceeded
temporarily by pressing the accelerator firmly
beyond the point of resistance.
To return to the programmed speed, simply
release the accelerator pedal until the set limit
speed has been reached again.
The programmed speed is erased when
the ignition is switched off.
The limiter cannot, under any
circumstances, replace respect for speed
limits, nor the vigilance of the driver.
Steering mounted control
The controls for this system are grouped
together on this steering mounted control.
1.Activation/deactivation of the limiter: by
pressing on the end of the control.
2. Programming the speed/decreasing the
value: by pressing the control downwards.
3. Resuming speed limitation/increasing the
value: by pressing the control upwards.
4. Pause limitation: by pulling the control
towards you.
Driving
Page 90 of 180
88
Setting the thresholds for
triggering the alertDeactivation/reactivation
Press this button for more than 3 seconds.
T his warning lamp comes on in the
instrument panel and the message
"PCS OFF" is displayed. Press this button again to reactivate the
system.
This indicator lamp lights up on the
instrument panel.
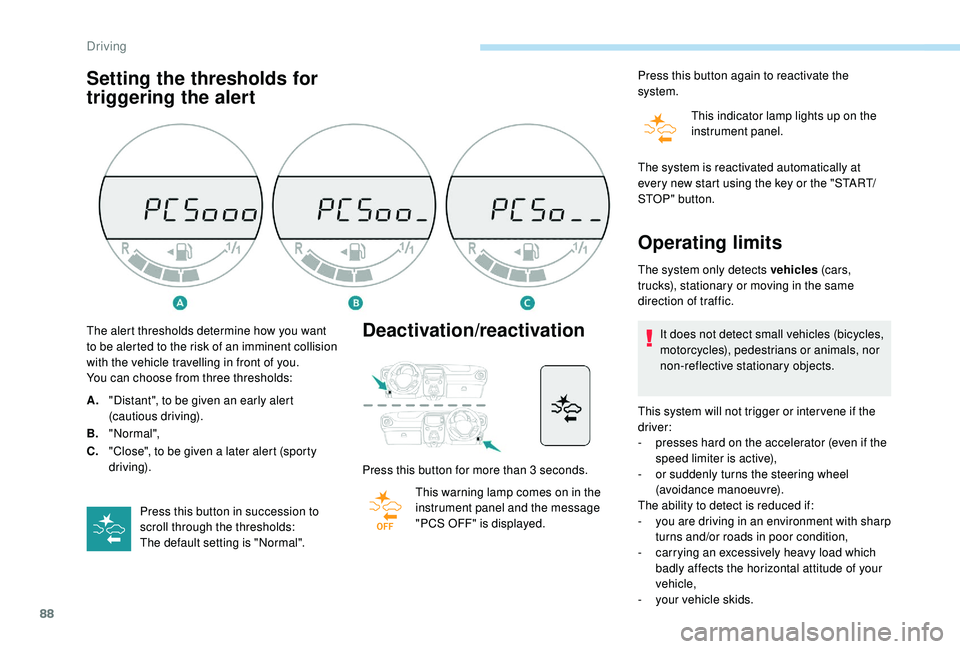
The alert thresholds determine how you want
to be alerted to the risk of an imminent collision
with the vehicle travelling in front of you.
You can choose from three thresholds:
A. "Distant", to be given an early alert
(cautious driving).
B. "Normal",
C. "Close", to be given a
later alert (sporty
driving).
Press this button in succession to
scroll through the thresholds:
The default setting is "Normal". The system is reactivated automatically at
every new start using the key or the "START/
STOP " button.
Operating limits
The system only detects vehicles
(c ar s,
trucks), stationary or moving in the same
direction of traffic.
It does not detect small vehicles (bicycles,
motorcycles), pedestrians or animals, nor
non-reflective stationary objects.
This system will not trigger or inter vene if the
driver:
-
p
resses hard on the accelerator (even if the
speed limiter is active),
-
o
r suddenly turns the steering wheel
(avoidance manoeuvre).
The ability to detect is reduced if:
-
y
ou are driving in an environment with sharp
turns and/or roads in poor condition,
-
c
arrying an excessively heavy load which
badly affects the horizontal attitude of your
vehicle,
-
y
our vehicle skids.
Driving
Page 92 of 180

90
Lane departure warning
system
System that detects involuntary crossing of
longitudinal markings of roads, using a camera
that recognises the continuous or broken lines.
To increase your safety, the camera analyses
the image then triggers a
warning if the driver's
attention drops and the vehicle drifts over
a
lane marking (speed greater than 30 mph
(50
km/h)).
This system is particularly suited to motor ways
and dual carriageways.
The lane departure warning system
cannot under any circumstances replace
the need for vigilance on the part of the
driver.
You must obser ve the driving regulations
and take a
break every two hours.
When driving with snow chains or with the
spare wheel fitted, you must deactivate
the system.
Activation
Detection
You are alerted by an audible signal and the
lighting of a warning lamp in the instrument panel.
No warning is given while the direction indicator
is flashing and for approximately 20 seconds
after the direction indicator is switched off.
Displays in the instrument panel
Display in the
instrument panelComments
The function is activated
(green indicator lamp).
The system has detected
the markings on the road
(green indicator lamp).
The system alerts you to
crossing a
line (green and
orange indicator lamp).
The display of this
indicator lamp is
accompanied by an
audible signal.
Deactivation
F Press this button, located on the steering wheel.
F
P
ress this button again.
The system state remains in memory when the
ignition is switched off.
Driving
Page 94 of 180

92
Under-inflation detection
The system monitors the pressure in all four
tyres, once the vehicle is moving.
It compares the information given by the
wheel speed sensors with reference values,
which must be reinitialised after ever y tyre
pressure adjustment or wheel change.
The system triggers an alert as soon as it
detects a
drop in the pressure of one or more
tyres. The tyre under-inflation detection system
does not replace the need for vigilance on
the part of the driver.
This system still requires you to check the
tyre inflation pressure (including the spare
wheel) every month as well as before
a
long journey.
Driving with under-inflated tyres impairs
handling, extends braking distances and
causes early tyre wear, particularly in
adverse conditions (heavy loads, high
speeds, long journeys).
Driving with under-inflated tyres
increases fuel consumption. The tyre pressure specifications for your
vehicle can be found on the tyre pressure
label.
For more information on the
Identification markings
, refer to the
corresponding section.
Tyre pressures should be checked when
the tyres are "cold" (vehicle stopped for
1 hour or after a journey of less than
6 miles (10 km) at moderate speeds).
Other wise (when hot), add 0.3 bar to the
pressures shown on the label.Under-inflation alert
This is shown by the warning lamp
coming on, fixed, accompanied by
an audible signal.
F
R
educe speed immediately, avoid excessive
steering movements and sudden braking.
F
S
top as soon as it is safe to do so.
This system automatically monitors the tyre
pressure while driving.
Detection of loss of pressure does not
always bring about a visible deformation
of the tyre. Do not make do with just
a
visual check.
Driving
Page 105 of 180
103
Brake pads
Brake wear depends on the style
of driving, particularly in the case
of vehicles used in town, over short
distances. It may be necessary to
have the condition of the brakes
checked, even between vehicle
services.
Unless there is a
leak in the circuit, a drop in
the brake fluid level indicates that the brake
pads are worn.
Brake disc/drum wear
For information on checking
brake disc/drum wear, contact
a
PEUGEOT dealer or a qualified
workshop.
Parking brake
If excessive travel or a loss of
e ffectiveness of this system is
noticed, the parking brake must
be checked, even between two
services.
This system must be checked by a
PEUGEOT
dealer or a
qualified workshop.
Wheels and tyres
The pressure must be checked on
all tyres, including the spare wheel,
when the tyres are "cold", at least
once a month and before a long
j o u r n ey. Driving with worn or damaged tyres reduces
braking efficiency and control of the vehicle's
steering. Regular inspections of the condition
of tyres (tread and sides) and rims are
recommended as well as making sure that
valves are fitted.
Using different size wheels and tyres from
those specified can affect the lifetime of tyres,
wheel rotation, ground clearance and the
speedometer reading and have an adverse
effect on road holding.
Fitting different tyres on the front and rear axles
can cause the ESC to mistime.
Only use products recommended by
PEUGEOT or products of equivalent
quality and specification.
In order to optimise the operation of
components as important as those in the
braking system, PEUGEOT selects and
offers very specific products.
After washing the vehicle, dampness, or
in wintry conditions, ice can form on the
brake discs and pads: braking efficiency
may be reduced. Make light brake
applications to dry and defrost the brakes.
ETG gearbox
The ETG gearbox does not require
any maintenance (no oil change).
The pressures given on the tyre pressure label
are valid for "cold" tyres. If you have driven for
more than 10
minutes or more than 6 miles
(10
kilometres) at more than 31 mph (50 km/h),
0.3
bar (30 kPa) should be added to the values
given on the label.
Under-inflation increases fuel consumption.
Non-compliant tyre pressure causes premature
wear on tyres and has an adverse effect on the
vehicle's road holding – Risk of an accident!
7
Practical information