Page 49 of 155

Navigation49If there is more than one destination
possible according to the information
entered, a list of all matching
destinations found is displayed.
Select the desired address.
The destination details view is
displayed.
To start route guidance, select Go.
Crossroad entry screen
Select CROSSROADS . The
Crossroads Entry screen is
displayed.
Touch one of the entry fields next to
the address part entries. A keyboard
is displayed.
For a detailed description on the
keyboards 3 15.
Enter the required destination
information.
To confirm your input, select 9 in the
top right corner of the screen.
If there is more than one destination
possible according to the information
entered, a list of all matching
destinations found is displayed.
Select the desired address.
The destination details view is
displayed.
To start route guidance, select Go.
POIs entry
A point of interest (POI) is a specific
location that might be of general interest, e.g. a petrol station, a
parking area or a restaurant.
The data stored within the navigation
system contains a great number of
predefined POIs, which are indicated
on the map (if activated, 3 41).
You may also store individual POIs
within the system, see "Creating and downloading user defined POIs" inchapter "Usage" 3 41. Those POIs
are selectable as destinations via the
POI main category My POIs.
To select a POI as a destination for
route guidance, select
DESTINATION in the interaction
selector bar and then select POIs. A
list for search area selection is
displayed.
Setting a search location
Select one of the options.
Note
The options POIs along Route and
POIs near Destination are only
available when route guidance is active.
Page 50 of 155

50NavigationIf POIs at Another Location is
selected, a keyboard is displayed.
For a detailed description on the
keyboards 3 15.
Enter the desired location and
confirm your entry.
A list of POI categories is displayed.
Searching POIs via categories
Select one of the main categories in
the list. A list with subcategories is
displayed.
To display all POIs available in the
respective main category, select List
All . Scroll through the list and select
the desired POI.
To display all POIs within one
subcategory, select the respective
subcategory. Scroll through the list
and select the desired POI.
The destination details view is
displayed.
For more information on the POI
selected, touch Info in the top right
corner of the screen.
To start route guidance, select Go.Searching POIs via name input
To search for a particular POI, a
category or a specific location, select
Spell Name in the POI main
categories list or in one of the
subcategory lists. A keyboard is
displayed.
For a detailed description on the keyboards 3 15.
Enter the desired name or category.
Select 9 to confirm your input. The
destination details view is displayed.
For more information on the POI
selected, touch Info in the top right
corner of the screen.
To start route guidance, select Go.
Recent destinations list Select RECENT .
A list of all recently entered
destinations is displayed.
Select one of the entries. The
destination details view is displayed.
To start route guidance, select Go.
Contacts list Select CONTACTS . The contacts list
is displayed.
Page 51 of 155

Navigation51
Quick function icon
If there is only one address stored for a contact, a quick route icon is
displayed next to the respective entry
in the contacts list.
Select 1 to directly display the
destination details view.
To start route guidance, select Go.
Contact details view
If there is more than one address
stored for a contact, select the
desired contacts entry. The contact
details view is displayed.
Select one of the addresses stored for
the contact. The destination details
view is displayed.
To start route guidance, select Go.
Selecting an address from the
map
Tap on the desired location on themap. The map centres around this
location.
A red v is displayed at the respective
location and the corresponding
address is shown on a label.
Tap on the label. The destination
details view is displayed.
To start route guidance, select Go.
Waypoint trips
A waypoint is an intermediate
destination that is considered in the
calculation of a route to its final
destination. To create a waypoint trip,
you may add one or several
waypoints.
Enter or select the final destination of your waypoint trip and start route
guidance.
While under active route guidance,
select DESTINATION in the
interaction selector bar of the map
view.
Page 52 of 155
52NavigationAlternatively, touch the arrow symbol
indicating your next turning
manoeuvre on the right side of the
screen to display the route guidance
menu. Select DESTINATION in the
interaction selector bar of the route
guidance menu.
Enter or select a new address.
Select Go. You are prompted with a
message.
Select Add as Waypoint . The route is
recalculated and the new destination
is added as a waypoint to the current
route.
If desired, enter further waypoints as
described above.To save the entire route with
waypoints, select Save.
The waypoint trip is saved in the
contacts list in the Saved Trips folder
and designated according to its final
destination.
The saved waypoint trip can be
recalled via the contacts list.
For a detailed description on how to
edit a waypoint trip 3 53.
Page 53 of 155

Navigation53New destinationTo set a new destination, you may
cancel route guidance to the current
destination and then enter a new
destination. Or you may directly enter
a new destination.
While under active route guidance,
select DESTINATION in the
interaction selector bar of the map
view.
Alternatively, touch the arrow symbol
indicating your next turning
manoeuvre on the right side of the
screen to display the route guidance
menu. Select DESTINATION in the
interaction selector bar of the route
guidance menu.
Enter or select a new address.
Select Go. You are prompted with a
message.
Select Set New Destination . The
route is recalculated and the new
destination is set.
Calling a destination
After entering a destination and
before starting route guidance, the
destination details view is displayed.To initiate a phone call to the selected location, select Call.
Note
The Call screen button is only
available if a phone number is stored
for the respective location.
Storing destinations
Contacts entry
After entering a destination and
before starting route guidance, the
destination details view is displayed.
To save the respective destination in
the contacts list, select Save. For a
detailed description on how to save
an address in the contacts list 3 20.
Note
The Save screen button is only
available if the address has not yet been stored in the system.
Favourite
Favourites may be stored from almost
all screen views.
For a detailed description on how to store destination favourites 3 16.Guidance
Route guidance is provided by the
navigation system through visual
instructions and voice prompts (voice guidance).Visual instructions
Visual instructions are provided on
the displays.Navigation voice prompts
Navigation voice prompts announce
which direction to follow, when
approaching an intersection at which
you need to turn.
To activate the voice prompts
function and set the volume, see
"Navigation voice settings" below.
Page 54 of 155

54NavigationStarting and cancelling route
guidance
Starting route guidance
To start route guidance to a new
destination chosen, select Go in the
destination details view.
To directly start route guidance to the last destination chosen, select
MENU in the interaction selector bar
and then select Resume to.
Route guidance to the last destination selected is restarted.
Cancelling route guidance
To cancel route guidance, you may
optionally:
● Touch x on the navigation map
screen.
● Select MENU in the interaction
selector bar and then select
Cancel Route .
● Touch the arrow symbol indicating your next turning
manoeuvre on the right side of
the screen to display the route
guidance menu (see "Route
guidance menu" below).Select END in the interaction
selector bar.
Navigation voice settings
Mute
To temporarily mute the output of
navigation voice prompts, select y on
the left side of the map screen. The
icon changes to z.
To unmute the system, select z
again.
Voice prompts
Select MENU in the interaction
selector bar and then select Navigation Voice Preferences to
display the respective submenu.
If Voice Prompts - On is set,
navigation voice prompts are read out
by the system during active route guidance.
Set Voice Prompts - On or Voice
Prompts - Off .
If set to Off, no navigation voice
prompts are provided by the system.Voice prompts during phone calls
Select MENU in the interaction
selector bar and then select Navigation Voice Preferences to
display the respective submenu.
Select Prompts During Phone Calls .
If On is selected, navigation voice
prompts are also read out during
phone calls.
If Off is selected, no voice prompts
are given out. If Beeps is selected, a
beep sounds instead of the
announcement.
Volume
To adjust the volume of the voice
prompts, select ─ or w.
Information on traffic incidents Traffic list
To display a list of traffic incidents
close to the current location of the vehicle, press ; and select
TRAFFIC .
Page 55 of 155

Navigation55Alternatively, select MENU in the
interaction selector bar and then select Traffic to display the respective
submenu. Select Show Nearby
Traffic Incidents .
If route guidance is not active, the list is displayed as follows:
If route guidance is active, two
additional screen button are
displayed: All for a list displaying all
traffic incidents and Along Route for a
list displaying only those traffic
incidents regarding your current
route.
By default, the list is sorted by
distance from the vehicle location. To sort the list alphabetically, select
Sort in the top line of the screen.
Touch one of the list elements to
display detailed information on the
respective traffic incident.
Note
If the traffic list has been entered via
the TRAFFIC screen button on the
Home screen, touch w in the top left
corner of the screen to enter the menu for traffic settings.
Traffic icons on the map
If Show Icons on Map - On is set traffic
incident icons around the current
location and along the route are
displayed on the map.
Set Show Icons on Map - On or Show
Icons on Map - Off .
Traffic routing
This submenu contains settings of
how the system may deal with traffic
incidents before and during route
guidance.
Select Traffic Routing Preferences to
display the respective submenu.If you wish slow traffic to be generally
avoided, set Avoid Slow Traffic to On .
Select Automatically Avoid Traffic or
Ask Me before Avoiding .
Types of traffic incidents
Select Traffic Types to display the
respective submenu.
Select the types of traffic incidents to be avoided.
TMC stations
The TMC radio stations supply
information on the current traffic
situation considered in the calculation
of the route.
Note
Depending on the country you are in, the TMC service is enhanced by a
PayTMC functionality integrated in
the Infotainment system.
Select TMC Station to display the
respective submenu.
The default setting is Auto consulting
different TMC stations.
If you wish a specific TMC station to
be observed, select the respective
station from the list.
Page 56 of 155

56NavigationIf this station is no longer received,
the system switches back to the
Auto function.
Route settings
Select MENU in the interaction
selector bar and then select Routing
Preferences to display the respective
submenu.
Route style
To define by what criteria a route may
be calculated, select Route Style.
Select Fast, Eco Friendly or Short
from the list.
If Eco Friendly has been selected, the
eco-friendly route style may be
adapted to the load of the vehicle.
Select Edit Eco Profile to display the
respective submenu.
Repeatedly select Roof Load and
Trailer to toggle between the
available load options. Set the
options as needed.
Road selection
Select from the list which road types
may be included in the calculation of
the route.Route modification
To modify the route during active
route guidance, touch the arrow
symbol indicating your next turning
manoeuvre on the right side of the
screen.
The route guidance menu is
displayed.
Note
The route guidance menu may only
be displayed if route guidance is
active.
The route guidance menu provides
additional options to change route
settings during active route guidance.
Displaying the turn list
The turn list displays all streets on the
calculated route, starting from the
current location.
Select TURN LIST in the interaction
selector bar of the route guidance
menu. The turn list is displayed and
the next manoeuvre is read out by the
system.
Each list entry may show the following
information:
● name of the street, motorway or motorway junction
● direction arrow
● distance to the next street on the
route
● estimated arrival time when reaching the next street
To display all available information on a particular list item, select the
respective list item and then select
Info in the top line of the screen.
 1
1 2
2 3
3 4
4 5
5 6
6 7
7 8
8 9
9 10
10 11
11 12
12 13
13 14
14 15
15 16
16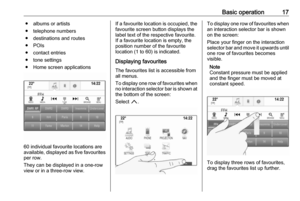 17
17 18
18 19
19 20
20 21
21 22
22 23
23 24
24 25
25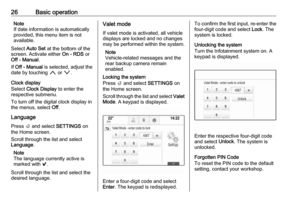 26
26 27
27 28
28 29
29 30
30 31
31 32
32 33
33 34
34 35
35 36
36 37
37 38
38 39
39 40
40 41
41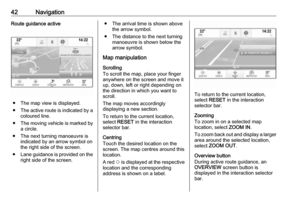 42
42 43
43 44
44 45
45 46
46 47
47 48
48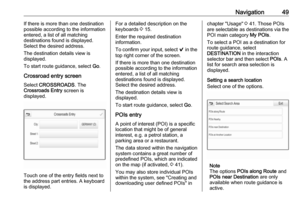 49
49 50
50 51
51 52
52 53
53 54
54 55
55 56
56 57
57 58
58 59
59 60
60 61
61 62
62 63
63 64
64 65
65 66
66 67
67 68
68 69
69 70
70 71
71 72
72 73
73 74
74 75
75 76
76 77
77 78
78 79
79 80
80 81
81 82
82 83
83 84
84 85
85 86
86 87
87 88
88 89
89 90
90 91
91 92
92 93
93 94
94 95
95 96
96 97
97 98
98 99
99 100
100 101
101 102
102 103
103 104
104 105
105 106
106 107
107 108
108 109
109 110
110 111
111 112
112 113
113 114
114 115
115 116
116 117
117 118
118 119
119 120
120 121
121 122
122 123
123 124
124 125
125 126
126 127
127 128
128 129
129 130
130 131
131 132
132 133
133 134
134 135
135 136
136 137
137 138
138 139
139 140
140 141
141 142
142 143
143 144
144 145
145 146
146 147
147 148
148 149
149 150
150 151
151 152
152 153
153 154
154