Page 123 of 702

Unlocking doors
Press thebutton on the key fob once.
∙ Only the driver’s door unlocks.
∙ The hazard warning lights flash once if
all doors are completely closed with the
ignition switch in any position except
the ON position.
∙ The interior light turns on and the light
timer activates for 30 seconds when
the interior light switch is in the DOOR
position with the ignition switch in any
position except the ON position.Press the
button on the key fob again
within five seconds.
∙ All doors unlock.
∙ The hazard warning lights flash once if
all doors are completely closed.
The interior lights can be turned off without
waiting a period of time by inserting the key
into the ignition switch and placing the ig-
nition switch in the ON or START position,
locking the doors with the key fob, power
door lock switch or pushing the interior
light switch to the off position.
Auto relock
When thebutton on the key fob is
pressed, all doors will lock automatically
within 1 minute unless one of the following
operations is performed:
∙ Any door is opened.
∙ A key is inserted into the ignition switch
and the switch is cycled from OFF to ON.
∙ Press the
button.
Releasing the trunk lid
Press thebutton on the key fob for
longer than 0.5 seconds to open the trunk
lid. The trunk release button on the key fob
will not operate when the ignition switch is
placed in the ON position.
LPD2029LPD2030
3-8Pre-driving checks and adjustments
Page 124 of 702

Using the panic alarm
If you are near your vehicle and feel threat-
ened, you may activate the panic alarm to
call attention by pressing and holding
the
button on the key fob forlonger
than 0.5 seconds.
The panic alarm and headlights will stay on
for a period of time.
The panic alarm stops when:
∙ It has run for a period of time.
∙ Any button is pressed on the key fob.
Using the interior light
Press thebutton on the key fob once
to turn on the interior lights.
For additional information, refer to “Interior
light” in the “Instruments and controls” sec-
tion of this manual.
Silencing the horn beep feature
If desired, the horn beep feature can be
deactivated using the key fob.
To deactivate:Press and hold the
andbuttonsfor at least 2 seconds.
The hazard warning lights will flash three
times to confirm that the horn beep fea-
ture has been deactivated.
To activate:Press and hold the
andbuttonsfor at least 2 seconds
once more.
LPD2031LPD2032
Pre-driving checks and adjustments3-9
Page 125 of 702
The hazard warning lights will flash once
and the horn will sound once to confirm
that the horn beep feature has been reac-
tivated.
Deactivating the horn beep feature does
not silence the horn if the alarm is trig-
gered.
1. Pull the hood lock release handle
�1
located below the instrument panel
until the hood springs up slightly.
2. Locate the lever
�2in between the
hood and grille and push the lever side-
ways with your fingertips.
3. Raise the hood
�3.
4. Remove the support rod and insert it
into the slot
�4.Hold the coated parts when removing or
resetting the support rod. Avoid direct
contact with the metal parts, as they
may be hot immediately af ter the engine
has been stopped.
When closing the hood, return the support
rod to its original position, lower the hood
to approximately 12 in (30 cm) above the
latch and release it. This allows proper en-
gagement of the hood latch.
LPD2618
HOOD
3-10Pre-driving checks and adjustments
Page 126 of 702
WARNING
∙ Make sure the hood is completely
closed and latched before driving.
Failure to do so could cause the hood
to fly open and result in an accident.
∙ If you see steam or smoke coming
from the engine compartment, to
avoid injury do not open the hood.
WARNING
∙ Do not drive with the trunk lid open.
This could allow dangerous exhaust
gases to be drawn into the vehicle. For
additional information, refer to “Ex-
haust gas (carbon monoxide)” in the
“Starting and driving” section of this
manual.
∙ Closely supervise children when they
are around cars to prevent them from
playing and becoming locked in the
trunk where they could be seriously
injured. Keep the car locked, with the
rear seatback and trunk lid securely
latched when not in use, and prevent
children’s access to car keys.
KEY OPERATION
To open the trunk lid, turn the key clock-
wise. To close the trunk lid, lower and push
the trunk lid down securely.
LPD2036
TRUNK LID
Pre-driving checks and adjustments3-11
Page 127 of 702

WARNING
∙ Do not drive with the trunk lid open.
This could allow dangerous exhaust
gases to be drawn into the vehicle. For
additional information, refer to “Ex-
h")
OPENER OPERATION (if so
equipped)
WARNING
∙ Do not drive with the trunk lid open.
This could allow dangerous exhaust
gases to be drawn into the vehicle. For
additional information, refer to “Ex-
haust gas (carbon monoxide)” in the
“Starting and driving” section of this
manual.∙ Closely supervise children when they
are around cars to prevent them from
playing and becoming locked in the
trunk where they could be seriously
injured. Keep the car locked, with the
rear seatback and trunk lid securely
latched when not in use, and prevent
children’s access to car keys.
The trunk lid release is located on the floor
to the lef t of the driver’s seat.
To open the trunk lid, pull the opener lever
up.
To close the trunk lid, lower and push the
trunk lid down securely.
INTERIOR TRUNK LID RELEASE
WARNING
Closely supervise children when they
are around cars to prevent them from
playing and becoming locked in the
trunk where they could be seriously in-
jured. Keep the car locked, with the rear
seatback and trunk lid securely latched
when not in use, and prevent children’s
access to car keys.
LPD2215LPD0396
3-12Pre-driving checks and adjustments
Page 128 of 702

The interior trunk lid release mechanism
provides a means of escape for children
and adults in the event they become
locked inside the trunk.
To open the trunk from the inside, pull the
illuminated release handle until the lock re-
leases and push up on the trunk lid. The
release handle is made of a material that
glows in the dark af ter a brief exposure to
ambient light.
The handle is located inside the trunk com-
partment on the trunk lock at the center of
the trunk lid.
OPENER OPERATION
The fuel-filler door release is located below
the instrument panel. To open the fuel-filler
door, pull the release. To lock, close the fuel-
filler door securely.
FUEL-FILLER CAP
WARNING
∙ Gasoline is extremely flammable and
highly explosive under certain condi-
tions. You could be burned or seri-
ously injured if it is misused or mis-
handled. Always stop the engine and
do not smoke or allow open flames or
sparks near the vehicle when
refueling.
LPD2371LPD2616
FUEL-FILLER DOOR
Pre-driving checks and adjustments3-13
Page 129 of 702

∙ Do not attempt to top off the fuel tank
af ter the fuel pump nozzle shuts off
automatically. Continued refueling
may cause fuel overflow, resulting in
fuel spray and possibly a fire.
∙ Use only an original equipment type
fuel-filler cap as a replacement. It has
a built-in safety valve needed for
proper operation of the fuel system
and emission control system. An in-
correct cap can result in a serious mal-
function and possible injury. It could
also cause the
Malfunction Indi-
cator Light (MIL) to come on.
∙ Never pour fuel into the throttle body
to attempt to start your vehicle.
∙ Do not fill a portable fuel container in
the vehicle or trailer. Static electricity
can cause an explosion of flammable
liquid, vapor or gas in any vehicle or
trailer. To reduce the risk of serious
injury or death when filling portable
fuel containers:
– Always place the container on the
ground when filling.
– Do not use electronic devices when
filling.– Keep the pump nozzle in contact
with the container while you are
filling it.
– Use only approved portable fuel
containers for flammable liquid.
CAUTION
∙ Do not use a fuel containing more
than 15% ethanol in your vehicle. For
additional information, refer to “Fuel
Recommendation” in the “Technical
and consumer information” section of
this manual.
∙ The LOOSE FUEL CAP warning will ap-
pear if the fuel-filler cap is not prop-
erly tightened. It may take a few driv-
ing trips for the message to be
displayed. Failure to tighten the fuel-
filler cap properly af ter the LOOSE
FUEL CAP warning appears may cause
the
Malfunction Indicator Light
(MIL) to illuminate.∙ Failure to tighten the fuel-filler cap
properly may cause the
Mal-
function Indicator Light (MIL) to illumi-
nate. If the
light illuminates be-
cause the fuel-filler cap is loose or
missing, tighten or install the cap and
continue to drive the vehicle.
The
light should turn off af ter a
few driving trips. If the
light does
not turn off af ter a few driving trips,
have your vehicle inspected. It is rec-
ommended that you visit a NISSAN
dealer for this service.
∙ For additional information, refer to
“Malfunction Indicator Light (MIL)” in
the “Instruments and Controls” sec-
tion in this manual.
∙ If fuel is spilled on the vehicle body,
flush it away with water to avoid paint
damage.
NOTE:
Changing ignition switch status during
the refueling process may cause a delay
in fuel gauge response.
3-14Pre-driving checks and adjustments
Page 130 of 702
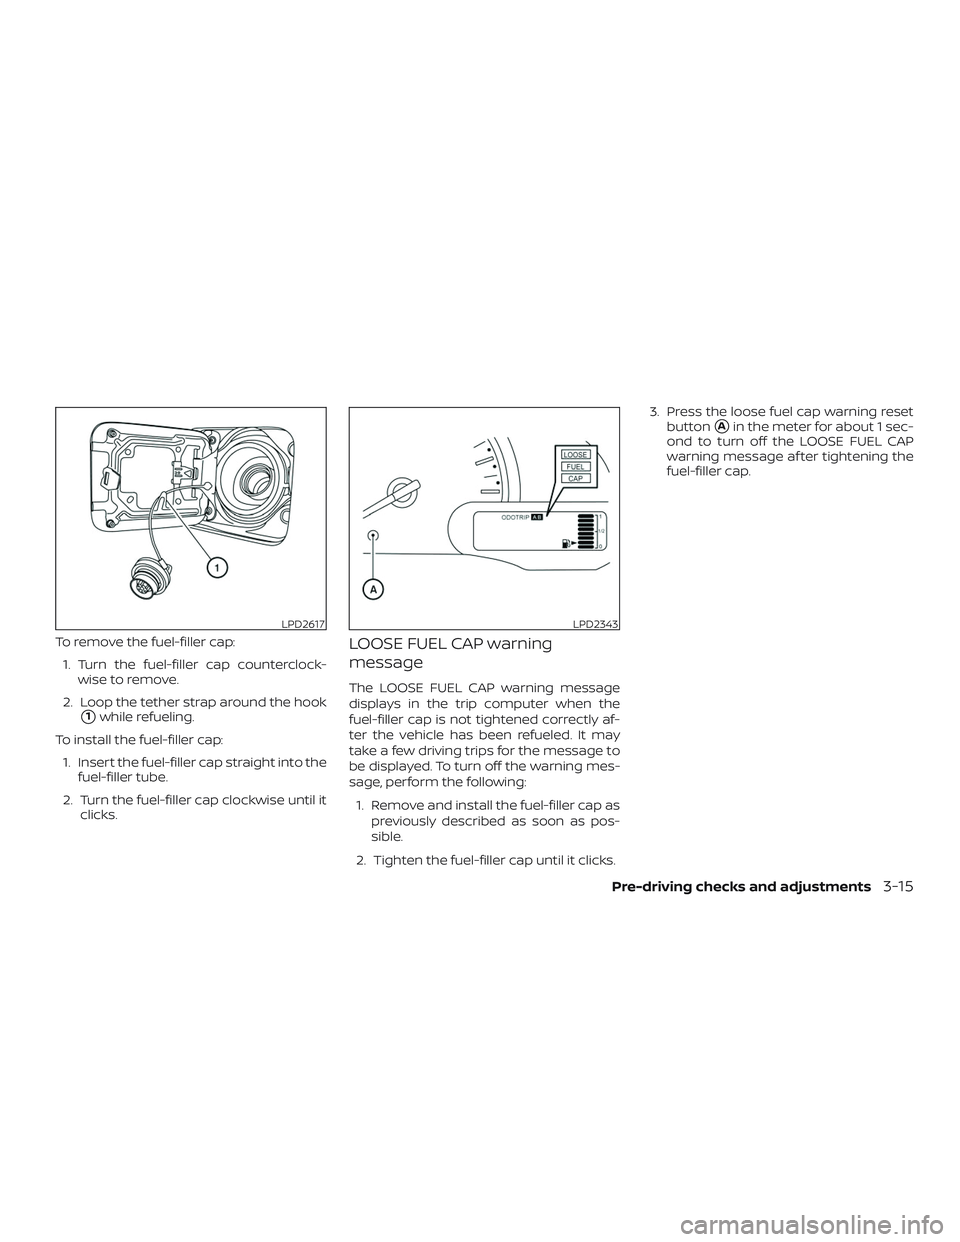
To remove the fuel-filler cap:
1. Turn the fuel-filler cap counterclock-
wise to remove.
2. Loop the tether strap around the hook
�1while refueling.
To install the fuel-filler cap:
1. Insert the fuel-filler cap straight into the
fuel-filler tube.
2. Turn the fuel-filler cap clockwise until it
clicks.
LOOSE FUEL CAP warning
message
The LOOSE FUEL CAP warning message
displays in the trip computer when the
fuel-filler cap is not tightened correctly af-
ter the vehicle has been refueled. It may
take a few driving trips for the message to
be displayed. To turn off the warning mes-
sage, perform the following:
1. Remove and install the fuel-filler cap as
previously described as soon as pos-
sible.
2. Tighten the fuel-filler cap until it clicks.3. Press the loose fuel cap warning reset
button
�Ain the meter for about 1 sec-
ond to turn off the LOOSE FUEL CAP
warning message af ter tightening the
fuel-filler cap.
LPD2617LPD2343
Pre-driving checks and adjustments3-15