Page 458 of 702
INSTRUMENT BRIGHTNESS
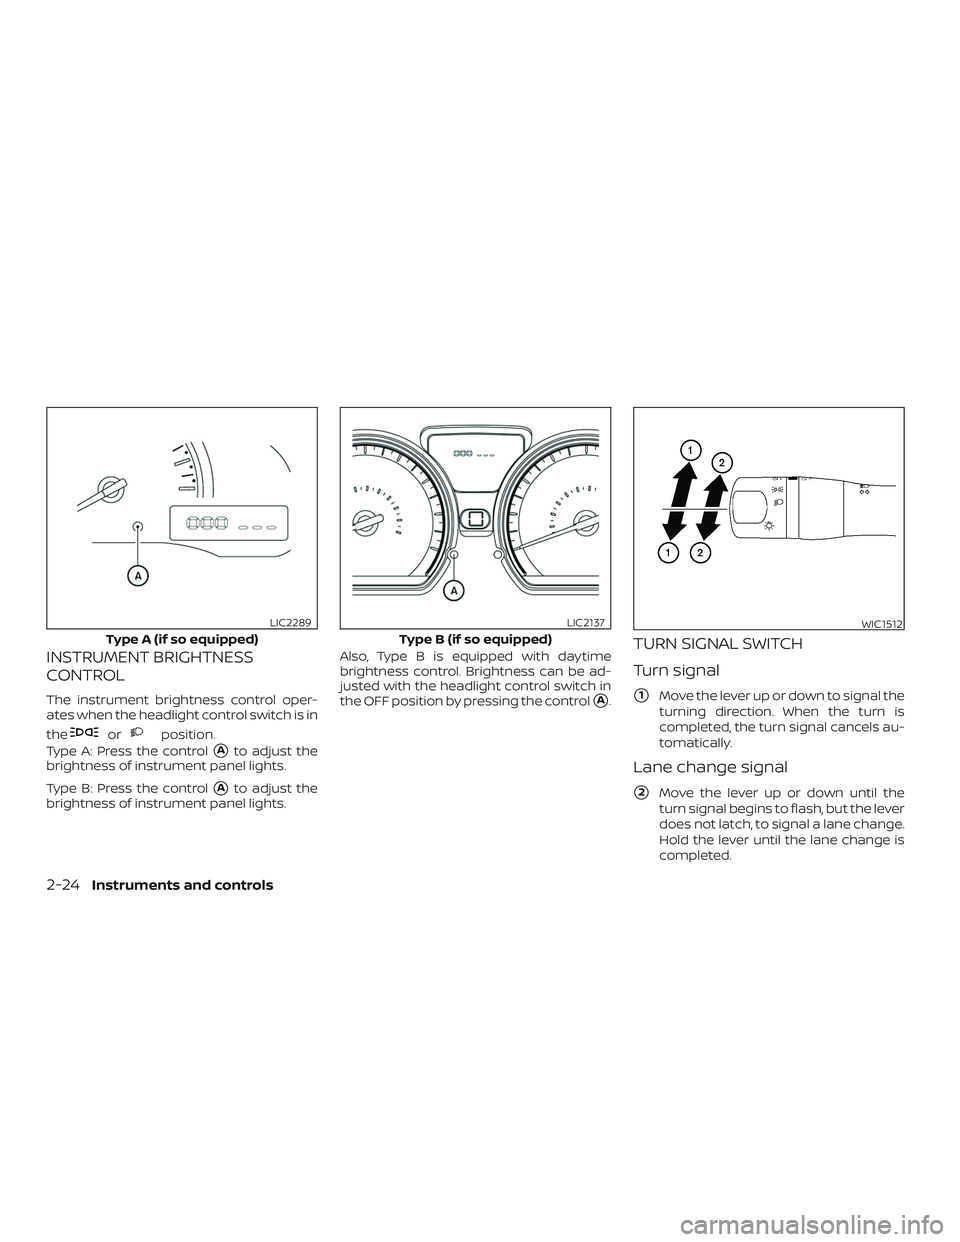
CONTROL
The instrument brightness control oper-
ates when the headlight control switch is in
the
orposition.
Type A: Press the control
�Ato adjust the
brightness of instrument panel lights.
Type B: Press the control
�Ato adjust the
brightness of instrument panel lights. Also, Type B is equipped with daytime
brightness control. Brightness can be ad-
justed with the headlight control switch in
the OFF position by pressing the control
�A.
TURN SIGNAL SWITCH
Turn signal
�1Move the lever up or down to signal the
turning direction. When the turn is
completed, the turn signal cancels au-
tomatically.
Lane change signal
�2Move the lever up or down until the
turn signal begins to flash, but the lever
does not latch, to signal a lane change.
Hold the lever until the lane change is
completed.
Type A (if so equipped)
LIC2289
Type B (if so equipped)
LIC2137WIC1512
2-24Instruments and controls
Page 459 of 702

Move the lever up or down until the
turn signal begins to flash, but the lever
does not latch, and release the lever.
The turn signal will automatically flash
three times.
Choose the appropriate method to signal
a lane change based on road and traffic
conditions.
FOG LIGHT SWITCH (if so
equipped)
To turn the fog lights on, turn the headlight
switch to the
position, then turn the
fog light switch to the
position.
To turn the fog lights off, turn the fog light
switch to the OFF position.
The headlights must be on and the low
beams selected for the fog lights to oper-
ate. The fog lights automatically turn off
when the high beam headlights are se-
lected. To sound the horn, push the center pad
area of the steering wheel.
WARNING
Do not disassemble the horn. Doing so
could affect proper operation of the
supplemental front air bag system.
Tampering with the supplemental front
air bag system may result in serious
personal injury.
WIC1513LIC4017
HORN
Instruments and controls2-25
Page 461 of 702

CAUTION
∙ The outlet and plug may be hot duringor immediately af ter use.
∙ Only certain power outlets are de- signed for use with a cigarette lighter
unit. Do not use any other power out-
let for an accessory lighter. It is rec-
ommended that you visit a NISSAN
dealer for additional information
∙ Do not use with accessories that ex- ceed a 12 volt, 120W (10A) power draw. ∙ Do not use double adapters or more
than one electrical accessory.
∙ Use power outlets with the engine running to avoid discharging the ve-
hicle battery.
∙ Avoid using power outlets when the air conditioner, headlights or rear win-
dow defroster is on.
∙ Before inserting or disconnecting a plug, be sure the electrical accessory
being used is turned off.
∙ Push the plug in as far as it will go. If good contact is not made, the plug
may overheat or the internal tem-
perature fuse may open.
∙ When not in use, be sure to close the cap. Do not allow water or any other
liquid to contact the outlet.
FRONT-DOOR POCKETSConsole (if so equipped)
LIC3610LIC2157
STORAGE
Instruments and controls2-27
Page 466 of 702
Automatic operation
To fully open a window equipped with au-
tomatic operation, press the window
switch down to the second detent and re-
lease it; it need not be held. The window
automatically opens all the way. To stop
the window, lif t the switch up while the win-
dow is opening.
MANUAL WINDOWS (if so
equipped)
The side windows can be opened or closed
by turning the hand crank on each door.The interior light has a three-position
switch and operates regardless of ignition
switch position.
When the switch is in the ON position�1,
the interior lights illuminate, regardless of
door position. The lights will go off af ter a
period of time unless the ignition switch is
placed in the ACC or ON position.
LIC0410LIC3352SIC2063A
INTERIOR LIGHTS
2-32Instruments and controls
Page 467 of 702
, a key or the power door
lock switch (")
When the switch is in the DOOR position�2,
the interior lights will stay on for a period of
time when:
∙ The doors are unlocked by the key fob (if so equipped), a key or the power door
lock switch (if so equipped) while all
doors are closed and the ignition switch
is placed in the OFF position.
∙ The driver’s door is opened and then closed while the key is removed from
the ignition switch.
∙ The key is removed from the ignition switch while all doors are closed.
The lights will turn off while the timer is
activated when: ∙ The driver’s door is locked by the key fob (if so equipped), a key, or the power door
lock switch (if so equipped).
∙ The ignition switch is placed in the ON position.
When the switch is in the OFF position
�3,
the interior lights do not illuminate, regard-
less of door position.
The lights will turn off automatically af ter a
period of time while doors are open to pre-
vent the battery from becoming dis-
charged.
CAUTION
Do not use for extended periods of time
with the engine stopped. This could re-
sult in a discharged battery.
MAP LIGHT (if so equipped)
The map light has a three-position switch
and operates regardless of ignition switch
position.
When the switch is in the ON position
�3,
the map light illuminates, regardless of
door position. The light will go off af ter a
period of time unless the ignition switch is
placed in the ACC or ON position.
When the switch is in the DOOR position
�2,
the map light will stay on for a period of
time when:
LIC2126
Instruments and controls2-33
Page 468 of 702
, a key or the power door
lock switch while all doors are closed
and the ignition switch is placed in the
OFF position.
∙ The driver’s door")
∙ The doors are unlocked by the key fob (ifso equipped), a key or the power door
lock switch while all doors are closed
and the ignition switch is placed in the
OFF position.
∙ The driver’s door is opened and then closed while the key is removed from
the ignition switch.
∙ The key is removed from the ignition switch while all doors are closed.
The light will turn off while the timer is acti-
vated when: ∙ The driver’s door is locked by the key fob (if so equipped), a key, or the power door
lock switch.
∙ The ignition switch is placed in the ON position.
When the switch is in the OFF position
�1,
the map light does not illuminate, regard-
less of door position.
The light will turn off automatically af ter a
period of time while doors are open to pre-
vent the battery from becoming dis-
charged.
CAUTION
Do not use for extended periods of time
with the engine stopped. This could re-
sult in a discharged battery. The light illuminates when the trunk lid is
opened. When the trunk lid is closed, the
light goes off. For additional information,
refer to “Exterior and interior lights” in the
“Do-it-yourself ” section of this manual.
TRUNK LIGHT
2-34Instruments and controls
Page 474 of 702
 is moved to the
lock position with the key in the ignition
switch while any door is open, all doors will
loc")
Lockout protection
When the power door lock switch (driver’s
or front passenger’s side) is moved to the
lock position with the key in the ignition
switch while any door is open, all doors will
lock and then unlock automatically. This
helps to prevent the keys from being acci-
dently locked inside the vehicle.
AUTOMATIC DOOR LOCKS (if so
equipped)
∙ All doors lock automatically when thevehicle speed reaches 15 mph
(24 km/h).
∙ Continuously Variable Transmission (CVT) (if so equipped)
– All doors unlock automatically when the transmission is placed in the P
(Park) position.
∙ Manual transmission (if so equipped) – All doors unlock automatically whenthe ignition is placed in the off posi-
tion.
CHILD SAFETY REAR DOOR LOCK
Child safety locks help prevent the rear
doors from being opened accidentally, es-
pecially when small children are in the ve-
hicle.
The child safety lock levers are located on
the edge of the rear doors.
When the lever is in the unlock position
�2,
the door can be opened from the outside
or the inside.
When the lever is in the LOCK position
�1,
the door can be opened only from the
outside.
WARNING
∙ Radio waves could adversely affect electric medical equipment. Those
who use a pacemaker should contact
the electric medical equipment
manufacturer for the possible influ-
ences before use.
∙ The remote keyless entry key fob transmits radio waves when the but-
tons are pressed. The FAA advises ra-
dio waves may affect aircraf t naviga-
tion and communication systems. Do
not operate the remote keyless entry
key fob while on an airplane. Make
sure the buttons are not operated un-
intentionally when the unit is stored
for a flight.
It is possible to lock/unlock all doors, turn
the interior lights on (if so equipped), and
activate the panic alarm (if so equipped) by
using the key fob from outside the vehicle.
Be sure to remove the key from the ve-
hicle before locking the doors.
The key fob can operate at a distance of
approximately 33 f t (10 m) from the vehicle.
The effective distance depends on the
conditions around the vehicle.
SPA2037
REMOTE KEYLESS ENTRY SYSTEM (if
so equipped)
3-6Pre-driving checks and adjustments
Page 475 of 702

As many as four key fobs can be used with
one vehicle. For information concerning
the purchase and use of additional key
fobs, it is recommended that you visit a
NISSAN dealer.
The key fob may not function when:∙ The battery is low or discharged.
∙ The distance between the vehicle and the key fob is over 33 f t (10 m).
The panic alarm (if so equipped) will not
activate when the key is in the ignition
switch.
CAUTION
Listed below are conditions or occur-
rences which will damage the key fob:
∙ Do not allow the key fob, which con- tains electrical components, to come
into contact with water or salt water.
This could affect the system function.
∙ Do not drop the key fob.
∙ Do not strike the key fob sharply against another object.
∙ Do not change or modif y the key fob. ∙ Wetting may damage the key fob. If
the key fob gets wet, immediately
wipe until it is completely dry.
∙ Do not place the key fob for an ex- tended period in an area where tem-
peratures exceed 140°F (60°C).
∙ Do not attach the key fob with a key holder that contains a magnet.
∙ Do not place the key fob near equip- ment that produces a magnetic field,
such as a TV, audio equipment and
personal computers.
If a key fob is lost or stolen, NISSAN rec-
ommends erasing the ID code of that
key fob. This will prevent the key fob
from unauthorized use to unlock the
vehicle. For information regarding the
erasing procedure, it is recommended
that you visit a NISSAN dealer.
HOW TO USE REMOTE KEYLESS
ENTRY SYSTEM
Locking doors
1. Close all windows.
2. Remove the key from the ignition switch.
3. Close all doors.
4. Press the
button on the key fob.
All the doors lock. The hazard warning
lights flash twice and the horn beeps
once to indicate all doors are locked.
LPD2028
Pre-driving checks and adjustments3-7