2018 NISSAN ROGUE SPORT instrument panel
[x] Cancel search: instrument panelPage 129 of 512

2-52Instruments and controls
SIC4544
The vehicle should be driven with the
Vehicle Dynamic Control (VDC) system on
for most driving conditions.
If the vehicle is stuck in mud or snow, the
VDC system reduces the engine output to
reduce wheel spin. The engine speed will
be reduced even if the accelerator is
depressed to the floor. If maximum en-
gine power is needed to free a stuck
vehicle, turn the VDC system off.
To turn off the VDC system, push the VDC
OFF switch. The
indicator light will
illuminate.
Push the VDC OFF switch again or restart the
engine to turn on the system. (See “Vehicle
Dynamic Control (VDC) system” (P.5-108).)
JVI1595X
The Intelligent 4x4 LOCK switch is located
on the instrument panel. The AWD LOCK
indicator light will illuminate when the
switch is turned on. For additional infor-
mation, refer to “Intelligent 4x4” (P.5-100).
Each time you push the switch, the AWD
mode will switch: AUTO ?LOCK ?AUTO.
JVS0185X
The ECO mode system helps to enhance
the fuel economy by controlling the
engine and CVT operation (for CVT mod-
els) automatically to avoid rapid accelera-
tion.
To turn on the ECO mode system, push
the ECO switch. The ECO mode indicator
appears on the meter.
To turn off the ECO mode, push the ECO
switch again. The ECO mode indicator will
turn off.
. The ECO mode system cannot be
turned off while the accelerator pedal
is depressed even if the ECO switch is
pushed to OFF. Release the accelera-
tor pedal to turn off the ECO mode
VEHICLE DYNAMIC CONTROL (VDC)
OFF SWITCH INTELLIGENT 4X4 LOCK SWITCH (if
so equipped)
ECO MODE SWITCH
Page 130 of 512

system.
. The ECO mode system will turn off
automatically if a malfunction occurs
in the system.
. Turn off the ECO mode system when
acceleration is required such as when:
— driving with a heavy load of pas-
sengers or cargo in the vehicle
— driving on a steep uphill slope
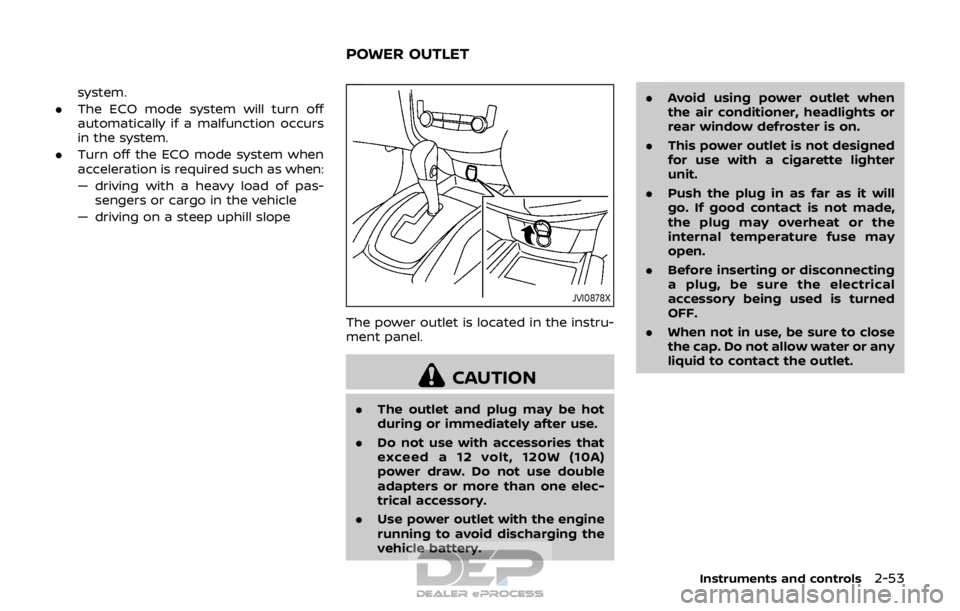
JVI0878X
The power outlet is located in the instru-
ment panel.
CAUTION
. The outlet and plug may be hot
during or immediately after use.
. Do not use with accessories that
exceed a 12 volt, 120W (10A)
power draw. Do not use double
adapters or more than one elec-
trical accessory.
. Use power outlet with the engine
running to avoid discharging the
vehicle battery. .
Avoid using power outlet when
the air conditioner, headlights or
rear window defroster is on.
. This power outlet is not designed
for use with a cigarette lighter
unit.
. Push the plug in as far as it will
go. If good contact is not made,
the plug may overheat or the
internal temperature fuse may
open.
. Before inserting or disconnecting
a plug, be sure the electrical
accessory being used is turned
OFF.
. When not in use, be sure to close
the cap. Do not allow water or any
liquid to contact the outlet.
Instruments and controls2-53
POWER OUTLET
Page 170 of 512

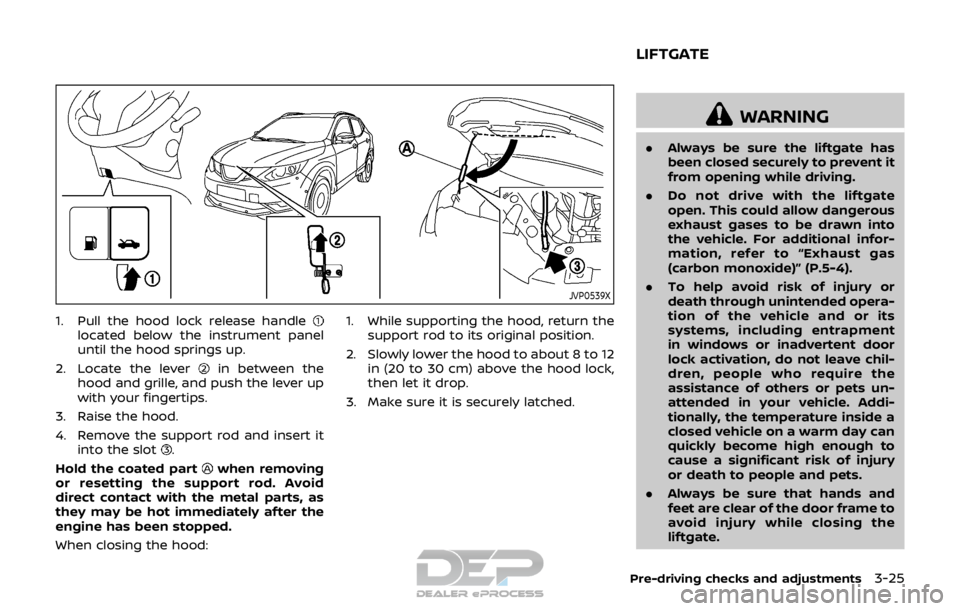
JVP0539X
1. Pull the hood lock release handlelocated below the instrument panel
until the hood springs up.
2. Locate the lever
in between the
hood and grille, and push the lever up
with your fingertips.
3. Raise the hood.
4. Remove the support rod and insert it into the slot
.
Hold the coated part
when removing
or resetting the support rod. Avoid
direct contact with the metal parts, as
they may be hot immediately after the
engine has been stopped.
When closing the hood: 1. While supporting the hood, return the
support rod to its original position.
2. Slowly lower the hood to about 8 to 12 in (20 to 30 cm) above the hood lock,
then let it drop.
3. Make sure it is securely latched.
WARNING
. Always be sure the liftgate has
been closed securely to prevent it
from opening while driving.
. Do not drive with the liftgate
open. This could allow dangerous
exhaust gases to be drawn into
the vehicle. For additional infor-
mation, refer to “Exhaust gas
(carbon monoxide)” (P.5-4).
. To help avoid risk of injury or
death through unintended opera-
tion of the vehicle and or its
systems, including entrapment
in windows or inadvertent door
lock activation, do not leave chil-
dren, people who require the
assistance of others or pets un-
attended in your vehicle. Addi-
tionally, the temperature inside a
closed vehicle on a warm day can
quickly become high enough to
cause a significant risk of injury
or death to people and pets.
. Always be sure that hands and
feet are clear of the door frame to
avoid injury while closing the
liftgate.
Pre-driving checks and adjustments3-25
LIFTGATE
Page 194 of 512

Available views:
.Front view
An approximately 150–degree view of
the front of the vehicle.
. Rear view
An approximately 150–degree view of
the rear of the vehicle.
. Bird’s-eye view
The surrounding views of the vehicle
from above.
. Front-side view
The view around and ahead of the
front passenger’s side wheel.
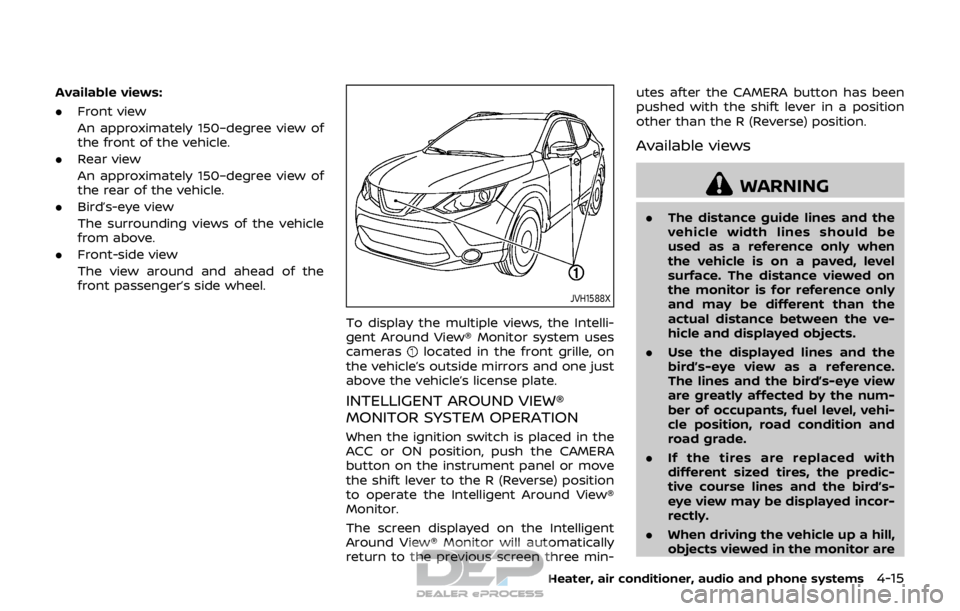
JVH1588X
To display the multiple views, the Intelli-
gent Around View® Monitor system uses
cameras
located in the front grille, on
the vehicle’s outside mirrors and one just
above the vehicle’s license plate.
INTELLIGENT AROUND VIEW®
MONITOR SYSTEM OPERATION
When the ignition switch is placed in the
ACC or ON position, push the CAMERA
button on the instrument panel or move
the shift lever to the R (Reverse) position
to operate the Intelligent Around View®
Monitor.
The screen displayed on the Intelligent
Around View® Monitor will automatically
return to the previous screen three min- utes after the CAMERA button has been
pushed with the shift lever in a position
other than the R (Reverse) position.
Available views
WARNING
.
The distance guide lines and the
vehicle width lines should be
used as a reference only when
the vehicle is on a paved, level
surface. The distance viewed on
the monitor is for reference only
and may be different than the
actual distance between the ve-
hicle and displayed objects.
. Use the displayed lines and the
bird’s-eye view as a reference.
The lines and the bird’s-eye view
are greatly affected by the num-
ber of occupants, fuel level, vehi-
cle position, road condition and
road grade.
. If the tires are replaced with
different sized tires, the predic-
tive course lines and the bird’s-
eye view may be displayed incor-
rectly.
. When driving the vehicle up a hill,
objects viewed in the monitor are
Heater, air conditioner, audio and phone systems4-15
Page 216 of 512

automatically switch to the outside air
circulation mode.
To turn the system off:
To turn off the heater and air conditioner,
push the ON·OFF button.
Push the ON·OFF button again, the sys-
tem will turn on in the mode which was
used immediately before the system was
turned off.
Remote engine start logic (if so
equipped)
When the remote engine start function is
activated, the vehicles equipped with the
automatic air conditioner and heater may
go into automatic heating or cooling
mode depending on the outside and
cabin temperatures. During this period,
the display and the buttons will be
inoperable until the ignition switch is
placed in the ON position. When the
temperature is low, the rear defroster
and the heated steering wheel (if so
equipped) may also be activated auto-
matically with the activation of the re-
mote engine start function. (See “Remote
engine start” (P.3-22).)
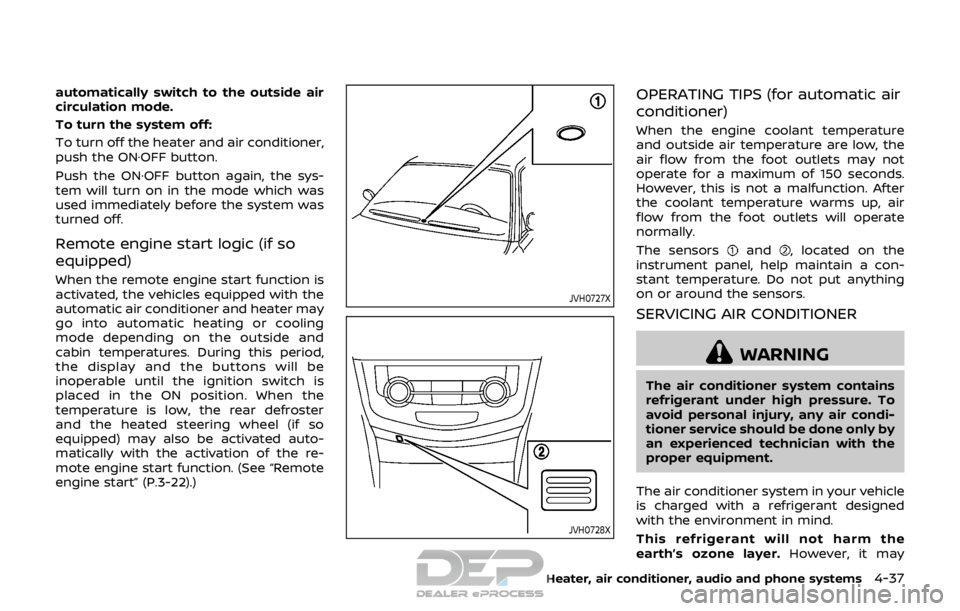
JVH0727X
JVH0728X
OPERATING TIPS (for automatic air
conditioner)
When the engine coolant temperature
and outside air temperature are low, the
air flow from the foot outlets may not
operate for a maximum of 150 seconds.
However, this is not a malfunction. After
the coolant temperature warms up, air
flow from the foot outlets will operate
normally.
The sensors
and, located on the
instrument panel, help maintain a con-
stant temperature. Do not put anything
on or around the sensors.
SERVICING AIR CONDITIONER
WARNING
The air conditioner system contains
refrigerant under high pressure. To
avoid personal injury, any air condi-
tioner service should be done only by
an experienced technician with the
proper equipment.
The air conditioner system in your vehicle
is charged with a refrigerant designed
with the environment in mind.
This refrigerant will not harm the
earth’s ozone layer. However, it may
Heater, air conditioner, audio and phone systems4-37
Page 230 of 512

5. Other buttons can be set in the samemanner.
If the battery cable is disconnected, or if
the fuse opens, the station memory will
be erased. In that case, reset the desired
stations.
CD player operation
Place the ignition switch in the ACC or ON
position. Insert the Compact Disc (CD)
into the slot with the label side facing up.
The CD will be guided automatically into
the slot and start playing.
After loading the CD, the number of
tracks on the CD and the play time will
appear on the display.
If another audio source is already operat-
ing, it will automatically turn off and the
CD will play.
If the system has been turned off while
the CD was playing, pushing the Power/
VOL dial will start the CD.
PLAY:
When the CD button is pushed while a CD
is loaded, the CD will start playing.
CD/MP3 display mode:
While listening to an MP3/WMA CD, cer-
tain text may be displayed on the screen
if the CD has been encoded with text information. Depending on how the MP3/
WMA CD is encoded, information such as
Artist, Song and Folder will be displayed.
The track number and the total number
of tracks in the current folder or on the
current disc are displayed on the screen
as well.
SEEK/TRACK:
When the
orbutton is pushed
and hold while the CD is being played, the
CD will play while fast forwarding or
rewinding. When the button is released,
the CD will return to normal play speed.
When the
orbutton is pushed
while the CD is being played, the next
track or the beginning of the current
track on the CD will be played. Push the
button again to select the previous
track.
REPEAT (RPT):
When the
button is pushed while the
CD is played, the play pattern can be
changed as follows:
(CD)
(Normal) ⇔1 Track Repeat
(CD with compressed audio files)
(Normal) ?1 Folder Repeat ?1 Track
Repeat ?(Normal)
RANDOM (RDM):
When the
button is pushed while a CD
is being played, the play pattern can be
changed as follows:
(CD)
(Normal) ⇔1 Disc Random
(CD with compressed audio files)
(Normal) ?1 Disc Random ?1 Folder
Random ?(Normal)
CD eject:
When the
button is pushed with the
CD loaded, the CD will be ejected.
If the CD comes out and is not removed,
it will be pulled back into the slot to
protect it.
USB memory player operation
USB memory main operation:
The USB connection port is located on
the lower part of the instrument panel.
(See “USB (Universal Serial Bus) connec-
tion port” (P.4-74).) Connect a USB mem-
ory into the port. When the audio system
operates, the system will switch to the
USB memory mode automatically.
If the system has been turned off while
the USB memory was playing, pushing
the Power/VOL dial will start the USB
Heater, air conditioner, audio and phone systems4-51
Page 231 of 512

4-52Heater, air conditioner, audio and phone systems
memory.
PLAY:
To change to the USB memory mode,
push the
button with a USB memory
connected until the USB memory mode is
selected.
Next/Previous File and Fast
Forward/Rewind:
When the
orbutton is pushed
and hold while a USB memory is being
played, the USB memory will play while
forwarding or rewinding. When the but-
ton is released, the USB memory will
return to normal play speed.
When the
orbutton is pushed
while the USB memory is being played,
the next track or the beginning of the
current track on the USB memory will be
played. Push the
button again to
select the previous track.
Folder selection:
To change to another folder in the USB
memory, choose a folder displayed on the
screen using the ENTER SETTING/
TUNE·FOLDER dial.
REPEAT (RPT):
When the
button is pushed while the USB memory is played, the play pattern
can be change as follows.
(Normal)
?1 Folder Repeat ?1 Track
Repeat ?(Normal)
RANDOM (RDM):
When the
button is pushed while a
USB memory is being played, the play
pattern can be changed as follows.
(Normal) ?All Random ?1 Folder Ran-
dom ?(Normal)
BACK button:
When the BACK button is pushed, it
returns to the previous display.
iPod® player operation
Connecting iPod®:
The USB connection port is located on
the lower part of the instrument panel.
(See “USB (Universal Serial Bus) connec-
tion port” (P.4-74).) Connect the iPod®
cable to the USB connection port. When
the audio system operates, the system
will switch to the iPod® mode automati-
cally. The battery of the iPod® is charged
while the cable is connected to the
vehicle.
Depending on the version of the iPod®,
the display on the iPod® shows a NISSAN or Accessory Attached screen when the
connection is completed. When the iPod®
is connected to the vehicle, the iPod®
music library can only be operated by the
vehicle audio controls.
Compatibility:
The following models are compatible:
.
iPod nano® 1G (Firmware version 1.3.1 -)
. iPod nano® 2G (Firmware version 1.1.3
-)
. iPod nano® 3G (Firmware version 1.0.0
-)
. iPod nano® 4G (Firmware version 1.0.2
-)
. iPod nano® 5G (Firmware version 1.0.1
-)
. iPod nano® 6G (Firmware version 1.0 -)
. iPod nano® 7G (Firmware version 1.0.0
-)
. iPod® 5G (Firmware version 1.2.1 -)
. iPod classic® (Firmware version 1.0.0 -)
. iPod Touch® (iOS 1.1 -)
. iPod Touch® 2G (iOS 2.1.1 -)
. iPod Touch® 3G (iOS 3.1 -)
. iPod Touch® 4G (iOS 4.1 -)
. iPod Touch® 5G (iOS 6.0.0 -)
. iPhone® (iOS 1.0.0 - 2.2.1)
. iPhone® 3G (iOS 2.1 -)
Page 233 of 512

4-54Heater, air conditioner, audio and phone systems
Bluetooth® audio player operation
If you have a compatible Bluetooth®
audio device that is capable of playing
audio files, the device can be connected
to the vehicle’s audio system so that the
audio files on the device play through the
vehicle’s speakers.
Regulatory information:
Bluetooth® trademark:
Bluetooth® is a trademark
owned by Bluetooth SIG, Inc.
and licensed to Visteon Cor-
poration.
Connecting Bluetooth® device:
To connect your Bluetooth® device to the
vehicle, follow the procedure below:
1. Push the ENTER SETTING/TUNE·FOLDER dial.JVH0620X
2. Select “Bluetooth” .
3. Select “Add Phone” . This same screencan be accessed to remove, replace or
select a different Bluetooth® device.
4. The system acknowledges the com- mand and asks you to initiate a
connection from the Bluetooth® de-
vice. The procedure for connecting a
Bluetooth® device varies according to
the cellular phone model. See the
owner’s manual of the Bluetooth®
device for details.
Bluetooth® audio main operation:
To switch to the Bluetooth® audio mode,
push the
button repeatedly until the
Bluetooth® audio mode is displayed on the screen.
The controls for the Bluetooth® audio are
displayed on the screen. Use the Preset
button to play and use the Presetbutton to pause.
AUX device player operation
The AUX input jack is located on the lower
part of the instrument panel. (See “AUX
(Auxiliary) input jack” (P.4-75).) The AUX
input jack accepts any standard analog
audio input such as from a portable
cassette tape/CD player, MP3 player or
laptop computer.
Push the
button repeatedly to play a
compatible device when it is plugged into
the AUX input jack.
NISSAN strongly recommends using a
stereo mini plug cable when connecting
your music device to the audio system.
Music may not play properly when a
monaural cable is used.