2018 NISSAN ROGUE SPORT fuel cap
[x] Cancel search: fuel capPage 91 of 512
2-14Instruments and controls
.Since the spare tire is not
equipped with the TPMS, when a
spare tire is mounted or a wheel
is replaced, the TPMS will not
function and the low tire pressure
warning light will flash for ap-
proximately 1 minute. The light
will remain on after 1 minute.
Have your tires replaced and/or
TPMS system reset as soon as
possible. It is recommended you
visit a NISSAN dealer for these
services.
. Replacing tires with those not
originally specified by NISSAN
could affect the proper operation
of the TPMS.
CAUTION
.The TPMS is not a substitute for
the regular tire pressure check.
Be sure to check the tire pressure
regularly.
. If the vehicle is being driven at
speeds of less than 16 MPH (25
km/h), the TPMS may not operate
correctly. .
Be sure to install the specified
size of tires to the four wheels
correctly.
Master warning light
When the ignition switch is in the ON
position, the master warning light illumi-
nates if any of the following are displayed
on the vehicle information display.
.No Key detected warning (if so
equipped)
. Shift to Park warning (Continuously
Variable Transmission (CVT) models)
(if so equipped)
. Key battery low warning (if so
equipped)
. Engine start operation for Intelligent
Key system indicator (if so equipped)
. Key ID incorrect warning (if so
equipped)
. Release Parking Brake warning
. Low fuel level warning
. Low Washer Fluid (if so equipped)
. Door/liftgate open warning
. Key System Error: See Owner’s Manual
warning (if so equipped)
. Loose Fuel Cap
. Tire Pressure Low - Add Air warning .
Low oil pressure Stop vehicle warning
. AWD Error: See Owner’s Manual warn-
ing (if so equipped)
. AWD High Temp. Stop vehicle warning
(if so equipped)
. Tire Size Incorrect: See Owner’s Man-
ual warning (if so equipped)
. Battery Voltage Low Charge Battery
warning
. Shipping Mode On Push Storage Fuse
warning (if so equipped)
. Power will turn off to save the battery
warning
. Power turned off to save the battery
warning
. Reminder: Turn OFF Headlights warn-
ing
. Headlight System Error: See Owner’s
Manual warning (if so equipped)
. Timer Alert - Time for a driver break?
indicator (if so equipped)
. Chassis Control System Error: See
Owner’s Manual warning
. CVT Error: See Owner’s Manual warn-
ing (for Continuously Variable Trans-
mission (CVT) models)
. Malfunction warning (if so equipped)
. Unavailable: High Cabin Temperature
warning (if so equipped)
Page 93 of 512
2-16Instruments and controls
properly. Have the system checked. It is
recommended you visit a NISSAN dealer
for this service. If a malfunction occurs in
the system, the VDC system function will
be canceled but the vehicle is still drive-
able. For additional information, see “Ve-
hicle Dynamic Control (VDC) system” (P.5-
108) of this manual.
INDICATOR LIGHTS
All-Wheel Drive (AWD) LOCK
indicator light (if so equipped)
When the ignition switch is in the ON
position, the All-Wheel Drive (AWD) LOCK
indicator light illuminates and then turns
off.
When selecting LOCK mode while the
engine is running, the LOCK indicator
light illuminates. (See “Intelligent 4x4”
(P.5-100).)
CAUTION
Do not drive on dry hard surface
roads in the LOCK mode.
Exterior light indicator
This indicator illuminates when the head-
light switch is turned to the AUTO (if so
equipped),
orposition and the
front parking lights, rear combination
lights, license plate lights or headlights
are on. The indicator turns off when these
lights are turned off.
Front fog light indicator light
(if so equipped)
The front fog light indicator light illumi-
nates when the front fog lights are on.
(See “Fog light switch” (P.2-48).)
High beam assist indicator
light (if so equipped)
The indicator light illuminates when the
headlights come on while the headlight
switch is in the AUTO position with the
high beam selected. This indicates that
the high beam assist system is opera-
tional. (See “High beam assist” (P.2-45).)
High beam indicator light
This light illuminates when the headlight
high beam is on and goes out when the
low beam is selected.
Malfunction Indicator Light
(MIL)
If the malfunction indicator light comes
on steady or blinks while the engine is
running, it may indicate a potential emis-
sion control and/or Continuously Variable
Transmission (CVT) malfunction.
The malfunction indicator light may also
illuminate steady if the fuel-filler cap is
loose or missing, or if the vehicle runs out
of fuel. Check to make sure the fuel-filler
cap is installed and closed tightly, and
that the vehicle has at least 3 US gallons
(11.4 liters) of fuel in the fuel tank.
After a few driving trips, the
light
should turn off if no other potential
emission control system malfunction ex-
ists.
If this indicator light remains on for 20
seconds and then blinks for 10 seconds
when the engine is not running, it indi-
cates that the vehicle is not ready for an
emission control system inspection/
maintenance test. (See “Readiness for
Inspection/Maintenance (I/M) test” (P.10-
Page 94 of 512
18).)
Operation:
The malfunction indicator light will come
on in one of two ways:
.Malfunction indicator light on steady
— An emission control system and/or
CVT malfunction has been detected.
Check the fuel-filler cap if the LOOSE
FUEL CAP warning appears in the
vehicle information display. If the
fuel-filler cap is loose or missing, tight-
en or install the cap and continue to
drive the vehicle. The
light should
turn off after a few driving trips. If the
light does not turn off after a few
driving trips, have the vehicle in-
spected. It is recommended you visit
a NISSAN dealer for this service. You
do not need to have your vehicle
towed to the dealer.
. Malfunction indicator light blinking —
An engine misfire has been detected
which may damage the emission
control system.
To reduce or avoid emission control
system damage:
1) Do not drive at speeds above 45
MPH (72 km/h).
2) Avoid hard acceleration or decel- eration. 3) Avoid steep uphill grades.
4) If possible, reduce the amount of
cargo being hauled or towed.
The malfunction indicator light may
stop blinking and remain on.
Have the vehicle inspected. It is re-
commended you visit a NISSAN dealer
for this service. You do not need to
have your vehicle towed to the dealer.
CAUTION
Continued vehicle operation without
having the emission control system
and/or CVT system checked and
repaired as necessary could lead to
poor driveability, reduced fuel econ-
omy, and possible damage to the
emission control system.
Security indicator light
The light blinks when the ignition switch
is in the OFF or LOCK position. This
function indicates the security system
equipped on the vehicle is operational.
If the security system is malfunctioning,
this light will remain on while the ignition
switch is in the ON position. For additional
information, see “Security systems” (P.2-
36).
Turn signal/hazard indicator
lights
The light flashes when the turn signal
switch lever or hazard switch is turned on.
Vehicle Dynamic Control (VDC)
off indicator light
When the ignition switch is in the ON
position, the Vehicle Dynamic Control
(VDC) off indicator light illuminates and
then turns off.
The light comes on when the Vehicle
Dynamic Control (VDC) off switch is
pushed to OFF. This indicates that the
VDC system and traction control system
are not operating.
AUDIBLE REMINDERS
Key reminder chime
Models with Intelligent Key:
A chime sounds if the driver’s door is
opened while the ignition switch is placed
in the OFF position with the Intelligent
Key left in the vehicle.
Make sure the ignition switch is placed in
the LOCK position, and carry it with you
when leaving the vehicle.
Instruments and controls2-17
Page 106 of 512
9. Low fuel level warning
This warning appears when the fuel level
in the fuel tank is getting low. Refuel as
soon as it is convenient, preferably before
the fuel gauge reaches 0 (Empty). There
will be a small reserve of fuel in the tank
when the fuel gauge needle reaches 0
(Empty).
10. Low Washer Fluid warning (if so
equipped)
This warning appears when the window
washer fluid is at a low level. Add window
washer fluid as necessary. For additional
information, refer to “Window washer
fluid” (P.8-10).
11. Door/liftgate open warning
This warning appears if any of the doors
and/or the liftgate are open or not closed
securely. The vehicle icon indicates which
door or the liftgate is open on the display.
12. Key System Error: See Owner’s
Manual warning (if so equipped)
This warning appears if there is a mal-
function in the Intelligent Key system.
If this warning appears while the engine is
stopped, the engine cannot be started. If
this warning appears while the engine is
running, the vehicle can be driven. How-
ever, it is recommended that you visit aNISSAN dealer for repair as soon as
possible.
13. Loose Fuel Cap warning
This warning appears when the fuel-filler
cap is not tightened correctly after the
vehicle has been refueled. For additional
information, refer to “Fuel-filler cap” (P.3-
27).
14. Tire Pressure Low — Add Air
warning
This warning appears when the low tire
pressure warning light in the meter
illuminates and low tire pressure is de-
tected. The warning appears each time
the ignition switch is placed in the ON
position as long as the low tire pressure
warning light remains illuminated. If this
warning appears, stop the vehicle and
adjust the pressure to the recommended
COLD tire pressure shown on the Tire and
Loading Information label. (See “Low tire
pressure warning light” (P.2-13) and “Tire
Pressure Monitoring System (TPMS)” (P.5-
5).)
15. Low Oil Pressure Stop Vehicle
warning
This warning appears if low engine oil
pressure is detected. If the warning ap-
pears during normal driving, pull off the
road in a safe area and stop the engine
immediately. It is recommended that you
call a NISSAN dealer.
The low oil pressure warning is not
designed to indicate a low oil level. Use
the dipstick to check the oil level. (See
“Engine oil” (P.8-6).)
CAUTION
Running the engine with the engine
oil pressure warning displayed could
cause serious damage to the engine.
16. AWD Error: See Owner’s Manual
warning (if so equipped)
This warning appears when the All-Wheel
Drive (AWD) system is not functioning
properly while the engine is running.
Reduce vehicle speed and have the sys-
tem checked. It is recommended that you
visit a NISSAN dealer for this service. See
“Intelligent 4x4” (P.5-100).
Instruments and controls2-29
Page 146 of 512

3 Pre-driving checks and adjustments
Keys ........................................................................\
................................. 3-2NISSAN Vehicle Immobilizer System key (if
so equipped) ........................................................................\
...... 3-2
Intelligent Key (if so equipped) ................................... 3-3
Doors ........................................................................\
.............................. 3-5 Locking with key .................................................................... 3-5
Locking with inside lock knob ..................................... 3-6
Locking with power door lock switch ................... 3-7
Automatic door locks ......................................................... 3-7
Child safety rear door lock ............................................. 3-7
Remote keyless entry system (if so equipped) ...... 3-8 How to use remote keyless entry system ......... 3-9
Intelligent Key system (if so equipped) .................... 3-11
Intelligent Key operating range .............................. 3-13
Door locks/unlocks precaution ............................... 3-13
Intelligent Key operation .............................................. 3-14
Battery saver system ....................................................... 3-16
Warning lights and audible reminders .............. 3-16
Troubleshooting guide ................................................... 3-17
How to use remote keyless entry function ...... 3-18 Remote engine start (if so equipped) ...................... 3-22
Remote engine start operating range ............ 3-22
Remote starting the engine .................................... 3-22
Extending engine run time ....................................... 3-23
Canceling a remote start ........................................... 3-23
Conditions the remote engine start will
not work ........................................................................\
.......... 3-23
Hood ........................................................................\
............................ 3-24
Liftgate ........................................................................\
...................... 3-25 Liftgate release lever ..................................................... 3-26
Fuel-filler door ........................................................................\
..... 3-27 Opening the fuel-filler door ...................................... 3-27
Fuel-filler cap ....................................................................... 3-27
Tilt/telescopic steering ........................................................ 3-29 Tilt or telescopic operation ...................................... 3-30
Sun visors ........................................................................\
................ 3-30
Mirrors ........................................................................\
...................... 3-31 Inside mirror ........................................................................\
. 3-31
Outside mirrors .................................................................. 3-31
Vanity mirror ........................................................................\
3-33
Page 172 of 512
WARNING
.Fuel is extremely flammable and
highly explosive under certain
conditions. You could be burned
or seriously injured if it is misused
or mishandled. Always stop the
engine and do not smoke or allow
open flames or sparks near the
vehicle when refueling.
. Fuel may be under pressure. Turn
the cap a half of a turn, and wait
for any “hissing” sound to stop to
prevent fuel from spraying out
and possibly causing personal
injury. Then remove the cap.
. Use only an original equipment
type fuel-filler cap as a replace-
ment. It has a built-in safety valve
needed for proper operation of
the fuel system and emission
control system. An incorrect cap
can result in a serious malfunc-
tion and possible injury.
JVP0540X
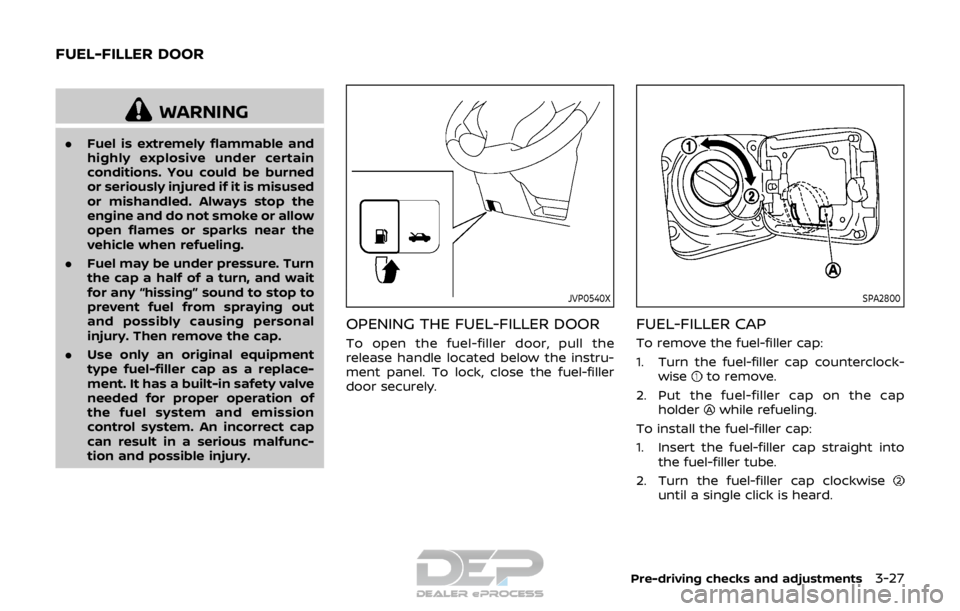
OPENING THE FUEL-FILLER DOOR
To open the fuel-filler door, pull the
release handle located below the instru-
ment panel. To lock, close the fuel-filler
door securely.
SPA2800
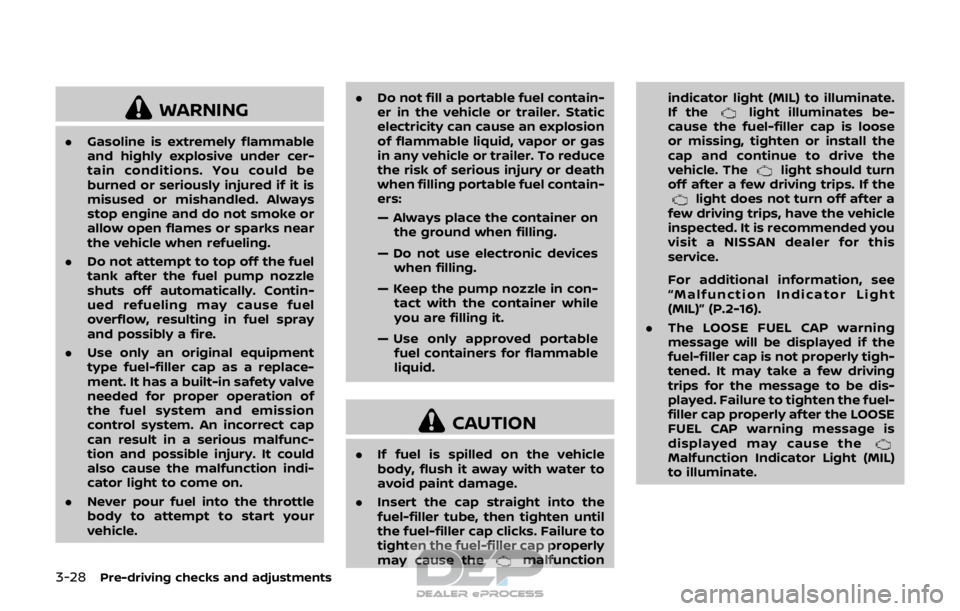
FUEL-FILLER CAP
To remove the fuel-filler cap:
1. Turn the fuel-filler cap counterclock-
wise
to remove.
2. Put the fuel-filler cap on the cap holder
while refueling.
To install the fuel-filler cap:
1. Insert the fuel-filler cap straight into the fuel-filler tube.
2. Turn the fuel-filler cap clockwise
until a single click is heard.
Pre-driving checks and adjustments3-27
FUEL-FILLER DOOR
Page 173 of 512
3-28Pre-driving checks and adjustments
WARNING
.Gasoline is extremely flammable
and highly explosive under cer-
tain conditions. You could be
burned or seriously injured if it is
misused or mishandled. Always
stop engine and do not smoke or
allow open flames or sparks near
the vehicle when refueling.
. Do not attempt to top off the fuel
tank after the fuel pump nozzle
shuts off automatically. Contin-
ued refueling may cause fuel
overflow, resulting in fuel spray
and possibly a fire.
. Use only an original equipment
type fuel-filler cap as a replace-
ment. It has a built-in safety valve
needed for proper operation of
the fuel system and emission
control system. An incorrect cap
can result in a serious malfunc-
tion and possible injury. It could
also cause the malfunction indi-
cator light to come on.
. Never pour fuel into the throttle
body to attempt to start your
vehicle. .
Do not fill a portable fuel contain-
er in the vehicle or trailer. Static
electricity can cause an explosion
of flammable liquid, vapor or gas
in any vehicle or trailer. To reduce
the risk of serious injury or death
when filling portable fuel contain-
ers:
— Always place the container on
the ground when filling.
— Do not use electronic devices when filling.
— Keep the pump nozzle in con- tact with the container while
you are filling it.
— Use only approved portable fuel containers for flammable
liquid.
CAUTION
. If fuel is spilled on the vehicle
body, flush it away with water to
avoid paint damage.
. Insert the cap straight into the
fuel-filler tube, then tighten until
the fuel-filler cap clicks. Failure to
tighten the fuel-filler cap properly
may cause the
malfunction indicator light (MIL) to illuminate.
If the
light illuminates be-
cause the fuel-filler cap is loose
or missing, tighten or install the
cap and continue to drive the
vehicle. The
light should turn
off after a few driving trips. If the
light does not turn off after a
few driving trips, have the vehicle
inspected. It is recommended you
visit a NISSAN dealer for this
service.
For additional information, see
“Malfunction Indicator Light
(MIL)” (P.2-16).
. The LOOSE FUEL CAP warning
message will be displayed if the
fuel-filler cap is not properly tigh-
tened. It may take a few driving
trips for the message to be dis-
played. Failure to tighten the fuel-
filler cap properly after the LOOSE
FUEL CAP warning message is
displayed may cause the
Malfunction Indicator Light (MIL)
to illuminate.
Page 174 of 512
JVP0503X
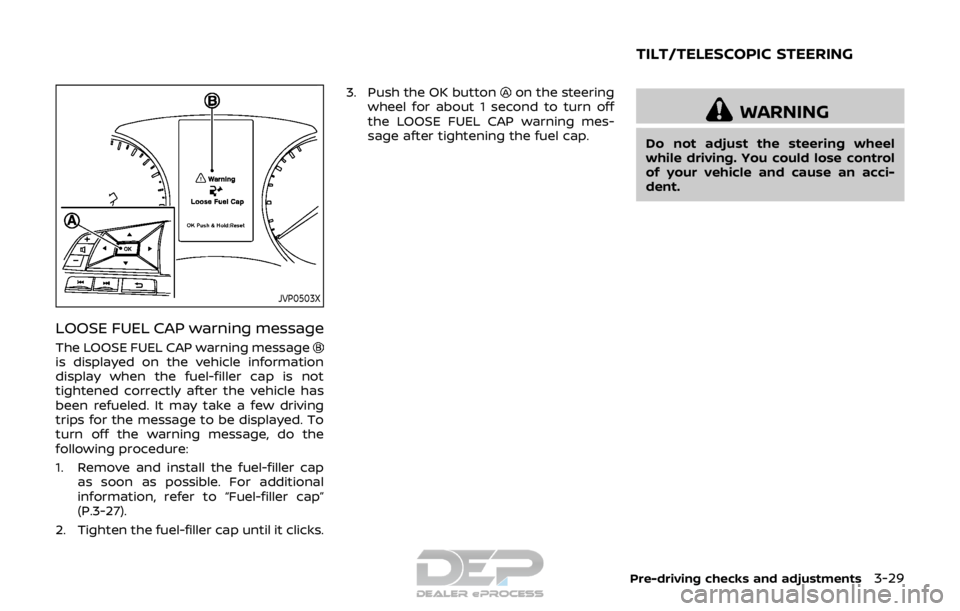
LOOSE FUEL CAP warning message
The LOOSE FUEL CAP warning messageis displayed on the vehicle information
display when the fuel-filler cap is not
tightened correctly after the vehicle has
been refueled. It may take a few driving
trips for the message to be displayed. To
turn off the warning message, do the
following procedure:
1. Remove and install the fuel-filler capas soon as possible. For additional
information, refer to “Fuel-filler cap”
(P.3-27).
2. Tighten the fuel-filler cap until it clicks. 3. Push the OK button
on the steering
wheel for about 1 second to turn off
the LOOSE FUEL CAP warning mes-
sage after tightening the fuel cap.
WARNING
Do not adjust the steering wheel
while driving. You could lose control
of your vehicle and cause an acci-
dent.
Pre-driving checks and adjustments3-29
TILT/TELESCOPIC STEERING