2018 NISSAN NV PASSENGER VAN lock
[x] Cancel search: lockPage 213 of 426
Clock Set1. Press the ENTER/SETTING button.
2. Turn the TUNE/SCROLL knob to select “Clock Adjust”.
3. Press the ENTER/SETTING button.
4. Turn the TUNE/SCROLL knob to adjust hours.
5. Press the ENTER/SETTING button.
6. Rotate the TUNE/SCROLL knob to ad- just minutes.
7. Press the ENTER/SETTING button.
8. Press the
BACK button to finish.
DISP (display) button
The DISP (display) button turns the display
screen on or off.
iPod MENU button
This button can only be used for iPod® op-
erations. For additional information, refer to
“iPod® player operation without Navigation
System” in this section.
BACK button
Press the
BACK button to return to
the previous menu screen.
FM/AM/SAT radio operation
FM·AM button
Press the FM·AM button to change the
band as follows:
AM →FM1 →FM2 →AM
If another audio source is playing when the
FM·AM button is pressed, the audio source
playing will automatically be turned off and
the last radio station played will begin play-
ing.
XM band select
Press the XM button to change the band as
follows:
XM1* →XM2* →XM3* →XM1 (satellite, if so
equipped)
When the XM button is pressed while the
ignition switch is in the ACC or ON position,
the radio will come on at the station last
played.
The last station played will also come on
when the
(power) button is pressed
on.
*When the XM button is pressed, the satel-
lite radio reception will not be available un-
less an optional satellite receiver and an-
tenna are installed and a SiriusXM® Satellite Radio service subscription is active. Satel-
lite radio is not available in Alaska, Hawaii
and Guam.
If a compact disc is playing when the XM
button is pressed, the compact disc will
automatically be turned off and the last
radio station played will come on.
TUNE/SCROLL knob (Tuning)
Turn the TUNE/SCROLL knob to the lef t or
right for manual tuning.
SEEK/CAT tuning
Press the
CAT button orSEEK
button to tune from low to high or high to
low frequencies and to stop at the next
broadcasting station.
SCAN tuning
Press the SCAN button to stop at each
broadcasting station for 5 seconds. SCAN
will appear on the screen while the radio is
scan tuning.
Pressing the button again during this
5 second period will stop SCAN tuning and
the radio will remain tuned to that station. If
the SCAN button is not pressed within
5 seconds, SCAN tuning moves to the next
station.
4-50Monitor, climate, audio, phone and voice recognition systems
Page 236 of 426
SOURCE switch
Press the SOURCE switch to change the
mode in the following sequence:
AM→FM1 →FM2 →(XM1 →XM2 →XM3
(satellite radio, if so
equipped))→(SXM1→SXM2→SXM3 (satellite,
if so equipped))→ CD*→USB/iPod®* →
Bluetooth® Audio* (if so equipped) →AUX*
→ AM.
* These modes are only available when
compatible media storage is inserted into
the device or connected to the system.
Volume control switch
Push the + or – volume control switch to
increase or decrease the volume.
Tuning switch
While the display is showing a map or audio
screen, tilt the Tuning switch upward or
downward to select a station, track, CD or
folder. For most audio sources, tilting the
switch up/down for more than 1.5 seconds
provides a different function than a tilting
up/down for less than 1.5 seconds. AM and FM
∙ Tilt up/down for less than 1.5 seconds to increase or decrease the preset station.
∙ Tilt up/down for more than 1.5 seconds to seek up or down to the next station.
XM/SXM (if so equipped) ∙ Tilt up/down for less than 1.5 seconds to increase or decrease the preset station.
∙ Tilt up/down for more than 1.5 seconds to go to the next or previous category.
iPod® ∙ Tilt up/down for less than 1.5 seconds to increase or decrease the track number.
CD ∙ Tilt up/down for less than 1.5 seconds to increase or decrease the track number.
∙ Tilt up/down for more than 1.5 seconds to increase or decrease the folder num-
ber (if playing compressed audio files)
or to fast forward or rewind the current
track. USB
∙ Tilt up/down for less than 1.5 seconds to increase or decrease the track number.
Bluetooth® Audio ∙ Tilt up/down for less than 1.5 seconds to skip ahead or back to the next song.
ANTENNA
The antenna cannot be shortened, but can
be removed. When you need to remove the
antenna, turn the antenna rod counter-
clockwise.
To install the antenna rod, turn the antenna
clockwise. Tighten the antenna rod to
specification using a suitable tool such as
an open-end wrench. The antenna rod
tightening specification is 3.4 – 3.6 N·m (30 –
32 in-lb). Do not use pliers to tighten the
antenna as they can leave marks on the
antenna surface. The antenna rod cannot
be hand tightened to the proper specification.
CAUTION
Always properly tighten the antenna
rod during installation or the antenna
rod may break during vehicle operation.
Monitor, climate, audio, phone and voice recognition systems4-73
Page 239 of 426
with the in-vehicle phone module when
the ignition switch is placed in the ON po-
sition with the previously connected cellu-
lar phone turned on and carried in the ve-
hicle.
NOTE:
Some devices require the user to accept
connections to other Bluetooth® de-
vices. If your phone does not connect au-
tomatic ally to the system, consult the
phone’s Owner’s Manual for details on
device operation.
You can connect up to five different
Bluetooth® cellular phones to the in-
vehicle phone module. However, you can
talk on only one cellular phone at a time.
Before using the Bluetooth® Hands-Free
Phone System, refer to the following notes.∙ Set up the wireless connection be- tween a compatible cellular phone and
the in-vehicle phone module before us-
ing the hands-free phone system. ∙ Some Bluetooth® enabled cellular
phones may not be recognized or work
properly. Please visit
www.nissanusa.com/bluetooth or
www.nissan.ca/bluetooth for a recom-
mended phone list and connecting in-
structions.
∙ You will not be able to use a hands-free phone under the following conditions:
– Your vehicle is outside of the cellular service area.
– Your vehicle is in an area where it is difficult to receive a cellular signal;
such as in a tunnel, in an under-
ground parking garage, near a tall
building or in a mountainous area.
– Your cellular phone is locked to pre- vent it from being dialed.
∙ When the radio wave condition is not ideal or ambient sound is too loud, it
may be difficult to hear the other per-
son’s voice during a call.
∙ Do not place the cellular phone in an area surrounded by metal or far away
from the in-vehicle phone module to
prevent tone quality degradation and
wireless connection disruption. ∙ While a cellular phone is connected
through the Bluetooth® wireless con-
nection, the battery power of the cellu-
lar phone may discharge quicker than
usual. The Bluetooth® Hands-Free
Phone System cannot charge cellular
phones.
∙ For additional information, you can visit www.nissanusa.com/bluetooth or
www.nissan.ca/bluetooth for trouble-
shooting help.
∙ Some cellular phones or other devices may cause interference or a buzzing
noise to come from the audio system
speakers. Storing the device in a differ-
ent location may reduce or eliminate
the noise.
∙ For additional information, refer to the cellular phone Owner’s Manual regard-
ing the telephone charges, cellular
phone antenna and body, etc.
4-76Monitor, climate, audio, phone and voice recognition systems
Page 251 of 426
∙ You will not be able to use a hands-freephone under the following conditions:
– Your vehicle is outside of the cellular service area.
– Your vehicle is in an area where it is difficult to receive cellular signal;
such as in a tunnel, in an under-
ground parking garage, near a tall
building or in a mountainous area.
– Your cellular phone is locked to pre- vent it from being dialed.
∙ When the radio wave condition is not ideal or ambient sound is too loud, it
may be difficult to hear the other per-
son’s voice during a call.
∙ Immediately af ter the ignition switch is placed in the ON position, it may be im-
possible to receive a call for a short pe-
riod of time.
∙ Do not place the cellular phone in an area surrounded by metal or far away
from the in-vehicle phone module to
prevent tone quality degradation and
wireless connection disruption. ∙ While a cellular phone is connected
through the Bluetooth® wireless con-
nection, the battery power of the cellu-
lar phone may discharge quicker than
usual. The Bluetooth® Hands-Free
Phone System cannot charge cellular
phones.
∙ For additional information, refer to “Troubleshooting guide” in this section if
the hands-free phone system seems to
be malfunctioning.
∙ Some cellular phones or other devices may cause interference or a buzzing
noise to come from the audio system
speakers. Storing the device in a differ-
ent location may reduce or eliminate
the noise.
∙ For additional information, refer to the cellular phone owner’s manual regard-
ing the telephone charges, cellular
phone antenna and body, etc.
∙ The signal strength display on the monitor will not coincide with the signal
strength display of some cellular
phones.REGULATORY INFORMATION
FCC Regulatory information
– CAUTION: To maintain compliance with FCC’s RF exposure guidelines, use only
the supplied antenna. Unauthorized an-
tenna, modification, or attachments
could damage the transmitter and may
violate FCC regulations.
– Operation is subject to the following two conditions:
1. This device may not cause interference and
2. this device must accept any interfer- ence, including interference that may
cause undesired operation of the de-
vice.
IC Regulatory information
– Operation is subject to the following two conditions: (1) this device may not cause
interference, and (2) this device must ac-
cept any interference, including interfer-
ence that may cause undesired opera-
tion of the device.
4-88Monitor, climate, audio, phone and voice recognition systems
Page 264 of 426
5 Starting and driving
Precautions when starting and driving..........5-2
Exhaust gas (carbon monoxide) ..............5-2
Three-way catalyst ...........................5-2
Driving precautions ...........................5-3
Tire Pressure Monitoring System
(TPMS)........................................5-4
Avoiding collision and rollover ................5-6
Off-roadrecovery ............................5-7
Rapid air pressure loss .......................5-7
Drinking alcohol/drugs and driving ...........5-8
Ignition switch ...................................5-8
Automatic transmission ......................5-9
Ignition switch positions .....................5-10
NISSAN Vehicle Immobilizer System
(if so equipped) .............................. 5-10
Before starting the engine ......................5-10
Starting the engine .............................. 5-11
Driving the vehicle .............................. 5-12
Engine protection mode .....................5-12
Automatic transmission (A/T) ...............5-13
Parking brake .................................. 5-18
Cruise control .................................. 5-18
Precautions on cruise control ................5-18
Cruise control operations ....................5-19Break-in schedule
.............................. 5-20
Fuel efficient driving tips ........................5-20
Increasing fuel economy .......................5-22
Parking/parking on hills ........................5-22
Power steering ................................. 5-23
Brake system ................................... 5-24
Brake precautions ........................... 5-24
Anti-lock Braking System (ABS) ..............5-24
Brake assist ................................. 5-25
Active brake limited slip (ABLS) system ..........5-26
Vehicle Dynamic Control (VDC) system .........5-27
Brake force distribution ......................5-28
Rear Sonar System (RSS) (if so equipped) .......5-29
Front and rear sonar system (if so equipped) . . . 5-30
Cold weather driving ........................... 5-32
Freeing a frozen door lock ...................5-32
Antifreeze ................................... 5-32
B
attery...................................... 5-32
Draining of coolant water ....................5-32
Tire equipment .............................. 5-32
Special winter equipment ...................5-33
Driving on snow or ice .......................5-33
Engine block heater (if so equipped) .........5-33
Page 271 of 426
3. When appropriate, slowly release theaccelerator pedal to gradually slow the
vehicle.
4. Gradually steer the vehicle to a safe location off the road and away from
traffic if possible.
5. Lightly apply the brake pedal to gradu- ally stop the vehicle.
6. Turn on the hazard warning flashers and contact a roadside emergency
service to change the tire. For addi-
tional information, refer to “Changing a
flat tire” in the “In case of emergency”
section of this manual.DRINKING ALCOHOL/DRUGS AND
DRIVING
WARNING
Never drive under the influence of alco-
hol or drugs. Alcohol in the bloodstream
reduces coordination, delays reaction
time and impairs judgement. Driving
af ter drinking alcohol increases the
likelihood of being involved in an acci-
dent injuring yourself and others. Addi-
tionally, if you are injured in an accident,
alcohol can increase the severity of the
injury.
NISSAN is committed to safe driving. How-
ever, you must choose not to drive under the
influence of alcohol. Every year thousands of
people are injured or killed in alcohol-related
collisions. Although the local laws vary on
what is considered to be legally intoxicated,
the fact is that alcohol affects all people dif-
ferently and most people underestimate
the effects of alcohol.
Remember, drinking and driving don’t mix!
That is true for drugs (over-the-counter,
prescription) and illegal drugs, too. Don’t
drive if your ability to operate your vehicle is
impaired by alcohol, drugs, or some other
physical condition.
WARNING
∙ Never remove the ignition key or placethe ignition switch in the LOCK posi-
tion while driving. The steering wheel
will lock. This may cause the driver to
lose control of the vehicle and could
result in serious vehicle damage or
personal injury.
IGNITION SWITCH
5-8Starting and driving
Page 272 of 426
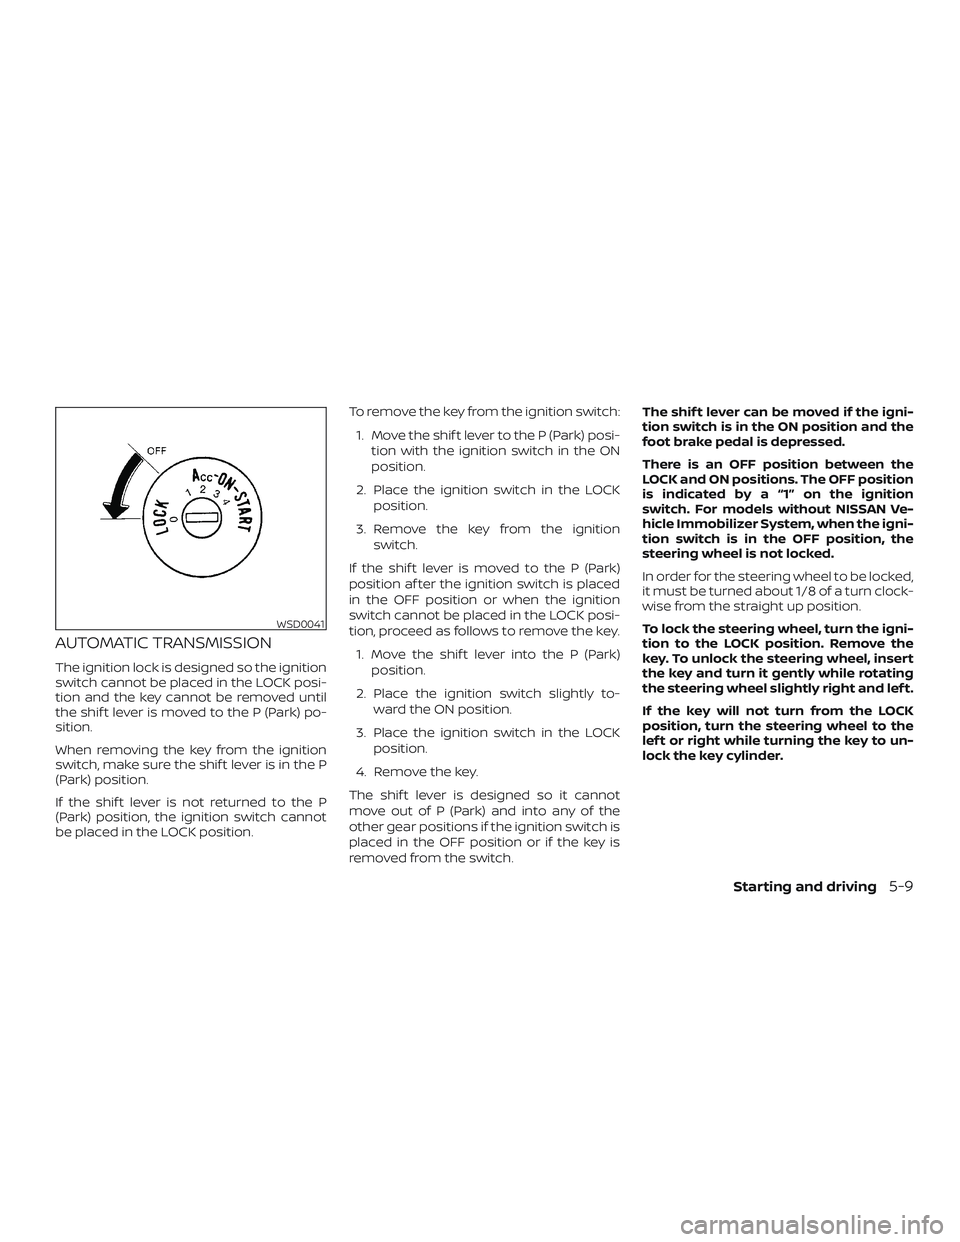
AUTOMATIC TRANSMISSION
The ignition lock is designed so the ignition
switch cannot be placed in the LOCK posi-
tion and the key cannot be removed until
the shif t lever is moved to the P (Park) po-
sition.
When removing the key from the ignition
switch, make sure the shif t lever is in the P
(Park) position.
If the shif t lever is not returned to the P
(Park) position, the ignition switch cannot
be placed in the LOCK position.To remove the key from the ignition switch:
1. Move the shif t lever to the P (Park) posi- tion with the ignition switch in the ON
position.
2. Place the ignition switch in the LOCK position.
3. Remove the key from the ignition switch.
If the shif t lever is moved to the P (Park)
position af ter the ignition switch is placed
in the OFF position or when the ignition
switch cannot be placed in the LOCK posi-
tion, proceed as follows to remove the key. 1. Move the shif t lever into the P (Park) position.
2. Place the ignition switch slightly to- ward the ON position.
3. Place the ignition switch in the LOCK position.
4. Remove the key.
The shif t lever is designed so it cannot
move out of P (Park) and into any of the
other gear positions if the ignition switch is
placed in the OFF position or if the key is
removed from the switch. The shif t lever can be moved if the igni-
tion switch is in the ON position and the
foot brake pedal is depressed.
There is an OFF position between the
LOCK and ON positions. The OFF position
is indicated by a “1” on the ignition
switch. For models without NISSAN Ve-
hicle Immobilizer System, when the igni-
tion switch is in the OFF position, the
steering wheel is not locked.
In order for the steering wheel to be locked,
it must be turned about 1/8 of a turn clock-
wise from the straight up position.
To lock the steering wheel, turn the igni-
tion to the LOCK position. Remove the
key. To unlock the steering wheel, insert
the key and turn it gently while rotating
the steering wheel slightly right and lef t.
If the key will not turn from the LOCK
position, turn the steering wheel to the
lef t or right while turning the key to un-
lock the key cylinder.
WSD0041
Starting and driving5-9
Page 273 of 426
IGNITION SWITCH POSITIONS
LOCK: Normal parking position (0)
OFF: (1)
The engine can be turned off without lock-
ing the steering wheel.
ACC: (Accessories) (2)
This position activates electrical accesso-
ries such as the radio when the engine is
not running.
ON: Normal operating position (3)
This position turns on the ignition system
and the electrical accessories.
START: (4)
This position starts the engine. As soon as
the engine has started, release the key. It
automatically returns to the ON position.
NISSAN VEHICLE IMMOBILIZER
SYSTEM (if so equipped)
The NISSAN Vehicle Immobilizer System
will not allow the engine to start without
the use of the registered key.
If the engine fails to start using a registered
key (for example, when interference is
caused by another registered key, an auto-
mated toll road device or automatic pay-
ment device on the key ring), restart the
engine using the following procedures:1. Leave the ignition switch in the ON po- sition for approximately 5 seconds.
2. Place the ignition switch in the OFF or LOCK position, and wait approximately
10 seconds.
3. Repeat steps 1 and 2.
4. Restart the engine while holding the device (which may have caused the in-
terference) separate from the regis-
tered key.
If the no start condition re-occurs, NISSAN
recommends placing the registered key on
a separate key ring to avoid interference
from other devices. ∙ Make sure the area around the vehicle is
clear.
∙ Check fluid levels such as engine oil, coolant, brake fluid, and windshield-
washer fluid as frequently as possible,
or at least whenever you refuel.
∙ Check that all windows and lights are clean.
∙ Visually inspect tires for their appear- ance and condition. Also check tires for
proper inflation.
∙ Check that all doors are closed.
∙ Position seat and adjust head restraints/headrests.
∙ Adjust inside and outside mirrors.
∙ Fasten seat belts and ask all passen- gers to do likewise.
∙ Check the operation of warning lights when the ignition switch is placed in the
ON position. For additional information,
refer to “Warning lights, indicator lights
and audible reminders” in the “Instru-
ments and controls” section of this
manual.
BEFORE STARTING THE ENGINE
5-10Starting and driving