Page 297 of 426
∙ Use a heavy-duty 3-wire, 3-prongedextension cord rated for at least 10 A.
Plug the extension cord into a Ground
Fault Interrupt (GFI) protected,
grounded 110-VAC outlet. Failure to
use the proper extension cord or a
grounded outlet can result in a fire or
electrical shock and cause serious
personal injury.
To use the engine block heater: 1. Turn the engine off.
2. Open the hood and unwrap the engine block heater cord.
3. Plug the engine block heater cord into a grounded 3-wire, 3-pronged exten-
sion cord.
4. Plug the extension cord into a Ground Fault Interrupt (GFI) protected,
grounded 110-volt AC (VAC) outlet.
5. The engine block heater must be plugged in for at least 2–4 hours, de-
pending on outside temperatures, to
properly warm the engine coolant. Use
an appropriate timer to turn the engine
block heater on. 6. Before starting the engine, unplug and
properly store the cord to keep it away
from moving parts.
5-34Starting and driving
Page 301 of 426
A. Tire stoppers
B. Flat Tire
Blocking wheels
Place tire stoppers, supplied in tool kit, at
both the front and back of the wheel diago-
nally opposite the flat tire to prevent the
vehicle from moving when it is jacked up.
WARNING
Be sure to block the wheel as the vehicle
may move and result in personal injury.
Getting the spare tire and tools
The jack and tool kit are located behind the
rear passenger side access cover. To re-
move the jack and tool kit perform the fol-
lowing:1. Remove the access cover
�1. 2. To easily access removing the jack, first
remove the tool kit by unscrewing the
retainer
�2counterclockwise.
3. Remove the tool bag.
LCE2142LCE2032LCE2030
6-4In case of emergency
Page 302 of 426

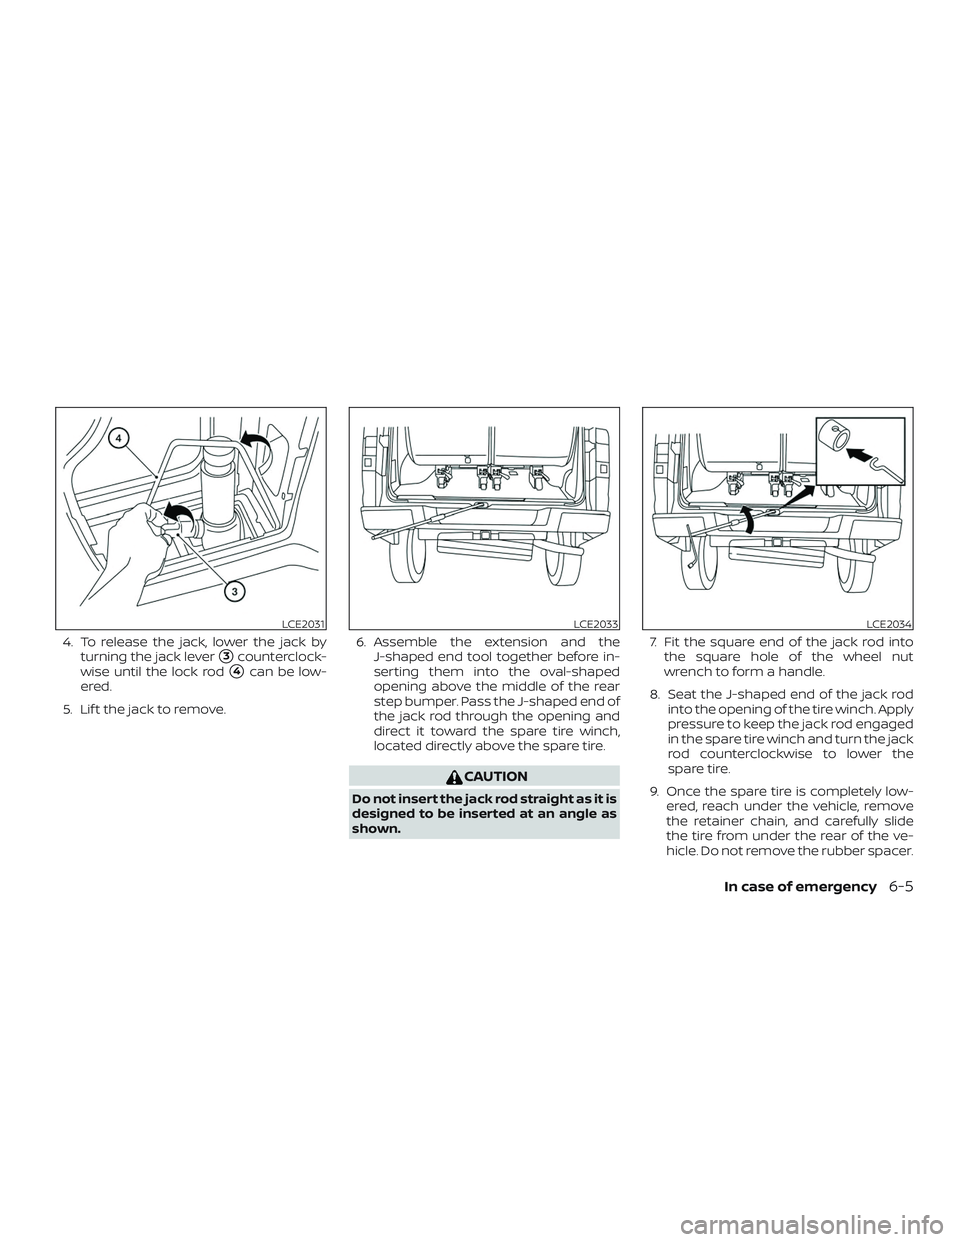
4. To release the jack, lower the jack byturning the jack lever
�3counterclock-
wise until the lock rod
�4canbelow-
ered.
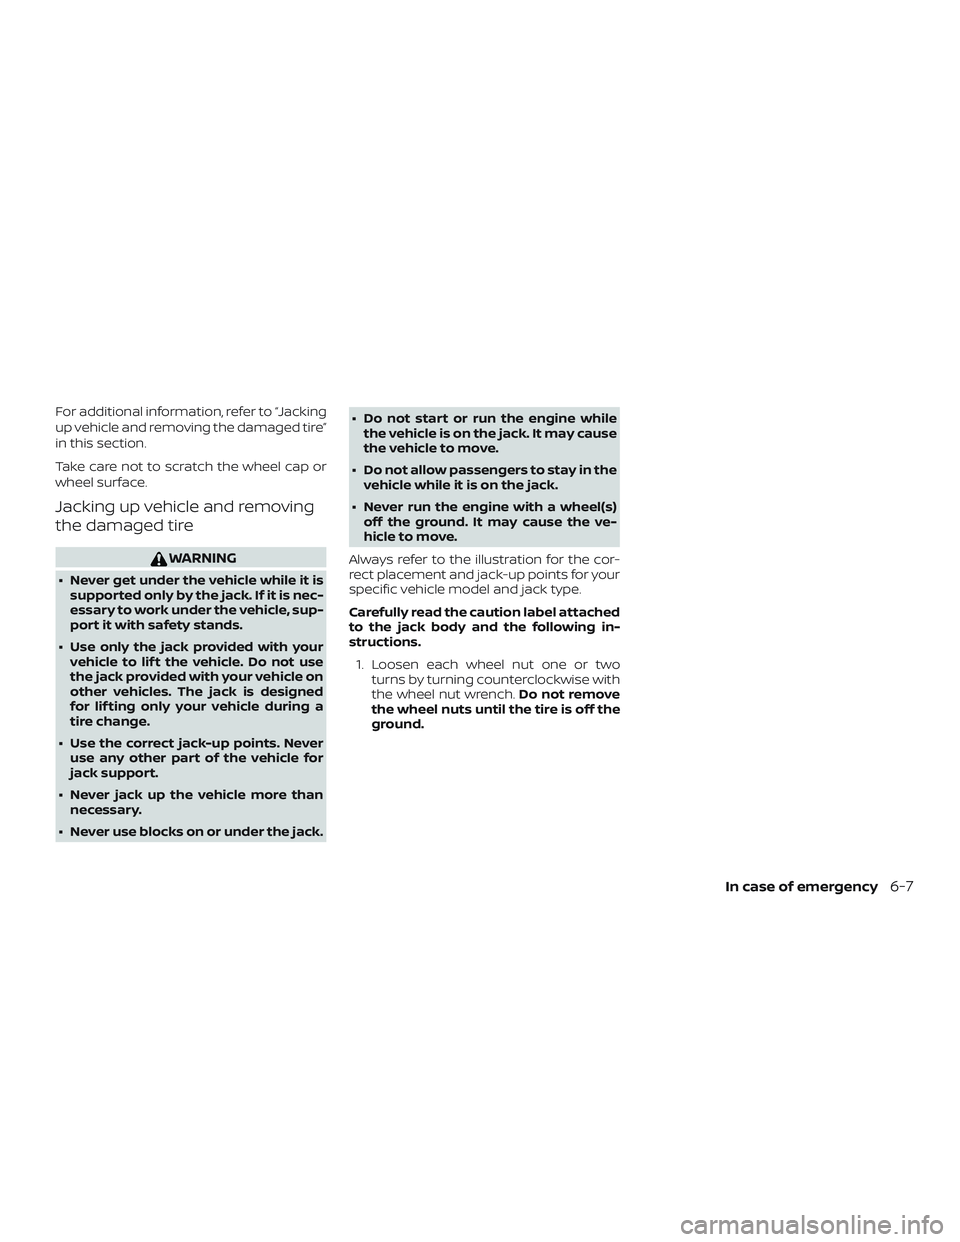
5. Lif t the jack to remove. 6. Assemble the extension and the
J-shaped end tool together before in-
serting them into the oval-shaped
opening above the middle of the rear
step bumper. Pass the J-shaped end of
the jack rod through the opening and
direct it toward the spare tire winch,
located directly above the spare tire.
CAUTION
Do not insert the jack rod straight as it is
designed to be inserted at an angle as
shown. 7. Fit the square end of the jack rod into
the square hole of the wheel nut
wrench to form a handle.
8. Seat the J-shaped end of the jack rod into the opening of the tire winch. Apply
pressure to keep the jack rod engaged
in the spare tire winch and turn the jack
rod counterclockwise to lower the
spare tire.
9. Once the spare tire is completely low- ered, reach under the vehicle, remove
the retainer chain, and carefully slide
the tire from under the rear of the ve-
hicle. Do not remove the rubber spacer.
LCE2031LCE2033LCE2034
In case of emergency6-5
Page 303 of 426
10. To reinstall the wheel, insert the tirechain through the wheel. Be sure the
rubber spacer is centered on the wheel
before lif ting. Use the assembled jack
rod and slowly rotate the winch clock-
wise to raise the wheel to the vehicle.
NOTE:
Inspect the spacer every six years and
replace as necessary. Contact a NISSAN
dealer for replacement parts if neces-
sary.
CAUTION
∙ Be sure to center the spare tire sus- pending plate on the wheel and then
lif t the spare tire.
∙ Failure to use the spacer may allow the chain to get stuck on the wheel
nut holes.
Removing bolt-on wheel caps
CAUTION
Do not use your hands to pry off wheel
caps or wheel covers. Doing so could
result in personal injury.
The wheel cap�1is only attached with the
wheel nuts and is separate from the wheel
�2.
To remove the wheel cap, remove the
wheel nuts af ter the jack is securely sup-
porting the vehicle and the tire clears the
ground.
LCE2017LCE2367
6-6In case of emergency
Page 304 of 426

For additional information, refer to “Jacking
up vehicle and removing the damaged tire”
in this section.
Take care not to scratch the wheel cap or
wheel surface.
Jacking up vehicle and removing
the damaged tire
WARNING
∙ Never get under the vehicle while it issupported only by the jack. If it is nec-
essary to work under the vehicle, sup-
port it with safety stands.
∙ Use only the jack provided with your vehicle to lif t the vehicle. Do not use
the jack provided with your vehicle on
other vehicles. The jack is designed
for lif ting only your vehicle during a
tire change.
∙ Use the correct jack-up points. Never use any other part of the vehicle for
jack support.
∙ Never jack up the vehicle more than necessary.
∙ Never use blocks on or under the jack. ∙ Do not start or run the engine while
the vehicle is on the jack. It may cause
the vehicle to move.
∙ Do not allow passengers to stay in the vehicle while it is on the jack.
∙ Never run the engine with a wheel(s) off the ground. It may cause the ve-
hicle to move.
Always refer to the illustration for the cor-
rect placement and jack-up points for your
specific vehicle model and jack type.
Carefully read the caution label attached
to the jack body and the following in-
structions. 1. Loosen each wheel nut one or two turns by turning counterclockwise with
the wheel nut wrench. Do not remove
the wheel nuts until the tire is off the
ground.
In case of emergency6-7
Page 312 of 426

CAUTION
∙ Never tow automatic transmissionmodels with the rear wheels on the
ground or four wheels on the ground
(forward or backward), as this may
cause serious and expensive damage
to the transmission. If it is necessary
to tow the vehicle with the front
wheels raised always use towing dol-
lies under the rear wheels.
∙ When towing automatic transmission models with the front wheels on the
ground or on towing dollies:
– Place the ignition switch in the OFF position, and secure the steering
wheel in a straight-ahead position
with a rope or similar device. Never
secure the steering wheel by plac-
ing the ignition switch in the LOCK
position. This may damage the
steering lock mechanism (for
models with a steering lock
mechanism).
VEHICLE RECOVERY
(freeing a stuck vehicle)
There are two options to recover a stuck
vehicle: pulling and rocking. For additional
information regarding these options,
please refer to the following sections.
Pulling a stuck vehicle
WARNING
To avoid vehicle damage, serious per-
sonal injury or death when recovering a
stuck vehicle:
∙ Contact a professional towing serviceto recover the vehicle if you have any
questions regarding the recovery
procedure.
∙ Attach recovery devices only to main structural members of the vehicle or
the recovery hooks.
∙ Do not use the vehicle tie-downs to tow or free a stuck vehicle.
∙ Only use devices specifically designed for vehicle recovery and follow the
manufacturer’s instructions. ∙ Always pull the recovery device
straight out from the front of the ve-
hicle. Never pull at an angle.
∙ Route recovery devices so they do not touch any part of the vehicle except
the attachment point.
If your vehicle is stuck in sand, snow, mud,
etc., use a tow strap or other device de-
signed specifically for vehicle recovery. Al-
ways follow the manufacturer’s instruc-
tions for the recovery device.
Rocking a stuck vehicle
WARNING
∙ Stand clear of a stuck vehicle.
∙ Do not spin your tires at high speed. This could cause them to explode and
result in serious injury. Parts of your
vehicle could also overheat and be
damaged.
If your vehicle is stuck in sand, snow, mud,
etc., use the following procedure: 1. Turn off the Vehicle Dynamic Control (VDC) system .
2. Make sure the area in front and behind the vehicle is clear of obstructions.
In case of emergency6-15
Page 323 of 426

When performing any inspection or main-
tenance work on your vehicle, always take
care to prevent serious accidental injury to
yourself or damage to the vehicle. The fol-
lowing are general precautions which
should be closely observed.
WARNING
∙ Park the vehicle on a level surface, ap-ply the parking brake securely and
block the wheels to prevent the ve-
hicle from moving. Move the shif t le-
ver to P (Park).
∙ Be sure the ignition key is in the OFF or LOCK position when performing any
parts replacement or repairs.
∙ If you must work with the engine run- ning, keep your hands, clothing, hair
and tools away from moving fans,
belts and any other moving parts.
∙ It is advisable to secure or remove any loose clothing and remove any jew-
elry, such as rings, watches, etc. be-
fore working on your vehicle.
∙ Always wear eye protection whenever you work on your vehicle. ∙ Your vehicle is equipped with an auto-
matic engine cooling fan. It may come
on at any time without warning, even
if the ignition key is in the OFF position
and the engine is not running. To
avoid injury, always disconnect the
negative battery cable before work-
ing near the fan.
∙ If you must run the engine in an en- closed space such as a garage, be sure
there is proper ventilation for exhaust
gases to escape.
∙ Never get under the vehicle while it is supported only by a jack. If it is neces-
sary to work under the vehicle, sup-
port it with safety stands.
∙ Keep smoking materials, flame and sparks away from the fuel tank and
battery.
∙ On gasoline engine models, the fuel filter or fuel lines should be serviced. It
is recommended that you visit a
NISSAN dealer for this service because
the fuel lines are under high pressure
even when the engine is off.
CAUTION
∙ Do not work under the hood while theengine is hot. Turn the engine off and
wait until it cools down.
∙ Avoid contact with used engine oil and coolant. Improperly disposed en-
gine oil, engine coolant and/or other
vehicle fluids can damage the envi-
ronment. Always conform to local
regulations for disposal of vehicle
fluid.
∙ Never leave the engine or the trans- mission related component harness
connector disconnected while the ig-
nition switch is in the ON position.
∙ Never connect or disconnect the bat- tery or any transistorized component
while the ignition switch is in the ON
position.
∙ DO NOT power wash any interior por- tion of this vehicle to help minimize
liquid intrusion and potential elec-
tronic component damage.
This “Do-it-yourself ” section gives instruc-
tions regarding only those items which are
relatively easy for an owner to perform.
MAINTENANCE PRECAUTIONS
8-2Do-it-yourself
Page 330 of 426
CAUTION
Oil level should be checked regularly.
Operating the engine with an insuffi-
cient amount of oil can damage the en-
gine, and such damage is not covered
by warranty.
CHANGING ENGINE OIL
1. Park the vehicle on a level surface andapply the parking brake. 2. Start the engine and let it idle until it
reaches operating temperature, then
turn it off.
3. Remove the oil filler cap
�Aby turning it
counterclockwise.
VQ40DE engineLDI2595
VK56VD engine
LDI3068
Do-it-yourself8-9