Page 10 of 330
1. Engine hood (P. 3-9)
2. Windshield (P. 8-16)
3. Wiper and washer switch (P. 2-16)
4. Antenna (P. 4-46)
5. Power windows (if so equipped)(P. 2-27)
6. Door locks (P. 3-3) Key fob (if so equipped) (P. 3-6)
Keys (P. 3-2)
7 Mirrors (P. 3-15)
8. Tire pressure (P. 8-32) Flat tire (P. 6-2)
Tire chains (P. 8-32)
9. Headlight and turn signal switch
(P. 2-18)
Daytime Running Lights (DRL)
system (P. 2-18)
Replacing bulbs (P. 8-22)
10. Fog light switch (if so equipped)
(P. 2-18)
Refer to the page number indicated in
parentheses for operating details.
LII2335
EXTERIOR FRONT
Illustrated table of contents0-3
Page 11 of 330
1. Replacing bulbs (P. 8-22)
2. Rear wiper and washer switch(P. 2-16)
3. Rear window defroster switch
(P. 2-18)
4. Rear hatch opener (P. 3-10)
5 Rearview monitor (if so equipped)
(P. 4-2)
6. Fuel-filler door (P. 3-11) Fuel-filler cap (P. 3-11)
Fuel recommendation (P. 10-2)
7. Child safety rear door lock (P. 3-3)
Refer to the page number indicated in
parentheses for operating details.
LII2336
EXTERIOR REAR
0-4Illustrated table of contents
Page 16 of 330

warning light 2-9
Brake warning
light
2-9
Charge warning
light2-9
Door open
warning light2-10
Engine oil pres-
sure warning light2-10
High tempera")
Warninglight Name Page
Anti-lock Braking
System (ABS)
warning light 2-9
Brake warning
light
2-9
Charge warning
light2-9
Door open
warning light2-10
Engine oil pres-
sure warning light2-10
High temperature
warning light (red)2-10
Low windshield-
washer fluid
warning light2-10
Warning
light Name Page
Power steering
warning light
(if so equipped) 2-11
Seat belt warning
light and chime
2-11
Supplemental air
bag warning light2-11
Indicator
light Name Page
Automatic Trans-
mission position
indicator light
(A/T models only) 2-12
CRUISE indicator
light (if so equipped)
2-12
Front fog light
indicator light
(if so equipped)
2-12
Indicator
light Name Page
Front passenger air
bag status light2-12
High beam indi-
cator light (blue) 2-12
Malfunction Indi-
cator Light (MIL)2-12
Overdrive OFF
indicator light
(A/T models only) 2-13
Security indicator
light
2-13
Slip indicator light 2-13
Turn signal/hazard
indicator lights2-13
Vehicle Dynamic
Control (VDC) OFF
indicator light2-14
WARNING AND INDICATOR LIGHTS
Illustrated table of contents0-9
Page 19 of 330

WARNING
∙ Do not ride in a moving vehicle whenthe seatback is reclined. This can be
dangerous. The shoulder belt will not
be against your body. In an accident,
you could be thrown into it and re-
ceive neck or other serious injuries.
You could also slide under the lap belt
and receive serious internal injuries. ∙ For the most effective protection
when the vehicle is in motion, the seat
should be upright. Always sit well
back and upright in the seat with both
feet on the floor and adjust the seat
properly. For additional information,
refer to “Precautions on seat belt us-
age” in this section.
∙ Af ter adjustment, gently rock in the seat to make sure it is securely locked. ∙ Do not leave children unattended in-
side the vehicle. They could unknow-
ingly activate switches or controls or
make the vehicle move. Unattended
children could become involved in se-
rious accidents.
∙ To help avoid risk of injury or death through unintended operation of the
vehicle and/or its systems, do not
leave children, people who require the
assistance of others or pets unat-
tended in your vehicle. Additionally,
the temperature inside a closed ve-
hicle on a warm day can quickly be-
come high enough to cause a signifi-
cant risk of injury or death to people
and pets.
∙ Do not adjust the driver’s seat while driving so full attention may be given
to vehicle operation. The seat may
move suddenly and could cause loss
of control of the vehicle.
∙ The seatback should not be reclined any more than needed for comfort.
Seat belts are most effective when the
passenger sits well back and straight
up in the seat. If the seatback is re-
clined, the risk of sliding under the lap
belt and being injured is increased.
ARS1152
SEATS
1-2Safety—Seats, seat belts and supplemental restraint system
Page 20 of 330

CAUTION
When adjusting the seat positions, be
sure not to contact any moving parts to
avoid possible injuries and/or damage.
FRONT MANUAL SEAT
ADJUSTMENT
Your vehicle seats can be adjusted manu-
ally. For additional information about ad-
justing the seats, refer to the steps outlined
in this section.
Forward and backward
Pull the center of the bar up and hold it
while you slide the seat forward or back-
ward to the desired position. Release the
bar to lock the seat in position.
Reclining
To recline the seatback, pull the lever up
and lean back. To bring the seatback for-
ward, pull the lever up and lean your body
forward. Release the lever to lock the seat-
back in position.
The reclining feature allows adjustment of
the seatback for occupants of different
sizes for added comfort and to help obtain
proper seat belt fit. For additional informa-
tion, refer to “Precautions on seat belt us-
age” in this section. Also, the seatback can
be reclined to allow occupants to rest
when the vehicle is stopped and the shif t
LRS2459LRS2460
Safety—Seats, seat belts and supplemental restraint system1-3
Page 22 of 330
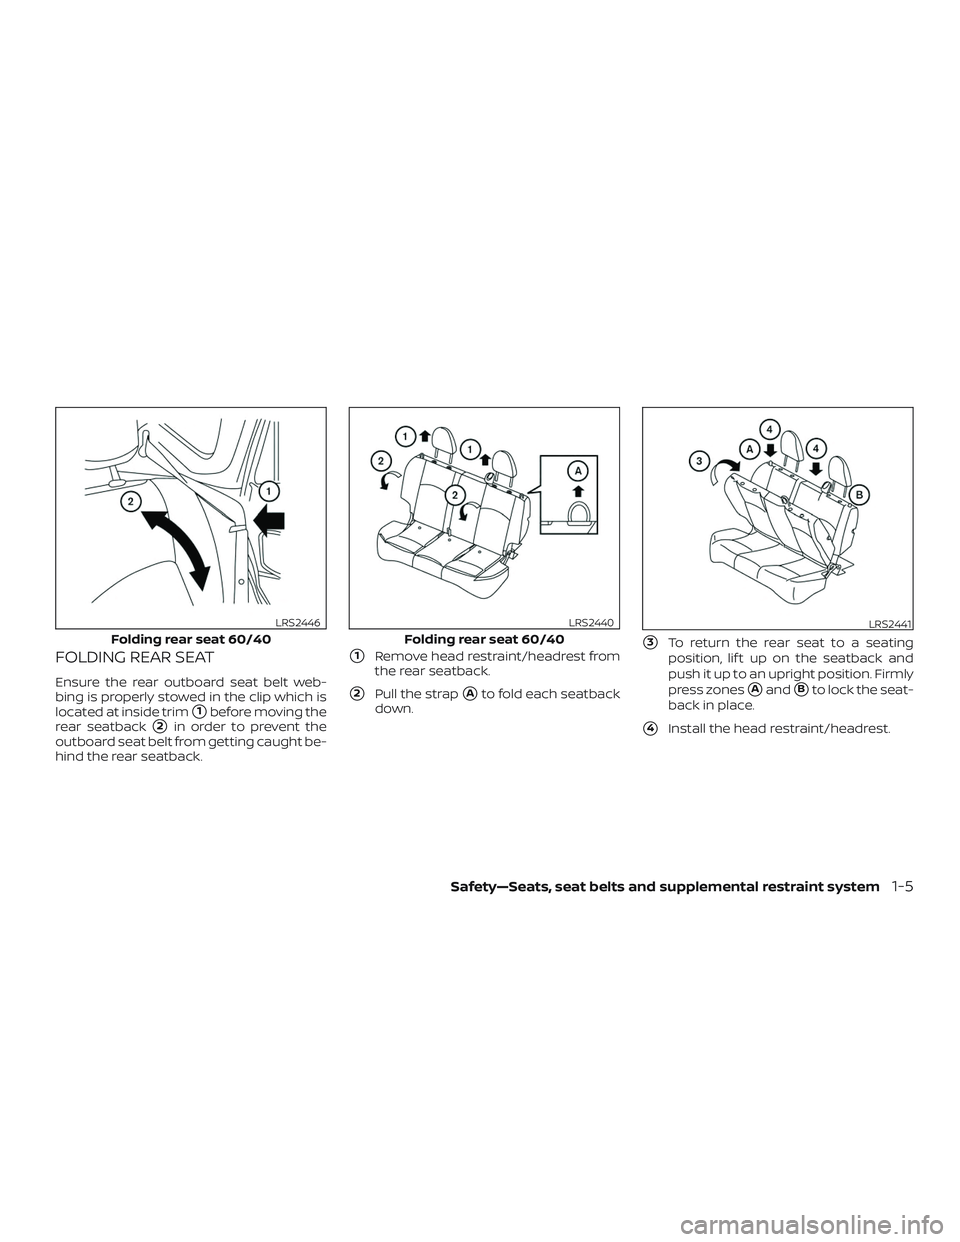
FOLDING REAR SEAT
Ensure the rear outboard seat belt web-
bing is properly stowed in the clip which is
located at inside trim
�1before moving the
rear seatback
�2in order to prevent the
outboard seat belt from getting caught be-
hind the rear seatback.
�1Remove head restraint/headrest from
the rear seatback.
�2Pull the strap�Ato fold each seatback
down.
�3To return the rear seat to a seating
position, lif t up on the seatback and
push it up to an upright position. Firmly
press zones
�Aand�Bto lock the seat-
back in place.
�4Install the head restraint/headrest.
Folding rear seat 60/40
LRS2446
Folding rear seat 60/40
LRS2440LRS2441
Safety—Seats, seat belts and supplemental restraint system1-5
Page 23 of 330

WARNING
∙ Never allow anyone to ride in thecargo area or on the rear seat when it
is in the fold-down position. Use of
these areas by passengers without
proper restraints could result in seri-
ous injury or death in an accident or
sudden stop.
∙ Properly secure all cargo with ropes or straps to help prevent it from sliding
or shif ting. Do not place cargo higher
than the seatbacks. In a sudden stop
or collision, unsecured cargo could
cause personal injury.
∙ When returning the seatbacks to the upright position, be certain they are
completely secured in the latched po-
sition. If they are not completely se-
cured, passengers may be injured in
an accident or sudden stop.
∙ Closely supervise children when they are around cars to prevent them from
playing and becoming locked in the
hatch where they could be seriously
injured. Keep the car locked, with the
rear seatback and hatch securely
latched when not in use, and prevent
children’s access to car keys.
WARNING
Head restraints/headrests supplement
the other vehicle safety systems. They
may provide additional protection
against injury in certain rear end colli-
sions. Adjustable head
restraints/headrests must be adjusted
properly, as specified in this section.
Check the adjustment af ter someone
else uses the seat. Do not attach any-
thing to the head restraint/headrest
stalks or remove the head
restraint/headrest. Do not use the seat
if the head restraint/headrest has been
removed. If the head restraint/headrest
was removed, reinstall and properly ad-
just the head restraint/headrest before
an occupant uses the seating position.
Failure to follow these instructions can
reduce the effectiveness of the head
restraints/headrests. This may in-
crease the risk of serious injury or death
in a collision.
The illustration shows the seating positions
equipped with head restraints/headrests.
� Indicates the seating position is
equipped with a head restraint.
� Indicates the seating position is equipped
with a headrest.
+ Indicates the seating position is not
equipped with a head restraint or headrest
(if applicable).
∙ Your vehicle is equipped with a head restraint/headrest that may be inte-
grated, adjustable or non-adjustable.
LRS2000
HEAD RESTRAINTS/HEADRESTS
1-6Safety—Seats, seat belts and supplemental restraint system
Page 24 of 330

to lock them in a desired adjustment
position.
∙ The non-adjustable head restraints/ headrests have a single locking")
∙ Adjustable head restraints/headrestshave multiple notches along the stalk(s)
to lock them in a desired adjustment
position.
∙ The non-adjustable head restraints/ headrests have a single locking notch
to secure them to the seat frame.
∙ Proper Adjustment: – For the adjustable type, align thehead restraint/headrest so the cen-
ter of your ear is approximately level
with the center of the head
restraint/headrest.
– If your ear position is still higher than the recommended alignment, place
the head restraint/headrest at the
highest position.
∙ If the head restraint/headrest has been removed, ensure that it is reinstalled
and locked in place before riding in that
designated seating position.
ADJUSTABLE HEAD RESTRAINT/
HEADREST COMPONENTS
1. Removable head restraint/headrest
2. Multiple notches
3. Lock knob
4. Stalks
NON-ADJUSTABLE HEAD
RESTRAINT/HEADREST
COMPONENTS
1. Removable head restraint/headrest
2. Single notch
3. Lock knob
4. Stalks
LRS2300LRS2299
Safety—Seats, seat belts and supplemental restraint system1-7

2. Windshield (P. 8-16)
3. Wiper and washer switch (P. 2-16)
4. Antenna (P. 4-46)
5. Power windows (if so equipped)(P. 2-27)
6. Door locks (P. 3-3) Key fob (if so equipped) (P.")

2. Rear wiper and washer switch(P. 2-16)
3. Rear window defroster switch
(P. 2-18)
4. Rear hatch opener (P. 3-10)
5 Rearview monitor (if so equipped)
(P. 4-2)
6. Fuel-fill")