2018 NISSAN MICRA lock
[x] Cancel search: lockPage 47 of 330
hicle seat belt (if applicable). Not all
child restraints fit in all types of vehicles.
5. Check to make sure the child restraint is properly secured prior to each use. If
the child restraint is loose, repeat
steps 1 through 4.
REAR-FACING CHILD RESTRAINT
INSTALLATION USING THE SEAT
BELTS
WARNING
The three-point seat belt with Auto-
matic Locking Retractor (ALR) must be
used when installing a child restraint.
Failure to use the ALR mode will result in
the child restraint not being properly
secured. The restraint could tip over or
be loose and cause injury to a child in a
sudden stop or collision.
For additional information, refer to all Warn-
ings and Cautions in the “Child safety” and
“Child restraints” sections of this manual
before installing a child restraint. Do not use the lower anchors if the com-
bined weight of the child and the child re-
straint exceeds 65 lbs (29.5 kg). If the com-
bined weight of the child and the child
restraint is greater than 65 lbs (29.5 kg), use
the vehicle’s seat belt (not the lower an-
chors) to install the child restraint. Be sure
to follow the child restraint manufacturer’s
instructions for installation.
Follow these steps to install a rear-facing
child restraint using the vehicle seat belts in
the rear seats:
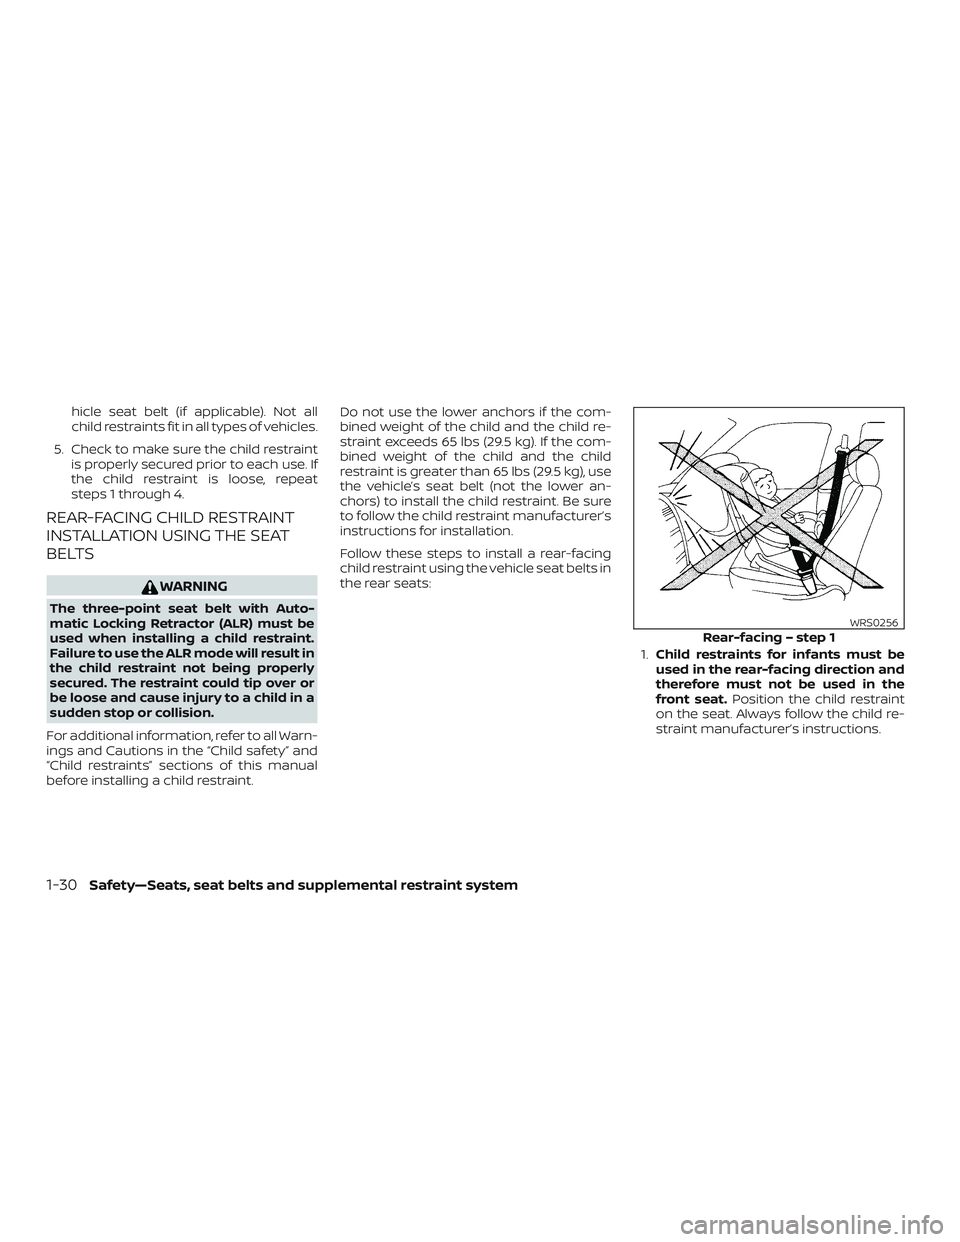
1.Child restraints for infants must be
used in the rear-facing direction and
therefore must not be used in the
front seat. Position the child restraint
on the seat. Always follow the child re-
straint manufacturer’s instructions.
Rear-facing – step 1WRS0256
1-30Safety—Seats, seat belts and supplemental restraint system
Page 49 of 330
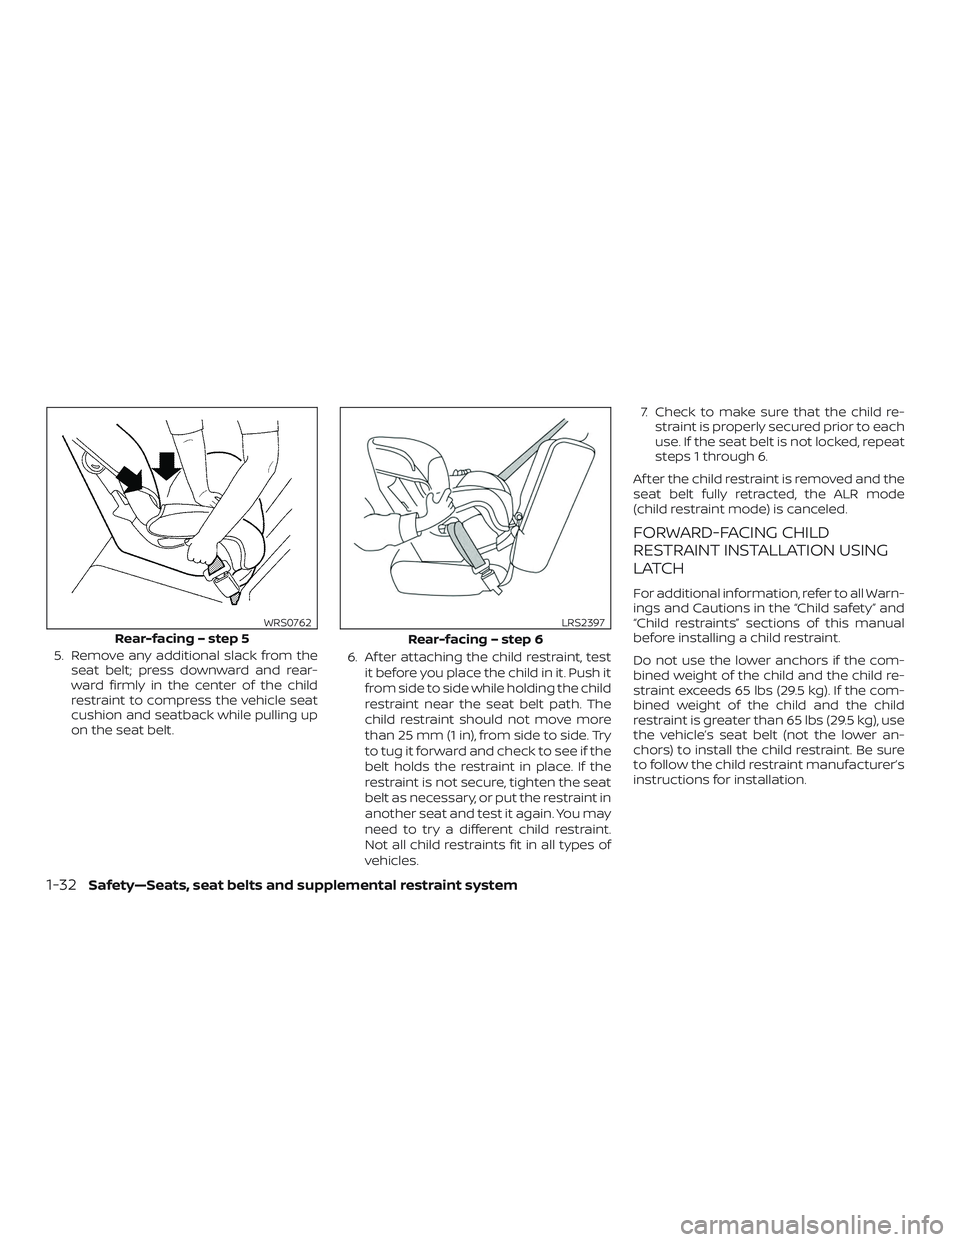
5. Remove any additional slack from theseat belt; press downward and rear-
ward firmly in the center of the child
restraint to compress the vehicle seat
cushion and seatback while pulling up
on the seat belt. 6. Af ter attaching the child restraint, test
it before you place the child in it. Push it
from side to side while holding the child
restraint near the seat belt path. The
child restraint should not move more
than 25 mm (1 in), from side to side. Try
to tug it forward and check to see if the
belt holds the restraint in place. If the
restraint is not secure, tighten the seat
belt as necessary, or put the restraint in
another seat and test it again. You may
need to try a different child restraint.
Not all child restraints fit in all types of
vehicles. 7. Check to make sure that the child re-
straint is properly secured prior to each
use. If the seat belt is not locked, repeat
steps 1 through 6.
Af ter the child restraint is removed and the
seat belt fully retracted, the ALR mode
(child restraint mode) is canceled.
FORWARD-FACING CHILD
RESTRAINT INSTALLATION USING
LATCH
For additional information, refer to all Warn-
ings and Cautions in the “Child safety” and
“Child restraints” sections of this manual
before installing a child restraint.
Do not use the lower anchors if the com-
bined weight of the child and the child re-
straint exceeds 65 lbs (29.5 kg). If the com-
bined weight of the child and the child
restraint is greater than 65 lbs (29.5 kg), use
the vehicle’s seat belt (not the lower an-
chors) to install the child restraint. Be sure
to follow the child restraint manufacturer’s
instructions for installation.
Rear-facing – step 5
WRS0762
Rear-facing – step 6
LRS2397
1-32Safety—Seats, seat belts and supplemental restraint system
Page 53 of 330

FORWARD-FACING CHILD
RESTRAINT INSTALLATION USING
THE SEAT BELTS
WARNING
The three-point seat belt with Auto-
matic Locking Retractor (ALR) must be
used when installing a child restraint.
Failure to use the ALR mode will result in
the child restraint not being properly
secured. The restraint could tip over or
be loose and cause injury to a child in a
sudden stop or collision. Also, it can
change the operation of the front pas-
senger air bag. For additional informa-
tion, refer to “Front passenger air bag
and status light” in this section.For additional information, refer to all Warn-
ings and Cautions in the “Child safety” and
“Child restraints” sections of this manual
before installing a child restraint.
Do not use the lower anchors if the com-
bined weight of the child and the child re-
straint exceeds 29.5 kg (65 lbs). If the com-
bined weight of the child and the child
restraint is greater than 29.5 kg (65 lbs), use
the vehicle’s seat belt (not the lower an-
chors) to install the child restraint. Be sure
to follow the child restraint manufacturer’s
instructions for installation. Follow these steps to install a forward-
facing child restraint using the vehicle seat
belt in the rear seats or in the front passen-
ger seat:
1. If you must install a child restraint in
the front seat, it should be placed in a
forward-facing direction only. Move
the seat to the rearmost position.
Child restraints for infants must be
used in the rear-facing direction and,
therefore, must not be used in the
front seat.
2. Position the child restraint on the seat. Always follow the child restraint manu-
facturer’s instructions.
The back of the child restraint should
be secured against the vehicle seat-
back.
If necessary, adjust or remove the head
restraint/headrest to obtain the cor-
rect child restraint fit. If the head
restraint/headrest is removed, store it
in a secure place. Be sure to reinstall
the head restraint/headrest when
the child restraint is removed. For ad-
ditional information about head
restraint/headrest adjustment, re-
moval and installation, refer to “Head
restraints/headrests” in this section.
Forward-facing (front passenger seat) – step 1
WRS0699
1-36Safety—Seats, seat belts and supplemental restraint system
Page 56 of 330
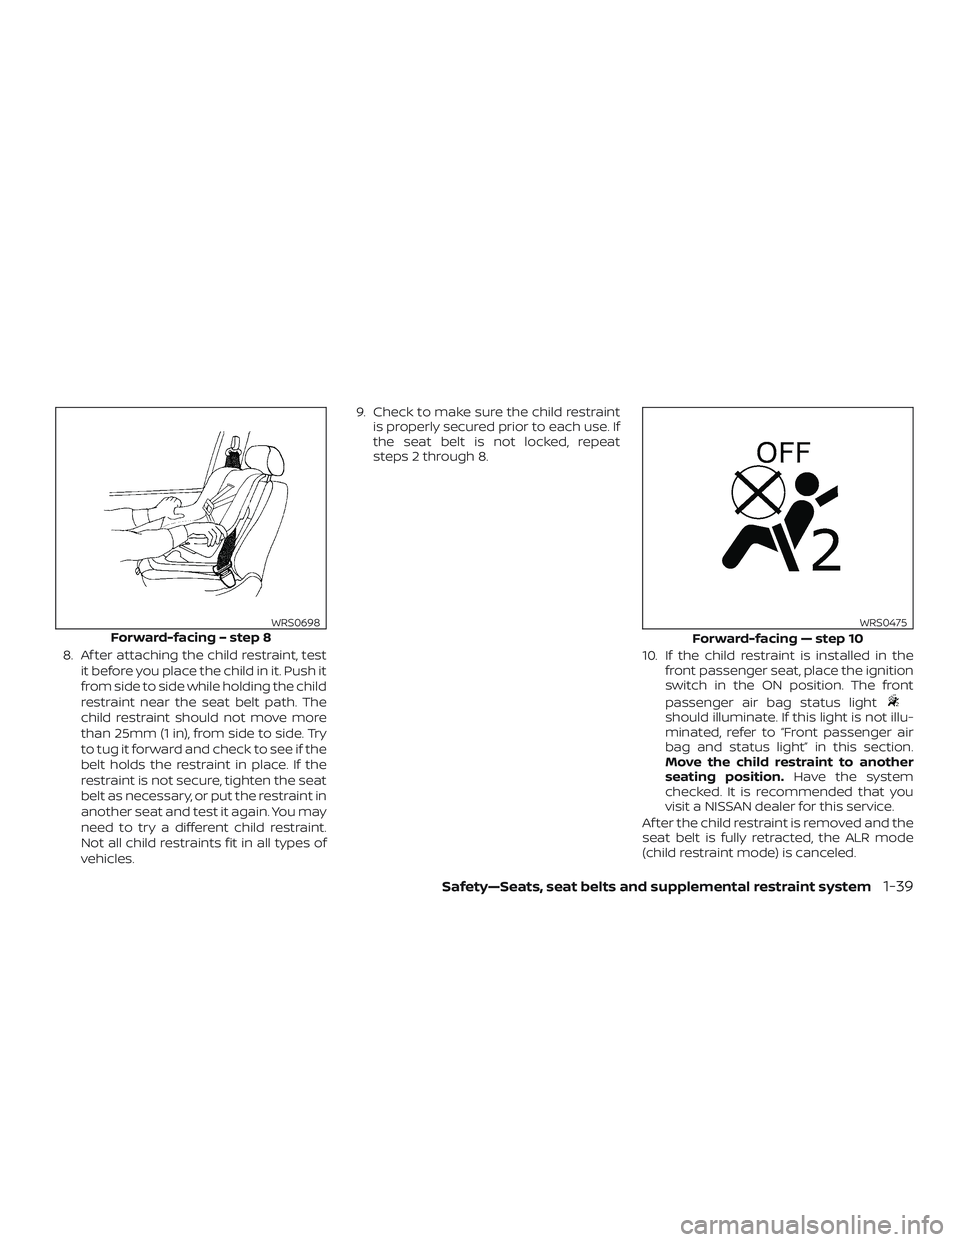
8. Af ter attaching the child restraint, testit before you place the child in it. Push it
from side to side while holding the child
restraint near the seat belt path. The
child restraint should not move more
than 25mm (1 in), from side to side. Try
to tug it forward and check to see if the
belt holds the restraint in place. If the
restraint is not secure, tighten the seat
belt as necessary, or put the restraint in
another seat and test it again. You may
need to try a different child restraint.
Not all child restraints fit in all types of
vehicles. 9. Check to make sure the child restraint
is properly secured prior to each use. If
the seat belt is not locked, repeat
steps 2 through 8.
10. If the child restraint is installed in thefront passenger seat, place the ignition
switch in the ON position. The front
passenger air bag status light
should illuminate. If this light is not illu-
minated, refer to “Front passenger air
bag and status light” in this section.
Move the child restraint to another
seating position. Have the system
checked. It is recommended that you
visit a NISSAN dealer for this service.
Af ter the child restraint is removed and the
seat belt is fully retracted, the ALR mode
(child restraint mode) is canceled.
Forward-facing – step 8WRS0698
Forward-facing — step 10
WRS0475
Safety—Seats, seat belts and supplemental restraint system1-39
Page 59 of 330
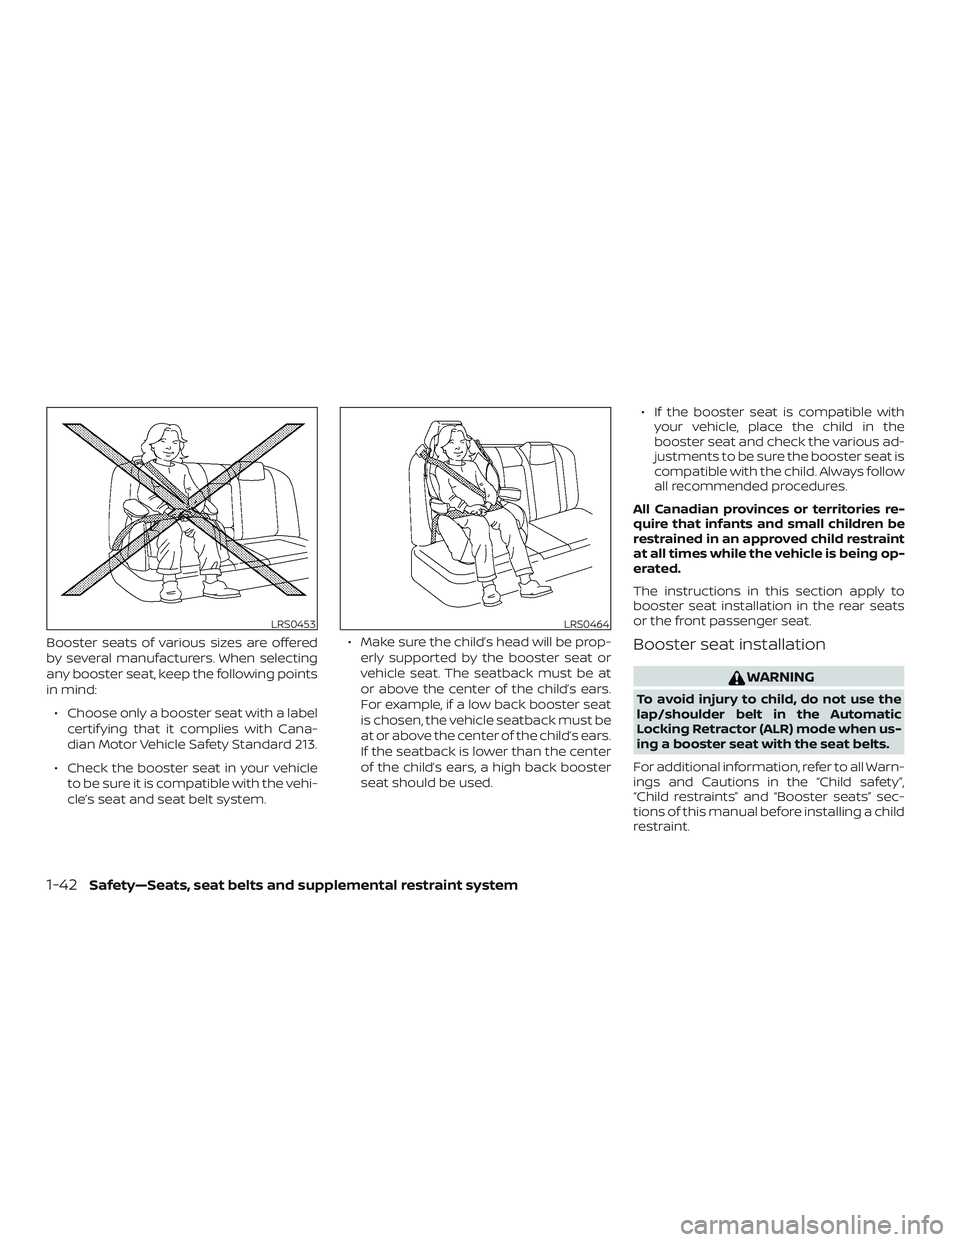
Booster seats of various sizes are offered
by several manufacturers. When selecting
any booster seat, keep the following points
in mind:∙ Choose only a booster seat with a label certif ying that it complies with Cana-
dian Motor Vehicle Safety Standard 213.
∙ Check the booster seat in your vehicle to be sure it is compatible with the vehi-
cle’s seat and seat belt system. ∙ Make sure the child’s head will be prop-
erly supported by the booster seat or
vehicle seat. The seatback must be at
or above the center of the child’s ears.
For example, if a low back booster seat
is chosen, the vehicle seatback must be
at or above the center of the child’s ears.
If the seatback is lower than the center
of the child’s ears, a high back booster
seat should be used. ∙ If the booster seat is compatible with
your vehicle, place the child in the
booster seat and check the various ad-
justments to be sure the booster seat is
compatible with the child. Always follow
all recommended procedures.
All Canadian provinces or territories re-
quire that infants and small children be
restrained in an approved child restraint
at all times while the vehicle is being op-
erated.
The instructions in this section apply to
booster seat installation in the rear seats
or the front passenger seat.Booster seat installation
WARNING
To avoid injury to child, do not use the
lap/shoulder belt in the Automatic
Locking Retractor (ALR) mode when us-
ing a booster seat with the seat belts.
For additional information, refer to all Warn-
ings and Cautions in the “Child safety”,
“Child restraints” and “Booster seats” sec-
tions of this manual before installing a child
restraint.
LRS0453LRS0464
1-42Safety—Seats, seat belts and supplemental restraint system
Page 74 of 330
NOTE:
This vehicle’s occupant classification
sensor system locks the classification
during driving so it is important that you
confirm that the front passenger is prop-
erly classified prior to driving. Also, the
occupant classification sensor system
may recalculate the weight of the occu-
pant when the vehicle comes to a stop
(i.e. stop light, stop sign, etc.), so front
passenger seat occupants should con-
tinue to remain seated as outlined
above.
Troubleshooting
If you think the front passenger air bag
status light is incorrect:1. If the light is ON with no front passenger and no objects on the front passenger
seat:
This may be due to the following condi-
tions that may be interfering with the
weight sensors: ∙ An object weighing over 9.1 lbs. (4 kg) hanging on the seat or placed in the
seatback pocket.
∙ A child restraint or other object pressing against the rear of the seatback. ∙ A rear passenger pushing or pulling on
the back of the front passenger seat.
∙ Forcing the front seat or seatback against an object on the seat or floor
behind it.
∙ An object placed under the front pas- senger seat.
∙ An object placed between the seat cushion and center console or between
the seat cushion and the door.
If the vehicle is moving, please come to a
stop when it is safe to do so. Check and
correct any of the above conditions. Re-
start the vehicle and wait 1 minute.
NOTE:
A system check will be performed during
which the front passenger air bag status
light will remain lit for about 7 seconds
initially.
If the light is still ON af ter this, the vehicle
should be checked as soon as possible. It is
recommended that you visit a NISSAN
dealer for this service. 2. If the light is ON with an adult occupy-
ing the front passenger seat:
∙ Occupant is a small adult — the air bag light is functioning as intended. The
front passenger air bag is suppressed.
However, if the occupant is not a small
adult, then this may be due to the following
conditions that may be interfering with the
weight sensors: ∙ Occupant is not sitting upright, leaning against the seatback, and centered on
the seat cushion with his/her feet com-
fortably extended to the floor.
∙ A child restraint or other object pressing against the rear of the seatback.
∙ A rear passenger pushing or pulling on the back of the front passenger seat.
∙ Forcing the front seat or seatback against an object on the seat or floor
behind it.
∙ An object placed under the front pas- senger seat.
∙ An object placed between the seat cushion and center console or between
the seat cushion and the door.
Safety—Seats, seat belts and supplemental restraint system1-57
Page 80 of 330

SUPPLEMENTAL AIR BAG WARNING
LIGHT
The supplemental air bag warning light,
displaying
in the instrument panel,
monitors the circuits for the air bag sys-
tems and all related wiring.
When the ignition switch is in the ON or
START position, the supplemental air bag
warning light illuminates for about 7 sec-
onds and then turns off. This means the
system is operational. If any of the following conditions occur, the
front air bag needs servicing:
∙ The supplemental air bag warning light remains on af ter approximately 7 sec-
onds.
∙ The supplemental air bag warning light flashes intermittently.
∙ The supplemental air bag warning light does not come on at all.
Under these conditions, the front air bag
may not operate properly. It must be
checked and repaired. It is recommended
that you visit a NISSAN dealer for this ser-
vice.
WARNING
If the supplemental air bag warning
light is on, it could mean that the front
air bag will not operate in an accident.
To help avoid injury to yourself or oth-
ers, have your vehicle checked as soon
as possible. It is recommended that you
visit a NISSAN dealer for this service.
Repair and replacement
procedure
The front air bags, side air bags, curtain air
bags and pretensioner(s) are designed to
inflate on a one-time-only basis. As a re-
minder, unless it is damaged, the supple-
mental air bag warning light remains illu-
minated af ter inflation has occurred. These
systems should be repaired and/or re-
placed as soon as possible. It is recom-
mended that you visit a NISSAN dealer for
this service.
When maintenance work is required on the
vehicle, the front air bags, side air bags,
curtain air bags, pretensioner(s) and re-
lated parts should be pointed out to the
person performing the maintenance. The
ignition switch should always be placed in
the LOCK position when working under the
hood or inside the vehicle.
LRS0100
Safety—Seats, seat belts and supplemental restraint system1-63
Page 89 of 330

Anti-lock Braking System (ABS)
warning lightPower steering warning light
(if so equipped)High beam indicator light (blue)
Brake warning lightSeat belt warning light and chimeMalfunction Indicator Light (MIL)
Charge warning lightSupplemental air bag warning lightOverdrive OFF indicator light
(A/T models only)
Door open warning lightAutomatic Transmission position
indicator light (A/T models only)Security indicator light
Engine oil pressure warning lightCRUISE indicator light (if so equipped)Slip indicator light
High temperature warning light (red)Front fog light indicator light
(if so equipped)Turn signal/hazard indicator lights
Low windshield-washer fluid warning lightFront passenger air bag status lightVehicle Dynamic Control (VDC)
OFF indicator light
CHECKING LIGHTS
With all doors closed, apply the parking
brake, fasten the seat belts and place the
ignition switch in the ON position without
starting the engine.The following lights (if so equipped) will
come on:
,,,,,
The following lights (if so equipped) come
on briefly and then go off:
,,,,,
If any light fails to come on or operate in a
way other than described, it may indicate a
burned-out bulb and/or a system mal-
function. Have the system checked. It is
WARNING LIGHTS, INDICATOR LIGHTS
AND AUDIBLE REMINDERS
2-8Instruments and controls