Page 12 of 330
1. Sun visors (P. 3-14)
2. Interior lights (P. 2-29)
3. Rearview mirror (P. 3-15)
4. Glove box (P. 2-23)
5. Storage trays (P. 2-23)Cup holders (P. 2-23)
Refer to the page number indicated in
parentheses for operating details.
LII2375
PASSENGER COMPARTMENT
Illustrated table of contents0-5
Page 82 of 330

2 Instruments and controls
Instrument panel................................2-2
Meters and gauges ..............................2-3
Speedometer and odometer .................2-4
Tachometer ..................................2-5
Fuel gauge ...................................2-6
Trip computer ................................2-6
Warning lights, indicator lights and audible
reminders .......................................2-8
Checking lights ...............................2-8
Warning lights ................................2-9
Indicator lights .............................. 2-12
Audible reminders ........................... 2-14
Security systems ............................... 2-14
NISSAN Vehicle Immobilizer System .........2-14
Wiper and washer switch .......................2-16
Switch operation ............................ 2-16
Rear switch operation ....................... 2-17
Rear window and outside mirror
(if so equipped) defroster switch ................2-18
Headlight and turn signal switch ...............2-18Headlight control switch
.....................2-18
Daytime Running Lights (DRL) system .......2-19
Instrument brightness control ...............2-20
Turn signal switch ........................... 2-20
Front fog lights (if so equipped) ..............2-21
Horn ........................................... 2-21
Vehicle Dynamic Control (VDC) OFF switch ......2-22
Power outlet .................................... 2-22
Storage ........................................ 2-23
Front-door pockets .......................... 2-23
Storage tray (if so equipped) .................2-23
Glovebox.................................... 2-24
Cup holders ................................. 2-24
Cargo cover (if so equipped) .................2-25
Windows ....................................... 2-27
Manual windows (if so equipped) ............2-27
Power windows (if so equipped) .............2-27
Interior light .................................... 2-29
Luggage compartment light ...................2-30
Page 110 of 330

Automatic operation
To fully open a window equipped with au-
tomatic operation, push the window
switch down to the second detent and re-
lease it; it need not be held. The window
automatically opens all the way. To stop
the window, lif t the switch up while the win-
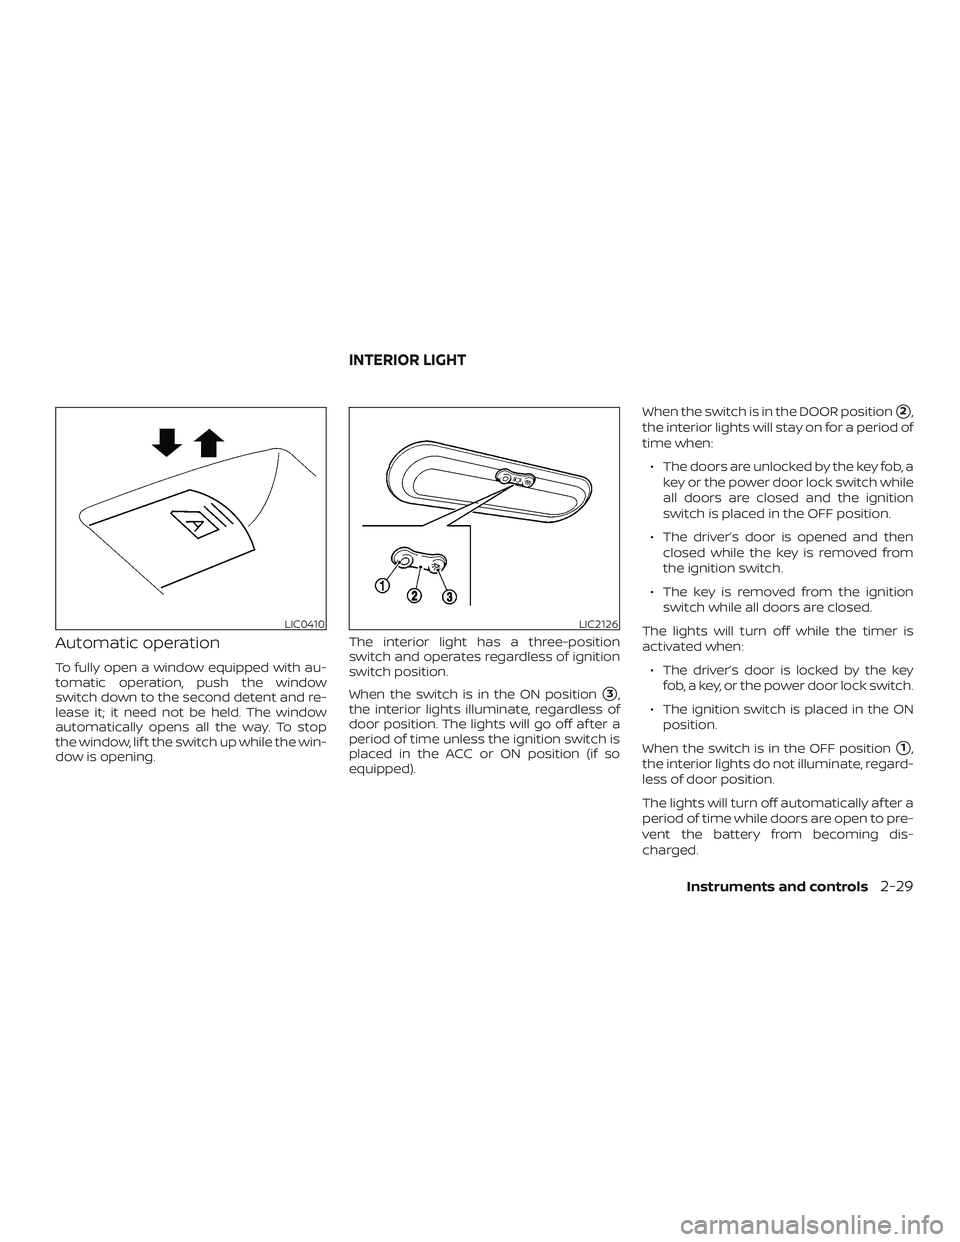
dow is opening.The interior light has a three-position
switch and operates regardless of ignition
switch position.
When the switch is in the ON position
�3,
the interior lights illuminate, regardless of
door position. The lights will go off af ter a
period of time unless the ignition switch is
placed in the ACC or ON position (if so
equipped). When the switch is in the DOOR position
�2,
the interior lights will stay on for a period of
time when:
∙ The doors are unlocked by the key fob, a key or the power door lock switch while
all doors are closed and the ignition
switch is placed in the OFF position.
∙ The driver’s door is opened and then closed while the key is removed from
the ignition switch.
∙ The key is removed from the ignition switch while all doors are closed.
The lights will turn off while the timer is
activated when: ∙ The driver’s door is locked by the key fob, a key, or the power door lock switch.
∙ The ignition switch is placed in the ON position.
When the switch is in the OFF position
�1,
the interior lights do not illuminate, regard-
less of door position.
The lights will turn off automatically af ter a
period of time while doors are open to pre-
vent the battery from becoming dis-
charged.
LIC0410LIC2126
INTERIOR LIGHT
Instruments and controls2-29
Page 111 of 330
CAUTION
Do not use for extended periods of time
with the engine stopped. This could re-
sult in a discharged battery.The light illuminates when the rear hatch is
opened. When the rear hatch is closed, the
light will turn off.
The light also illuminates with other interior
lights when the interior light switch is in the
DOOR position. For additional information,
refer to “Interior light” in this section.
LUGGAGE COMPARTMENT LIGHT
2-30Instruments and controls
Page 120 of 330
Using the interior light
Press thebutton on the key fob once
to turn on the interior lights.
For additional information, refer to “Interior
light” in the “Instruments and controls” sec-
tion of this manual.
1. Pull the hood lock release handle
�1
located below the instrument panel
until the hood springs up slightly.
2. Locate the lever
�2in between the
hood and grille and push the lever side-
ways with your fingertips.
3. Raise the hood
�3.
4. Remove the support rod
�4and insert
it into the slot
�5. Hold the coated parts
�Awhen removing
or resetting the support rod. Avoid direct
contact with the metal parts, as they
may be hot immediately af ter the engine
has been stopped.
When closing the hood, return the support
rod to its original position, lower the hood
to approximately 30 cm (12 in) above the
latch and release it. This allows proper en-
gagement of the hood latch.
LPD2795
HOOD
Pre-driving checks and adjustments3-9
Page 242 of 330

8 Do-it-yourself
Maintenance precautions.......................8-2
Engine compartment check locations ...........8-3
Engine cooling system ..........................8-4
Checking engine coolant level ................8-5
Changing engine coolant .....................8-5
Engine oil ........................................8-6
Checking engine oil level .....................8-6
Changing engine oil ..........................8-7
Changing engine oil filter .....................8-8
4-speed Automatic Transmission Fluid (ATF)
(if so equipped) ..................................8-9
Brake and clutch (if so equipped) fluid ...........8-9
Brake fluid ................................... 8-10
Clutch (if so equipped) fluid ..................8-10
Windshield-washer fluid ........................8-10
Windshield-washer fluid reservoir ............8-10
Battery.......................................... 8-11
Jump starting ............................... 8-13
Drive belt ....................................... 8-14
Spark plugs .................................... 8-14
Replacing spark plugs ....................... 8-14
Air cleaner ...................................... 8-15In-cabin microfilter (if so equipped)
..........8-15
Windshield wiper blades ........................8-16
Cleaning .................................... 8-16
Replacing ................................... 8-16
Brakes.......................................... 8-17
Fuses ........................................... 8-18
Engine compartment .......................8-18
Passenger compartment ....................8-19
Battery replacement ........................... 8-21
Key fob (if so equipped) ......................8-21
Lights .......................................... 8-22
Headlights ................................... 8-22
Headlight aim ............................... 8-24
Fog lights (if so equipped) ...................8-26
Exterior and interior lights ...................8-27
Wheels and tires ................................ 8-32
Tire pressure ................................ 8-32
Tir e
labeling ................................. 8-35
Types of tires ................................ 8-37
Tire chains .................................. 8-38
Changing wheels and tires ..................8-39
Page 268 of 330
EXTERIOR AND INTERIOR LIGHTS
ItemWattage (W)Bulb No.*
Headlight assembly High/Low/Daytime running light 60/55H4
Turn* 283457NAK
Park* 5W5W
Side marker* 5W5W
Fog light (if so equipped)* 55H11
Interior light 5W5W
Cargo light 5W5W
High-mounted stop light Spoiler (Type A) (if so equipped) 16W16W
Spoiler (Type B) (if so equipped)* ——
Rear combination light* Turn signal 21WY21W
Stop/Tail 21/5W21/5W
Backup (reversing) 16W16W
License plate light 5W5W
Always check with the Parts Department at a NISSAN dealer for the latest parts information.
* If replacement is required it is recommended that you visit a NISSAN dealer for this service.
Do-it-yourself8-27
Page 270 of 330
Replacement procedures
All other lights are either type A, B, C or D.
When replacing a bulb, first remove the
lens, lamp and/or cover.
Indicates bulb removal
Indicates bulb installationUse a cloth to protect the housing.
To replace the bulbs in the rear combina-
tion light:
�1Remove the rear combination light
mounting bolts.
SDI1805
Interior light
LDI2044
Rear combination lightLDI2374
Do-it-yourself8-29