Page 22 of 428

WARNING
∙ Do not ride in a moving vehicle whenthe seatback is reclined. This can be
dangerous. The shoulder belt will not
be against your body. In an accident,
you could be thrown into it and re-
ceive neck or other serious injuries.
You could also slide under the lap belt
and receive serious internal injuries. ∙ For the most effective protection
when the vehicle is in motion, the seat
should be upright. Always sit well
back and upright in the seat with both
feet on the floor and adjust the seat
properly. For additional information,
refer to “Precautions on seat belt us-
age” in this section.
∙ Af ter adjustment, gently rock in the seat to make sure it is securely locked. ∙ Do not leave children unattended in-
side the vehicle. They could unknow-
ingly activate switches or controls or
make the vehicle move. Unattended
children could become involved in se-
rious accidents.
∙ To help avoid risk of injury or death through unintended operation of the
vehicle and/or its systems, do not
leave children, people who require the
assistance of others or pets unat-
tended in your vehicle. Additionally,
the temperature inside a closed ve-
hicle on a warm day can quickly be-
come high enough to cause a signifi-
cant risk of injury or death to people
and pets.
∙ Do not adjust the driver’s seat while driving so full attention may be given
to vehicle operation. The seat may
move suddenly and could cause loss
of control of the vehicle.
∙ The seatback should not be reclined any more than needed for comfort.
Seat belts are most effective when the
passenger sits well back and straight
up in the seat. If the seatback is re-
clined, the risk of sliding under the lap
belt and being injured is increased.
Page 37 of 428
WARNING
When fastening the seat belts, be cer-
tain that the seatbacks are completely
secured in the latched position. If they
are not completely secured, passengers
may be injured in an accident or sudden
stop.
Unfastening the seat belts
To unfasten the seat belt, press the button
on the buckle
�1. The seat belt automati-
cally retracts.
Checking seat belt operation
Seat belt retractors are designed to lock
seat belt movement by two separate
methods:
∙ When the seat belt is pulled quickly from the retractor
∙ When the vehicle slows down rapidly To increase your confidence in the seat
belts, check the operation as follows:
∙ Grasp the shoulder belt and pull for- ward quickly. The retractor should lock
and restrict further belt movement.
If the retractor does not lock during this
check, get the system checked. It is recom-
mended that you visit a NISSAN dealer for
this service or to learn more about seat belt
operation.
Page 43 of 428
–Child restraint anchorages are de-
signed to withstand only those
loads imposed by correctly fitted
child restraints. Under no circum-
stances are they to be used to at-
tach adult seat belts, or other items
or equipment to the vehicle. Doing
so could damage the child restraint
anchorages. The child restraint will
not be properly installed using the
damaged anchorage, and a child
could be seriously injured or killed in
a collision.
– Never use the anchor points for adult seat belts, or other items.
– A child restraint with a top tether strap should not be used in the
front passenger seat.
–
Keep seatbacks as upright as pos-
sible af ter fitting the child restraint.
– Infants and children should always be placed in an appropriate child
restraint while in the vehicle.
∙ When the child restraint is not in use, keep it secured with the LATCH system
or a seat belt. In a sudden stop or col-
lision, loose objects can injure occu-
pants or damage the vehicle.
Page 44 of 428

All U.S. states and Canadian provinces or
territories require that infants and small
children be restrained in an approved
child restraint at all times while the ve-
hicle is being operated. Canadian law re-
quires the top tether strap on forward-
facing child restraints be secured to the
designated anchor point on the vehicle.
LATCH (Lower Anchors and
Tethers for CHildren) SYSTEM
Your vehicle is equipped with special an-
chor points that are used with LATCH sys-
tem compatible child restraints. This sys-
tem may also be referred to as the ISOFIX
or ISOFIX compatible system. With this sys-
tem, you do not have to use a vehicle seat
belt to secure the child restraint unless the
combined weight of the child and child re-
straint exceeds 65 lbs. (29.5 kg). If the com-
bined weight of the child and child restraint
is greater than 65 lbs. (29.5 kg) use the vehi-
cle’s seat belt (not the lower anchors) toinstall the child restraint. Be sure to follow
the child restraint manufacturer’s instruc-
tions for installation.
The LATCH anchor points are provided to
install child restraints in the rear outboard
seating positions only. Do not attempt to
install a child restraint in the center position
using the LATCH anchors.
LATCH lower anchor
Page 45 of 428

– Inspect the lower anchors by in-serting your fingers into the lower
anchor area. Feel to make sure
there are no obstructions over the
anchors such as seat belt webbing
or seat cushion material. The child
restraint will not be secured prop-
erly if the lower anchors are
obstructed.
Child restraint anchorages are de-
signed to withstand only those loads
imposed by correctly fitted child re-
straints. Under no circumstances are
they to be used to attach adult seat
belts, or other items or equipment to
the vehicle. Doing so could damage the
child restraint anchorages. The child re-
straint will not be properly installed us-
ing the damaged anchorage, and a
child could be seriously injured or killed
in a collision.
LATCH lower anchor location
The LATCH lower anchors are located as
shown. A label is attached to the seatback
to help you locate the LATCH lower an-
chors.
Installing child restraint LATCH
lower anchor attachments
LATCH compatible child restraints include
two rigid or webbing-mounted attach-
ments that can be connected to two an-
chors located at certain seating positions
in your vehicle. With this system, you do not
have to use a vehicle seat belt to secure the
child restraint. Check your child restraint for
a label stating that it is compatible with
LATCH. This information may also be in the
instructions provided by the child restraint
manufacturer.
Page 48 of 428

3. For child restraints that are equippedwith webbing-mounted attachments,
remove any additional slack from the
anchor attachments. Press downward
and rearward firmly in the center of the
child restraint with your hand to com-
press the vehicle seat cushion and
seatback while tightening the webbing
of the anchor attachments. 4. Af ter attaching the child restraint, test
it before you place the child in it. Push it
from side to side while holding the child
restraint near the LATCH attachment
path. The child restraint should not
move more than 1 inch (25 mm), from
side to side. Try to tug it forward and
check to see if the LATCH attachment
holds the restraint in place. If the re-
straint is not secure, tighten the LATCH
attachment as necessary, or put the
restraint in another seat and test it
again. You may need to try a different
child restraint or try installing by using the vehicle seat belt (if applicable). Not
all child restraints fit in all types of ve-
hicles.
5. Check to make sure the child restraint is properly secured prior to each use. If
the child restraint is loose, repeat
steps 1 through 4.
REAR-FACING CHILD RESTRAINT
INSTALLATION USING THE SEAT
BELTS
Page 54 of 428
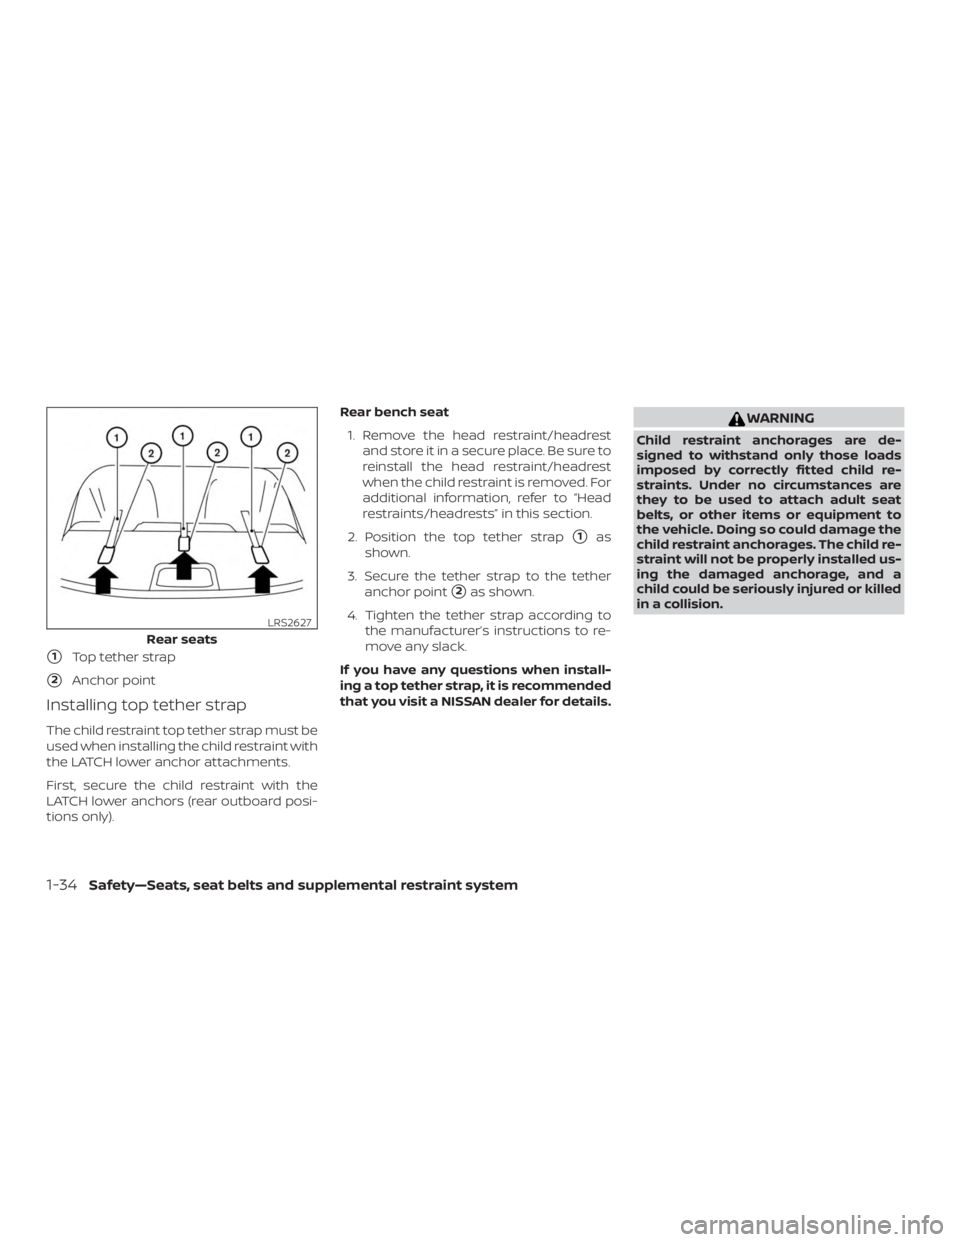
�1Top tether strap
�2Anchor point
Installing top tether strap
The child restraint top tether strap must be
used when installing the child restraint with
the LATCH lower anchor attachments.
First, secure the child restraint with the
LATCH lower anchors (rear outboard posi-
tions only).Rear bench seat
1. Remove the head restraint/headrest and store it in a secure place. Be sure to
reinstall the head restraint/headrest
when the child restraint is removed. For
additional information, refer to “Head
restraints/headrests” in this section.
2. Position the top tether strap
�1as
shown.
3. Secure the tether strap to the tether anchor point
�2as shown.
4. Tighten the tether strap according to the manufacturer’s instructions to re-
move any slack.
If you have any questions when install-
ing a top tether strap, it is recommended
that you visit a NISSAN dealer for details.
Page 59 of 428
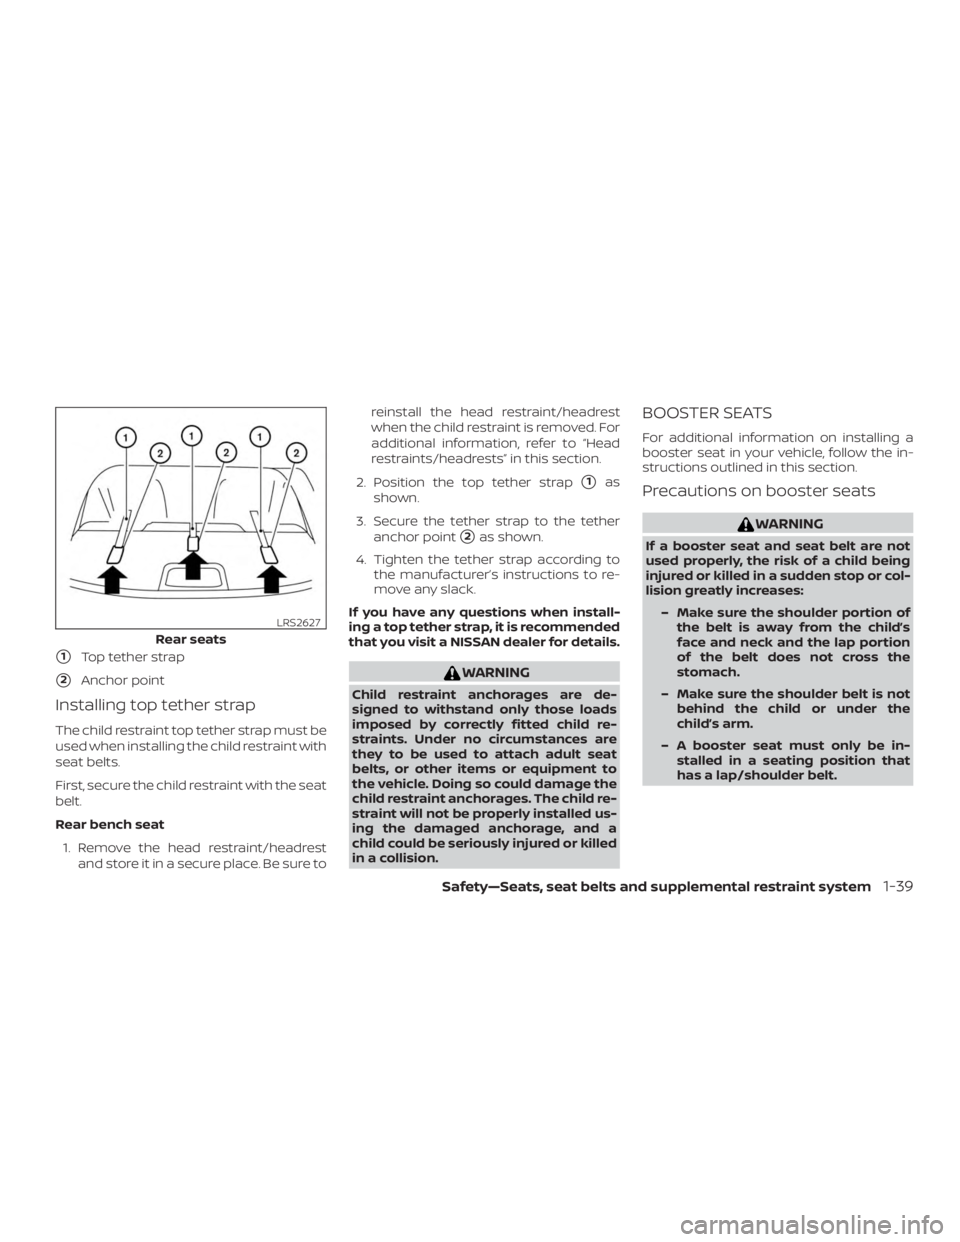
�1Top tether strap
�2Anchor point
Installing top tether strap
The child restraint top tether strap must be
used when installing the child restraint with
seat belts.
First, secure the child restraint with the seat
belt.
Rear bench seat1. Remove the head restraint/headrest and store it in a secure place. Be sure to reinstall the head restraint/headrest
when the child restraint is removed. For
additional information, refer to “Head
restraints/headrests” in this section.
2. Position the top tether strap
�1as
shown.
3. Secure the tether strap to the tether anchor point
�2as shown.
4. Tighten the tether strap according to the manufacturer’s instructions to re-
move any slack.
If you have any questions when install-
ing a top tether strap, it is recommended
that you visit a NISSAN dealer for details.