Page 132 of 428
parking brake is released. The LED DRL re-
main on while the engine is running.
It is necessary at dusk to turn the headlight
switch on for interior controls and switches
to illuminate, as those remain off while the
switch is in the OFF position.
Page 135 of 428

CAUTION
∙ The battery could run down if theclimate-controlled seat is operated
while the engine is not running.
∙ Do not use the climate-controlled seat for extended periods or when no
one is using the seat.
∙ Do not put anything on the seat which insulates heat, such as a blanket,
cushion, seat cover, etc. Otherwise,
the seat may become overheated.
∙ Do not place anything hard or heavy on the seat or pierce it with a pin or
similar objects. This may result in
damage to the climate-controlled
seat.
∙ Any liquid spilled on the seat should be removed immediately with a dry
cloth
∙ The climate-controlled seat has an air filter. Do not operate the climate-
controlled seat without an air filter.
This may result in damage to the
system.
∙ When cleaning the seat, never use gasoline, benzine, thinner, or any
similar materials. ∙ If any malfunctions are found or the
climate-controlled seat does not op-
erate, turn the switch off and have the
system checked. It is recommended
that you visit a NISSAN dealer for this
service.
The front seats are warmed by built-in
heaters.1. Start the engine.
2. Push the LO or HI position of the switch, as desired. The indicator light in the
switch will illuminate.
The heater is controlled by a thermo-
stat, automatically turning the heater
on and off. The indicator light will re-
main on as long as the switch is on.
3. When the seat is warmed or before you leave the vehicle, be sure to turn the
switch off.
Page 150 of 428
 on the
screen inlet port. Doing so may en-
tangle these objects in the screen
when it is extending or retracting,
causing im")
CAUTION
∙ Do not place objects (such as newspa-pers, handkerchiefs, etc.) on the
screen inlet port. Doing so may en-
tangle these objects in the screen
when it is extending or retracting,
causing improper operation or dam-
age to the screen.
∙ Do not push the sunshade arm with your hands, etc., as this may deform it.
Improper operation or damage to the
screen may result. ∙ Do not hang any object on the arm rail
as this may result in improper opera-
tion or damage the screen.
∙ Do not forcefully pull the screen. Do- ing so may elongate the screen. Im-
proper operation or damage to the
screen may result.
∙ To avoid personal injury, keep your hands, fingers and head away from
the sunshade arm, arm rail and screen
inlet port.
∙ Do not allow children near the rear sunshade system. They could be
injured.
∙ Do not pull or push the rear sunshade. This could cause improper operation
or damage it.
�1The interior lights can be turned on
regardless of door position. The lights
will go off af ter a period of time unless
the ignition switch is placed in the ON
position when any door is opened.
�2The interior lights can be set to operate
when the doors are opened. To turn off
the interior lights when a is door open,
push the switch; the interior lights will not
illuminate, regardless of door position.
The lights will go off when the ignition
switch is placed in the ON position, or
the driver’s door is closed and locked.
The lights will also go off af ter a period
of time when the doors are open.
Page 151 of 428
NOTE:
The step lights illuminate when the
driver and passenger doors are opened
regardless of the interior light switch po-
sition. These lights will turn off auto-
matically af ter a period of time while
doors are open to prevent the battery
from becoming discharged.
Page 153 of 428

WARNING
∙ Do not use the HomeLink® UniversalTransceiver with any garage door
opener that lacks safety stop and re-
verse features as required by federal
safety standards. (These standards
became effective for opener models
manufactured af ter April 1, 1982.) A
garage door opener which cannot de-
tect an object in the path of a closing
garage door and then automatically
stop and reverse does not meet cur-
rent federal safety standards. Using a
garage door opener without these
features increases the risk of serious
injury or death.
∙ During the programming procedure your garage door or security gate will
open and close (if the transmitter is
within range). Make sure that people
or objects are clear of the garage door,
gate, etc., that you are programming. ∙ Your vehicle’s engine should be
turned off while programming the
HomeLink® Universal Transceiver. Do
not breathe exhaust gases; they con-
tain colorless and odorless carbon
monoxide. Carbon monoxide is dan-
gerous. It can cause unconsciousness
or death.
PROGRAMMING HOMELINK®
If you have any questions or are having
difficulty programming your HomeLink®
buttons, refer to the HomeLink® web site at:
www.homelink.com or call 1-800-355-3515.
NOTE:
Place the ignition switch in the ACC posi-
tion when programming HomeLink®. It is
also recommended that a new battery
be placed in the hand-held transmitter
of the device being programmed to
HomeLink® for quicker programming
and accurate transmission of the radio
frequency. 1. Position the end of your hand-held
transmitter 1–3 in (2–8 cm) away from
the HomeLink® surface, keeping the
HomeLink® indicator light
�1in view.
Page 167 of 428

CAUTION
The lockout protection may not func-
tion under the following conditions:
∙ When the Intelligent Key is placed ontop of the instrument panel.
∙ When the Intelligent Key is placed in- side the glove box or a storage bin.
∙ When the Intelligent Key is placed in- side the door pockets.
∙ When the Intelligent Key is placed in- side or near metallic materials.
Unlocking doors
1. Carry the Intelligent Key.
2. Push the door handle request switch.
3. The door on which the request switch was pressed will unlock and the hazard
warning lights flash once, the outside
buzzer sounds once, and the front and
tail lights may turn on for 30 seconds.
4. Push the door handle request switch again within one minute, the outside
buzzer sounds once and the remaining
doors unlock. NOTE:
∙ If “Selective Unlock” is turned off in
“Vehicle Settings,” all doors will un-
lock upon the first request switch
�1
press.
∙ Request switches for all doors and
trunk lid can be deactivated when the
“Ext. Door Switch” is switched to OFF
in “Vehicle Settings” of the vehicle in-
formation display. For additional in-
formation, refer to “Vehicle informa-
tion display ” in the “Instruments and
controls” section of this manual.
Page 177 of 428
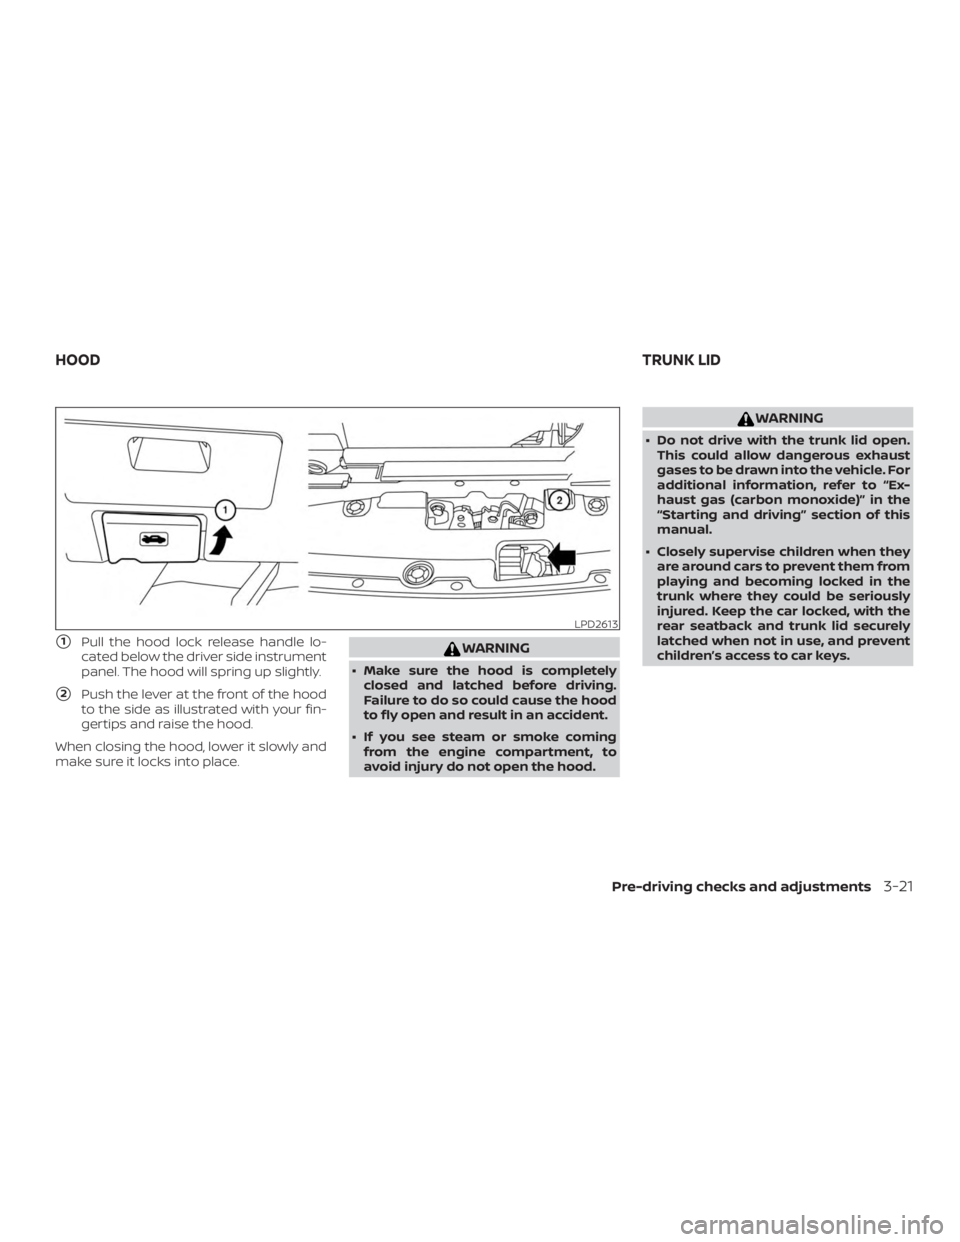
�1Pull the hood lock release handle lo-
cated below the driver side instrument
panel. The hood will spring up slightly.
�2Push the lever at the front of the hood
to the side as illustrated with your fin-
gertips and raise the hood.
When closing the hood, lower it slowly and
make sure it locks into place.
Page 200 of 428
∙ When strong light directly shines on thecamera, objects may not be displayed
clearly.
∙ Vertical lines may be seen in objects on the screen. This is due to strong re-
flected light from the bumper.
∙ The screen may flicker under fluores- cent light.
∙ The colors of objects on the RearView Monitor may differ somewhat from the
actual color of objects.
∙ Objects on the monitor may not be clear in a dark environment.
∙ There may be a delay when switching between views.
∙ If dirt, rain or snow accumulate on the camera, the RearView Monitor may not
display objects clearly. Clean the cam-
era.
∙ Do not use wax on the camera lens. Wipe off any wax with a clean cloth
dampened with a diluted mild cleaning
agent, then wipe with a dry cloth.
SYSTEM MAINTENANCE