Page 115 of 428

switches. For additional information, refer
to “Sport mode” in the “Starting and driving”
section of this manual.
Illumination indicator
This indicator shows the illumination ad-
justment of the instrument panel. For addi-
tional information, refer to “Instrument
brightness control” in this section.
Transmission Shif t Position indicator
This indicator shows the transmission shif t
position.
Outside Temperature Display
The outside temperature display appears
in the center region of the vehicle informa-
tion display.
Low Outside Temperature
This warning appears if the outside tem-
perature is below 37°F (3°C). The tempera-
ture can be changed to display in Celsius or
Fahrenheit. For additional information, re-
fer to “Settings” in this section.Oil and Filter
This indicator appears when the customer
set distance comes for changing the en-
gine oil and filter. You can set or reset the
distance for checking or replacing these
items. For scheduled maintenance items
and intervals, refer to the “Maintenance and
schedules” section of this manual.
Tire
This indicator appears when the customer
set distance is reached for replacing tires.
You can set or reset the distance for replac-
ing tires.
Page 153 of 428

WARNING
∙ Do not use the HomeLink® UniversalTransceiver with any garage door
opener that lacks safety stop and re-
verse features as required by federal
safety standards. (These standards
became effective for opener models
manufactured af ter April 1, 1982.) A
garage door opener which cannot de-
tect an object in the path of a closing
garage door and then automatically
stop and reverse does not meet cur-
rent federal safety standards. Using a
garage door opener without these
features increases the risk of serious
injury or death.
∙ During the programming procedure your garage door or security gate will
open and close (if the transmitter is
within range). Make sure that people
or objects are clear of the garage door,
gate, etc., that you are programming. ∙ Your vehicle’s engine should be
turned off while programming the
HomeLink® Universal Transceiver. Do
not breathe exhaust gases; they con-
tain colorless and odorless carbon
monoxide. Carbon monoxide is dan-
gerous. It can cause unconsciousness
or death.
PROGRAMMING HOMELINK®
If you have any questions or are having
difficulty programming your HomeLink®
buttons, refer to the HomeLink® web site at:
www.homelink.com or call 1-800-355-3515.
NOTE:
Place the ignition switch in the ACC posi-
tion when programming HomeLink®. It is
also recommended that a new battery
be placed in the hand-held transmitter
of the device being programmed to
HomeLink® for quicker programming
and accurate transmission of the radio
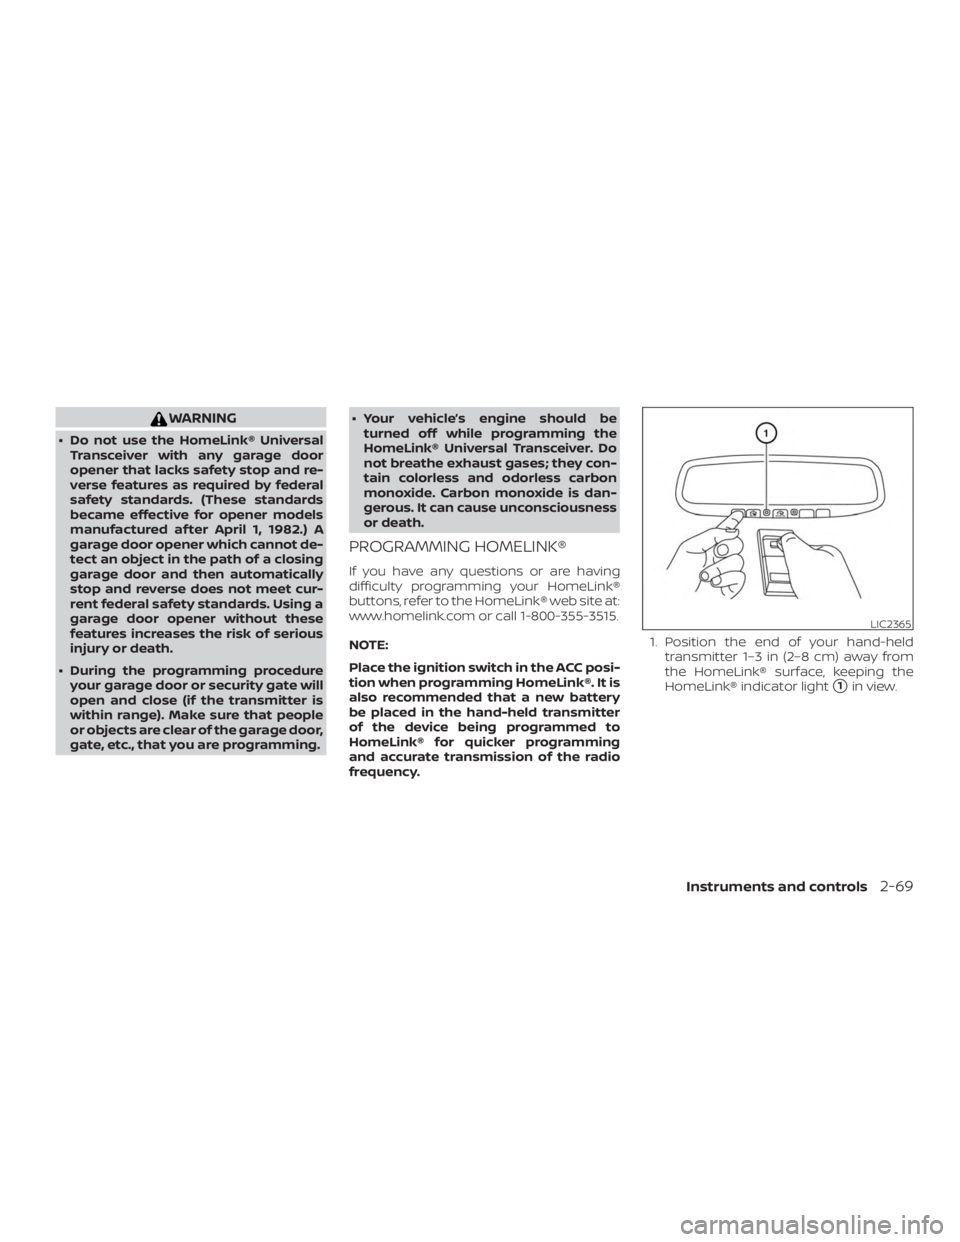
frequency. 1. Position the end of your hand-held
transmitter 1–3 in (2–8 cm) away from
the HomeLink® surface, keeping the
HomeLink® indicator light
�1in view.
Page 162 of 428

Lockout protection
When the power door lock switch (driver’s
or front passenger’s side) is moved to the
lock position with the Intelligent Key lef t in
the vehicle and any door open, all doors will
unlock automatically and a chime will
sound af ter the door is closed.
AUTOMATIC DOOR LOCKS
∙ All doors lock automatically when thevehicle speed reaches 15 mph
(24 km/h).
∙ All doors unlock automatically when the transmission is placed in the P (Park)
position or when the ignition switch is
placed in the OFF position.
NOTE:
The automatic door unlock function can
be changed using “Vehicle Settings” of
the vehicle information display. For ad-
ditional information, refer to “Vehicle in-
formation display ” in the “Instruments
and controls” section of this manual.
CHILD SAFETY REAR DOOR LOCK
Child safety locks help prevent the rear
doors from being opened accidentally, es-
pecially when small children are in the ve-
hicle.
The child safety lock levers are located on
the edge of the rear doors.
When the lever is in the unlock position
�2,
the door can be opened from the outside
or the inside.
When the lever is in the LOCK position
�1,
the door can be opened only from the
outside.
Page 240 of 428
CONTINUOUSLY VARIABLE
TRANSMISSION (CVT)
Page 241 of 428
4. Stop the vehicle completely beforeshif ting the shif t lever to the P (Park)
position.
The Continuously Variable Transmission
is designed so the foot brake pedal MUST
be depressed before shif ting from P
(Park) to any drive position while the ig-
nition switch is in the ON position.
The shif t lever cannot be moved out of P
(Park) and into any of the other gear po-
sitions if the ignition switch is pushed to
the LOCK position.
Page 245 of 428
If the shif t lever cannot be moved out of P
(Park), have the transmission checked as
soon as possible. It is recommended that
you visit a NISSAN dealer for this service.
Page 247 of 428
NORMAL MODE
NORMAL mode is recommended for nor-
mal driving. Press the NORMAL mode but-
ton to select this mode.
SPORT MODE
The SPORT mode adjusts the engine,
transmission, and steering to enhance
performance. Press the SPORT mode but-
ton to select this driving mode. The SPORT
mode indicator will appear in the vehicle
information display.
NOTE:
In the SPORT mode, fuel economy may
be reduced.
Page 305 of 428

WARNING
∙ Do not stop or park the vehicle overflammable materials such as dry
grass, waste paper or rags. They may
ignite and cause a fire. ∙ Safe parking procedures require that
both the parking brake be set and the
transmission placed into P (Park). Fail-
ure to do so could cause the vehicle to
move unexpectedly or roll away and
result in an accident. Make sure the
shif t lever has been pushed as far for-
ward as it can go and cannot be
moved without depressing the foot
brake pedal.
∙ Never leave the engine running while the vehicle is unattended. ∙ To help avoid risk of injury or death
through unintended operation of the
vehicle and/or its systems, do not
leave children, people who require the
assistance of others or pets unat-
tended in your vehicle. Additionally,
the temperature inside a closed ve-
hicle on a warm day can quickly be-
come high enough to cause a signifi-
cant risk of injury or death to people
and pets.
1. Firmly apply the parking brake.
2. Move the shif t lever to the P (Park) po- sition.
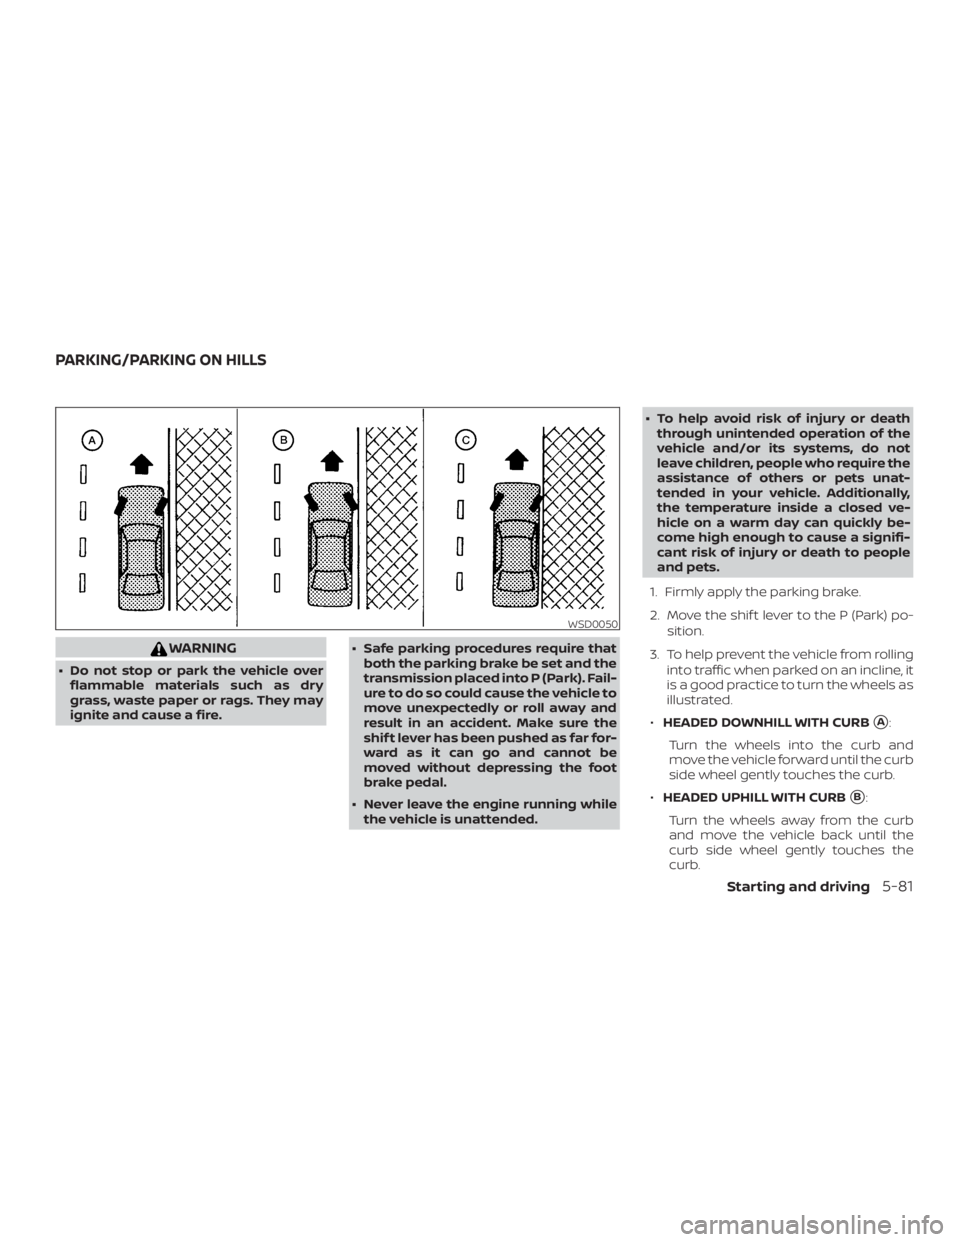
3. To help prevent the vehicle from rolling into traffic when parked on an incline, it
is a good practice to turn the wheels as
illustrated.
∙ HEADED DOWNHILL WITH CURB
�A:
Turn the wheels into the curb and
move the vehicle forward until the curb
side wheel gently touches the curb.
∙ HEADED UPHILL WITH CURB
�B:
Turn the wheels away from the curb
and move the vehicle back until the
curb side wheel gently touches the
curb.