2018 NISSAN ALTIMA ECO mode
[x] Cancel search: ECO modePage 208 of 467
∙ When thefront defroster button is
pressed, the air conditioner will auto-
matically be turned on at outside tem-
peratures above 36°F (2°C). The air recir-
culate mode automatically turns off,
allowing outside air to be drawn into the
passenger compartment to further im-
prove the defogging performance.
Remote Engine Start with
Intelligent Climate Control (if so
equipped)
Vehicles equipped with automatic climate
controls and Remote Engine Start function
may go into automatic heating or cooling
mode when Remote Engine Start is acti-
vated depending on outside and cabin
temperatures. During this period, the cli-
mate control display and buttons will be
inoperable until the ignition switch is
turned on. In Remote Engine Start defrost-
ing mode, the rear window defroster and
heated steering wheel (if so equipped) may
be activated automatically.
MANUAL OPERATION
Fan speed control
Press thefan speed control buttons
to manually control the fan speed.
Press the AUTO button to return to auto-
matic control of the fan speed.
Temperature control dial
The temperature control dial allows you to
adjust the temperature of the outlet air. To
lower the temperature, turn the dial to the
lef t. To increase the temperature, turn the
dial to the right. Temperature can be ad-
justed on the driver’s and passenger’s side.
Air recirculation
Press theair recirculation button to
recirculate interior air inside the vehicle.
The
indicator light on the button will
come on.
The air recirculation cannot be activated
when the air conditioner is in the
front defrosting mode.
When the outside temperature exceeds 70°F
(21°C), the air conditioning system may de-
fault to air recirculation mode automatically
to reduce overall power consumption. To exit
air recirculation mode, select the fresh air
intake button to enter fresh air mode.
Fresh air intake
Press thefresh air intake button to
draw outside air into the passenger com-
partment.
Air conditioner button
Start the engine, press thefan control
buttons to the desired position and press
the
button to turn on the air condi-
tioner. To turn off the air conditioner, press
the
button again.
The air conditioner cooling function op-
erates only when the engine is running.
Air flow control
Pressing the MODE button manually con-
trols air flow and selects the air outlet:
— Air flows from center and side vents.
— Air flows from center and sidevents and foot outlets.
— Air flows mainly from footoutlets.
— Air flows from defroster andfoot outlets.
4-22Monitor, climate, audio, phone and voice recognition systems
Page 209 of 467

To turn system off
Press the ON-OFF button.
Rear window and outside mirror
(if so equipped) defroster switch
For additional information, refer to “Rear
window and outside mirror (if so equipped)
defroster switch” in the “Instruments and
controls” section of this manual.
OPERATING TIPS
The sunload sensor, located on the top
driver’s side of the instrument panel, helps
the system maintain a constant tempera-
ture. Do not put anything on or around this
sensor.∙ When the climate system is in auto-
matic operation and the engine coolant
temperature and outside air tempera-
ture are low, the air flow outlet may de-
fault to defroster mode for a maximum
of 2 minutes 30 seconds. This is not a
malfunction. Af ter the engine coolant
temperature warms up, the air flow out-
let will return to foot mode and opera-
tion will continue normally.
∙ When the outside and interior cabin temperatures are moderate to high, the
intake setting may default to turn off air
recirculation to allow fresh air into the
passenger compartment. You may no-
tice air flow from the foot mode, bi-level
mode, or side demist vent outlets for a
maximum of 15 seconds. This may oc-
cur when previous climate setting was
system off. This is not a malfunction.
Af ter the initial warm air is expelled, the
intake will return to automatic control,
air flow outlet will return to previous set-
tings, and operation will continue nor-
mally. To exit, press any climate control
button.
∙ Keep the moonroof (if so equipped) closed while the air conditioner is in op-
eration.
LHA1136
Monitor, climate, audio, phone and voice recognition systems4-23
Page 210 of 467
∙ If you feel that the air flow mode youhave selected and the outlets the air is
coming out do not match, select
the
mode.
∙ When you change the air flow mode, you may feel air flow from the feet vents
for just a moment. This is not a mal-
function. The air conditioner system in your NISSAN
vehicle is charged with a refrigerant de-
signed with the environment in mind.
This refrigerant does not harm the
earth’s ozone layer.
Special charging equipment and lubricant
is required when servicing your NISSAN air
conditioner. Using improper refrigerants or
lubricants will cause severe damage to
your air conditioner system. For additional
information, refer to “Air conditioner sys-
tem refrigerant and oil recommendations”
in the “Technical and consumer informa-
tion” section of this manual.
It is recommended that you visit a NISSAN
dealer to service your “environmentally
friendly” air conditioner system.
WARNING
The air conditioner system contains re-
frigerant under high pressure. To avoid
personal injury, any air conditioner ser-
vice should be done only by an experi-
enced technician with proper
equipment.
RADIO
With the ignition placed in the ACC or ON
position, press the
POWER button to
turn the radio on. If you listen to the radio
with the engine not running, the ignition
should be placed in the ACC position.
Radio reception is affected by station sig-
nal strength, distance from radio transmit-
ter, buildings, bridges, mountains and other
external influences. Intermittent changes
in reception quality normally are caused by
these external influences.
Using a cellular phone in or near the ve-
hicle may influence radio reception qual-
ity.
Radio reception
Your NISSAN radio system is equipped with
state-of-the-art electronic circuits to en-
hance radio reception. These circuits are
designed to extend reception range, and to
enhance the quality of that reception.
However, there are some general charac-
teristics of both FM and AM radio signals
that can affect radio reception quality in a
moving vehicle, even when the finest
equipment is used. These characteristics
are completely normal in a given reception
SERVICING AIR CONDITIONER AUDIO SYSTEM
4-24Monitor, climate, audio, phone and voice recognition systems
Page 217 of 467
USB (Universal Serial Bus)
Connection Port
WARNING
Do not connect, disconnect or operate
the USB device while driving. Doing so
can be a distraction. If distracted you
could lose control of your vehicle and
cause an accident or serious injury.
CAUTION
∙ Do not force the USB device into theUSB port. Inserting the USB device
tilted or up-side-down into the port
may damage the port. Make sure that
the USB device is connected correctly
into the USB port.
∙ Do not grab the USB port cover (if so equipped) when pulling the USB de-
vice out of the port. This could dam-
age the port and the cover.
∙ Do not leave the USB cable in a place where it can be pulled unintentionally.
Pulling the cable may damage the
port. The vehicle is not equipped with a USB de-
vice. USB devices should be purchased
separately as necessary.
This system cannot be used to format USB
devices. To format a USB device, use a per-
sonal computer.
In some jurisdictions, the USB device for the
front seats plays only sound without im-
ages for regulatory reasons, even when the
vehicle is parked.
This system supports various USB
memory devices, USB hard drives and
iPod® players. Some USB devices may not
be supported by this system.
∙ Partitioned USB devices may not play correctly.
∙ Some characters used in other lan- guages (Chinese, Japanese, etc.) may
not appear properly in the display. Using
English language characters with a USB
device is recommended.
General notes for USB use: ∙ For additional information, refer to your device manufacturer’s owner informa-
tion regarding the proper use and care
of the device. Notes for iPod®) use:
iPod® is a trademark of Apple Inc., regis-
tered in the U.S. and other countries.
∙ Improperly plugging in the iPod® may cause a checkmark to be displayed on
and off (flickering). Always make sure
that the iPod® is connected properly.
∙ An iPod® nano (1st Generation) may re- main in fast forward or rewind mode if it
is connected during a seek operation. In
this case, please manually reset the
iPod®.
∙ An iPod® nano (2nd Generation) will continue to fast-forward or rewind if it is
disconnected during a seek operation.
∙ An incorrect song title may appear when the Play Mode is changed while
using an iPod® nano (2nd Generation).
∙ Audiobooks may not play in the same order as they appear on an iPod®.
∙ Large video files cause slow responses in an iPod®. The vehicle center display
may momentarily black out, but will
soon recover.
Monitor, climate, audio, phone and voice recognition systems4-31
Page 218 of 467
∙ If an iPod® automatically selects largevideo files while in the shuffle mode, the
vehicle center display may momen-
tarily black out, but will soon recover.
Bluetooth® streaming audio
∙ Some Bluetooth® audio devices maynot be recognized by the in-vehicle au-
dio system.
∙ It is necessary to set up the wireless connection between a compatible
Bluetooth® audio device and the in-
vehicle Bluetooth® module before using
the Bluetooth® audio.
∙ Operating procedure of the Bluetooth® audio will vary depending on the de-
vices. Make sure how to operate your
audio device before using it with this
system.
∙ The Bluetooth® audio may be stopped under the following conditions:
∙ Receiving a call on the Hands-Free Phone System.
∙ Checking the connection to the hands-free phone. ∙ Do not place the Bluetooth® audio de-
vice in an area surrounded by metal or
far away from the in-vehicle Bluetooth®
module to prevent tone quality degra-
dation and wireless connection disrup-
tion.
∙ While an audio device is connected through the Bluetooth® wireless con-
nection, the battery power of the device
may discharge quicker than usual.
∙ This system supports the Bluetooth® Audio Distribution Profile (A2DP, AVRCP).
BLUETOOTH® is a
trademark owned
by Bluetooth SIG,
Inc. and licensed
to Visteon.
4-32
Monitor, climate, audio, phone and voice recognition systems
Page 219 of 467
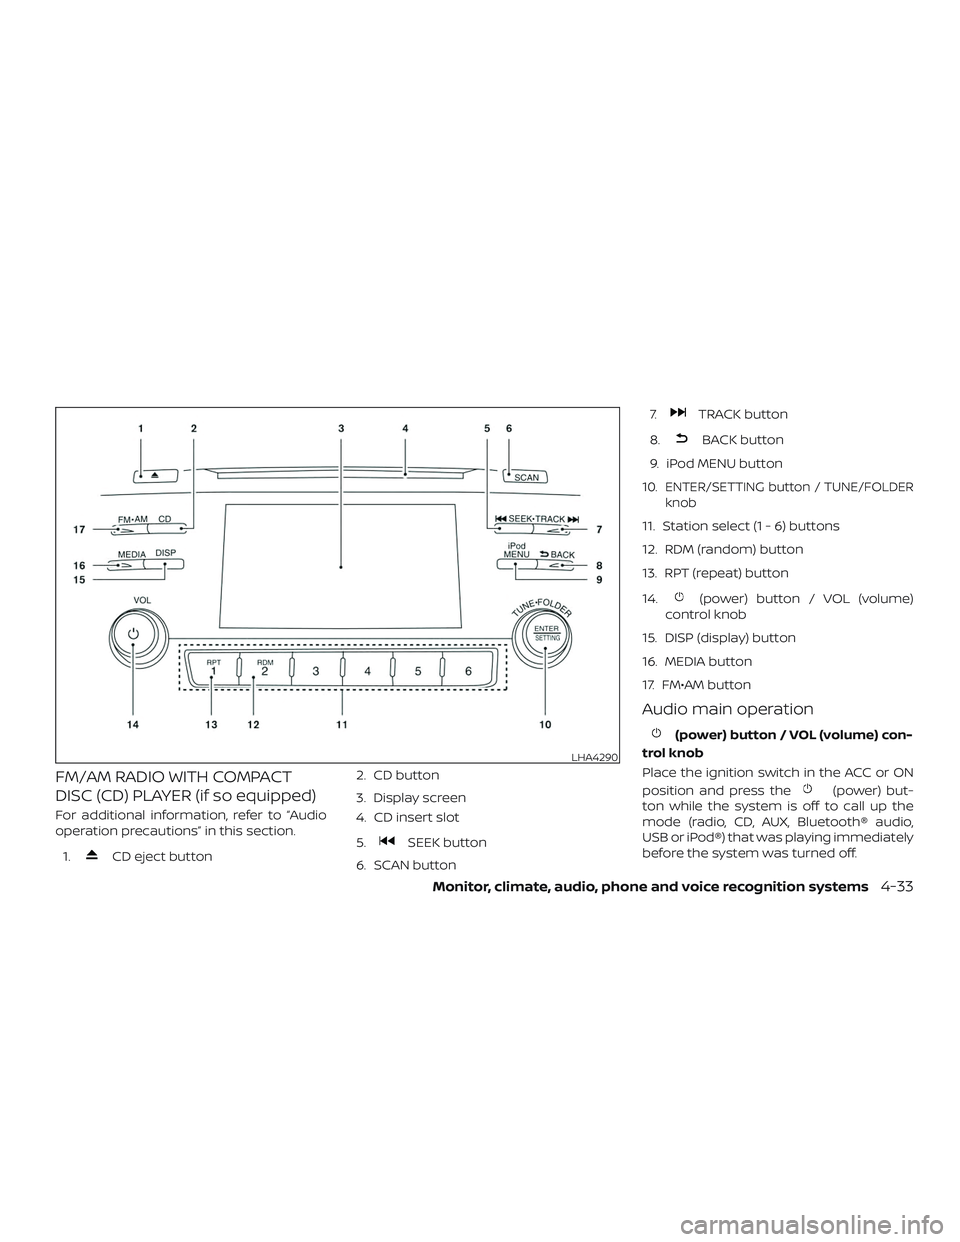
FM/AM RADIO WITH COMPACT
DISC (CD) PLAYER (if so equipped)
For additional information, refer to “Audio
operation precautions” in this section.1.
CD eject button 2. CD button
3. Display screen
4. CD insert slot
5.SEEK button
6. SCAN button 7.
TRACK button
8.
BACK button
9. iPod MENU button
10.
ENTER/SETTING button / TUNE/FOLDER
knob
11. Station select (1 - 6) buttons
12. RDM (random) button
13. RPT (repeat) button
14.
(power) button / VOL (volume)
control knob
15. DISP (display) button
16. MEDIA button
17. FM•AM button
Audio main operation
(power) button / VOL (volume) con-
trol knob
Place the ignition switch in the ACC or ON
position and press the
(power) but-
ton while the system is off to call up the
mode (radio, CD, AUX, Bluetooth® audio,
USB or iPod®) that was playing immediately
before the system was turned off.
LHA4290
Monitor, climate, audio, phone and voice recognition systems4-33
Page 221 of 467
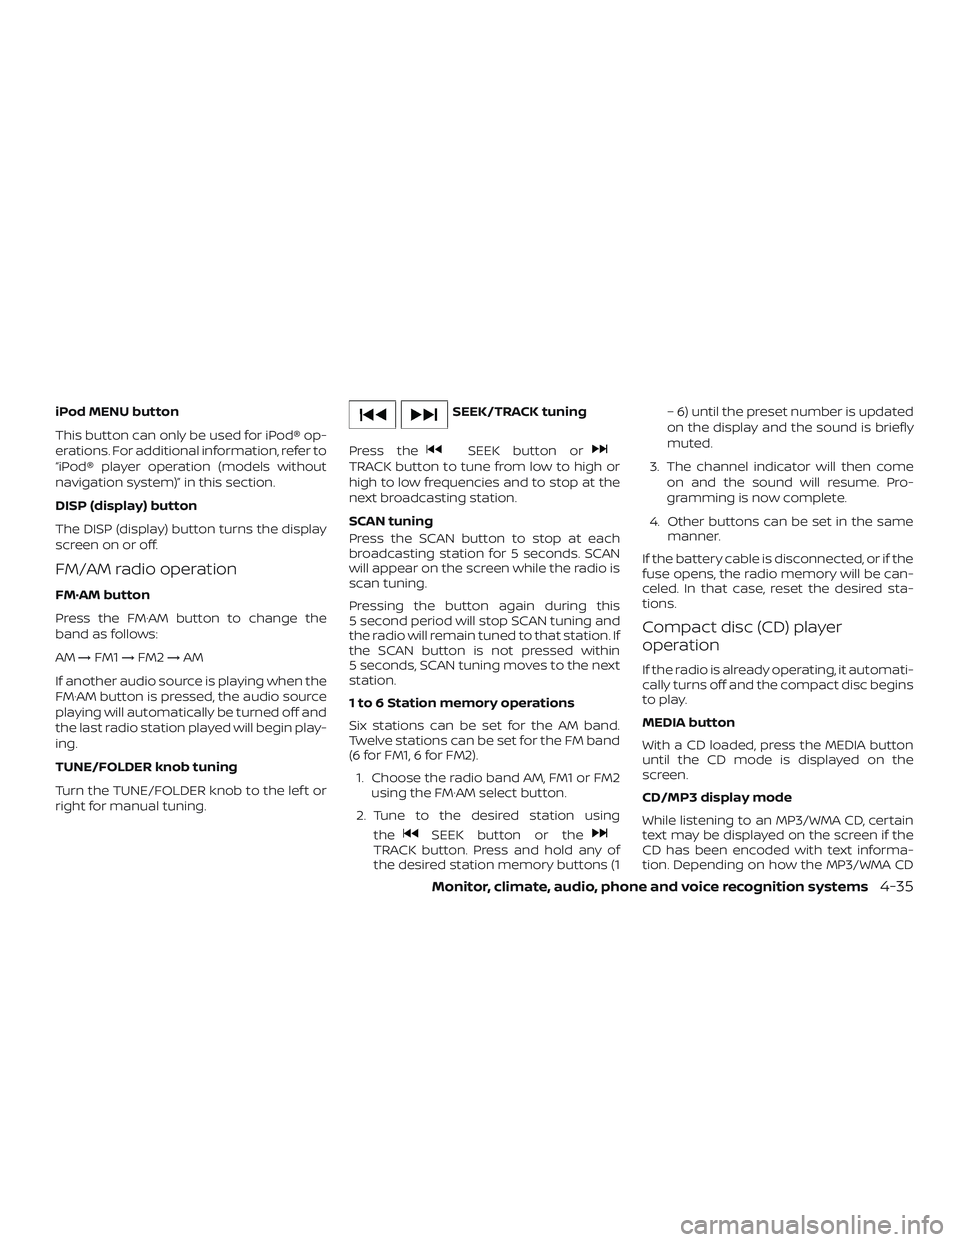
iPod MENU button
This button can only be used for iPod® op-
erations. For additional information, refer to
“iPod® player operation (models without
navigation system)” in this section.
DISP (display) button
The DISP (display) button turns the display
screen on or off.
FM/AM radio operation
FM·AM button
Press the FM·AM button to change the
band as follows:
AM→FM1 →FM2 →AM
If another audio source is playing when the
FM·AM button is pressed, the audio source
playing will automatically be turned off and
the last radio station played will begin play-
ing.
TUNE/FOLDER knob tuning
Turn the TUNE/FOLDER knob to the lef t or
right for manual tuning.
SEEK/TRACK tuning
Press the
SEEK button orTRACK button to tune from low to high or
high to low frequencies and to stop at the
next broadcasting station.
SCAN tuning
Press the SCAN button to stop at each
broadcasting station for 5 seconds. SCAN
will appear on the screen while the radio is
scan tuning.
Pressing the button again during this
5 second period will stop SCAN tuning and
the radio will remain tuned to that station. If
the SCAN button is not pressed within
5 seconds, SCAN tuning moves to the next
station.
1 to 6 Station memory operations
Six stations can be set for the AM band.
Twelve stations can be set for the FM band
(6 for FM1, 6 for FM2). 1. Choose the radio band AM, FM1 or FM2 using the FM·AM select button.
2. Tune to the desired station using the
SEEK button or theTRACK button. Press and hold any of
the desired station memory buttons (1 – 6) until the preset number is updated
on the display and the sound is briefly
muted.
3. The channel indicator will then come on and the sound will resume. Pro-
gramming is now complete.
4. Other buttons can be set in the same manner.
If the battery cable is disconnected, or if the
fuse opens, the radio memory will be can-
celed. In that case, reset the desired sta-
tions.
Compact disc (CD) player
operation
If the radio is already operating, it automati-
cally turns off and the compact disc begins
to play.
MEDIA button
With a CD loaded, press the MEDIA button
until the CD mode is displayed on the
screen.
CD/MP3 display mode
While listening to an MP3/WMA CD, certain
text may be displayed on the screen if the
CD has been encoded with text informa-
tion. Depending on how the MP3/WMA CD
Monitor, climate, audio, phone and voice recognition systems4-35
Page 223 of 467
CD EJECT button
When the
CD eject button is pressed
with a compact disc loaded, the compact
disc will eject and the last source will be
played.
When the
CD eject button is pressed
twice with a compact disc loaded, the
compact disc will be ejected further for
easier CD removal. If the disc is not re-
moved within 20 seconds, the disc will re-
load.
Additional features
For additional information about the iPod®
player available with this system, refer to
“iPod® player operation without Navigation
System” in this section.
For additional information about the USB
(Universal Serial Bus) connection port avail-
able with this system, refer to “USB (Univer-
sal Serial Bus) Connection Port (models
without Navigation System)” in this section.
For additional information about the
Bluetooth® audio interface available with
this system, refer to “Bluetooth® streaming
audio without Navigation System (Type B)”
in this section.
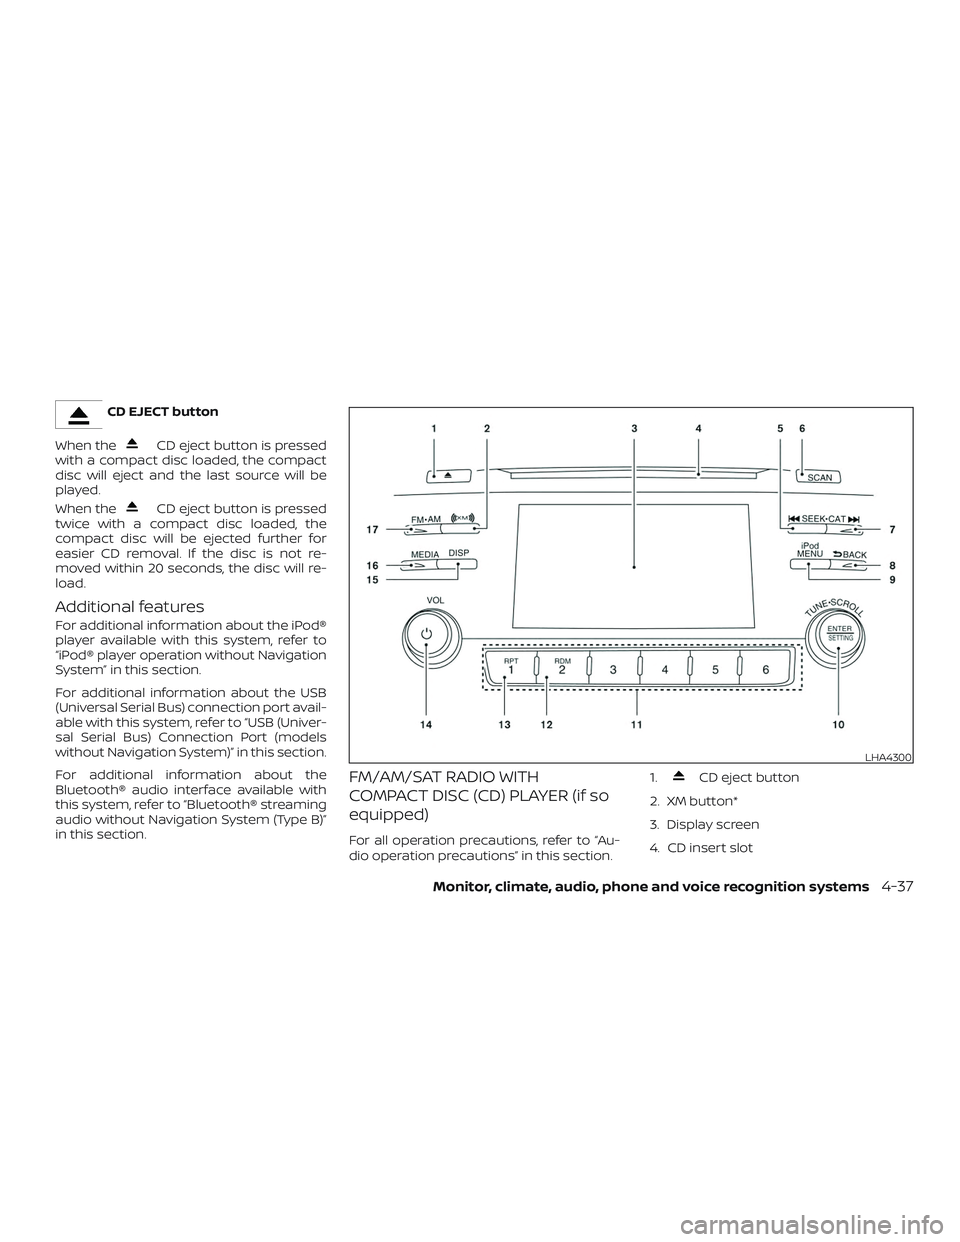
FM/AM/SAT RADIO WITH
COMPACT DISC (CD) PLAYER (if so
equipped)
For all operation precautions, refer to “Au-
dio operation precautions” in this section. 1.
CD eject button
2. XM button*
3. Display screen
4. CD insert slot
LHA4300
Monitor, climate, audio, phone and voice recognition systems4-37