2018 NISSAN 370Z low beam
[x] Cancel search: low beamPage 24 of 453

0-14Illustrated table of contents
Warninglight Name
Page
Anti-lock Braking System
(ABS) warning light 2-11
Automatic Transmission
(AT) check warning light (if
so equipped)2-11
Brake warning light
2-11
Charge warning light2-12
Engine oil pressure warning
light2-12
Intelligent Key system
warning light
2-12
Low tire pressure warning
light2-13
Master warning light
2-14
Seat belt warning light2-14
Supplemental air bag
warning light2-14
Vehicle Dynamic Control
(VDC) warning light 2-15Indica-
tor light Name
Page
Cruise indicator light 2-15
Exterior light indicator2-15
Front passenger air bag
status light2-16
High beam indicator light
2-16
Malfunction Indicator Light
(MIL)2-16
Rear fog light indicator light
(if so equipped) 2-17
Security indicator light
2-17
Soft top indicator light
(Roadster models)2-17
SynchroRev Match mode
(S-MODE) indicator (if so
equipped)2-17
Transmission position indi-
cator light (if so equipped)
2-18
Turn signal/hazard indica-
tor lights
2-18
Vehicle Dynamic Control
(VDC) off indicator light2-18
WARNING AND INDICATOR LIGHTS
Page 80 of 453

2-10Instruments and controls
Anti-lock Braking System (ABS) warn-
ing lightMaster warning lightRear fog light indicator light (if so
equipped)
Seat belt warning light and chimeSecurity indicator light
Automatic Transmission check warn-
ing light (if so equipped)Supplemental air bag warning lightSoft top indicator light (Roadster
models)
Brake warning light
Vehicle Dynamic Control (VDC) warn-
ing lightSynchroRev Match mode (S-MODE)
indicator (if so equipped)
Cruise indicator lightTransmission position indicator (if so
equipped)
Charge warning lightExterior light indicatorTurn signal/hazard indicator lights
Engine oil pressure warning lightFront passenger air bag status lightVehicle Dynamic Control (VDC) off
indicator light
Intelligent Key system warning lightHigh beam indicator light
Low tire pressure warning lightMalfunction Indicator Light (MIL)
WARNING LIGHTS, INDICATOR
LIGHTS AND AUDIBLE REMINDERS
Page 86 of 453

2-16Instruments and controls
Front passenger air bag sta-
tus light
The front passenger air bag status light
(), located on the center of the instru-
ment panel, will be lit and the passenger
front air bag will be OFF depending on
how the front passenger seat is being
used.
For front passenger air bag status light
operation, see “NISSAN Advanced Air Bag
System (front seats)” (P.1-36) of this man-
ual.
High beam indicator light
This light comes on when the headlight
high beam is on and goes out when the
low beam is selected.
Malfunction Indicator Light
(MIL)
If the malfunction indicator light comes
on steady or blinks while the engine is
running, it may indicate a potential emis-
sion control malfunction.
The malfunction indicator light may also
come on steady if the fuel-filler cap is
loose or missing, or if the vehicle runs out
of fuel. Check to make sure the fuel-filler
cap is installed and closed tightly, and
that the vehicle has at least 3 US gallons (11.4 liters) of fuel in the fuel tank.
After a few driving trips, the
light
should turn off if no other potential
emission control system malfunction ex-
ists.
If this indicator light remains on for 20
seconds and then blinks for 10 seconds
when the engine is not running, it indi-
cates that the vehicle is not ready for an
emission control system inspection/
maintenance test. (See “Readiness for
Inspection/Maintenance (I/M) test” (P.10-
25).)
Operation:
The malfunction indicator light will come
on in one of two ways:
. Malfunction indicator light on steady
— An emission control system mal-
function has been detected. Check
the fuel-filler cap if the LOOSE FUEL
CAP warning appears in the vehicle
information display. If the fuel-filler
cap is loose or missing, tighten or
install the cap and continue to drive
the vehicle. The
light should turn
off after a few driving trips. If the
light does not turn off after a few
driving trips, have the vehicle in-
spected. It is recommended you visit
a NISSAN dealer for this service. You
do not need to have your vehicle towed to the dealer.
. Malfunction indicator light blinking —
An engine misfire has been detected
which may damage the emission
control system.
To reduce or avoid emission control
system damage:
1) Do not drive at speeds above 45
MPH (72 km/h).
2) Avoid hard acceleration or decel- eration.
3) Avoid steep uphill grades.
4) If possible, reduce the amount of cargo being hauled or towed.
The malfunction indicator light may
stop blinking and remain on.
Have the vehicle inspected. It is re-
commended you visit a NISSAN dealer
for this service. You do not need to
have your vehicle towed to the dealer.
CAUTION
Continued vehicle operation without
having the emission control system
checked and repaired as necessary
could lead to poor driveability, re-
duced fuel economy, and possible
damage to the emission control sys-
tem.
Page 106 of 453

2-36Instruments and controls
SIC3996
Headlight beam select
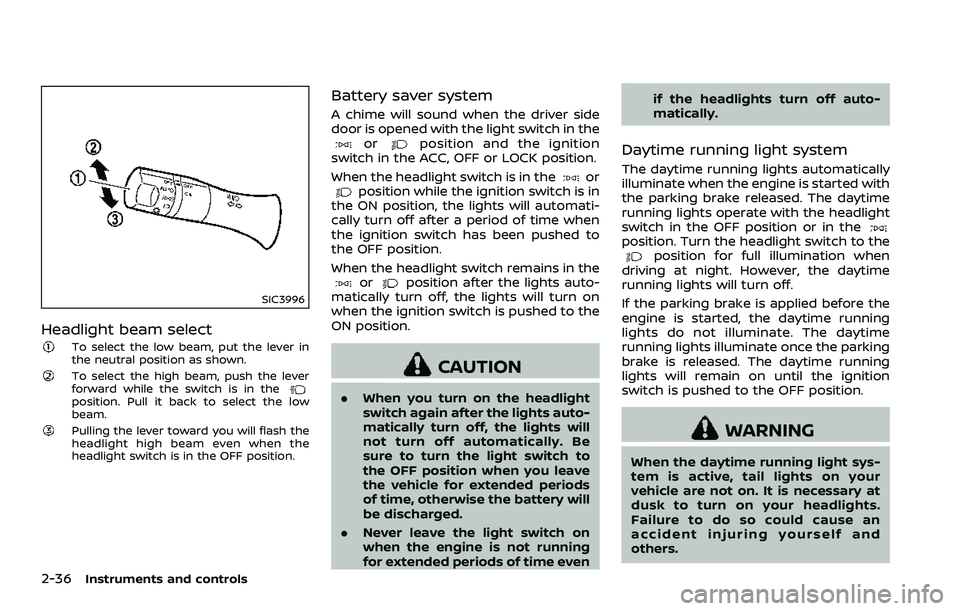
To select the low beam, put the lever in
the neutral position as shown.
To select the high beam, push the lever
forward while the switch is in the
position. Pull it back to select the low
beam.
Pulling the lever toward you will flash the
headlight high beam even when the
headlight switch is in the OFF position.
Battery saver system
A chime will sound when the driver side
door is opened with the light switch in the
orposition and the ignition
switch in the ACC, OFF or LOCK position.
When the headlight switch is in the
orposition while the ignition switch is in
the ON position, the lights will automati-
cally turn off after a period of time when
the ignition switch has been pushed to
the OFF position.
When the headlight switch remains in the
orposition after the lights auto-
matically turn off, the lights will turn on
when the ignition switch is pushed to the
ON position.
CAUTION
. When you turn on the headlight
switch again after the lights auto-
matically turn off, the lights will
not turn off automatically. Be
sure to turn the light switch to
the OFF position when you leave
the vehicle for extended periods
of time, otherwise the battery will
be discharged.
. Never leave the light switch on
when the engine is not running
for extended periods of time even if the headlights turn off auto-
matically.
Daytime running light system
The daytime running lights automatically
illuminate when the engine is started with
the parking brake released. The daytime
running lights operate with the headlight
switch in the OFF position or in the
position. Turn the headlight switch to theposition for full illumination when
driving at night. However, the daytime
running lights will turn off.
If the parking brake is applied before the
engine is started, the daytime running
lights do not illuminate. The daytime
running lights illuminate once the parking
brake is released. The daytime running
lights will remain on until the ignition
switch is pushed to the OFF position.
WARNING
When the daytime running light sys-
tem is active, tail lights on your
vehicle are not on. It is necessary at
dusk to turn on your headlights.
Failure to do so could cause an
accident injuring yourself and
others.
Page 384 of 453

8-22Do-it-yourself
JVM0467X
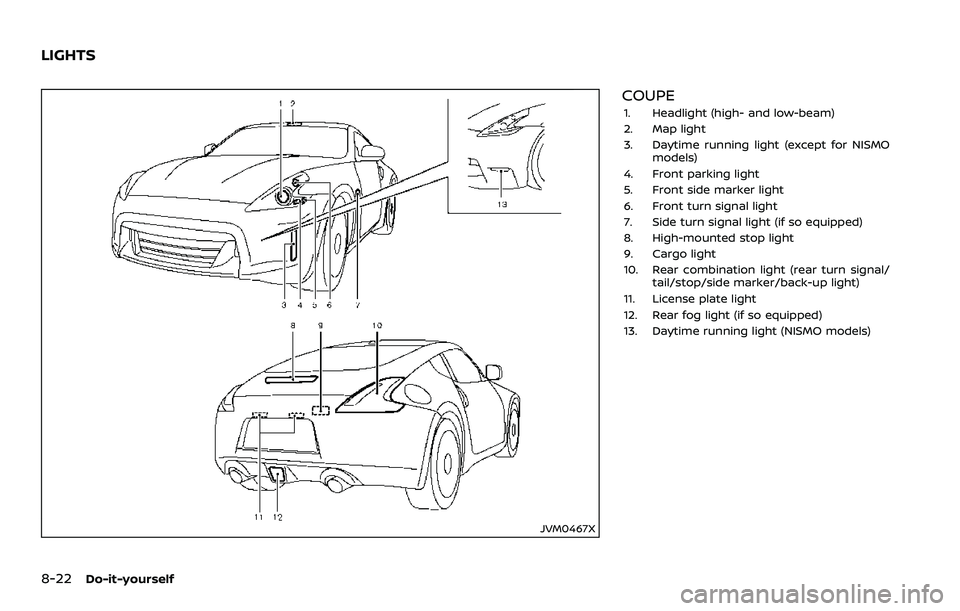
COUPE
1. Headlight (high- and low-beam)
2. Map light
3. Daytime running light (except for NISMOmodels)
4. Front parking light
5. Front side marker light
6. Front turn signal light
7. Side turn signal light (if so equipped)
8. High-mounted stop light
9. Cargo light
10. Rear combination light (rear turn signal/ tail/stop/side marker/back-up light)
11. License plate light
12. Rear fog light (if so equipped)
13. Daytime running light (NISMO models)
LIGHTS
Page 385 of 453

JVM0140X
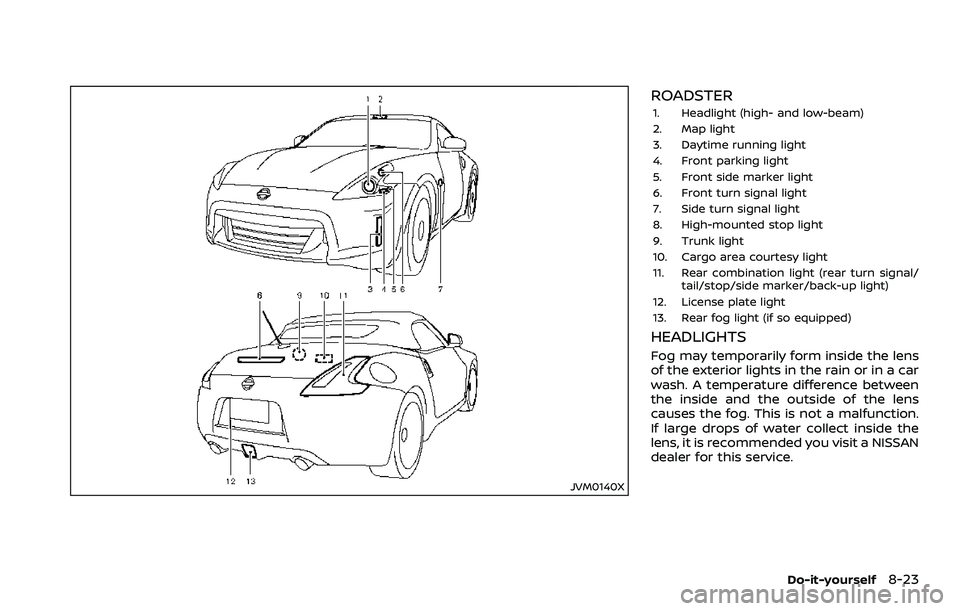
ROADSTER
1. Headlight (high- and low-beam)
2. Map light
3. Daytime running light
4. Front parking light
5. Front side marker light
6. Front turn signal light
7. Side turn signal light
8. High-mounted stop light
9. Trunk light
10. Cargo area courtesy light
11. Rear combination light (rear turn signal/tail/stop/side marker/back-up light)
12. License plate light
13. Rear fog light (if so equipped)
HEADLIGHTS
Fog may temporarily form inside the lens
of the exterior lights in the rain or in a car
wash. A temperature difference between
the inside and the outside of the lens
causes the fog. This is not a malfunction.
If large drops of water collect inside the
lens, it is recommended you visit a NISSAN
dealer for this service.
Do-it-yourself8-23
Page 386 of 453

8-24Do-it-yourself
Replacing
WARNING
HIGH VOLTAGE
When xenon headlights are on, they
produce a high voltage. To prevent
an electric shock, never attempt to
modify or disassemble. We recom-
mend you have your xenon head-
lights replaced at a NISSAN dealer.
For additional information, see
“Headlight and turn signal switch”
(P.2-34).
Use the same number and wattage
shown in the following chart as originally
installed.
It is recommended you visit a NISSAN
dealer if replacement is required.
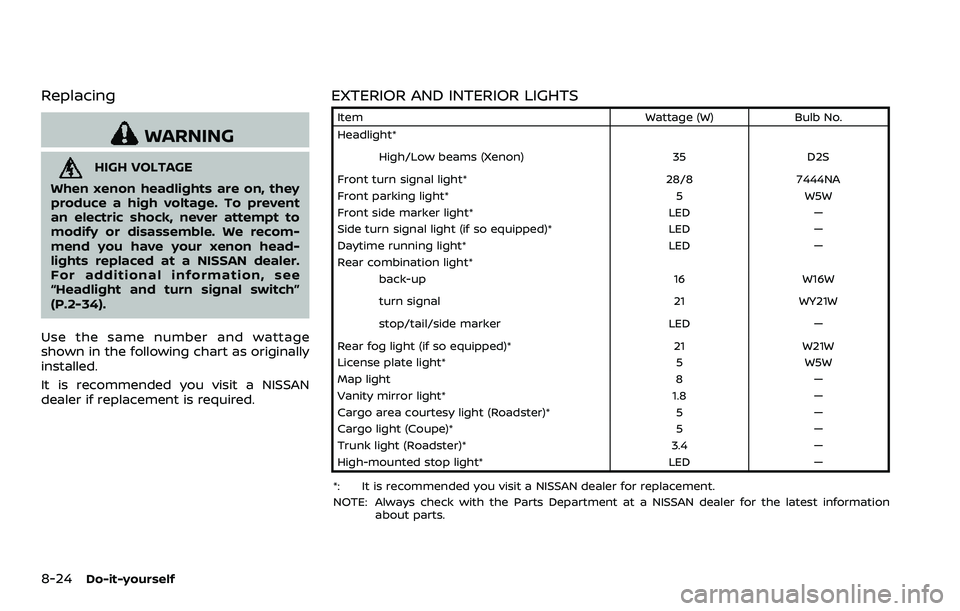
EXTERIOR AND INTERIOR LIGHTS
Item Wattage (W)Bulb No.
Headlight*
High/Low beams (Xenon) 35D2S
Front turn signal light* 28/87444NA
Front parking light* 5W5W
Front side marker light* LED—
Side turn signal light (if so equipped)* LED—
Daytime running light* LED—
Rear combination light*
back-up 16W16W
turn signal 21WY21W
stop/tail/side marker LED—
Rear fog light (if so equipped)* 21W21W
License plate light* 5W5W
Map light 8—
Vanity mirror light* 1.8—
Cargo area courtesy light (Roadster)* 5—
Cargo light (Coupe)* 5—
Trunk light (Roadster)* 3.4—
High-mounted stop light* LED—
*: It is recommended you visit a NISSAN dealer for replacement.
NOTE: Always check with the Parts Department at a NISSAN dealer for the latest information about parts.