2018 NISSAN 370Z ignition
[x] Cancel search: ignitionPage 186 of 453
4-18Center display, heater, air conditioner, audio, phone and voice recognition systems
CAUTION
Do not scratch the camera lens when
cleaning dirt or snow from the front
of the camera.
The RearView Monitor system automati-
cally shows a rear view of the vehicle
when the shift lever is placed in the “R”
(Reverse) position.
The radio can still be heard while the
RearView Monitor is active.
JVH1353X
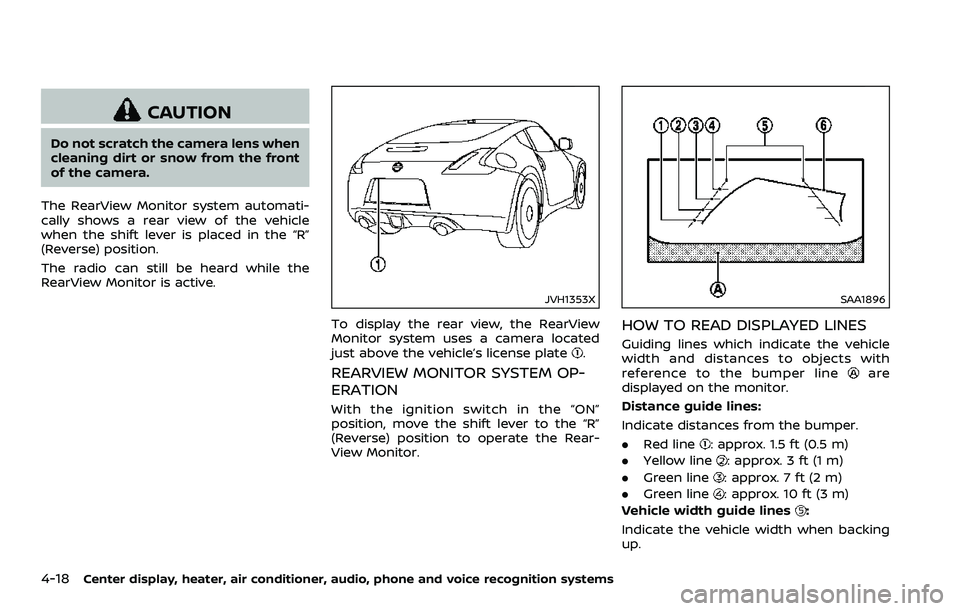
To display the rear view, the RearView
Monitor system uses a camera located
just above the vehicle’s license plate
.
REARVIEW MONITOR SYSTEM OP-
ERATION
With the ignition switch in the “ON”
position, move the shift lever to the “R”
(Reverse) position to operate the Rear-
View Monitor.
SAA1896
HOW TO READ DISPLAYED LINES
Guiding lines which indicate the vehicle
width and distances to objects with
reference to the bumper line
are
displayed on the monitor.
Distance guide lines:
Indicate distances from the bumper.
. Red line
: approx. 1.5 ft (0.5 m)
. Yellow line
: approx. 3 ft (1 m)
. Green line
: approx. 7 ft (2 m)
. Green line
: approx. 10 ft (3 m)
Vehicle width guide lines
:
Indicate the vehicle width when backing
up.
Page 198 of 453

4-30Center display, heater, air conditioner, audio, phone and voice recognition systems
OPERATING TIPS
When the engine coolant temperature
and outside air temperature are low, the
air flow from the foot outlets may not
operate. This is not a malfunction. After
the coolant temperature warms up, air
will flow normally from the foot outlets.
The sensors
andon the instrument
panel helps maintain a constant tem-
perature. Do not put anything on or
around this sensor.
IN-CABIN MICROFILTER
The air conditioning system is equipped
with an in-cabin microfilter which collects
dirt, pollen, dust, etc. To make sure the air
conditioner heats, defogs, and ventilates
efficiently, replace the filter in accordance
with the specified maintenance intervals
listed in the “9. Maintenance and sche-
dules” section. It is recommended to see a
NISSAN dealer to replace the filter.
The filter should be replaced if air flow
is extremely decreased or when win-
dows fog up easily when operating
heater or air conditioning system.
SERVICING AIR CONDITIONER
The air conditioning system in your
NISSAN is charged with a refrigerant
designed with the environment in mind.
This refrigerant will not harm the
earth’s ozone layer. However, special
charging equipment and lubricant are
required when servicing your NISSAN air
conditioner. Using improper refrigerants
or lubricants will cause severe damage to
your air conditioning system. (See “Capa-
cities and recommended fluids/lubri-
cants” (P.10-2) for air conditioning
system refrigerant and lubricant recom-
mendations.)
Your NISSAN dealer will be able to service
your environmentally friendly air condi-
tioning system.
WARNING
The system contains refrigerant un-
der high pressure. To avoid personal
injury, any air conditioner service
should be done only by an experi-
enced technician with the proper
equipment.
AUDIO OPERATION PRECAUTIONS
Radio
Push the ignition switch to the ACC or ON
position and push the radio band select
button to turn on the radio. If you listen to
the radio with the engine not running, the
ignition switch should be pushed to the
ACC position.
Radio reception is affected by station
signal strength, distance from radio
transmitter, buildings, bridges, mountains
and other external influences. Intermit-
tent changes in reception quality nor-
mally are caused by these external
influences.
Using a cellular phone in or near the
vehicle may influence radio reception
quality.
Radio reception:
Your NISSAN radio system is equipped
with state-of-the-art electronic circuits to
enhance radio reception. These circuits
are designed to extend reception range,
and to enhance the quality of that recep-
tion.
However there are some general charac-
teristics of both FM and AM radio signals
that can affect radio reception quality in a
moving vehicle, even when the finest
equipment is used. These characteristics
AUDIO SYSTEM
Page 211 of 453
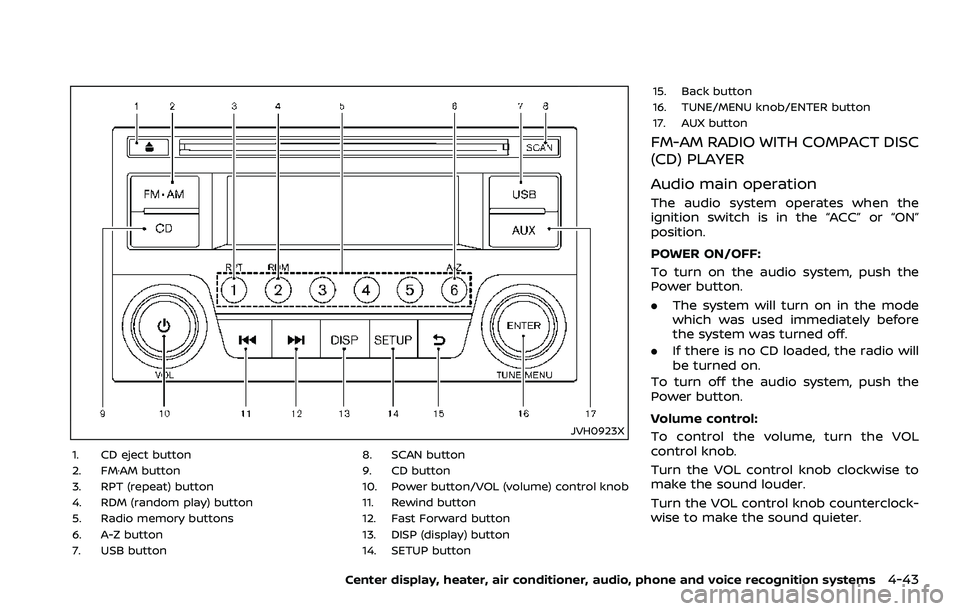
JVH0923X
1. CD eject button
2. FM·AM button
3. RPT (repeat) button
4. RDM (random play) button
5. Radio memory buttons
6. A-Z button
7. USB button8. SCAN button
9. CD button
10. Power button/VOL (volume) control knob
11. Rewind button
12. Fast Forward button
13. DISP (display) button
14. SETUP button15. Back button
16. TUNE/MENU knob/ENTER button
17. AUX button
FM-AM RADIO WITH COMPACT DISC
(CD) PLAYER
Audio main operation
The audio system operates when the
ignition switch is in the “ACC” or “ON”
position.
POWER ON/OFF:
To turn on the audio system, push the
Power button.
.
The system will turn on in the mode
which was used immediately before
the system was turned off.
. If there is no CD loaded, the radio will
be turned on.
To turn off the audio system, push the
Power button.
Volume control:
To control the volume, turn the VOL
control knob.
Turn the VOL control knob clockwise to
make the sound louder.
Turn the VOL control knob counterclock-
wise to make the sound quieter.
Center display, heater, air conditioner, audio, phone and voice recognition systems4-43
Page 212 of 453
4-44Center display, heater, air conditioner, audio, phone and voice recognition systems
SETUP button:
To configure Audio, Clock, Language or
Scroll direction settings, perform the
following procedure:
1. Push the SETUP button.
2. Push the ENTER button.
3. Turn the TUNE/MENU knob clockwiseor counterclockwise, the display will
appear in the following order:
Audio �œClock �œLanguage �œScroll
Direction
After the desired levels have been set,
push either the back button repeatedly,
the SETUP button, or wait for 8 seconds
without pushing any buttons to exit the
menu screen.
Audio adjustments:
Push the SETUP button to enter the setup
menu screen then select Audio by using
TUNE/MENU knob.
Each time the ENTER button is pushed,
the mode will change as follows:
Bass ?Treble ?Fade ?Balance ?AUX
VOL ?SPD VOL ?Audio (setup menu
screen)
Turn the TUNE/MENU knob clockwise or
counterclockwise to adjust the following
items and push the ENTER button to
confirm. Bass control:
Use this control to enhance or attenuate
bass response sound.
Treble control:
Use this control to enhance or attenuate
the treble.
Fade control:
Use this control to adjust the balance of
the volume between the front and rear (if
so equipped) speakers.
Balance control:
Use this control to adjust the balance of
the volume between the left and right
speakers.
AUX VOL (Auxiliary volume) control:
Use this control to adjust the volume
output from the auxiliary source.
SPD VOL (Speed volume) control:
This mode controls the volume output
from the speakers automatically in rela-
tion to vehicle speed.
Adjusting the setting to 0 (zero) turns off
the speed volume feature.
Clock setting:
Push the SETUP button to enter the setup
menu screen then select Clock.
Turn the TUNE/MENU knob, the mode will
change as follows: Set Time
�œON/OFF �œClock Format �œ
Set time
Set Time:
Select Set Time then adjust the clock as
follows:
1. The hour display will start flashing. Turn the TUNE/MENU knob to adjust
the hour and push the ENTER button.
2. The minute display will start flashing. Turn the TUNE/MENU knob to adjust
the minute and push the ENTER
button to finish the clock adjustment.
ON/OFF:
Set the clock display between on or off
when the audio unit is turned off. If set in
the ON position, the clock will be dis-
played when the audio unit is turned off
either by pushing the power button or
when the ignition switch is placed in the
“OFF” position.
Clock Format:
Switch the clock display between 24-hour
mode and 12-hour clock mode.
Language setting:
Push the SETUP button to enter the setup
menu screen then select Language.
Select the appropriate language and
push the ENTER button. Upon completion,
the screen will automatically adapt the
Page 213 of 453
language setting.
Scroll direction:
Set the scrolling behavior of the TUNE/
MENU knob to scroll UP or DOWN.
FM·AM radio operation
The audio system operates when the
ignition switch is in the “ACC” or “ON”
position.
FM·AM button:
When the FM·AM button is pushed while
the audio system is off, the audio system
will turn on and the radio will turn on.
When the FM·AM button is pushed while
another audio source is already operat-
ing, it will automatically turn off, and the
radio will turn on.
To change the radio bands, push the
FM·AM button until the desired band
appears.
AM ?FM 1 ?FM 2 ?AM
TUNE/MENU knob:
When adjusting the broadcasting station
frequency manually, turn the TUNE/MENU
knob until the preferred frequency is
achieved.
Seek tuning button:
When adjusting the broadcasting station
frequency automatically, push the
button. When the system detects a
broadcasting station, it will stop at the
station.
Radio memory buttons:
During radio reception, pushing the radio
memory button for less than 2 seconds
will select the stored radio station.
The audio system can store up to 12 FM
station frequencies (six in each of FM 1and
FM 2) and 6 AM station frequencies.
To store the station frequency manually:
1. Tune to the desired broadcasting station frequency by using the
button.
2. Push and hold a radio memory button
-until a beep sounds. (The radio
mutes when the radio memory button
is pushed.)
3. The channel indicator will display and the radio mute disengages, indicating
that the memory is stored properly.
4. Perform steps 1 - 3 for all other memory buttons.
If the battery cable is disconnected, or if
the audio fuse blows, the radio memory
will be erased. In such a case, reset the desired stations.
SCAN button:
Push the SCAN button to tune from low
to high frequencies and stops at each
broadcasting station for 5 seconds. Push-
ing the SCAN button again during this 5
seconds period will stop SCAN tuning and
the radio will remain tuned to that
station.
If the SCAN button is not pushed within 5
seconds, SCAN tuning moves to the next
station.
CD player operation
The audio system operates when the
ignition switch is in the “ACC” or “ON”
position.
Loading:
Insert a CD into the slot with the label side
facing up. The CD will be guided auto-
matically into the slot and will start
playing. After loading the CD, the number
of tracks and the playtime will appear on
the display.
CAUTION
Do not force the CD into the slot. This
could damage the player.
Center display, heater, air conditioner, audio, phone and voice recognition systems4-45
Page 215 of 453
played, the title of the played track is
displayed. If the title information is not
provided then “Track” is displayed.
When the DISP button is pushed repeat-
edly, further information about the track
can be displayed along with the track title
as follows:
CD:
Track time?Album ?Artist ?Track
time
CD with MP3/WMA:
Track time ?Album ?Artist ?Folder
name ?Track time
Track details:
Pushing and holding the DISP button will
turn the display into a detailed overview
and after a few seconds it returns to the
main display.
button:
When the SCAN button is pushed while a
CD is being played, the first 10 seconds of
all the tracks will be played.
When the SCAN button is pushed again,
the CD will return to normal play from the
track which is playing.
CD eject button:
When the CD eject button is pushed while
a CD is loaded, the CD will be ejected.
When the CD eject button is pushed twice,
the CD will be ejected further, and the CD
can be removed with ease.
When the ignition switch is in the “OFF” or
“LOCK” position it is possible to eject the
CD currently being played. However the
audio unit will not be activated.
If a CD is ejected by pushing the CD eject
button, and it is not taken out from the
loading slot within 8 seconds, the CD will
automatically be reloaded to the slot to
protect the CD.
JVH0920X
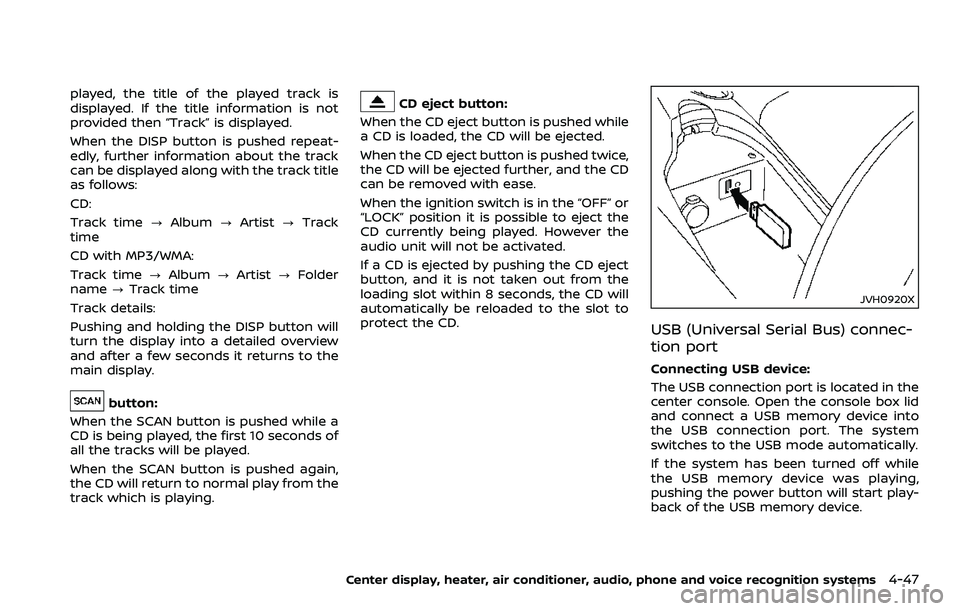
USB (Universal Serial Bus) connec-
tion port
Connecting USB device:
The USB connection port is located in the
center console. Open the console box lid
and connect a USB memory device into
the USB connection port. The system
switches to the USB mode automatically.
If the system has been turned off while
the USB memory device was playing,
pushing the power button will start play-
back of the USB memory device.
Center display, heater, air conditioner, audio, phone and voice recognition systems4-47
Page 220 of 453
4-52Center display, heater, air conditioner, audio, phone and voice recognition systems
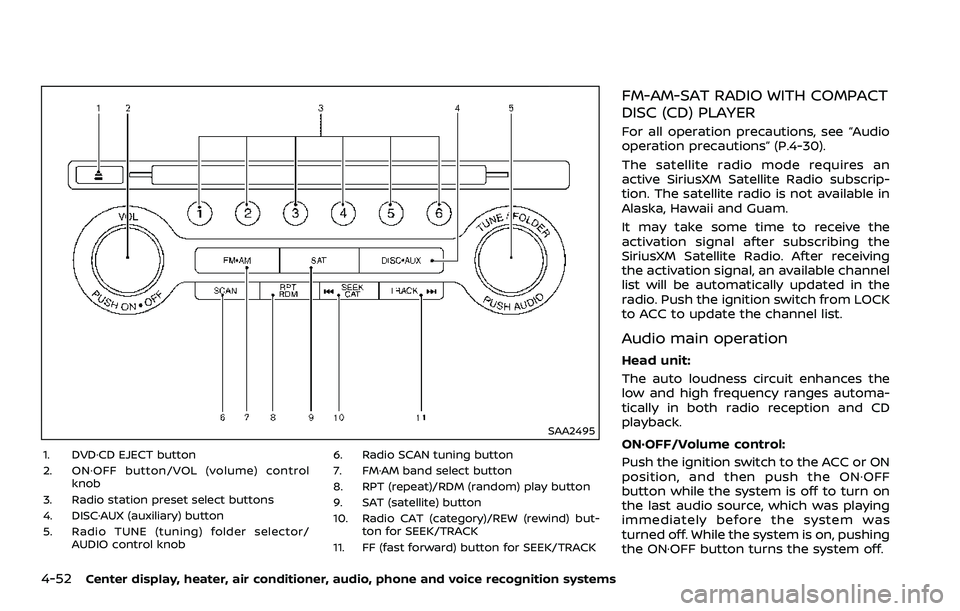
SAA2495
1. DVD·CD EJECT button
2. ON·OFF button/VOL (volume) controlknob
3. Radio station preset select buttons
4. DISC·AUX (auxiliary) button
5. Radio TUNE (tuning) folder selector/ AUDIO control knob 6. Radio SCAN tuning button
7. FM·AM band select button
8. RPT (repeat)/RDM (random) play button
9. SAT (satellite) button
10. Radio CAT (category)/REW (rewind) but-
ton for SEEK/TRACK
11. FF (fast forward) button for SEEK/TRACK
FM-AM-SAT RADIO WITH COMPACT
DISC (CD) PLAYER
For all operation precautions, see “Audio
operation precautions” (P.4-30).
The satellite radio mode requires an
active SiriusXM Satellite Radio subscrip-
tion. The satellite radio is not available in
Alaska, Hawaii and Guam.
It may take some time to receive the
activation signal after subscribing the
SiriusXM Satellite Radio. After receiving
the activation signal, an available channel
list will be automatically updated in the
radio. Push the ignition switch from LOCK
to ACC to update the channel list.
Audio main operation
Head unit:
The auto loudness circuit enhances the
low and high frequency ranges automa-
tically in both radio reception and CD
playback.
ON·OFF/Volume control:
Push the ignition switch to the ACC or ON
position, and then push the ON·OFF
button while the system is off to turn on
the last audio source, which was playing
immediately before the system was
turned off. While the system is on, pushing
the ON·OFF button turns the system off.
Page 221 of 453
Turn the VOL control knob to adjust the
volume.
Adjusting tone quality and speaker
balance:
To adjust Bass, Treble, Balance and Fade,
push the Audio control knob. When the
display shows the setting you want to
change (Bass, Treble, Balance and Fade),
rotate the Audio control knob to set the
desired setting. For the other setting
methods, see “How to use SETTING but-
ton” (P.4-11).
This vehicle has some sound effect func-
tions as follows:
.Speed Sensitive Vol.
For more details, see “How to use SETTING
button” (P.4-11).
Switching the display:
Pushing the DISC·AUX button will switch
the displays as follows:
iPod®/USB ?CD/DVD ?Bluetooth®
Audio ?AUX ?iPod®/USBFM-AM-SAT radio operation
radio (FM/AM) band select:
Pushing the radio band select button will
change the band as follows:
AM ?FM1 ?FM2 ?AM
radio (SAT) band select:
Pushing the radio band select button will
change the band as follows:
XM1 ?XM2 ?XM3 ?XM1
When the radio band select button is
pushed while the ignition switch is in the
ACC or ON position, the radio will come
on at the channel last played.
The last channel played will also come on
when the ON·OFF button is pushed to ON.
The satellite radio is not available in
Alaska, Hawaii and Guam.
If another audio source is playing when
the radio band select button is turned to
ON, the audio source will automatically be
turned off and the last radio channel
played will come on.
When the stereo broadcast signal is weak,
the radio will automatically change from
stereo to monaural reception. TUNE (Tuning):
. For AM and FM radio
Turn the radio TUNE knob for manual
tuning.
. For SiriusXM Satellite Radio
Turn the radio TUNE knob to seek
channels from all of the categories
when any category is not selected.
SEEK tuning/CATEGORY
(CAT):
. For AM and FM radio
Push the SEEK button
orto
tune from low to high or high to low
frequencies and to stop at the next
broadcasting station.
. For SiriusXM Satellite Radio
Push the SEEK button
orto
tune to the first channel of the next or
previous category.
During satellite radio reception, the fol-
lowing notices will be displayed under
certain conditions.
. NO SIGNAL (No signal is received while
the SAT tuner is connected.)
. OFF AIR (Broadcasting signed off)
. CHECK ANTENNA (Antenna connec-
tion error)
. LOADING (When the initial setting is
performed)
Center display, heater, air conditioner, audio, phone and voice recognition systems4-53